Prepare your paper
Thirty equal squares and space to support the assembly
- Thirty equal 15 × 15 cm squares of thin origami paper, all with the same green front and cream or white reverse. This size and material are proposed for a trial, not physically verified.
- Use one paper type throughout. Reject visibly unequal squares before folding; mixed size or thickness changes the fit. No paper brand or weight has been tested.
- A flat table, good lighting and two hands to support the growing structure. This sequence uses no scissors, glue, staples or internal supports.
- Optional loose number notes 01–30 and a soft pencil for small removable orientation marks. The diagrams use technical labels; labels are not extra paper parts.
- Dashed line: New crease, obscured edge or destination of a moving tab
- Thin line: Existing crease, geometric boundary or pocket lip
- Arrow: Move the indicated tab beneath the receiving lip. Orange is a technical highlight
- 01–30: Units. V01–V12: Recessed vertices. P01–P20: Peaks. T1/T2 and P1/P2: Local tabs and pockets
Instructions 1–18 repeat OrigamiLove’s own Sonobe unit sequence from the cube tutorial; 19–20 add the central valley and 21 prepares thirty matching units. Instructions 22–81 show one insertion each. The upper view gives the growing structure; the lower left enlarges the current peak and the lower right separates pocket layers schematically. Triangular central halves are shown in their intended positions, including parts held by hand before closure. Other free tabs are omitted; they are not silently counted as inserted. A faint empty outline in a local view reserves a position for a unit not yet added. Thick dark green edges identify completed joins. Unit and insertion counts below the upper view give the actual progress. A pocket label P1 or P2 is local to one unit; peak labels have two digits, P01–P20. Views turn to face each current peak. The detailed corner map in each instruction specifies orientation before insertion.
Read the complete paper & materials guide ↗Unit preparation and sixty separate insertions
Step 1: Place the first square
Set one square on the table with its cream reverse facing you. Keep a side horizontal; the coloured front is underneath. Use this first sheet to learn the unit before repeating it.
Orientation: Cream side up. Top means the edge farthest from you.
One complete square, with no cuts or creases.
Step 2: Mark the vertical centre
Bring the left edge onto the right edge, crease the vertical halfway line, then unfold the sheet completely. This temporary fold supplies the centre reference.
Orientation: Keep the top edge away from you.
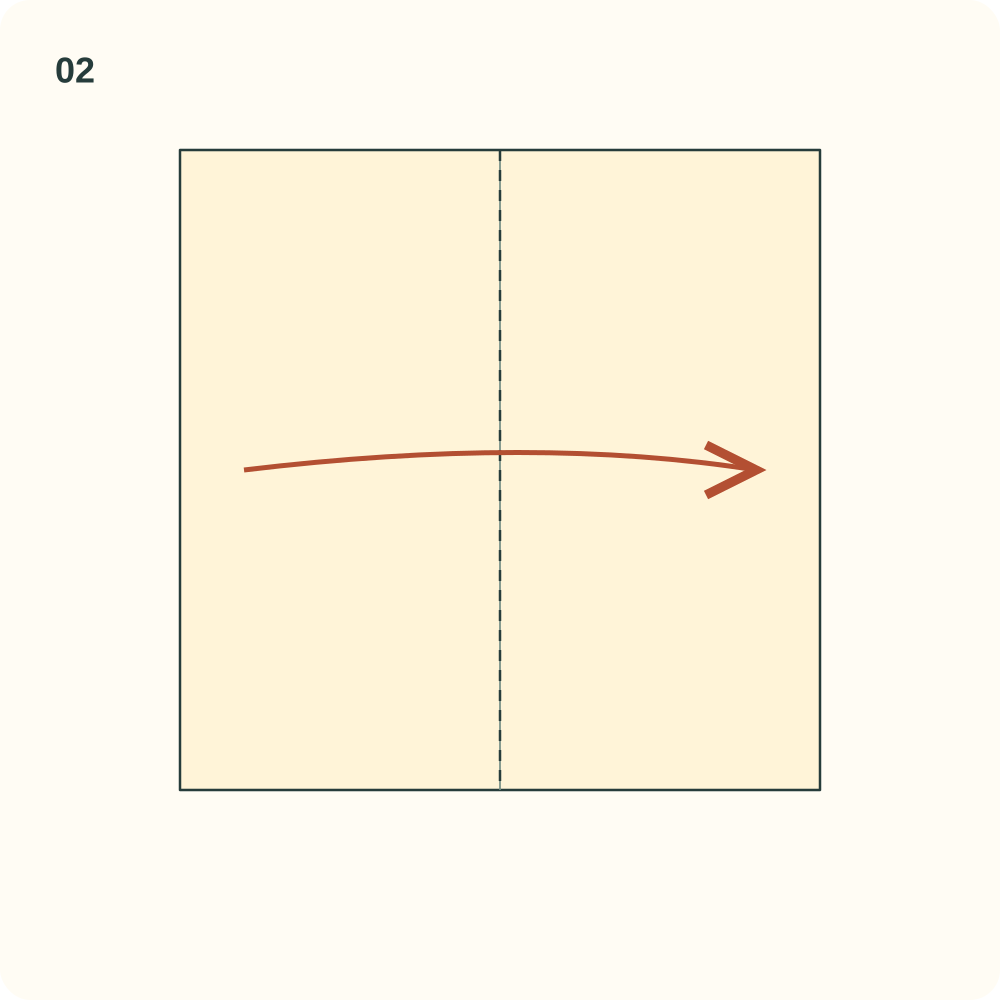
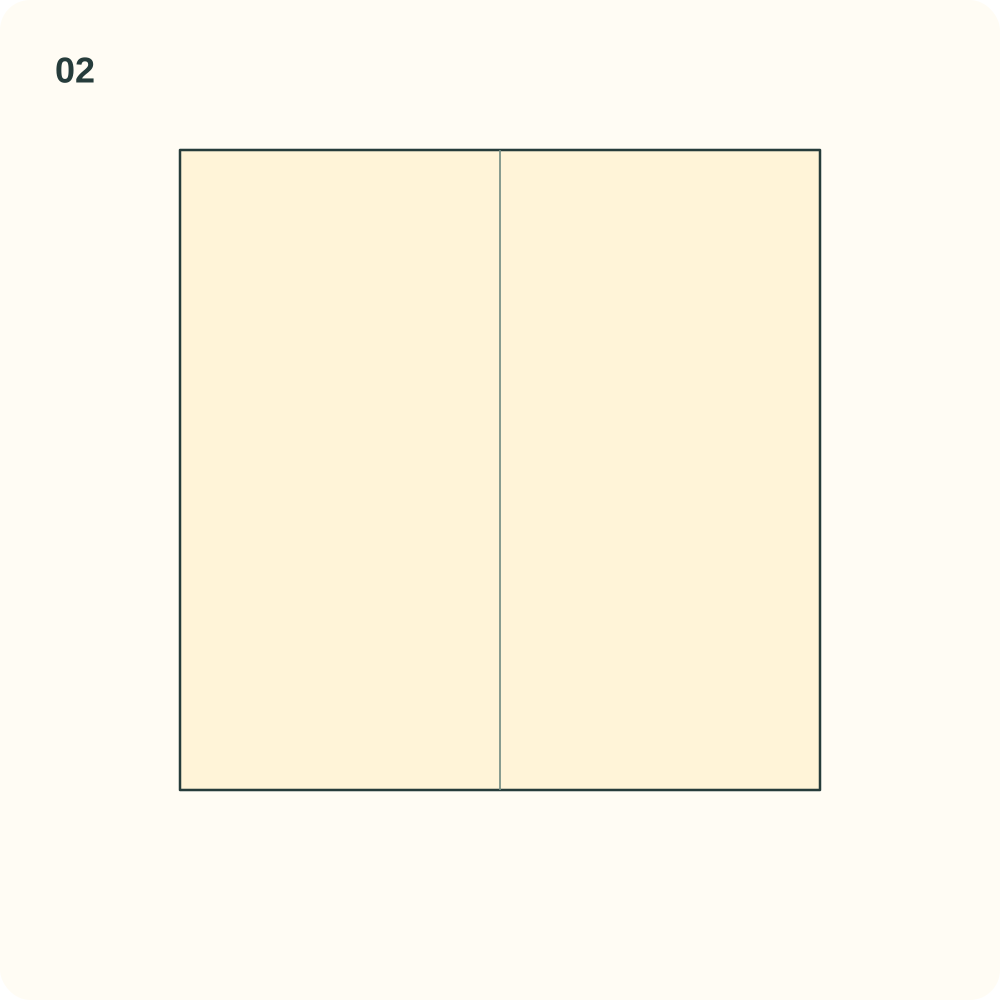
The open square has one vertical centre crease.
Step 3: Mark the left quarter
Bring the left edge onto the centre crease. Mark the new crease and reopen that strip.
Orientation: The cream side still faces up.
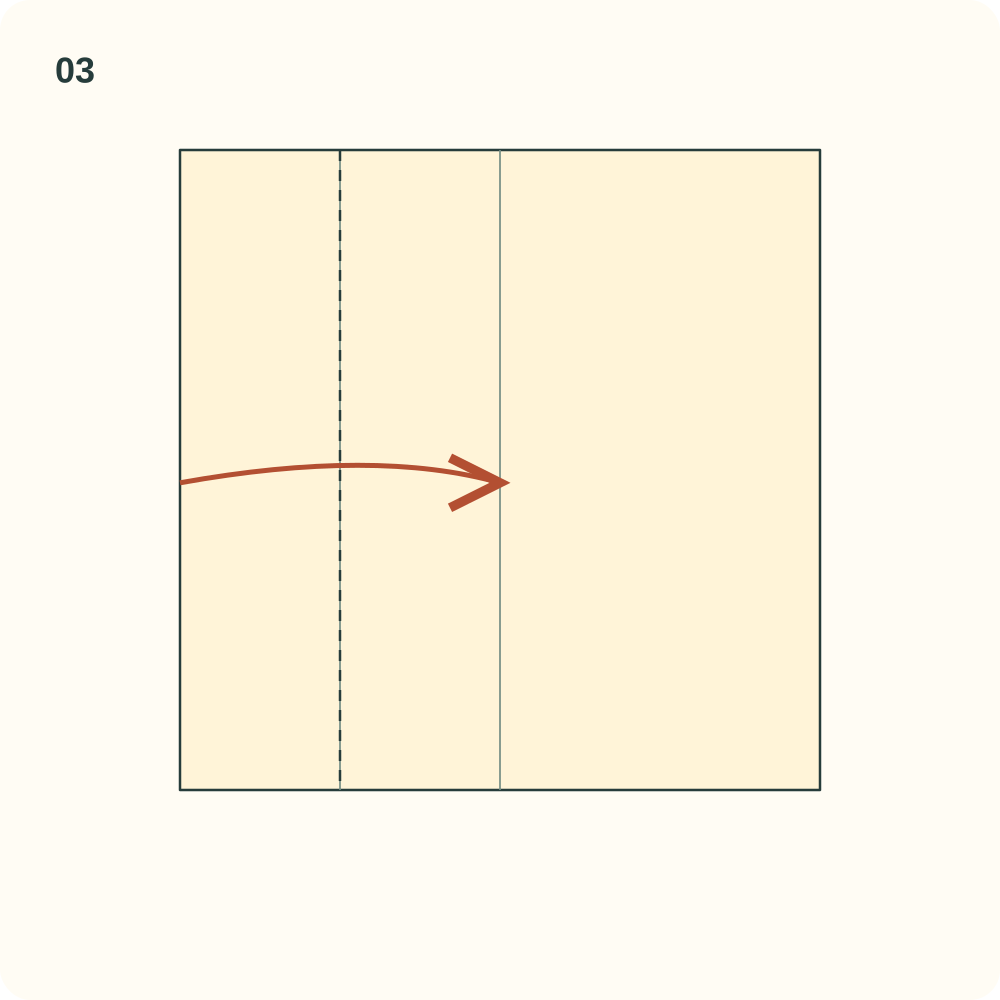
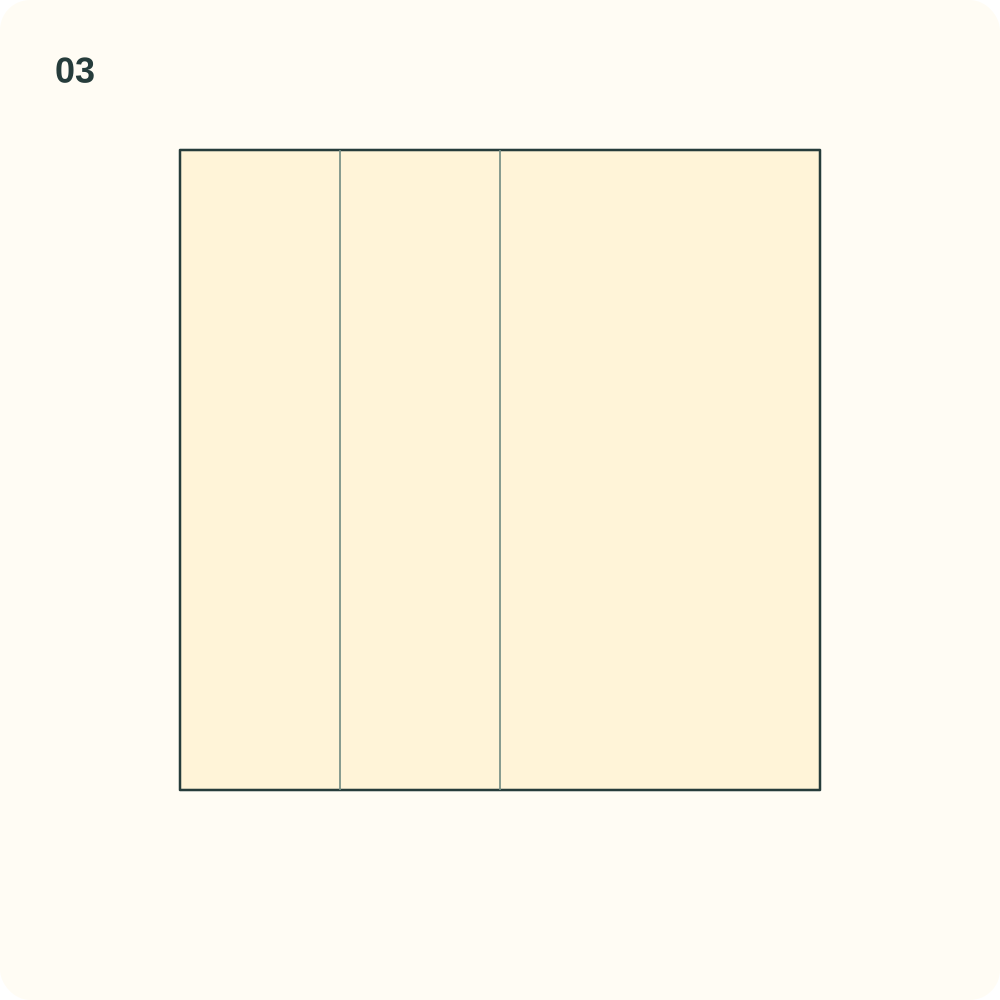
A second vertical line lies halfway between the left edge and the centre.
Step 4: Mark the right quarter
Bring the right edge onto the centre crease. Mark the new crease and reopen it.
Orientation: Do not turn the paper over.
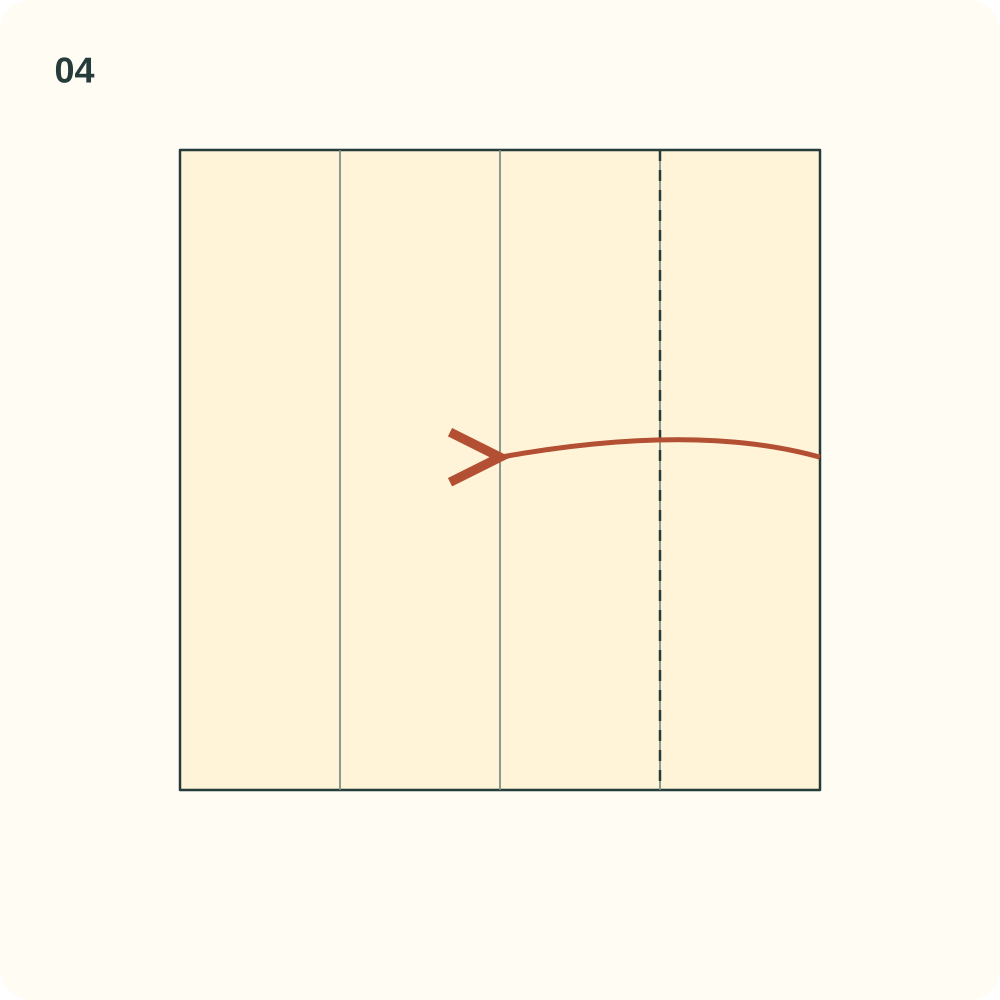
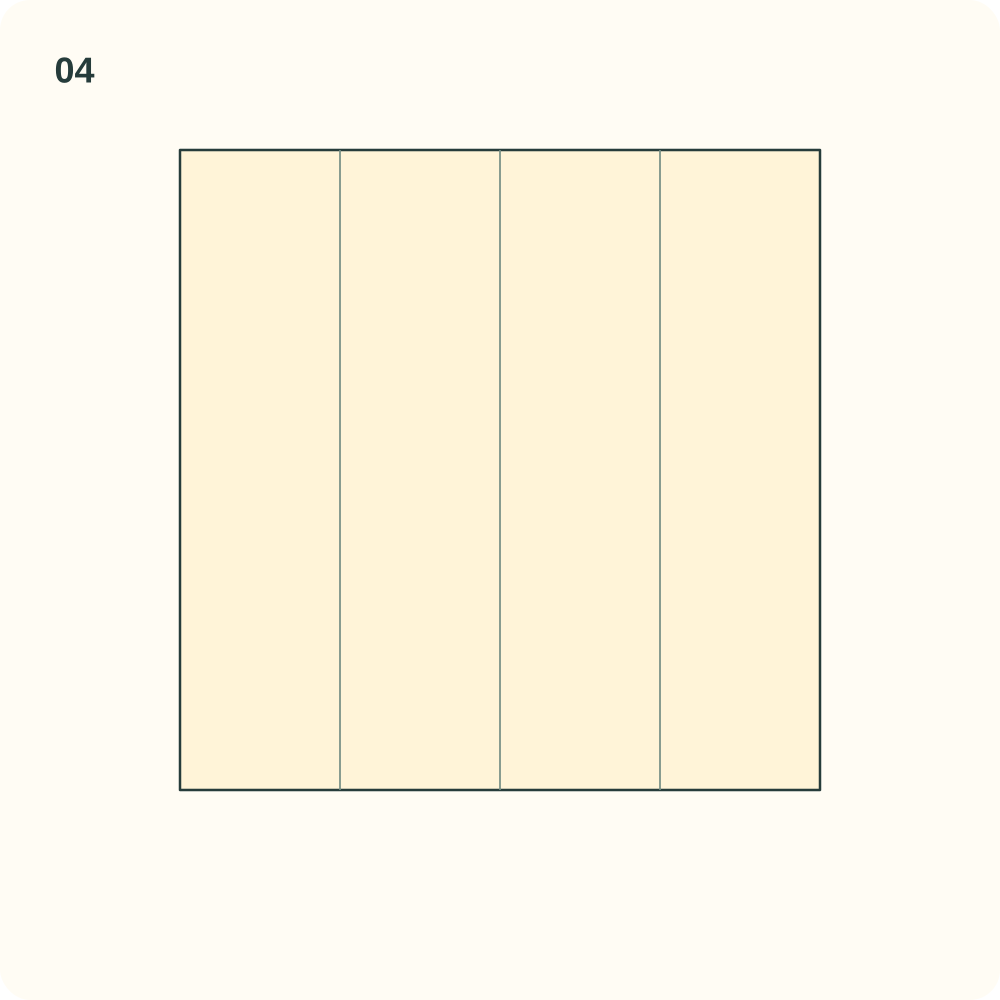
Three parallel creases divide the square into four equal strips.
Step 5: Fold the upper right corner
Fold the upper right corner diagonally inward so the top edge of the outer right strip lies along that strip’s left boundary. The small triangle stays inside the outer quarter; leave it folded.
Orientation: Use the upper right corner, not the upper left.
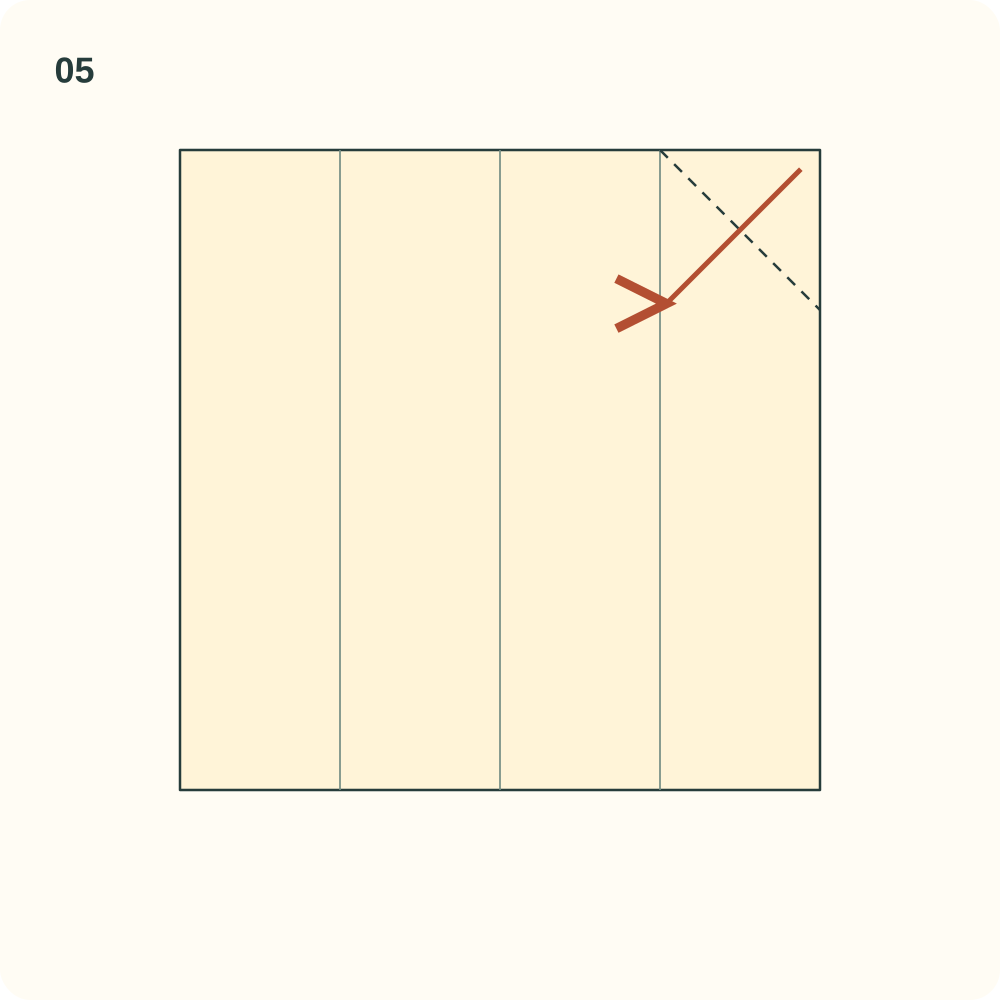
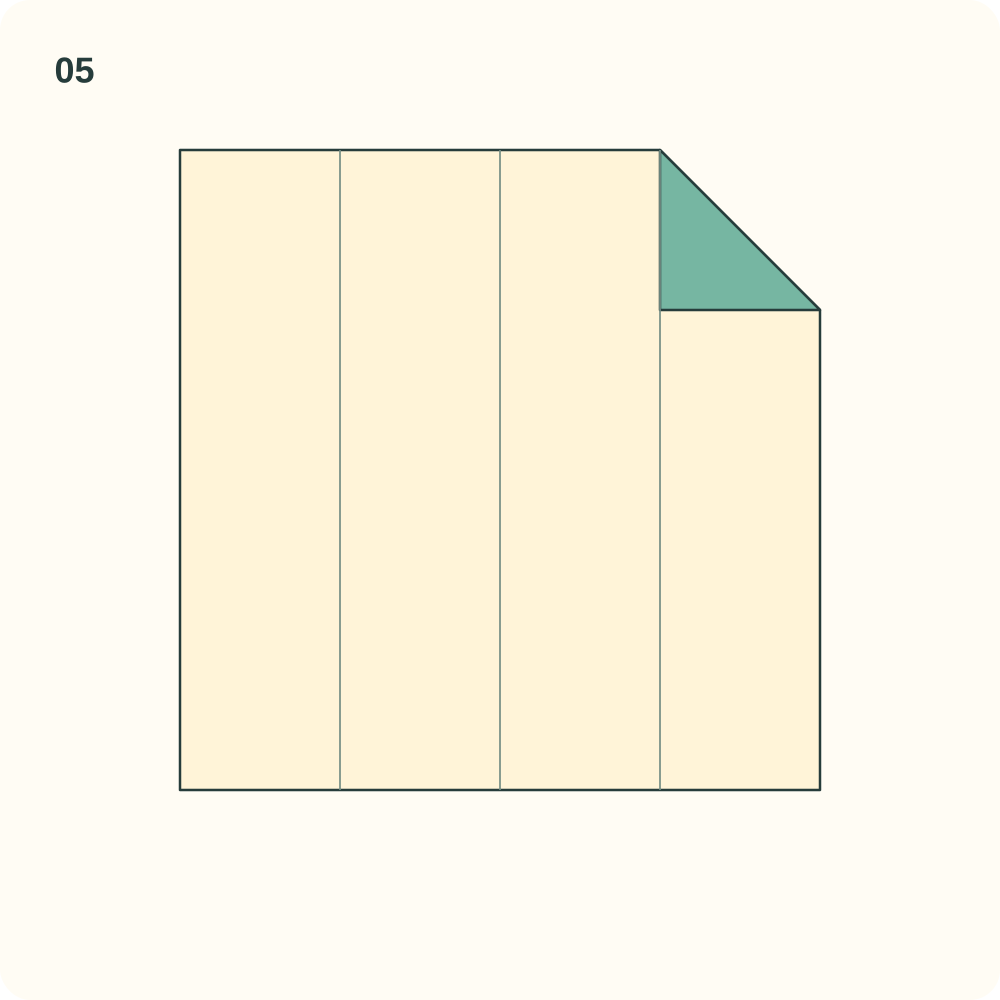
The upper right corner is a coloured triangle whose short edges lie on the quarter crease and a horizontal line.
Step 6: Fold the lower left corner
Fold the lower left corner inward in the corresponding way, putting the bottom edge of the outer left strip along its right boundary. Leave this triangle folded too.
Orientation: The two small triangles occupy opposite corners.
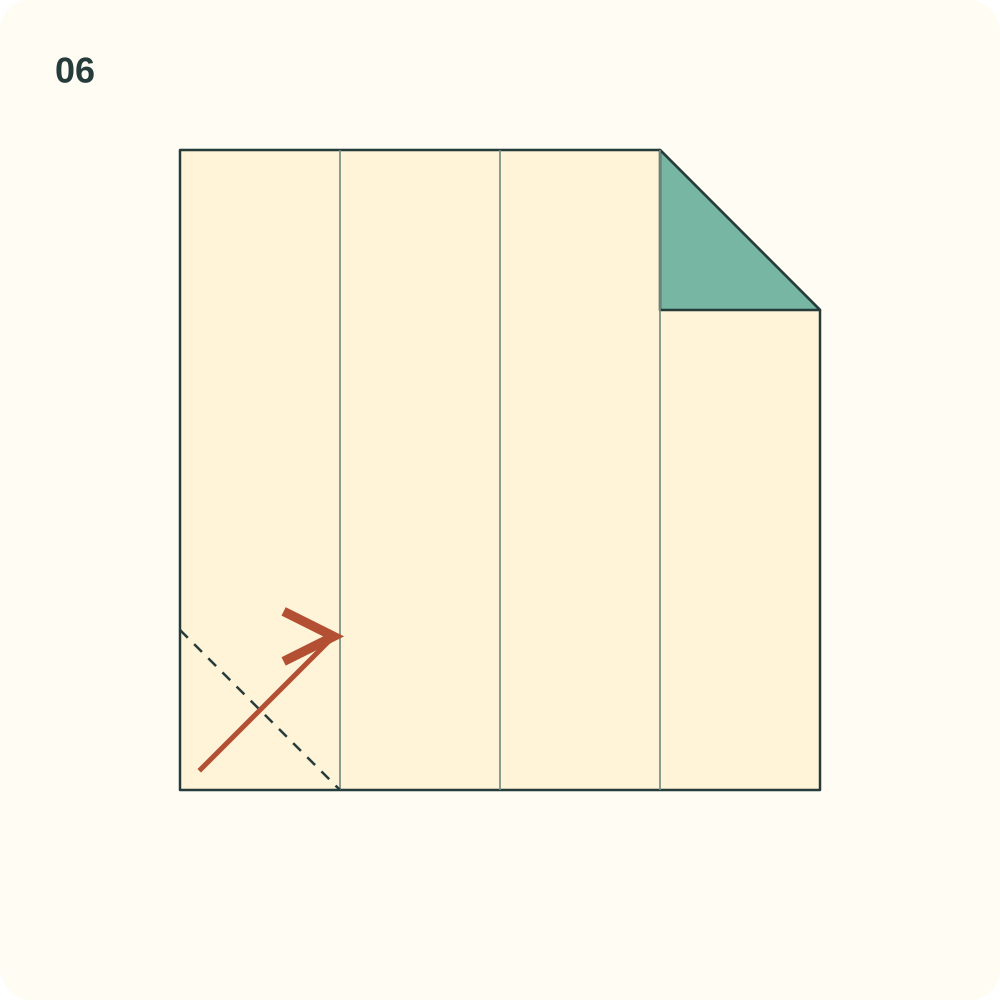
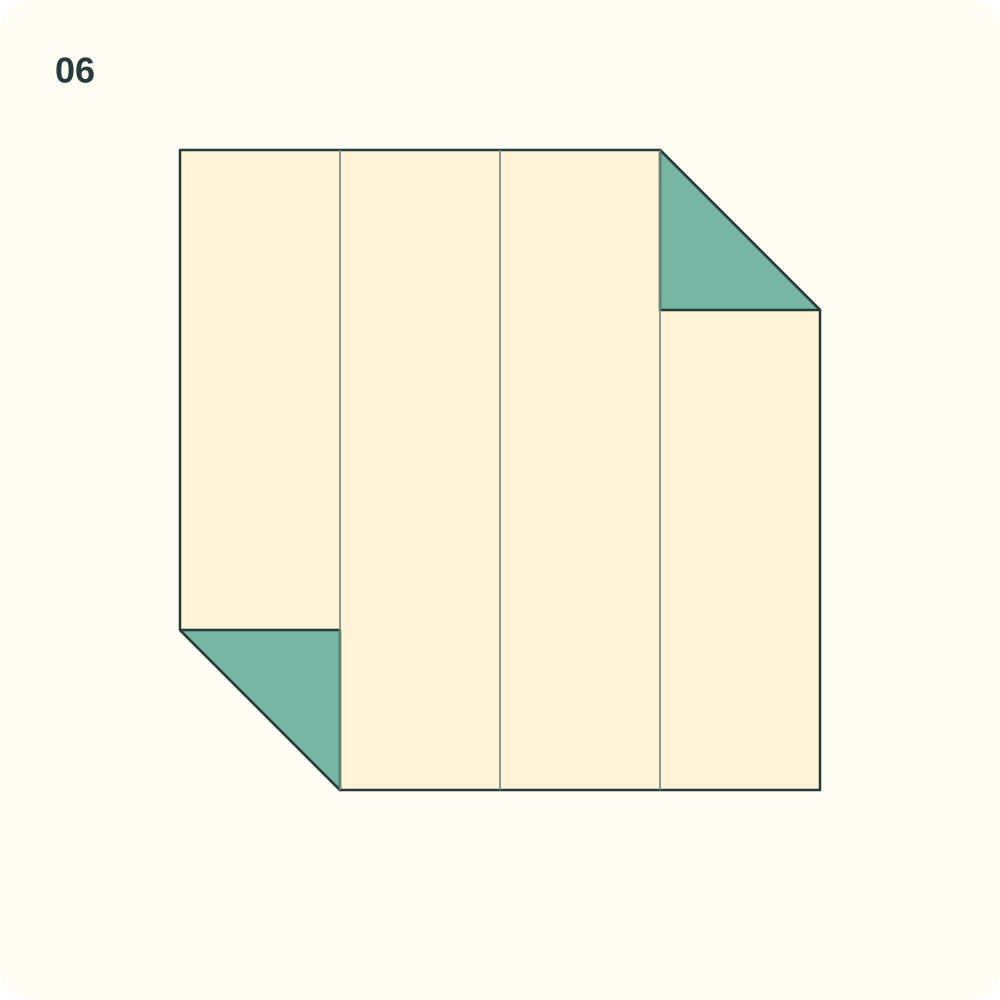
The upper right and lower left corners are folded; the other two corners remain square.
Step 7: Narrow the upper corner
Fold the sloping upper right edge inward onto the right quarter crease. Start at the top of that crease and move the whole attached corner, including its small folded layer. The new crease bisects the angle between the sloping edge and the vertical line.
Orientation: Keep all three vertical references upright.
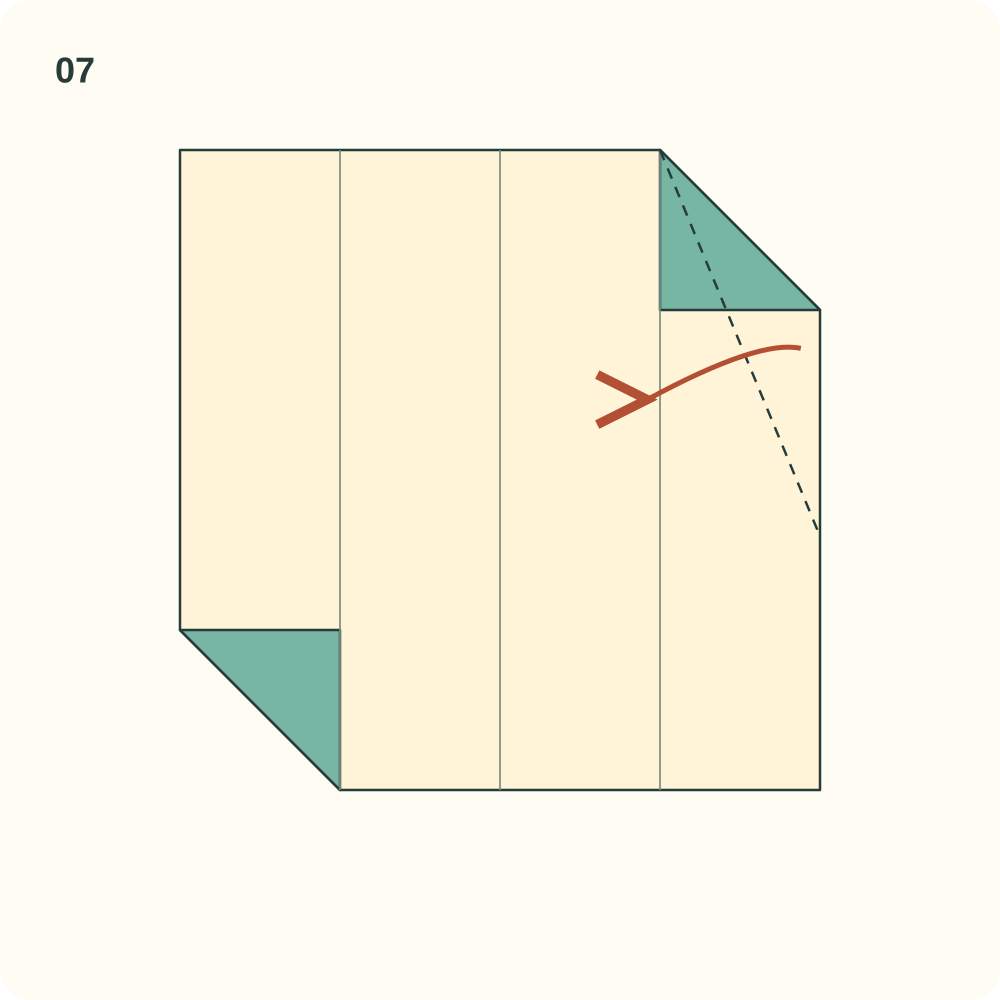
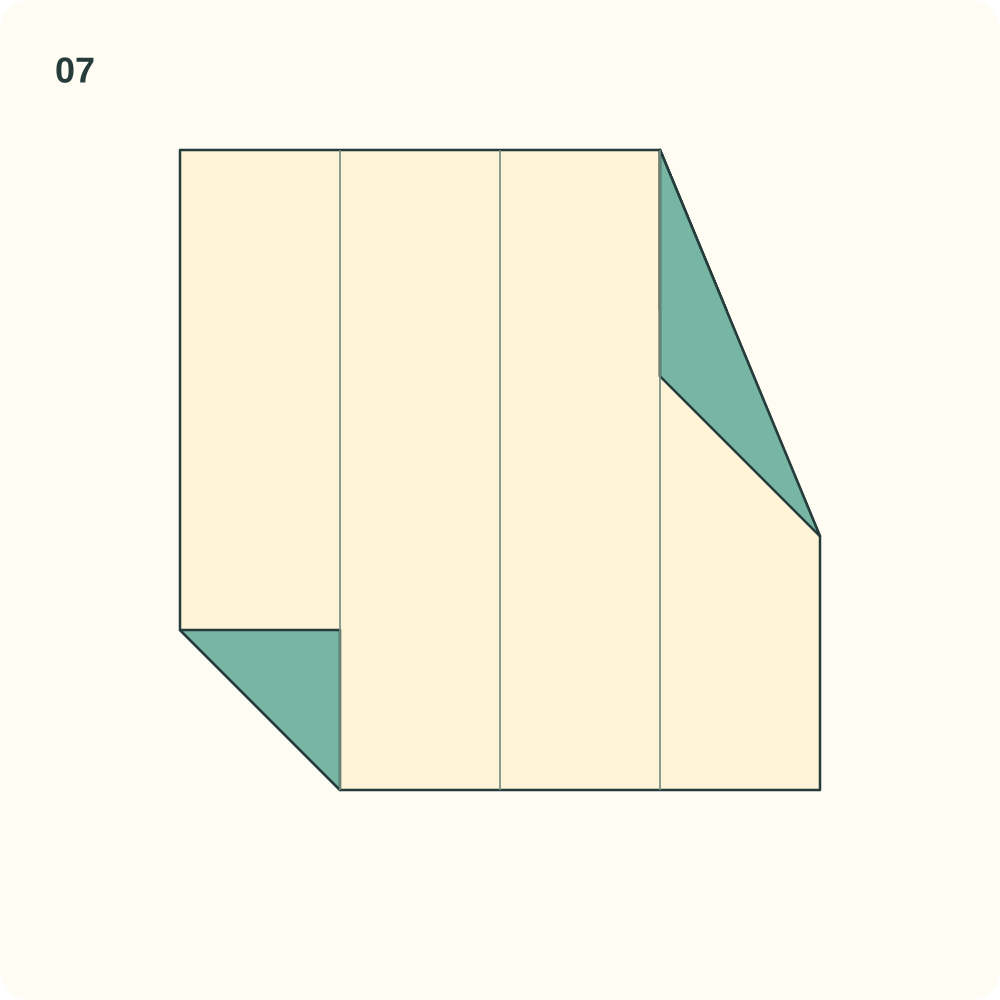
A long narrow corner replaces the short upper right triangle; its moved sloping edge now lies on the quarter crease.
Step 8: Narrow the lower corner
Fold the sloping lower left edge inward onto the left quarter crease, moving the whole attached corner. Make the same narrow shape at the opposite end.
Orientation: Do not mirror the choice of corners on later units.
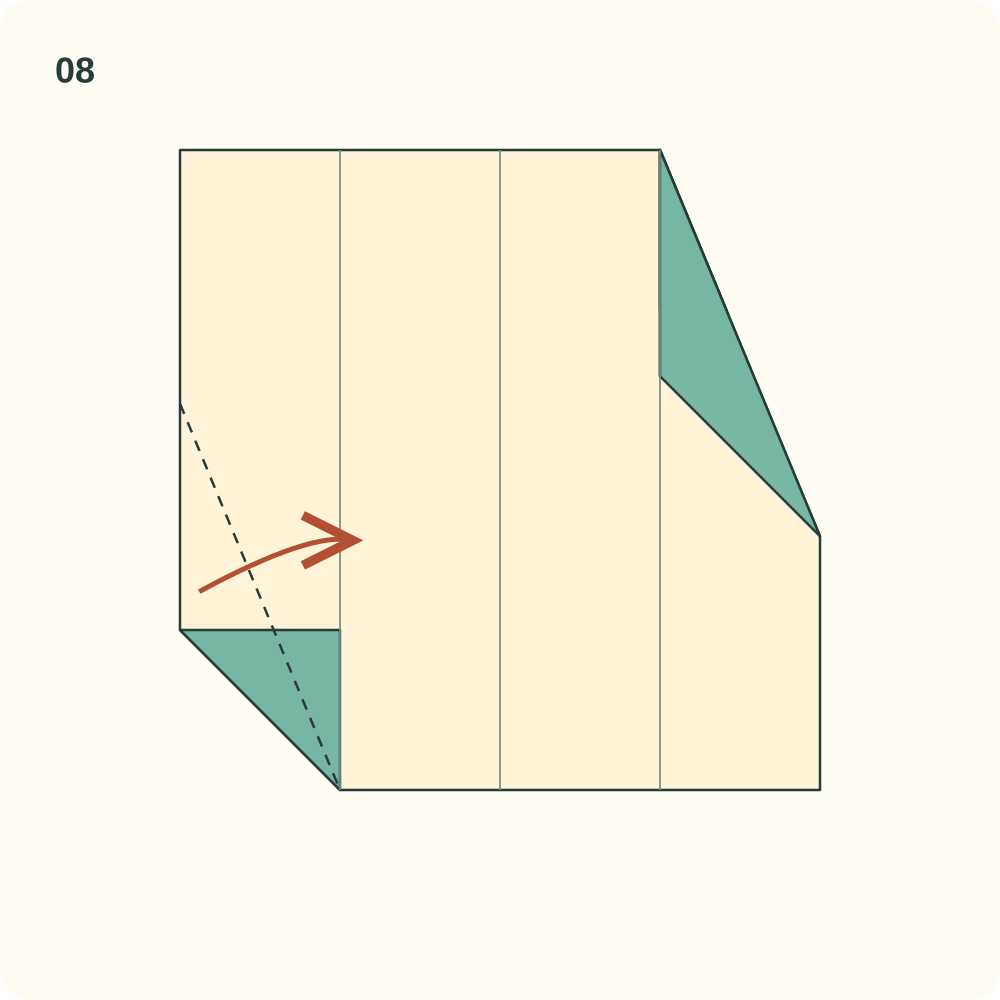
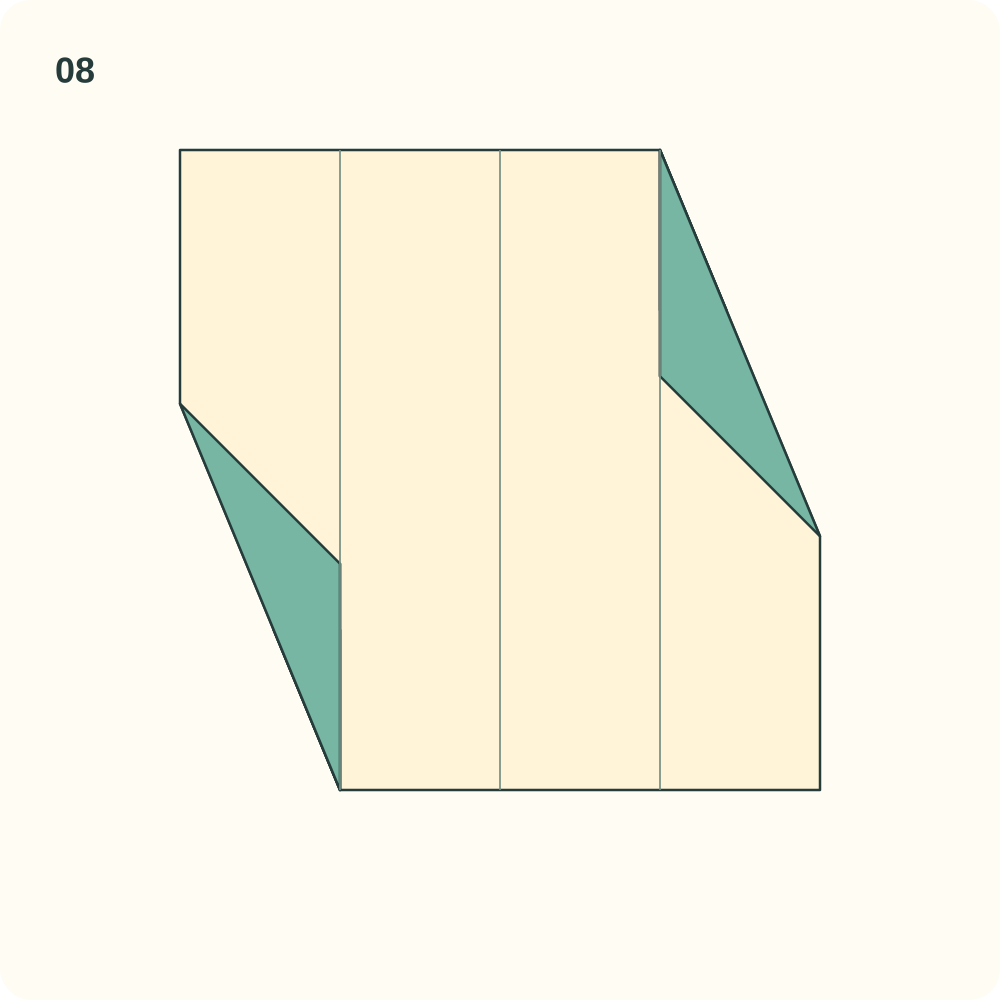
Both opposite corners are narrowed in the same handed arrangement.
Step 9: Close the left strip
Refold the left quarter strip inward along its existing vertical crease so its original outer edge meets the centre. Move its narrowed corner with the strip.
Orientation: The right quarter is still open.
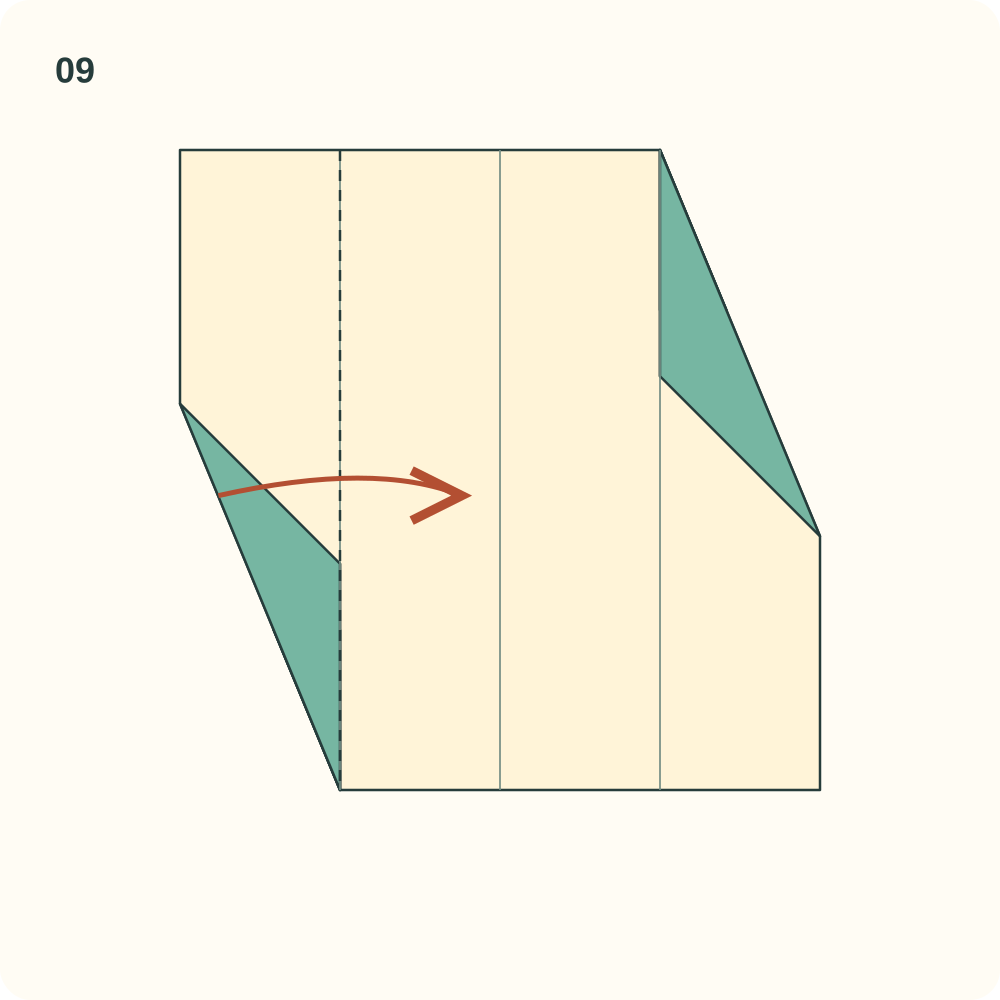
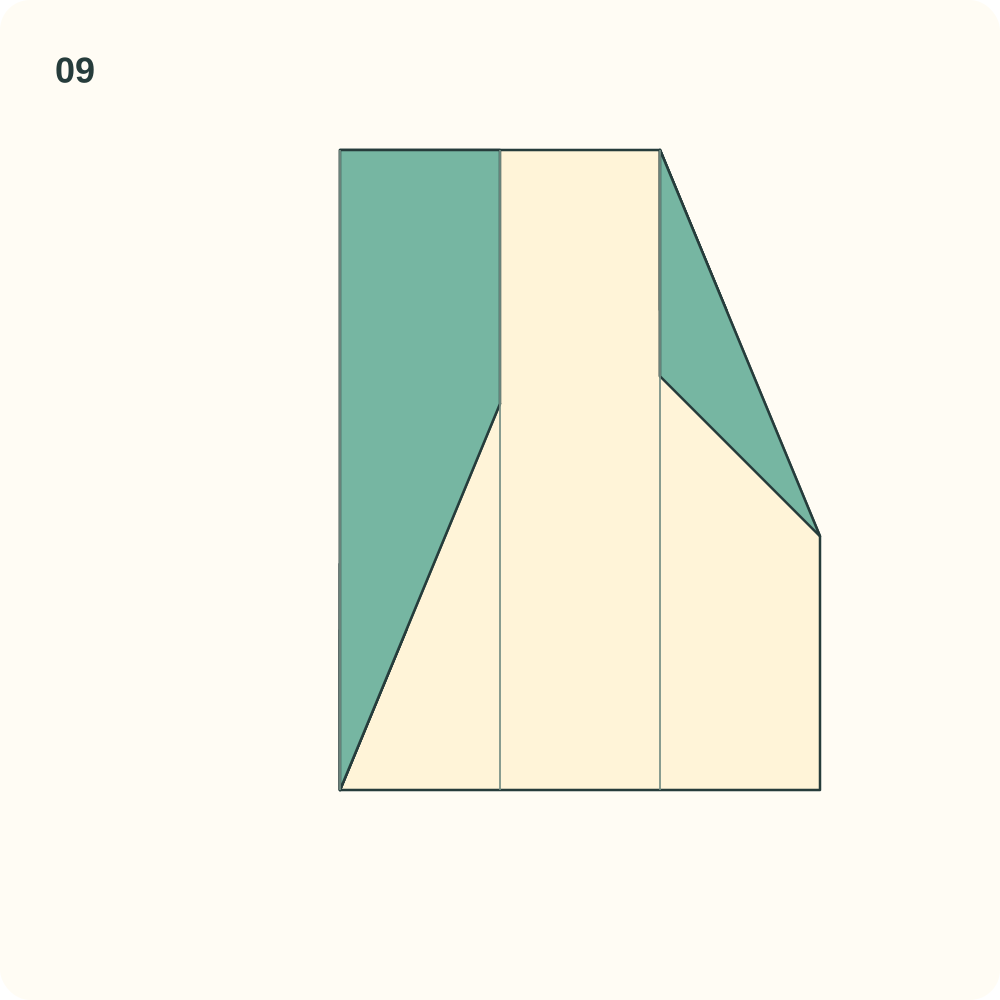
The left strip covers the left half of the central region.
Step 10: Close the right strip
Refold the right quarter strip inward so its original outer edge meets the centre beside the first strip.
Orientation: The result is a vertical rectangle half as wide as the starting square.
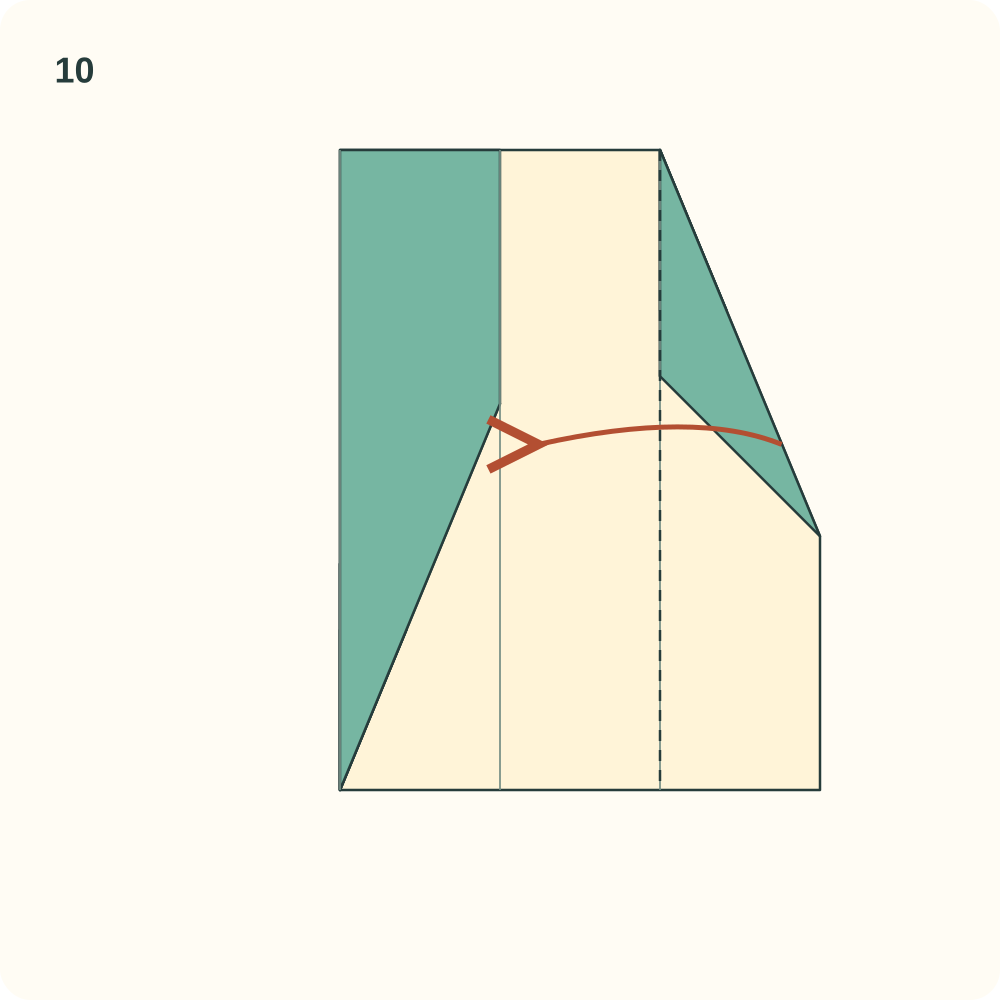
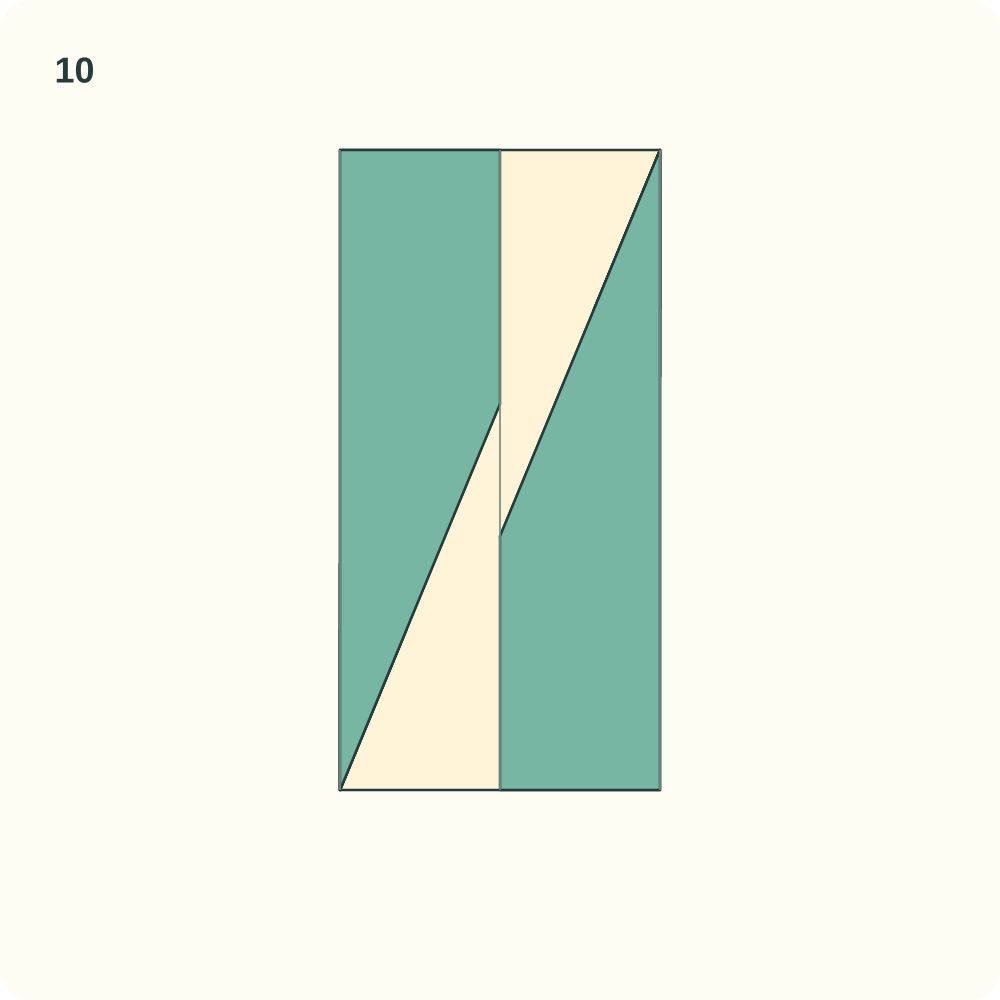
The two strips meet without intentional overlap; their narrowed corner layers remain inside.
Step 11: Rehearse the upper diagonal
Bring the upper left corner of the rectangle down to the right edge, making its top edge align with the right edge. Mark the diagonal from the upper right corner to the midpoint of the left edge, then reopen only this large triangle.
Orientation: Keep the two quarter strips closed.
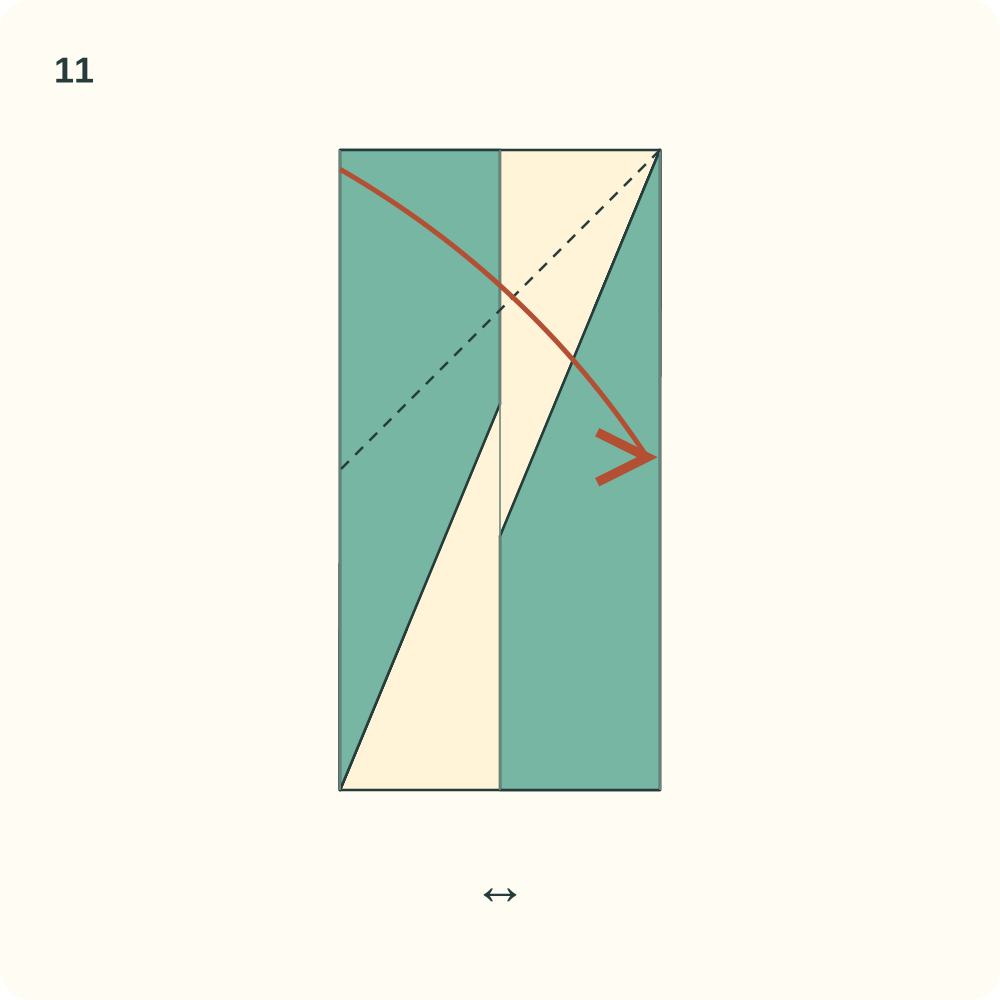
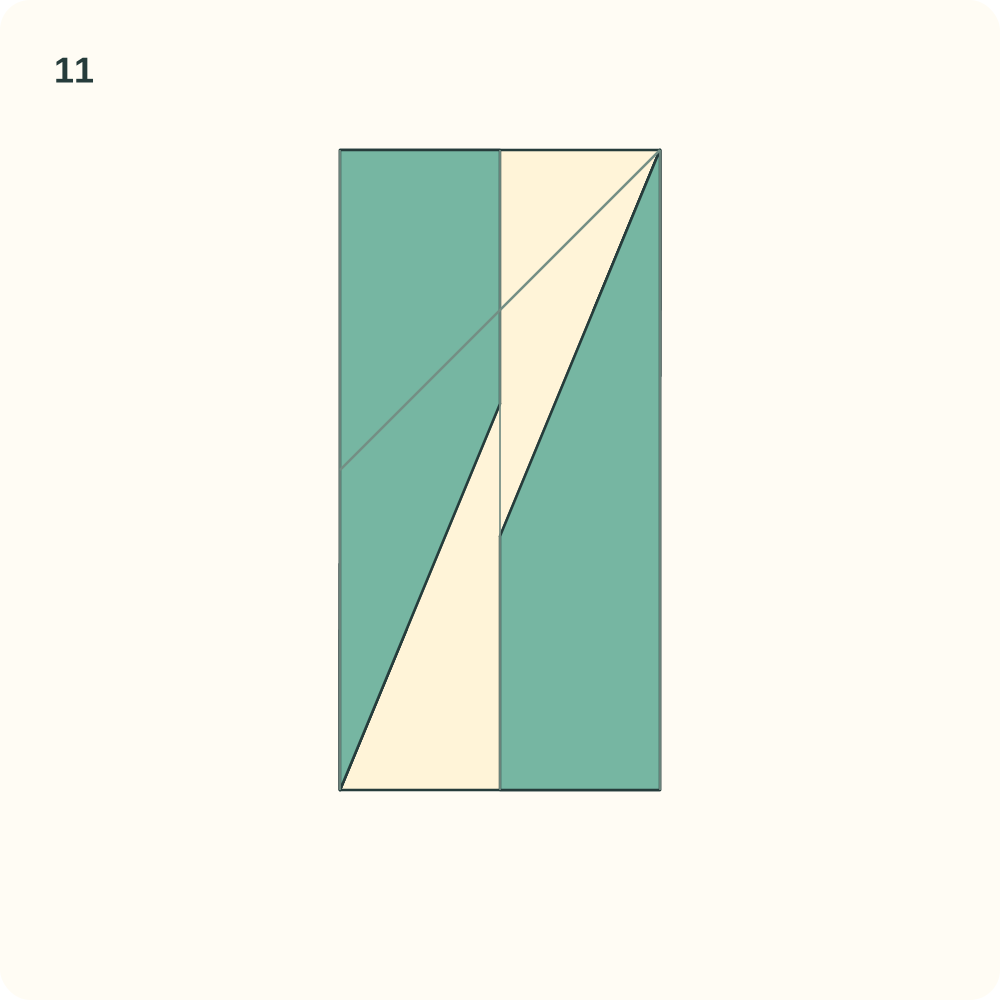
The rectangle is restored with a diagonal guide across its upper half.
Step 12: Rehearse the lower diagonal
Bring the lower right corner up to the left edge, aligning its bottom edge with the left edge. Mark the diagonal across the lower half, then reopen only this large triangle.
Orientation: The new diagonal is parallel to the previous one.
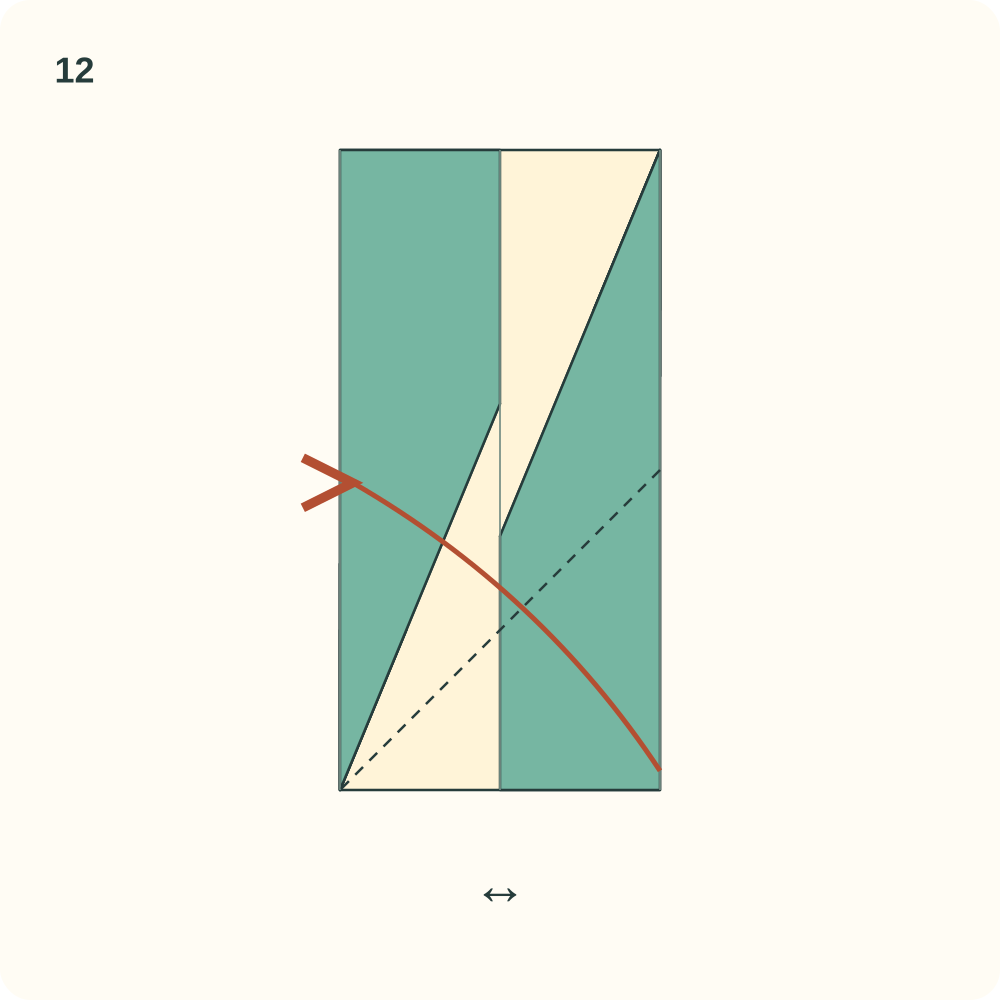
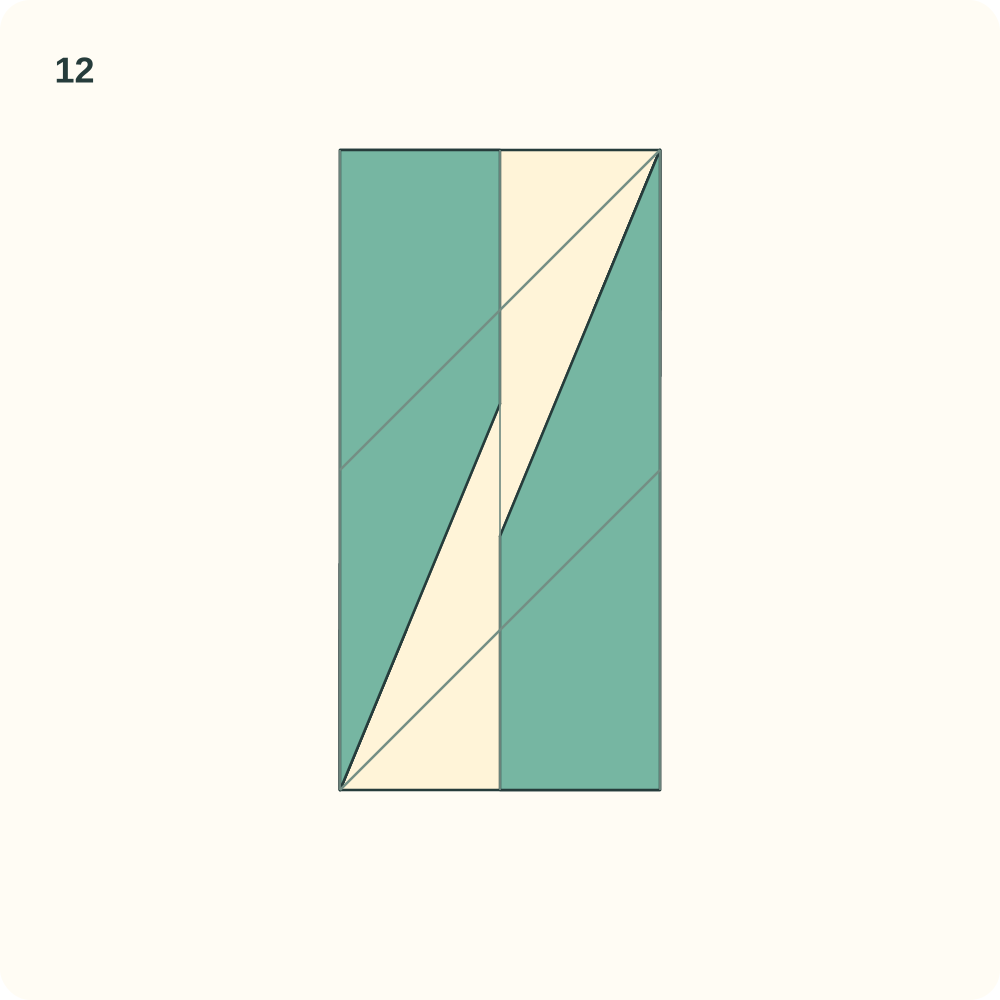
Two parallel diagonals are ready for the tucks; the long quarter strips remain folded.
Step 13: Tuck the upper triangle under the opposite strip
Lift the free edge of the right-hand quarter strip just enough to open its pocket. Refold the upper left large triangle on the diagonal from step 11 and slide it under that right strip. Lower the strip over it; do not merely lay the triangle on top.
Orientation: The inset separates the layers to show the route under the pocket lip. It is not a cut.
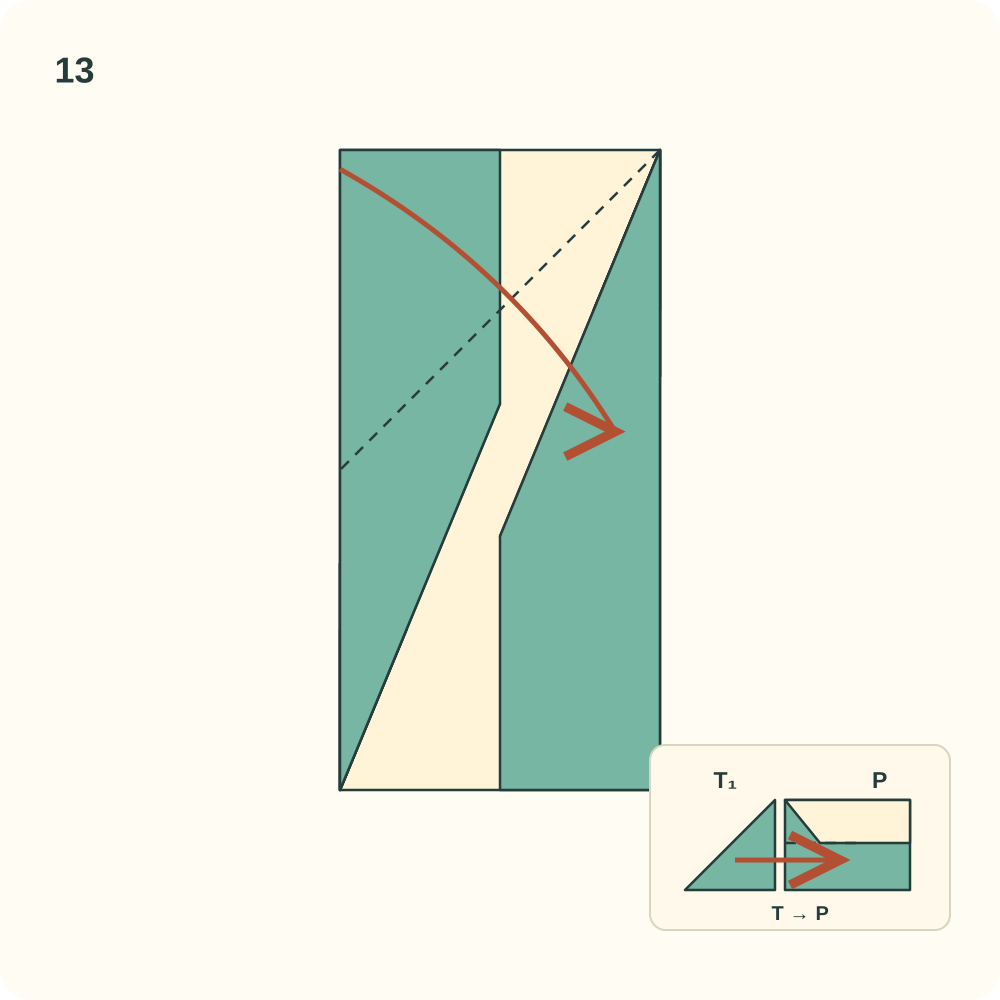
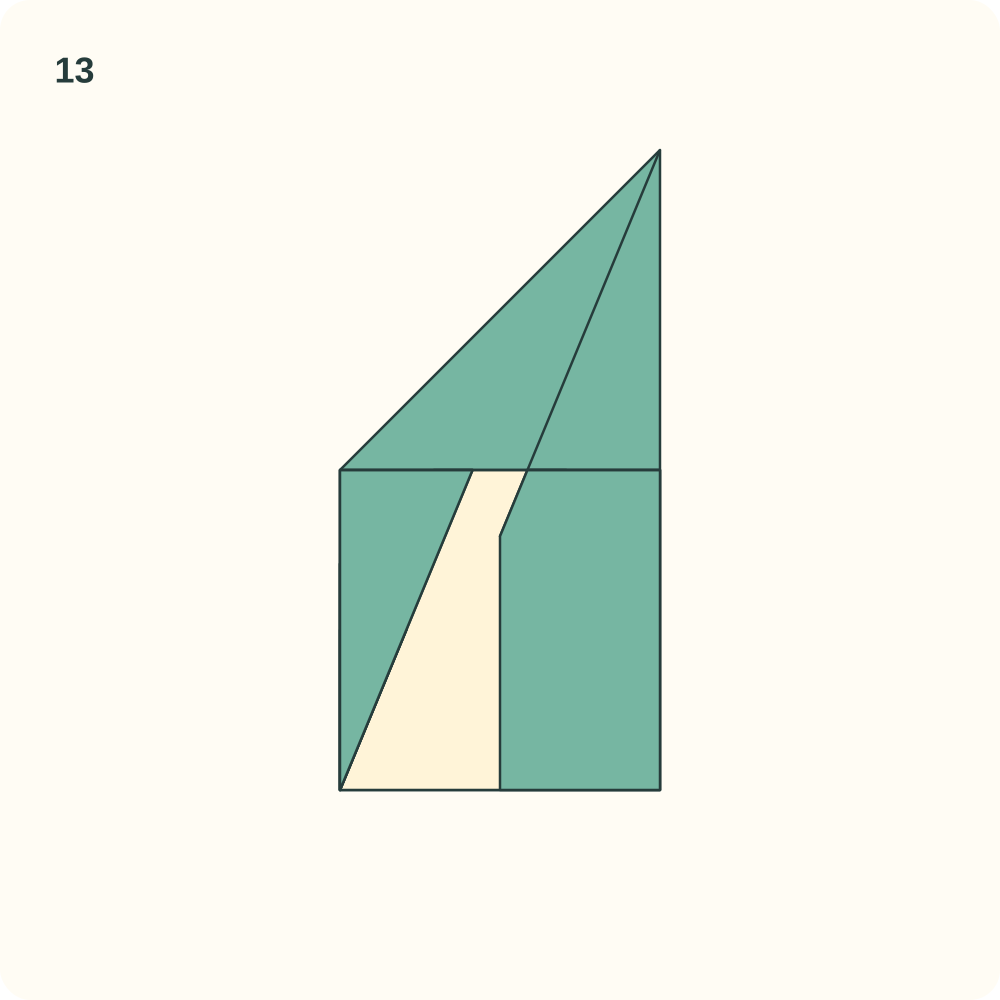
The upper end points upward and right; the receiving strip lies over the tucked triangle.
Step 14: Tuck the lower triangle under the opposite strip
Lift the free edge of the left-hand strip. Refold the lower right large triangle on its guide and slide it beneath that left strip, then lower the strip.
Orientation: The resulting parallelogram still has the original top pointing upward and right.
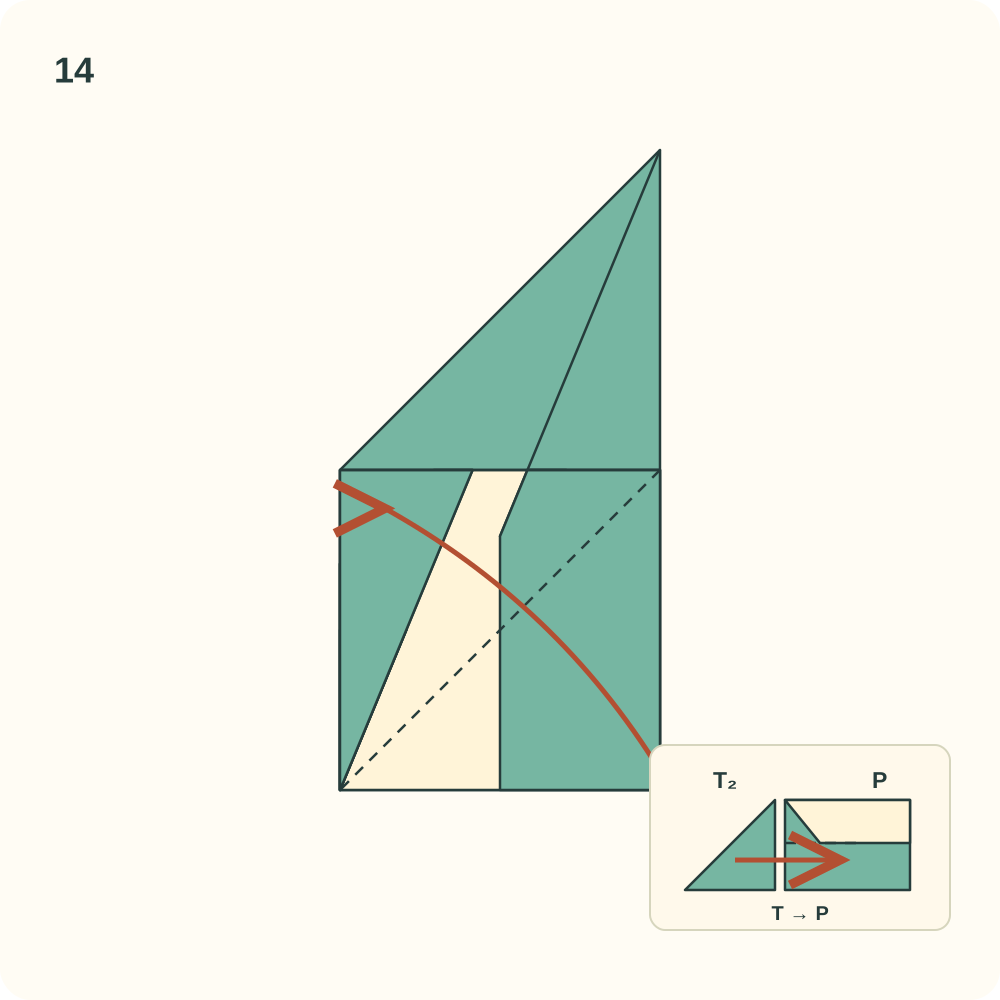
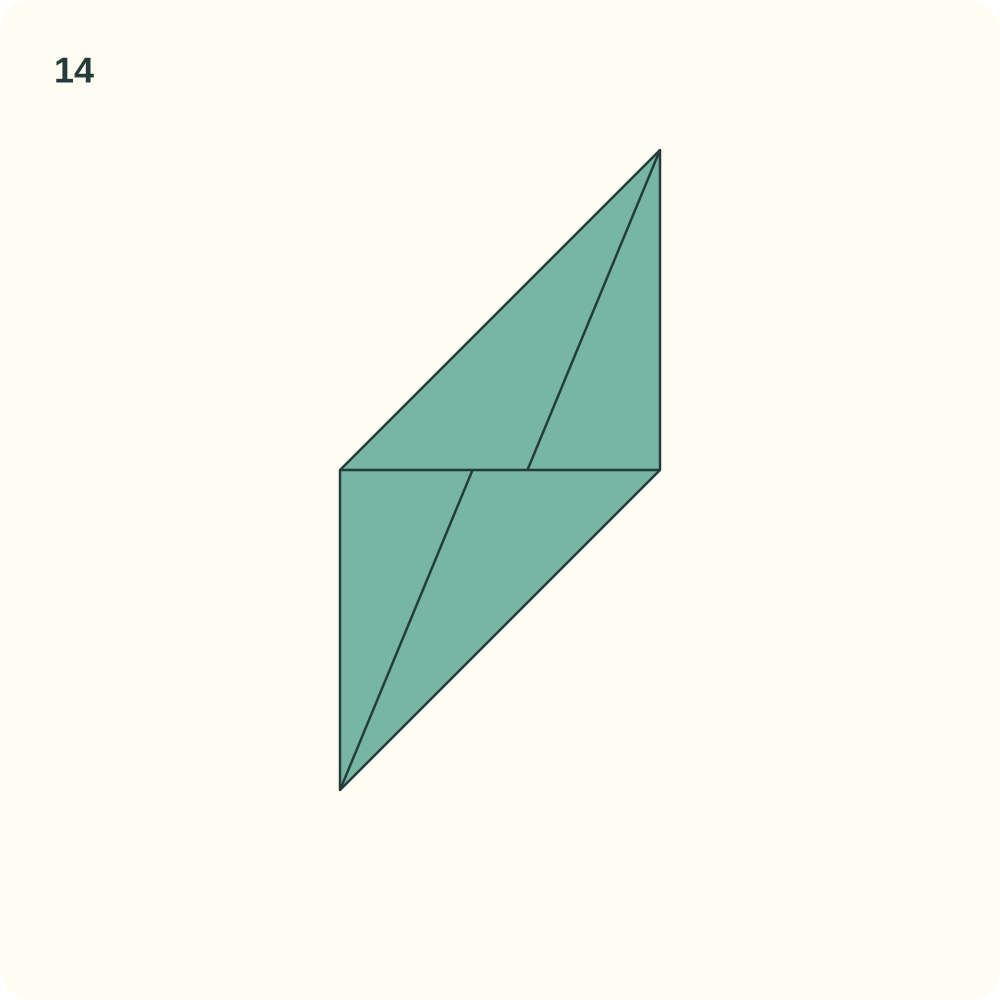
A flat parallelogram has two pointed ends and two opposite pocket mouths.
Step 15: Turn the unit over
Turn the complete unit over from left to right, like a page. Do not rotate it on the table. The upper point moves from the right side to the left side.
Orientation: The smooth back faces you; the long outline now slopes downward to the right.
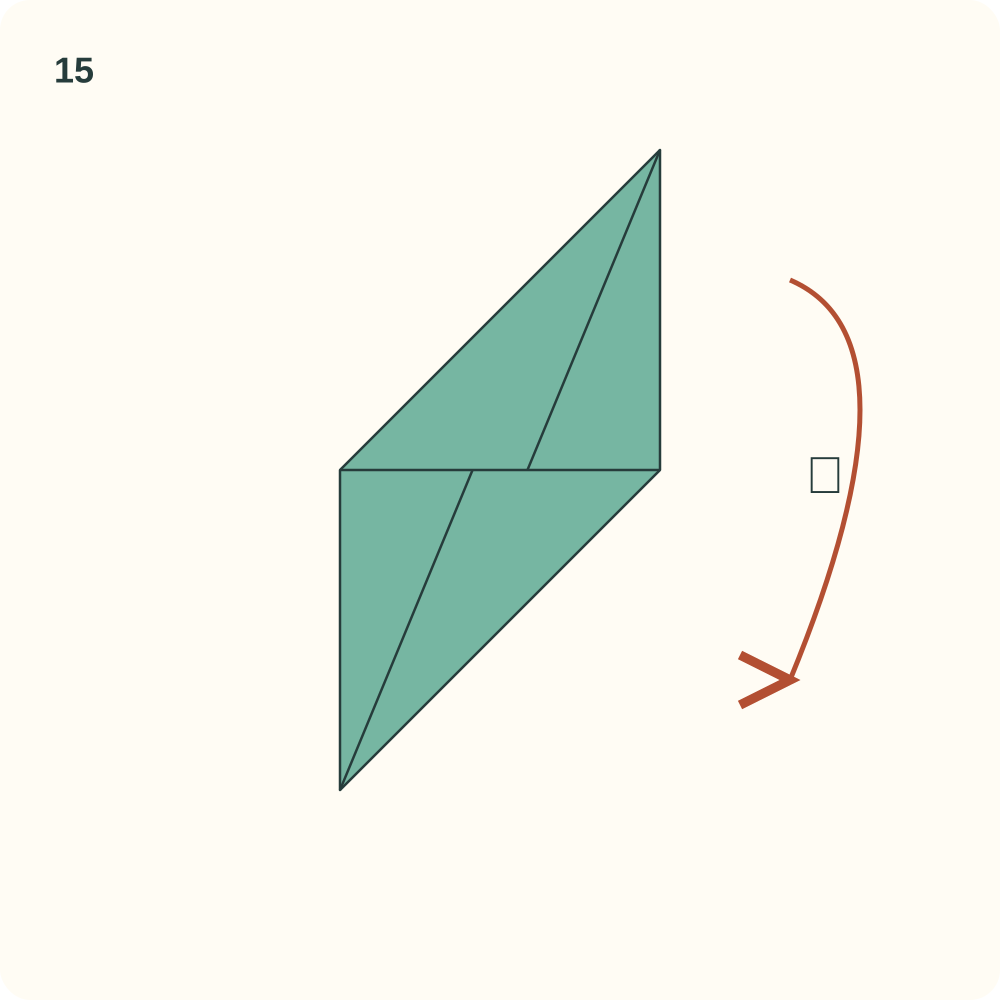
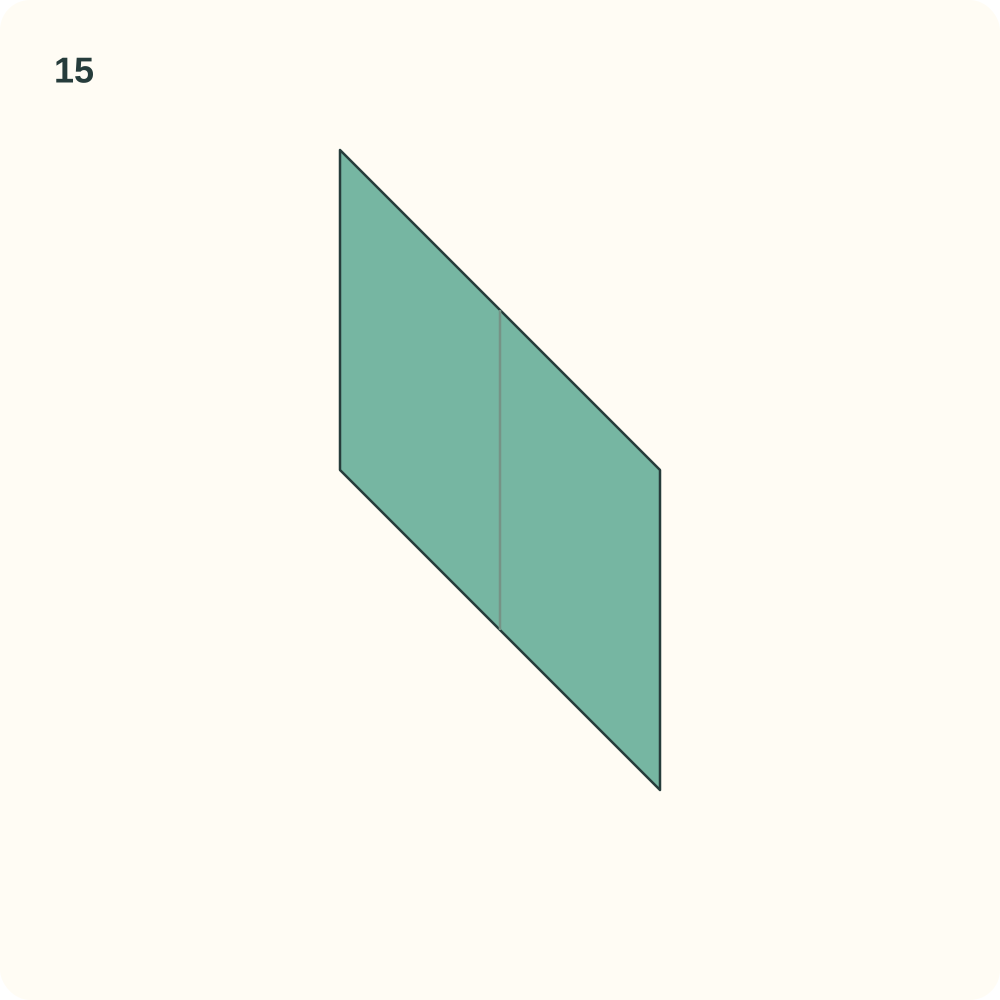
The reverse of the same parallelogram is visible. No new fold is made.
Step 16: Crease the upper tab hinge
Bring the upper pointed end down to the right-hand obtuse corner of the parallelogram. Crease the line that joins the two neighbouring side midpoints, then reopen this triangular tab.
Orientation: Use the point at the upper left; do not fold the whole parallelogram in half.
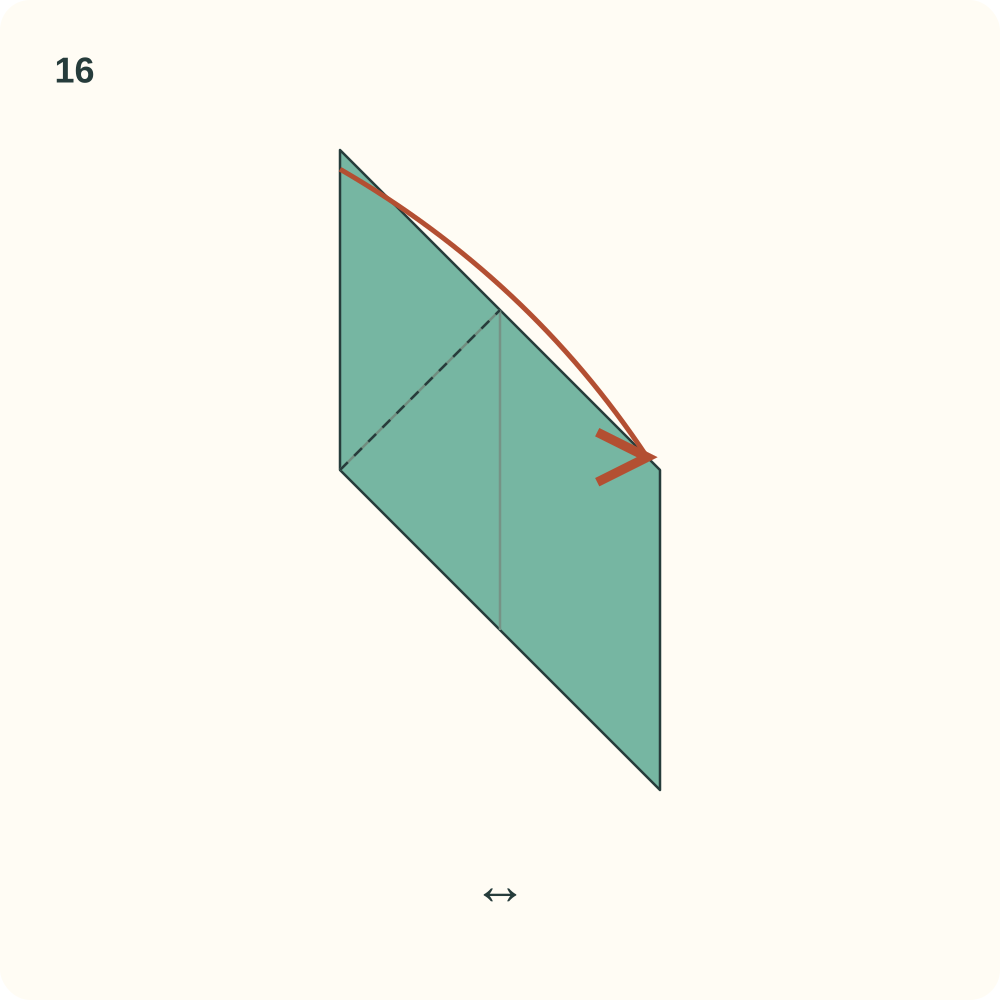
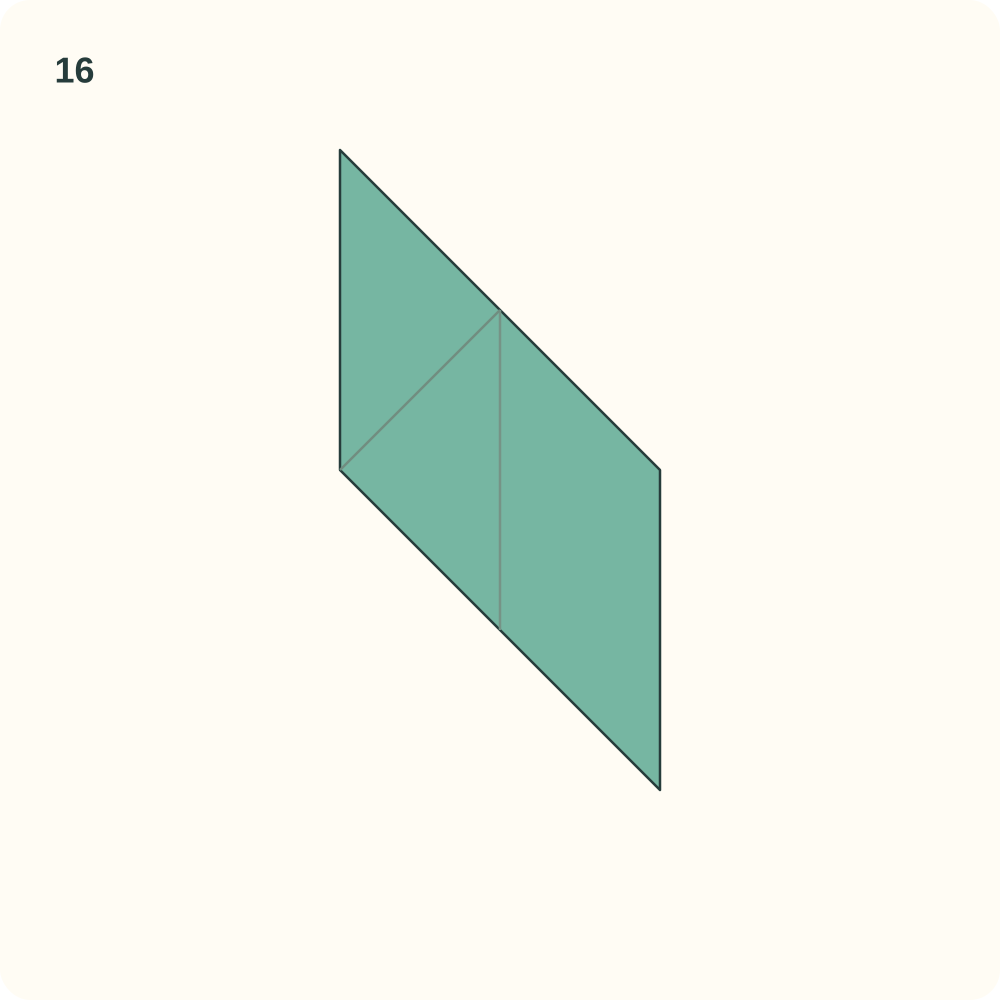
The upper tab has a diagonal hinge. Its tip can now fold onto the opposite corner of the central diamond.
Step 17: Crease the lower tab hinge
Bring the lower pointed end up to the left-hand obtuse corner. Crease its hinge, then reopen the tab. The central region between the two hinges is a square seen as a diamond.
Orientation: The two tab hinges are parallel.
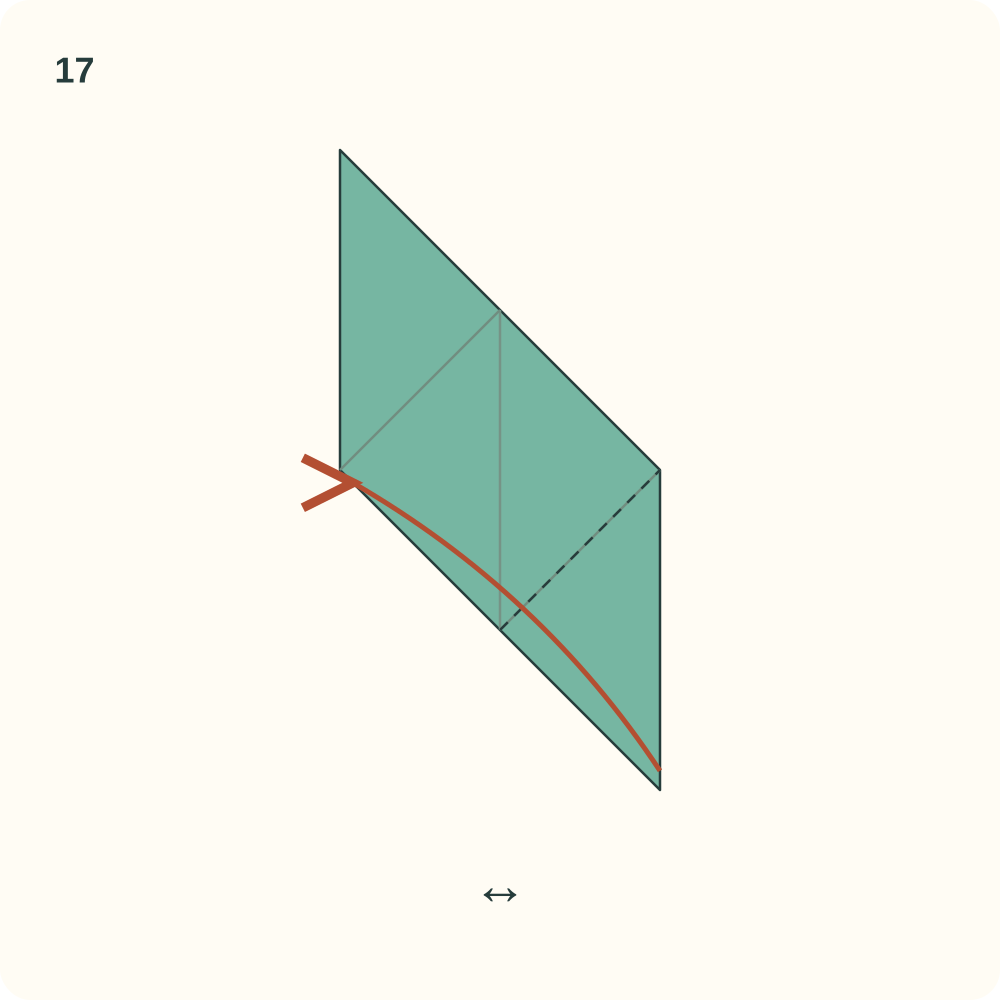
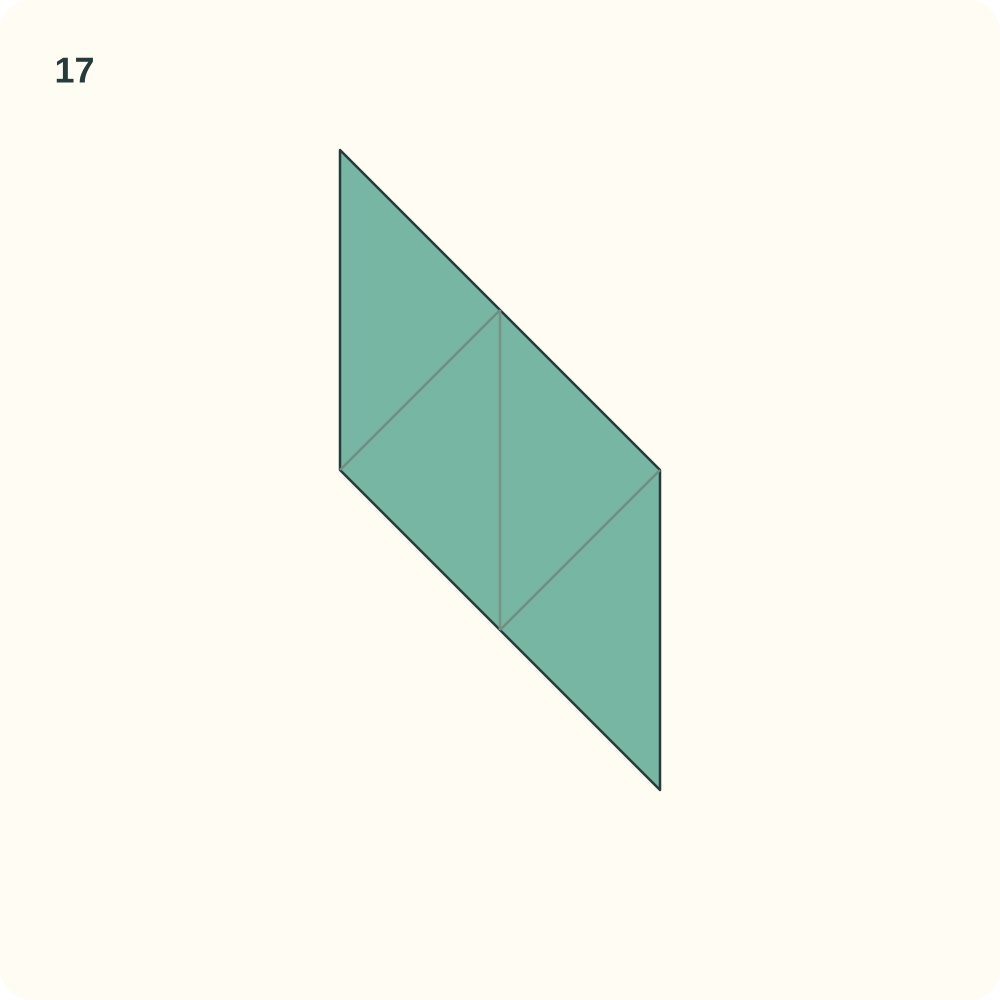
Two triangular tabs flank one central square face. No extra crease crosses that face.
Step 18: Return to the pocket side
Turn the complete unit back from left to right, restoring the pocket side. Gently bend the two end tabs away from you on their existing hinges, then leave them partly open for assembly. The result drawing lays them flat so T₁ and T₂ remain identifiable.
Orientation: The original upper point is again on the right. P₁ and P₂ mark the two receiving edges of the central diamond.
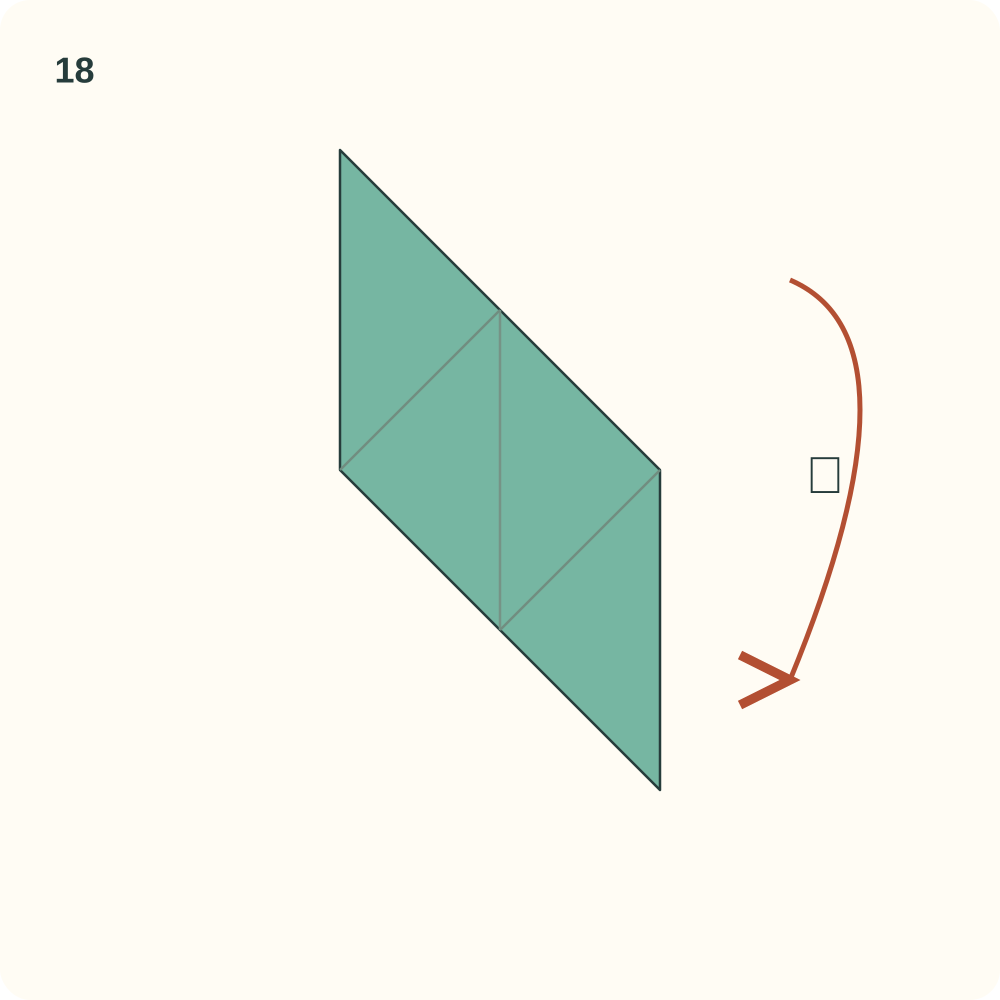
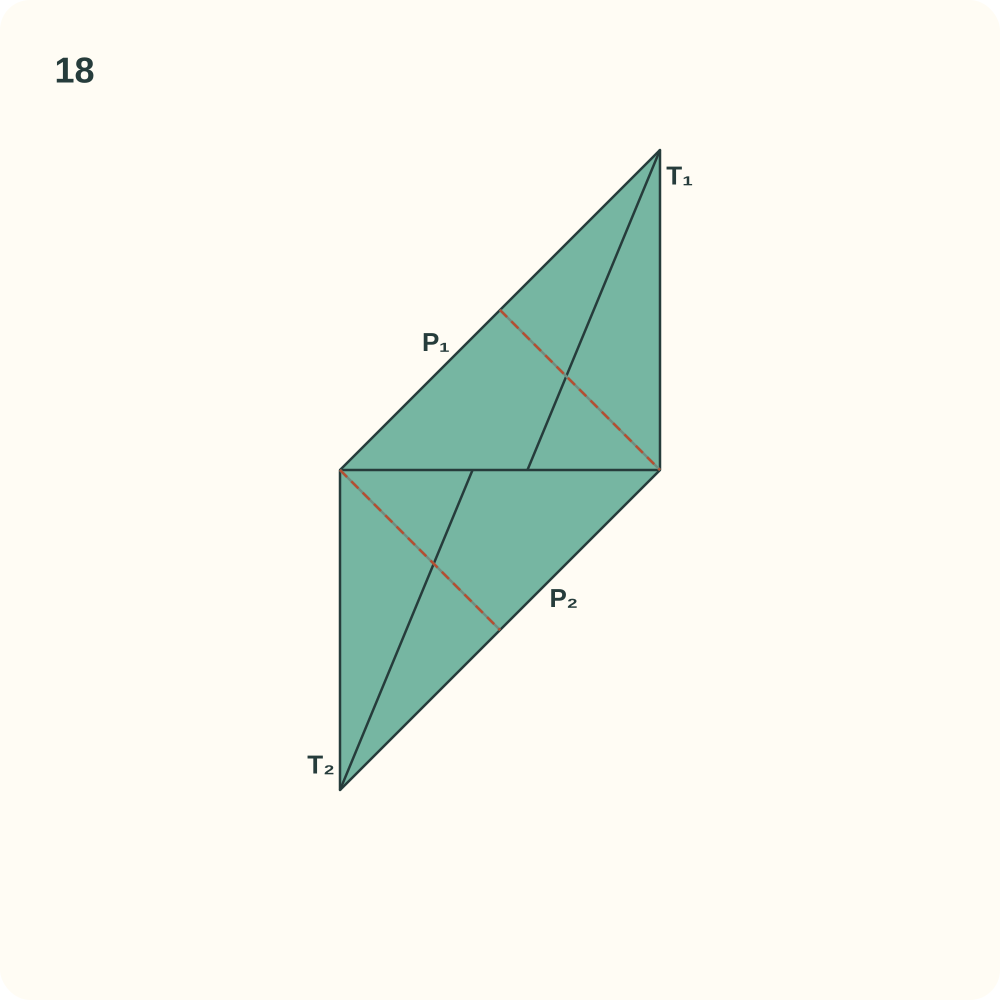
One Sonobe unit has two projecting tabs T and two pockets P. The central square must remain flat.
Step 19: Crease the central diagonal L–R
Keep the pocket side facing you after instruction 18. Find the two elbow corners halfway down the parallelogram, labelled L and R. Bring the upper half toward the lower half along the line joining L to R, crease through the central square and reopen. This line joins the elbow corners; it does not join the opposite corners Q and S of the central square.
Orientation: Pocket side up. R is right and L is left. Keep the two tabs outside the central square.
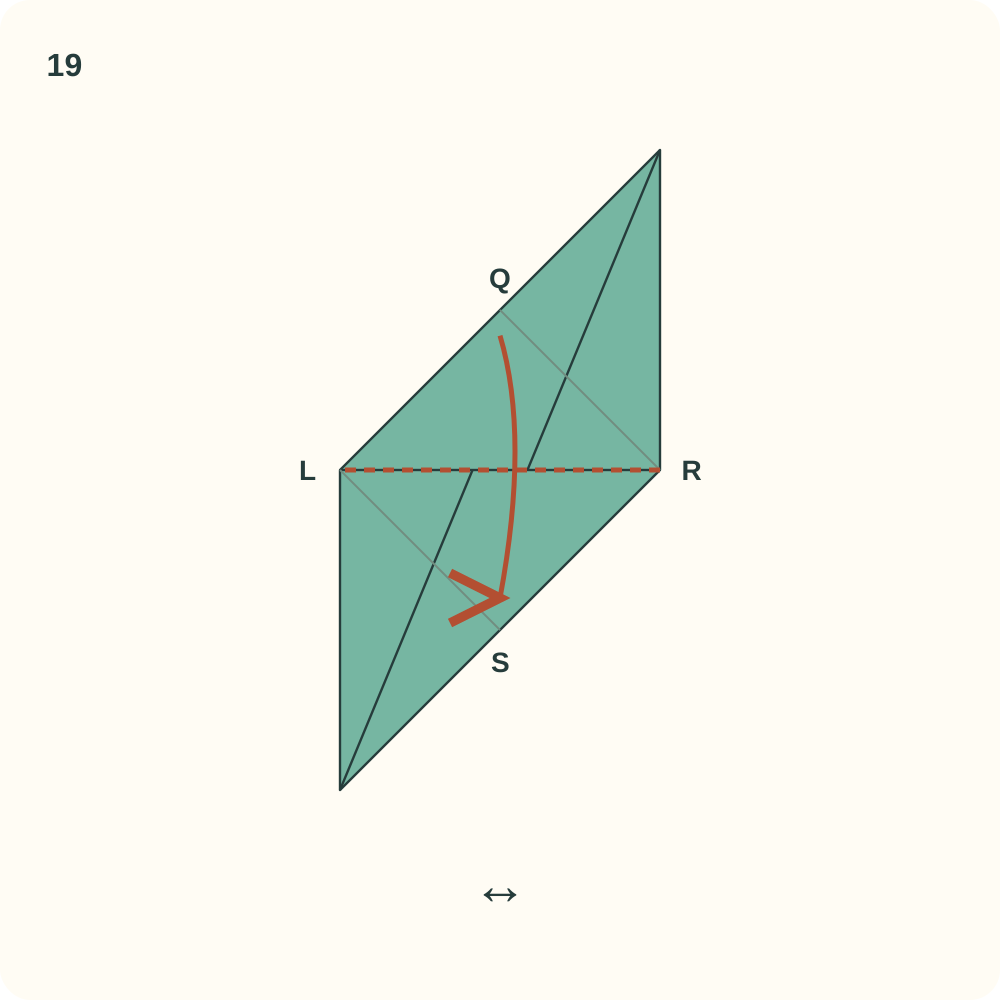
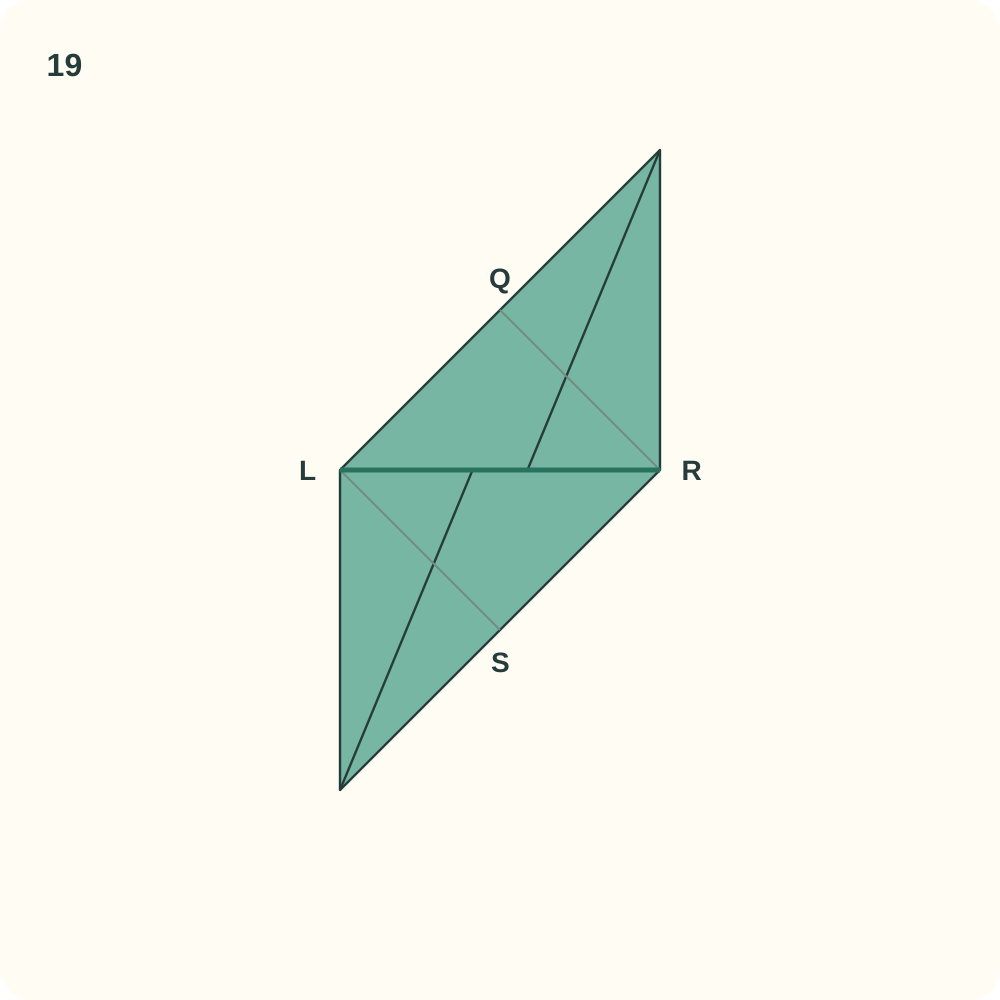
The central square has a new L–R diagonal crease, which divides it into the Q and S triangles.
Step 20: Bend the centre into a valley
Bend the L–R crease so the crease sinks between the two triangular halves when viewed from the coloured pocket side. Let the two free tabs bend at their existing hinges. Keep the pockets facing outward; do not reverse the corner tucks. The final valley angle will be set by the neighbouring units during assembly.
Orientation: The oblique view is rotated a half-turn from instruction 19, with S above Q and R to the left of L. It shows only the central square; free tabs remain attached but are omitted. The lower view looks along L–R to reveal the valley.
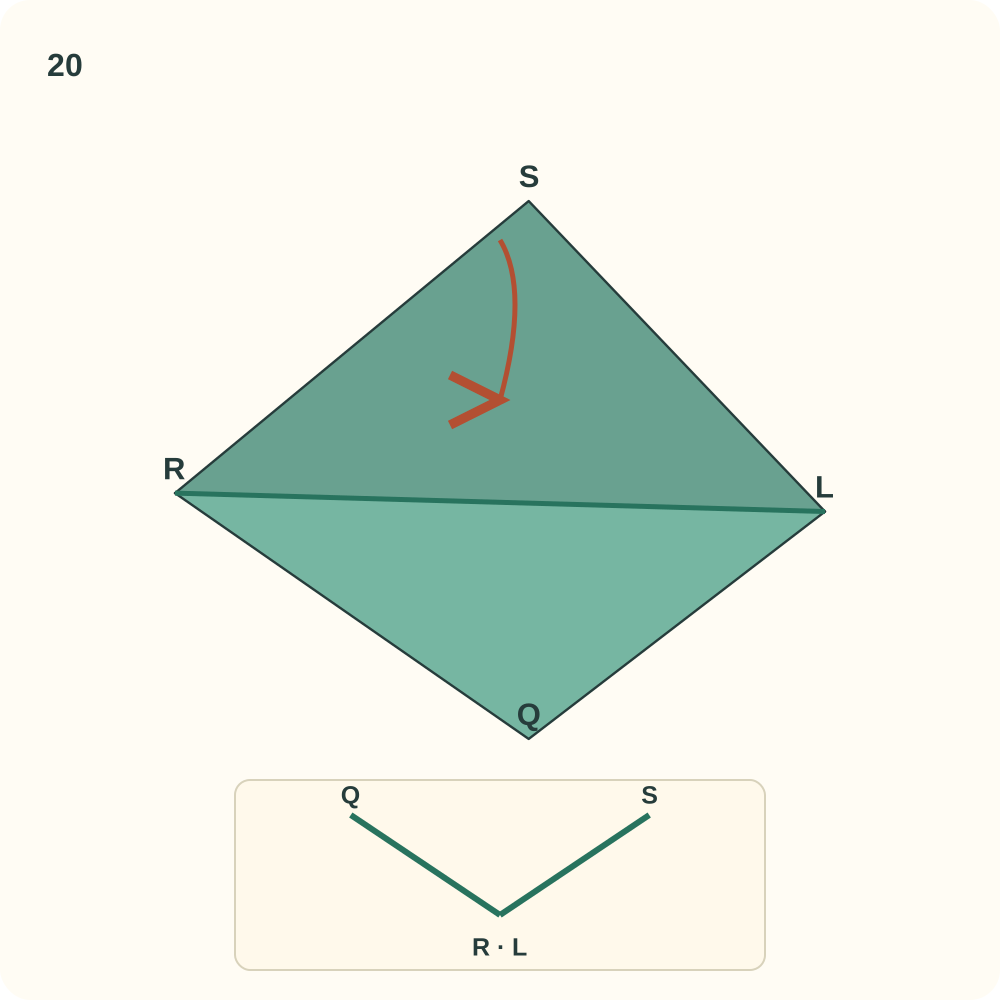
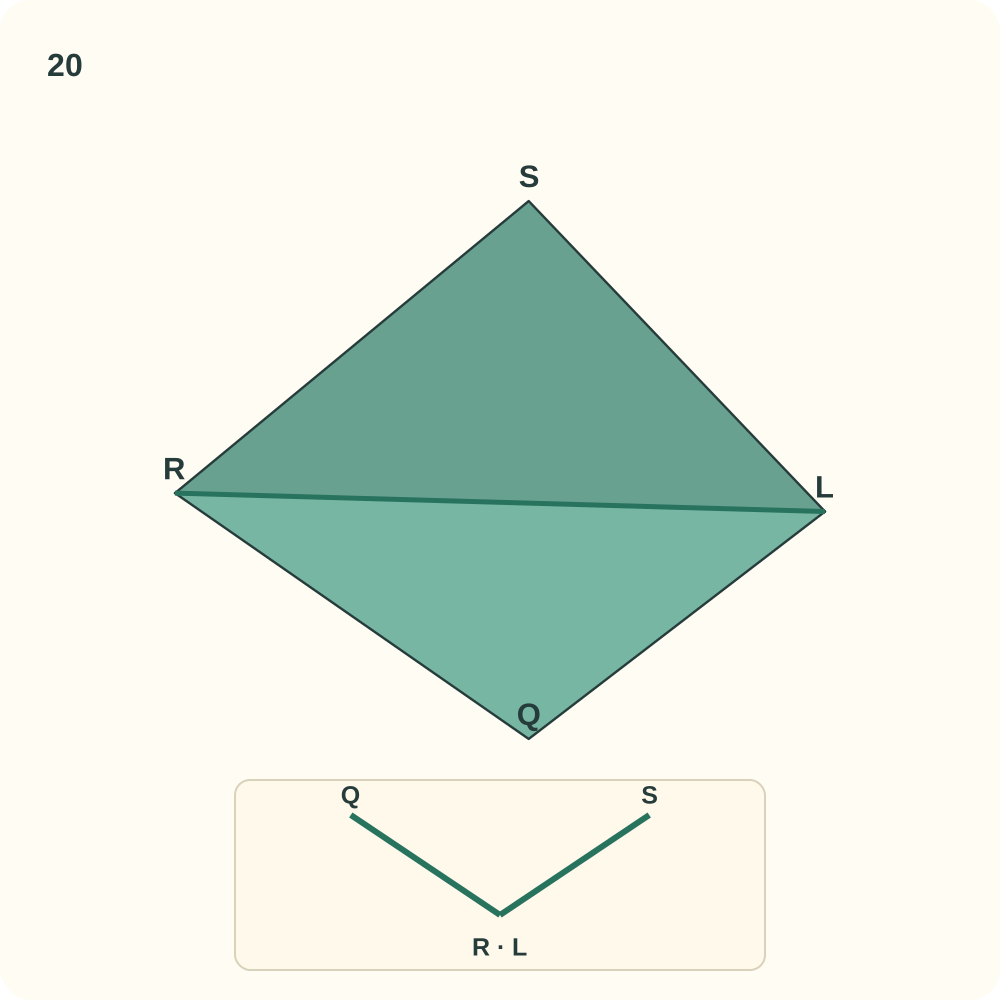
One unit has two outward triangular halves separated by a central valley. This is a different preparation from the flat-faced cube.
Step 21: Prepare and number thirty matching units
Repeat instructions 1–20 until you have thirty identical units. Use the same pair of starting corners and the same central valley on every sheet. Identify the units 01–30 with loose notes or very small removable pencil marks. In each unit T1 is the tab next to Q and R; P1 is the pocket next to Q and L. T2 is next to S and L; P2 is next to S and R.
Orientation: Letters Q/R/S/L identify local corners, not additional cuts. P01–P20 in assembly identify whole three-unit peaks; a peak label is different from a pocket label P1 or P2.
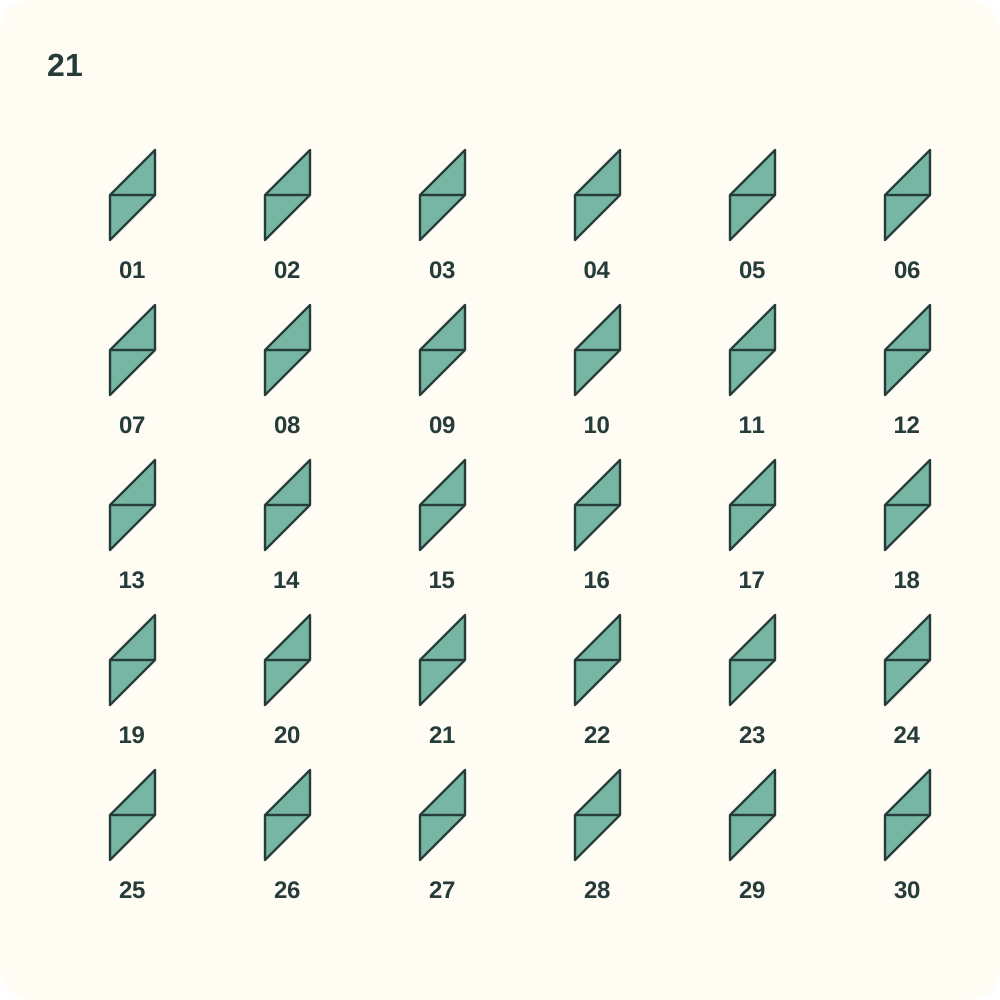
Thirty equal green units are ready. Each has two tabs, two pockets and two triangular central halves.
Step 22: Join 02·T2 to 06·P1
Start with these two units. At peak P01, lift the lip of 06·P1 beside V03 and guide 02·T2 underneath it. The tab hinges along the edge from V03 to the peak; its far tip heads toward V02. Leave the other loose tabs free while positioning the three halves around P01. Support the growing structure with your hands; the positions in the drawing do not mean its other joins are already closed.
Orientation: 02 S=P01, L=V03, R=V01. 06 Q=P01, R=V02, L=V03. Look toward P01; the lower left view enlarges this same peak. Orange marks only the moving tab.
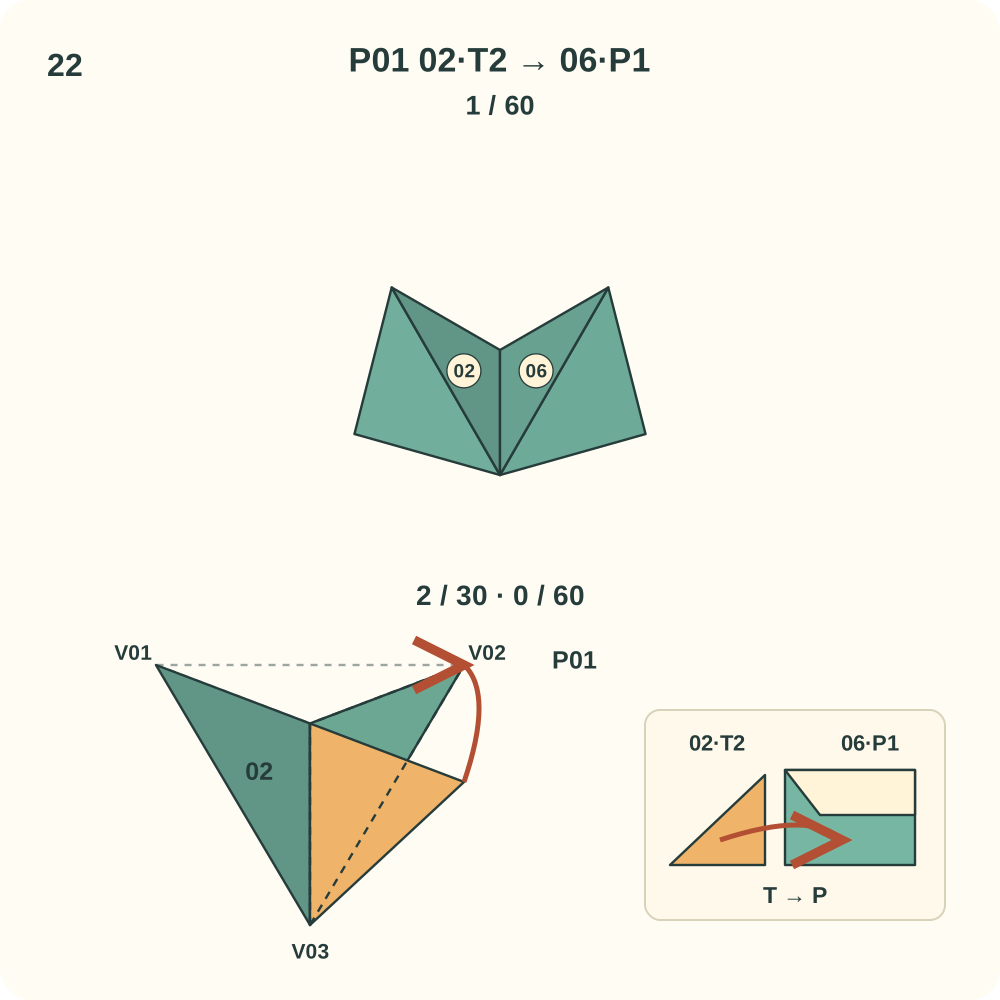
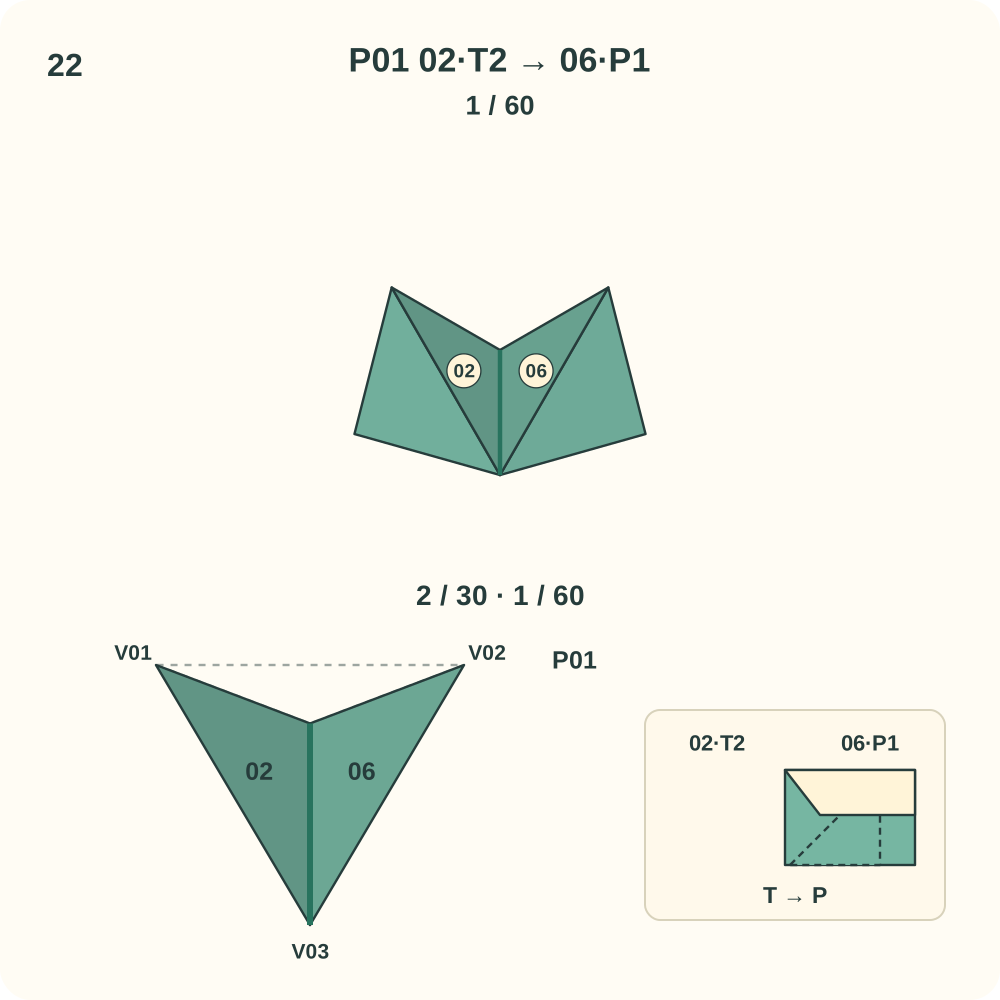
Join 1 of 60 is 02·T2 → 06·P1. Two other edges of this peak may still need a connection.
Step 23: Join 06·T1 to 01·P1
Bring in unit 01. At peak P01, lift the lip of 01·P1 beside V02 and guide 06·T1 underneath it. The tab hinges along the edge from V02 to the peak; its far tip heads toward V01. Leave the other loose tabs free while positioning the three halves around P01. Support the growing structure with your hands; the positions in the drawing do not mean its other joins are already closed.
Orientation: 06 Q=P01, R=V02, L=V03. 01 Q=P01, R=V01, L=V02. Look toward P01; the lower left view enlarges this same peak. Orange marks only the moving tab.
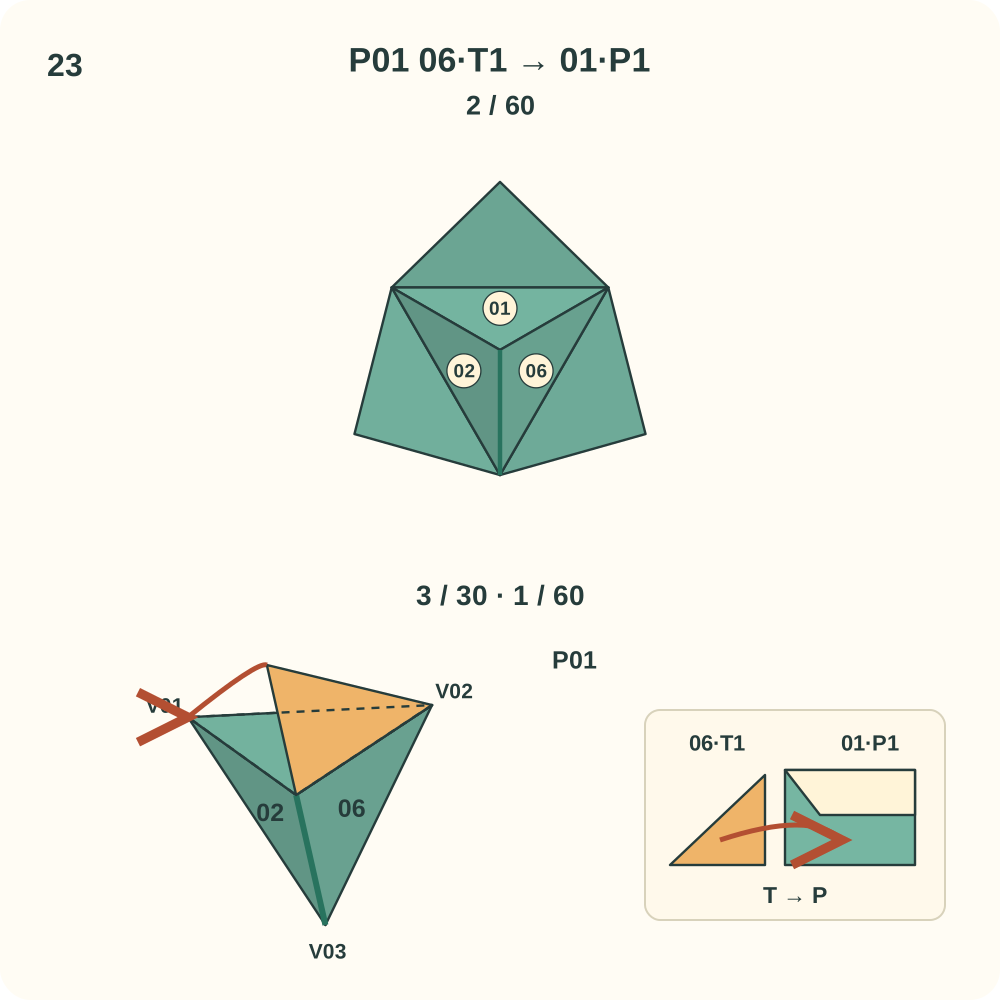
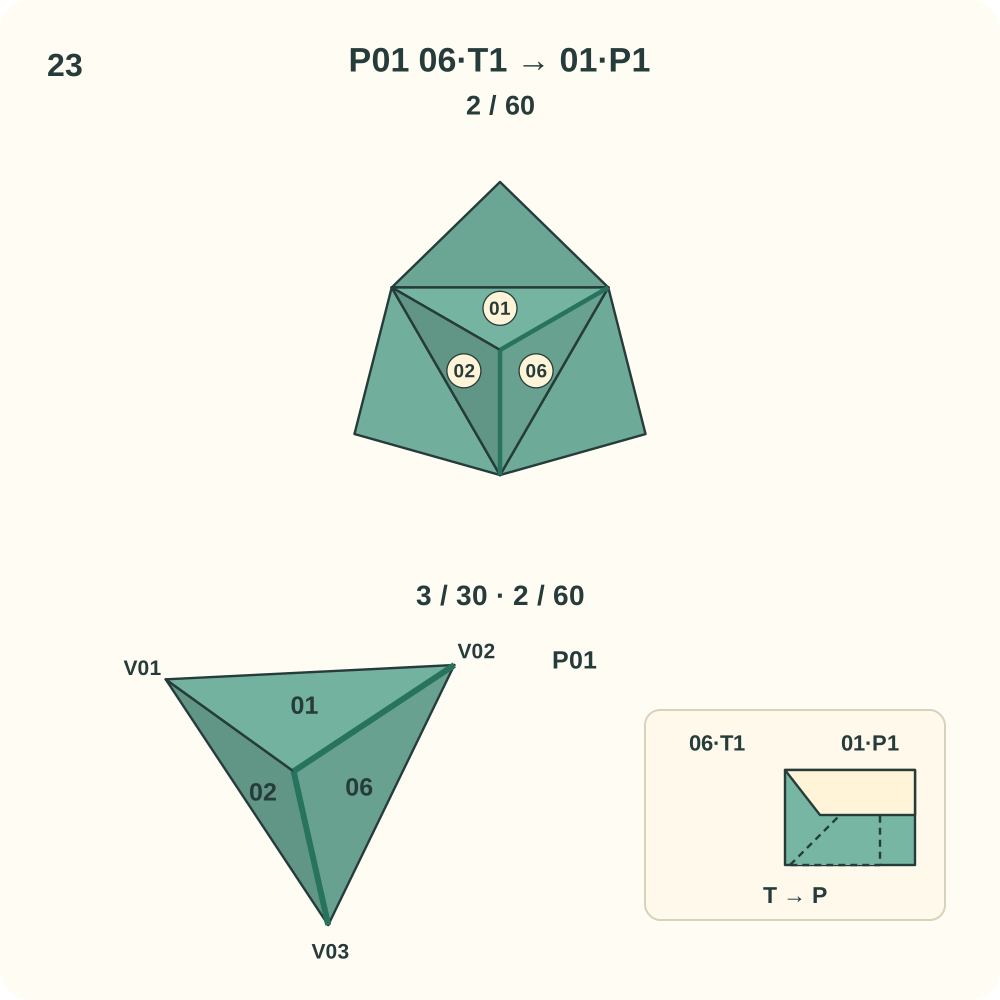
Join 2 of 60 is 06·T1 → 01·P1. Two other edges of this peak may still need a connection.
Step 24: Join 01·T1 to 02·P2
Keep the existing units in place. At peak P01, lift the lip of 02·P2 beside V01 and guide 01·T1 underneath it. The tab hinges along the edge from V01 to the peak; its far tip heads toward V03. This is the third join around P01; curve its three halves into one raised trihedral peak as you close the loop. Support the growing structure with your hands; the positions in the drawing do not mean its other joins are already closed.
Orientation: 01 Q=P01, R=V01, L=V02. 02 S=P01, L=V03, R=V01. Look toward P01; the lower left view enlarges this same peak. Orange marks only the moving tab.
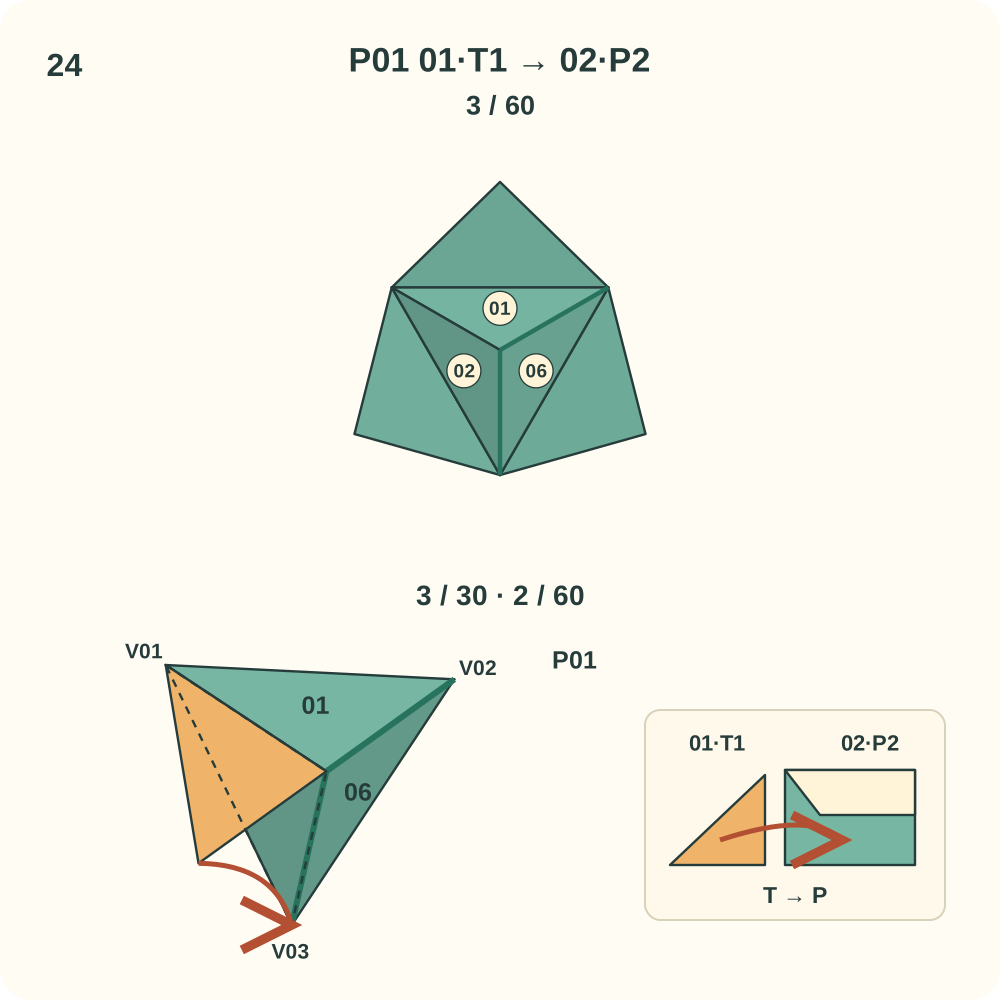
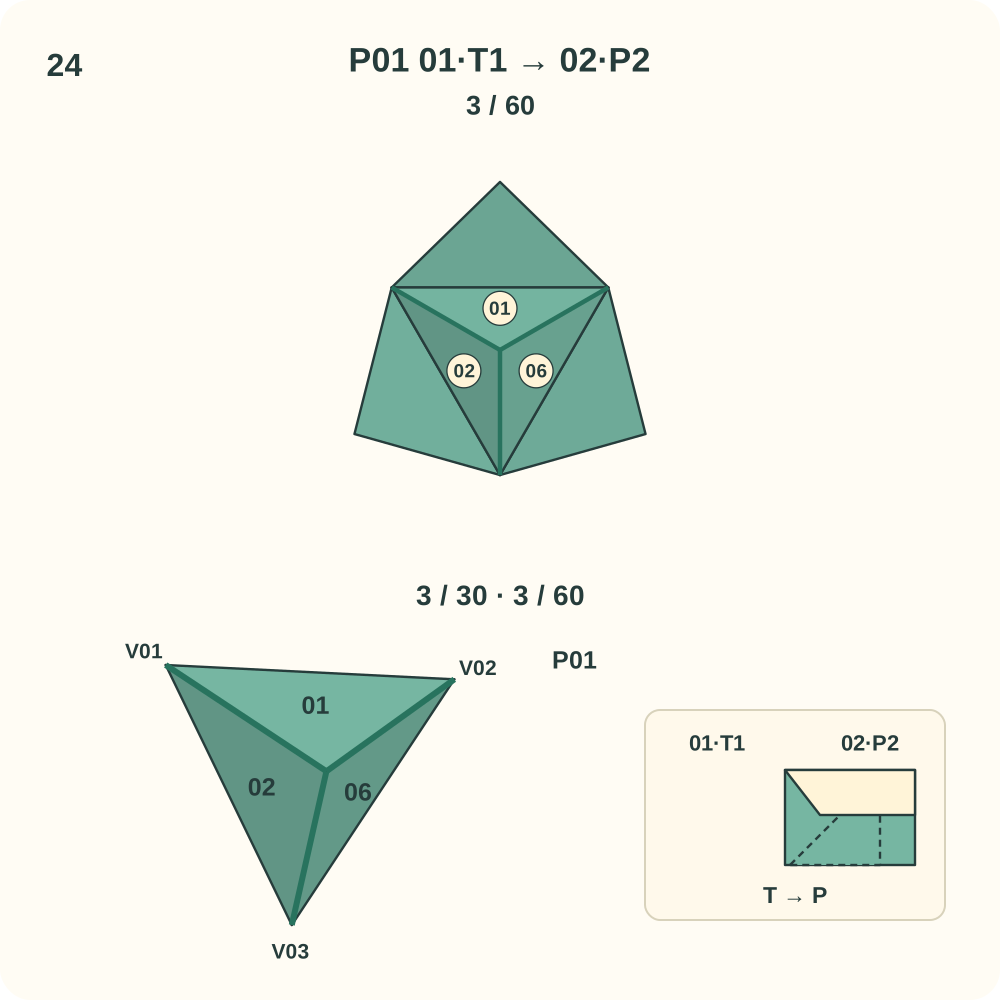
Join 3 of 60 is 01·T1 → 02·P2. Peak P01 now has its three directed joins.
Step 25: Join 01·T2 to 07·P2
Bring in unit 07. At peak P02, lift the lip of 07·P2 beside V02 and guide 01·T2 underneath it. The tab hinges along the edge from V02 to the peak; its far tip heads toward V04. Leave the other loose tabs free while positioning the three halves around P02. Support the growing structure with your hands; the positions in the drawing do not mean its other joins are already closed.
Orientation: 01 S=P02, L=V02, R=V01. 07 S=P02, L=V04, R=V02. Look toward P02; the lower left view enlarges this same peak. Orange marks only the moving tab.
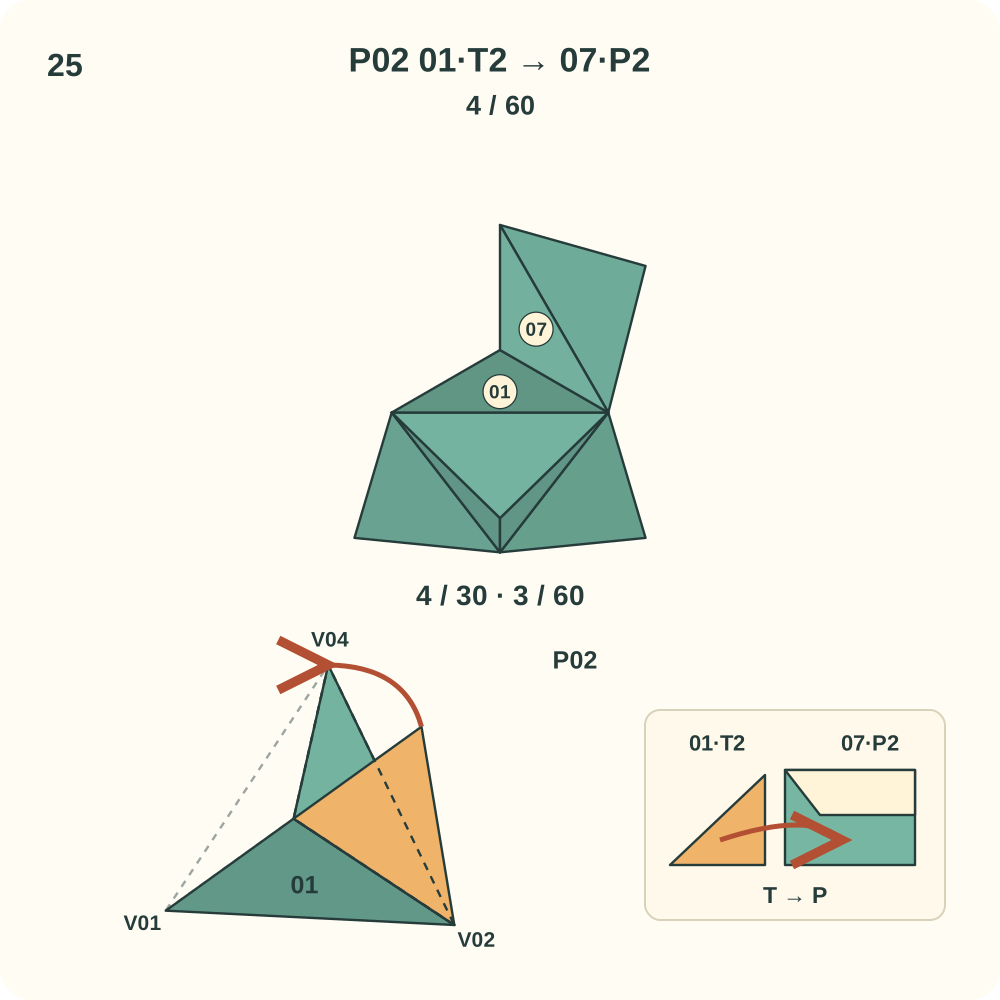
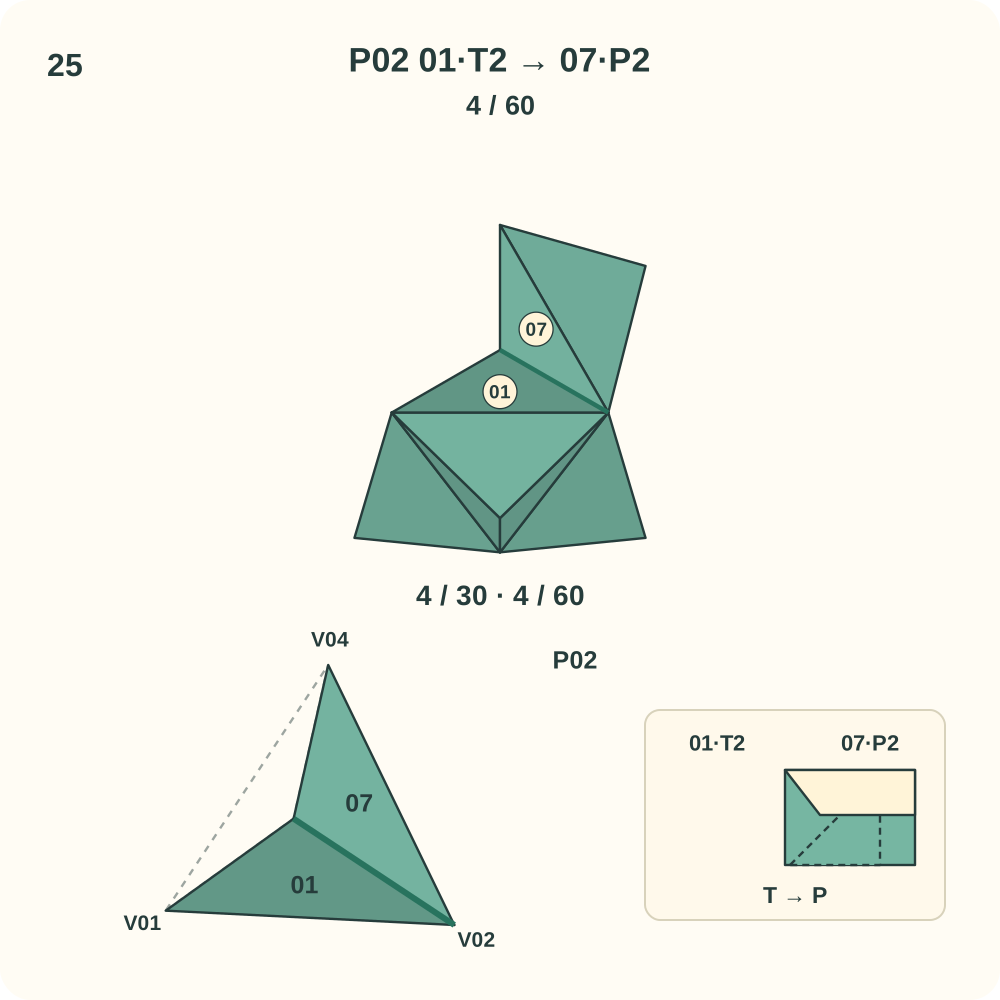
Join 4 of 60 is 01·T2 → 07·P2. Two other edges of this peak may still need a connection.
Step 26: Join 07·T2 to 03·P1
Bring in unit 03. At peak P02, lift the lip of 03·P1 beside V04 and guide 07·T2 underneath it. The tab hinges along the edge from V04 to the peak; its far tip heads toward V01. Leave the other loose tabs free while positioning the three halves around P02. Support the growing structure with your hands; the positions in the drawing do not mean its other joins are already closed.
Orientation: 07 S=P02, L=V04, R=V02. 03 Q=P02, R=V01, L=V04. Look toward P02; the lower left view enlarges this same peak. Orange marks only the moving tab.
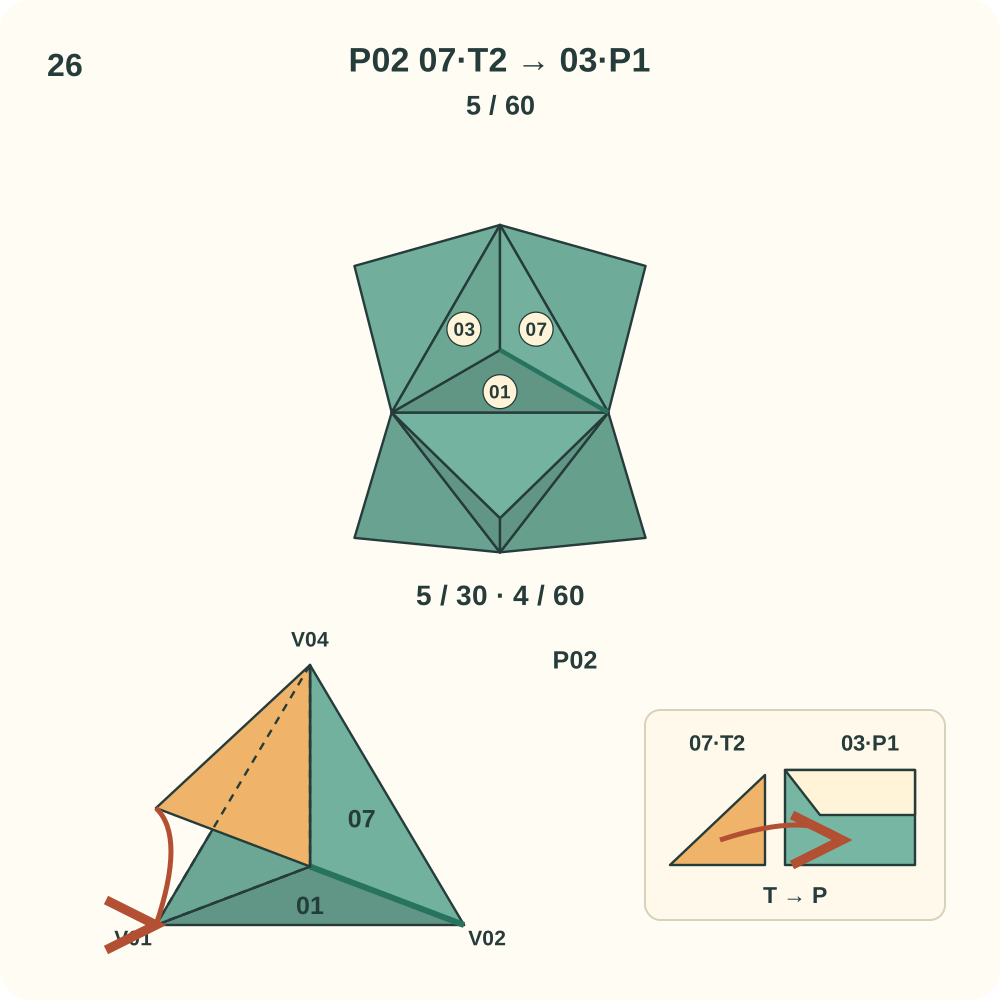
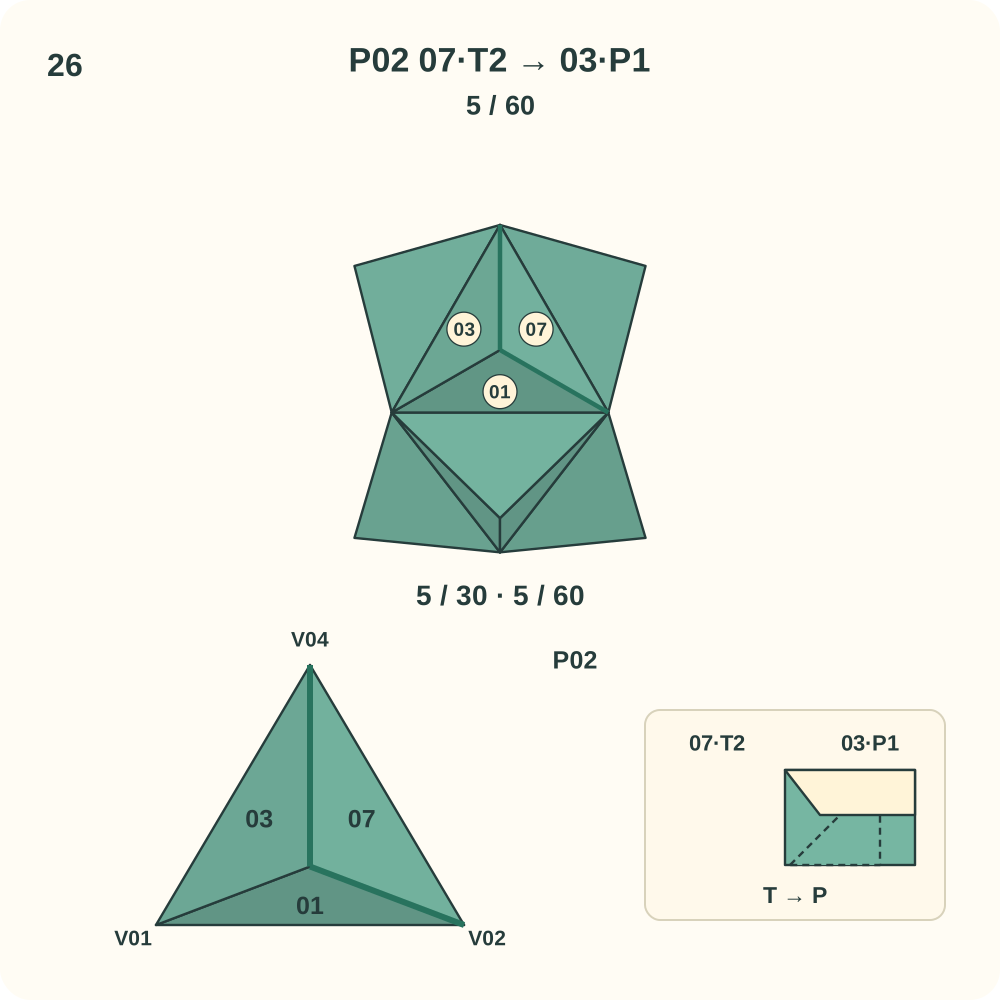
Join 5 of 60 is 07·T2 → 03·P1. Two other edges of this peak may still need a connection.
Step 27: Join 03·T1 to 01·P2
Keep the existing units in place. At peak P02, lift the lip of 01·P2 beside V01 and guide 03·T1 underneath it. The tab hinges along the edge from V01 to the peak; its far tip heads toward V02. This is the third join around P02; curve its three halves into one raised trihedral peak as you close the loop. Support the growing structure with your hands; the positions in the drawing do not mean its other joins are already closed.
Orientation: 03 Q=P02, R=V01, L=V04. 01 S=P02, L=V02, R=V01. Look toward P02; the lower left view enlarges this same peak. Orange marks only the moving tab.
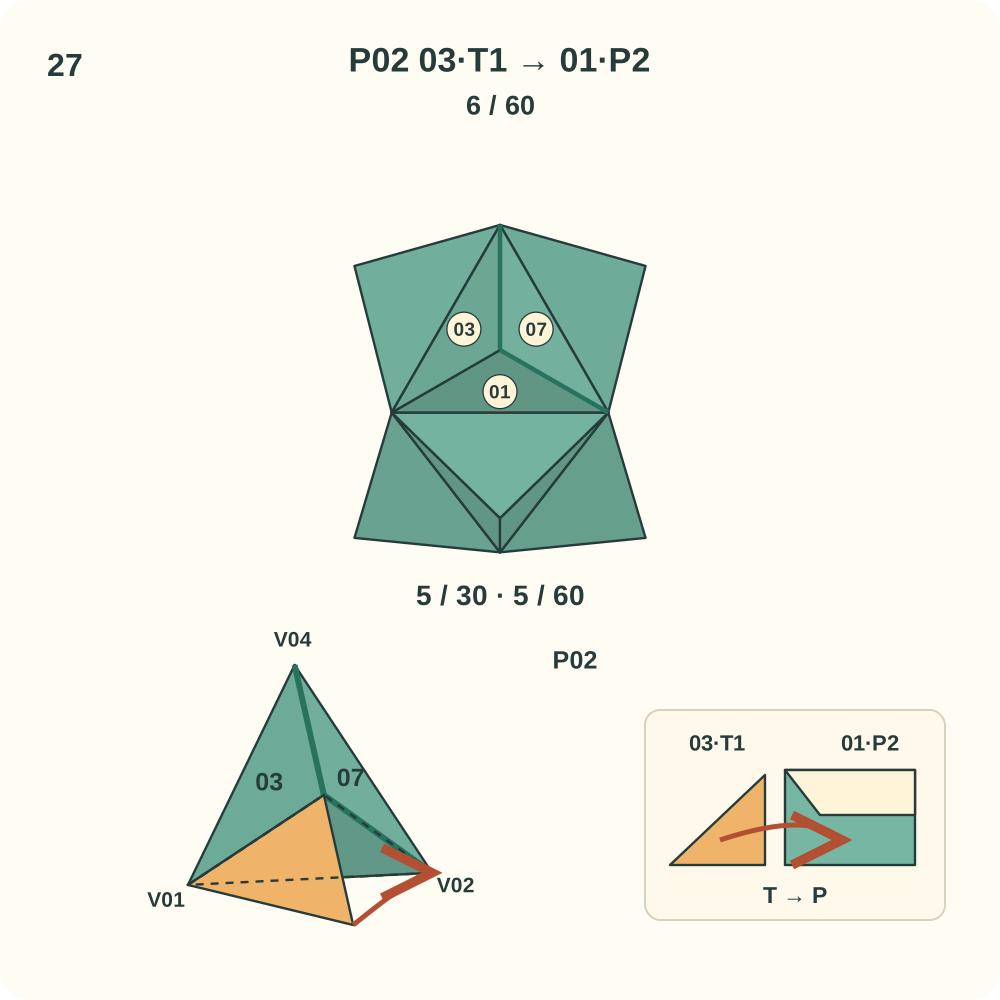
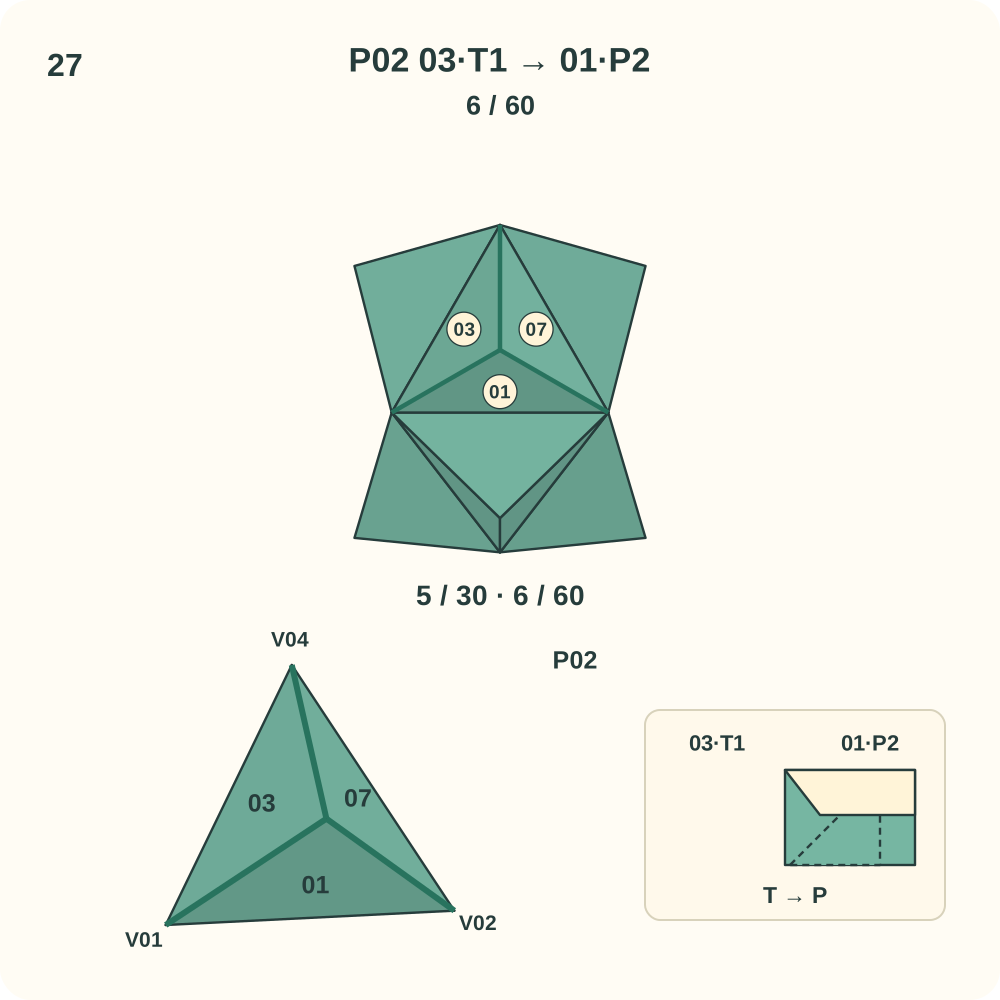
Join 6 of 60 is 03·T1 → 01·P2. Peak P02 now has its three directed joins.
Step 28: Join 02·T1 to 04·P2
Bring in unit 04. At peak P03, lift the lip of 04·P2 beside V01 and guide 02·T1 underneath it. The tab hinges along the edge from V01 to the peak; its far tip heads toward V05. Leave the other loose tabs free while positioning the three halves around P03. Support the growing structure with your hands; the positions in the drawing do not mean its other joins are already closed.
Orientation: 02 Q=P03, R=V01, L=V03. 04 S=P03, L=V05, R=V01. Look toward P03; the lower left view enlarges this same peak. Orange marks only the moving tab.
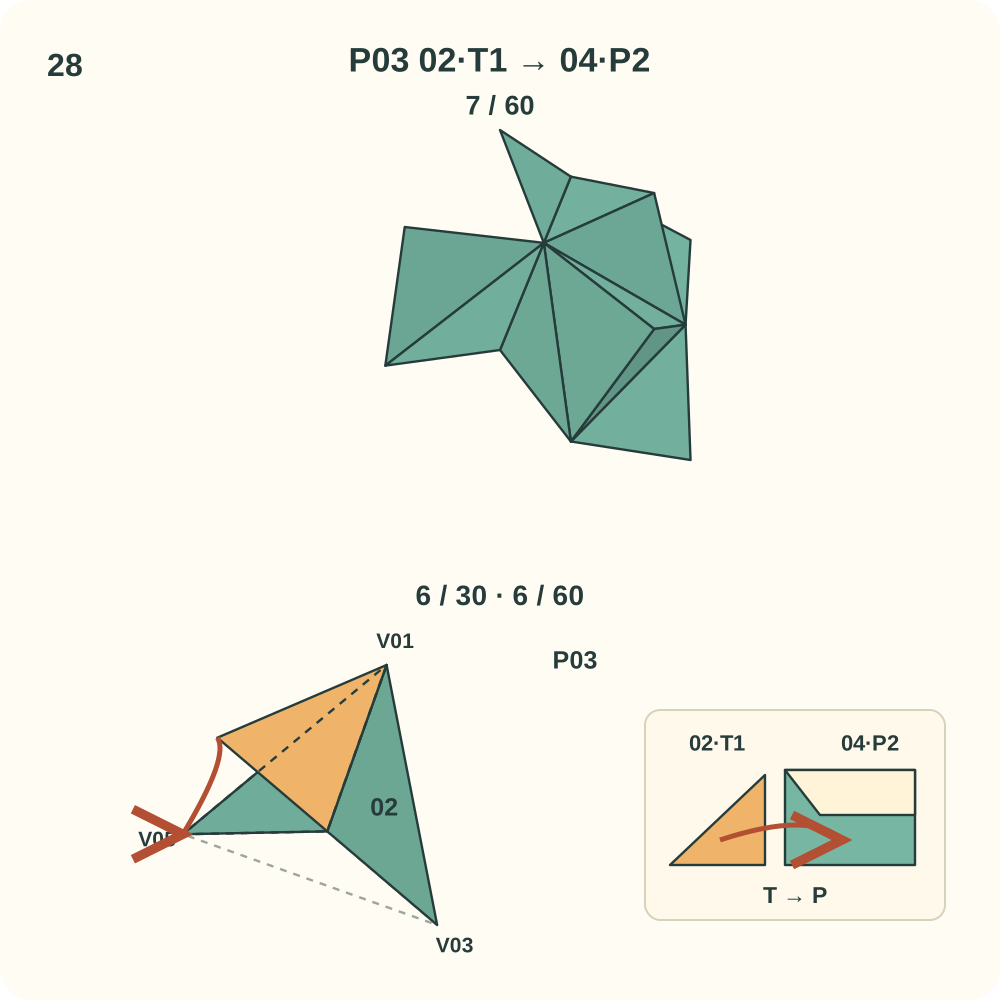
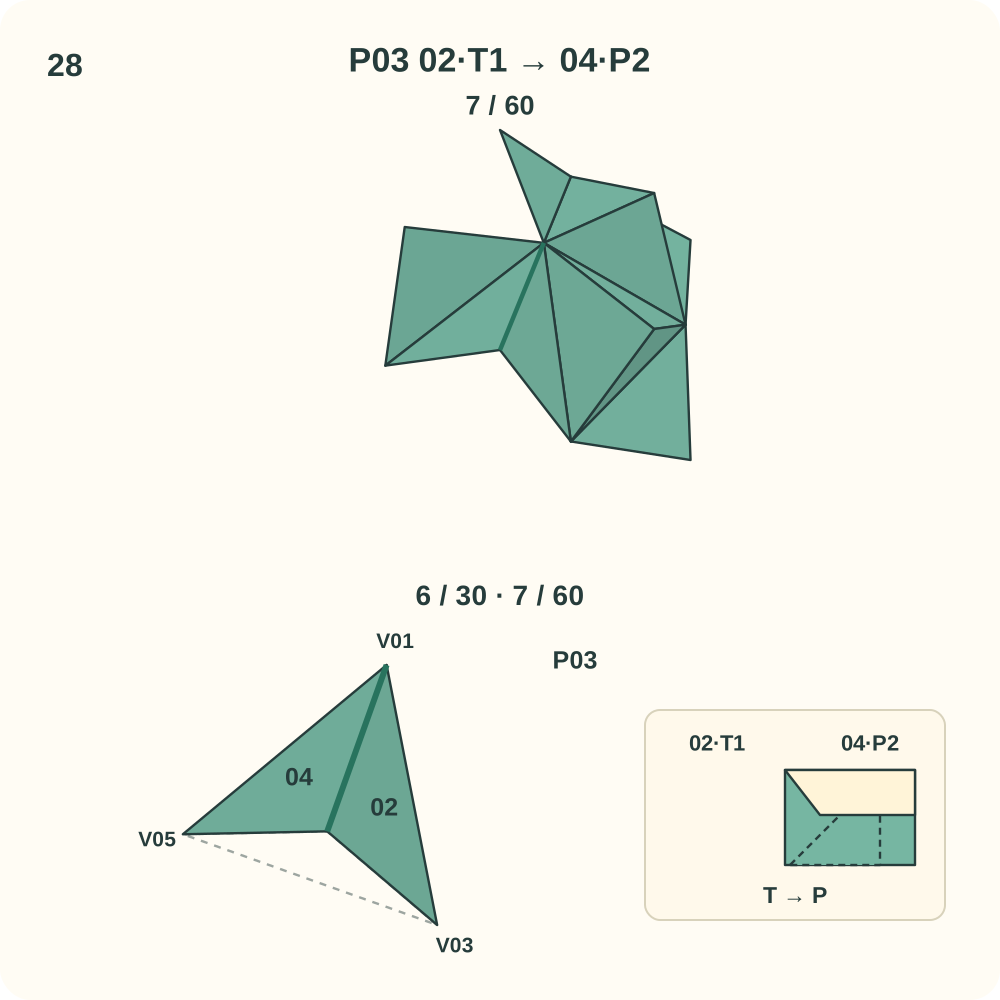
Join 7 of 60 is 02·T1 → 04·P2. Two other edges of this peak may still need a connection.
Step 29: Join 04·T2 to 10·P1
Bring in unit 10. At peak P03, lift the lip of 10·P1 beside V05 and guide 04·T2 underneath it. The tab hinges along the edge from V05 to the peak; its far tip heads toward V03. Leave the other loose tabs free while positioning the three halves around P03. Support the growing structure with your hands; the positions in the drawing do not mean its other joins are already closed.
Orientation: 04 S=P03, L=V05, R=V01. 10 Q=P03, R=V03, L=V05. Look toward P03; the lower left view enlarges this same peak. Orange marks only the moving tab.
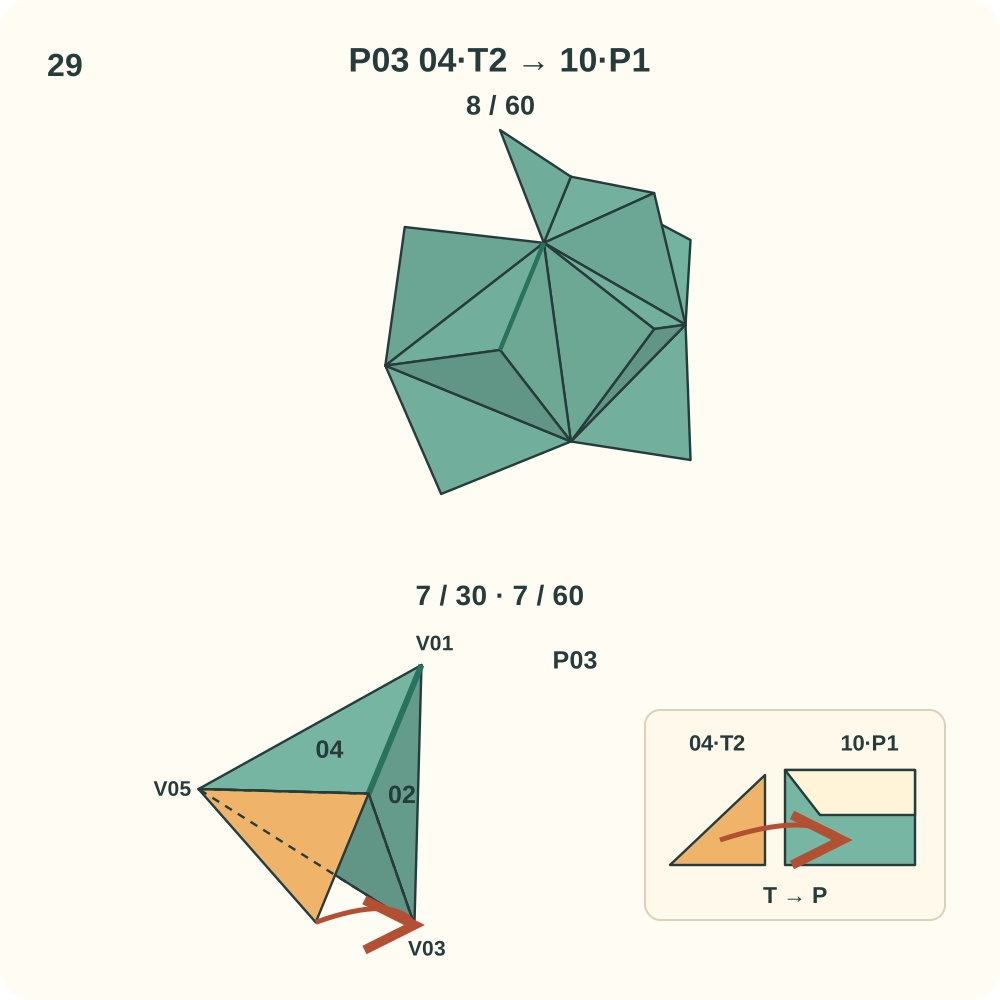
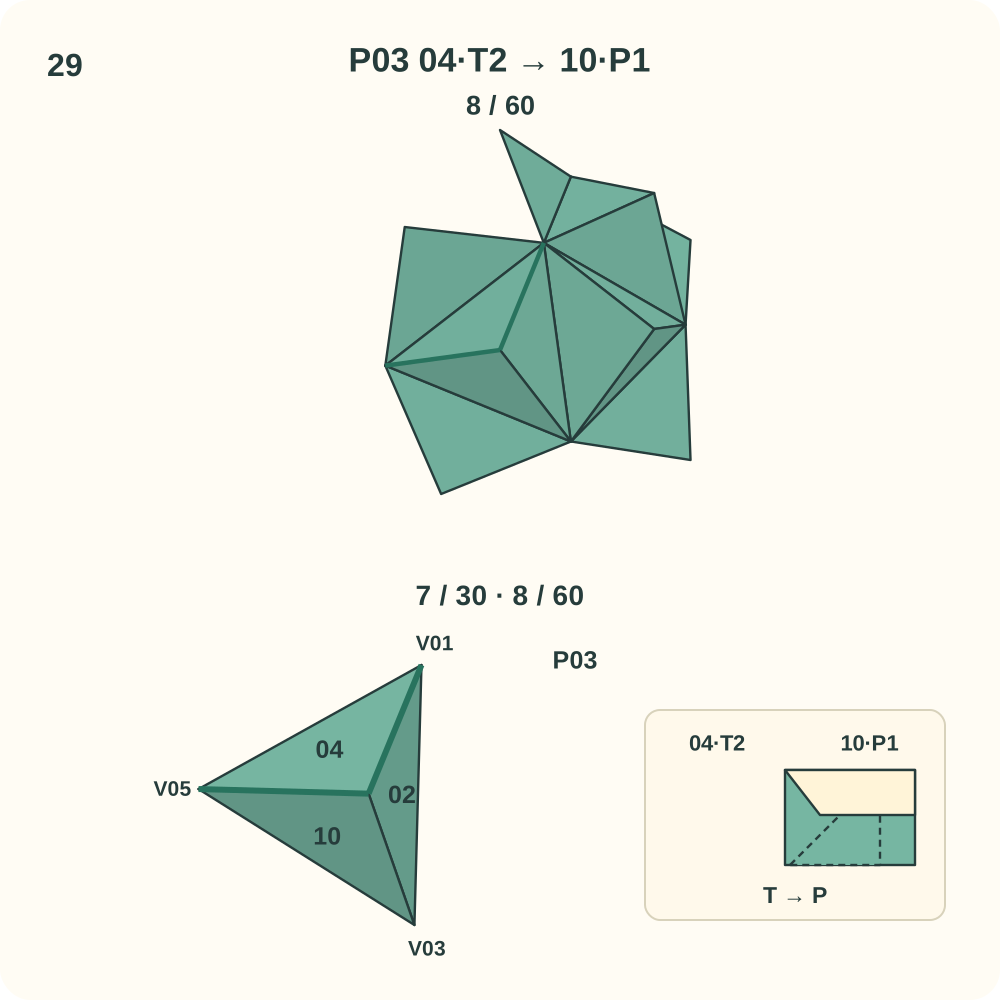
Join 8 of 60 is 04·T2 → 10·P1. Two other edges of this peak may still need a connection.
Step 30: Join 10·T1 to 02·P1
Keep the existing units in place. At peak P03, lift the lip of 02·P1 beside V03 and guide 10·T1 underneath it. The tab hinges along the edge from V03 to the peak; its far tip heads toward V01. This is the third join around P03; curve its three halves into one raised trihedral peak as you close the loop. Support the growing structure with your hands; the positions in the drawing do not mean its other joins are already closed.
Orientation: 10 Q=P03, R=V03, L=V05. 02 Q=P03, R=V01, L=V03. Look toward P03; the lower left view enlarges this same peak. Orange marks only the moving tab.
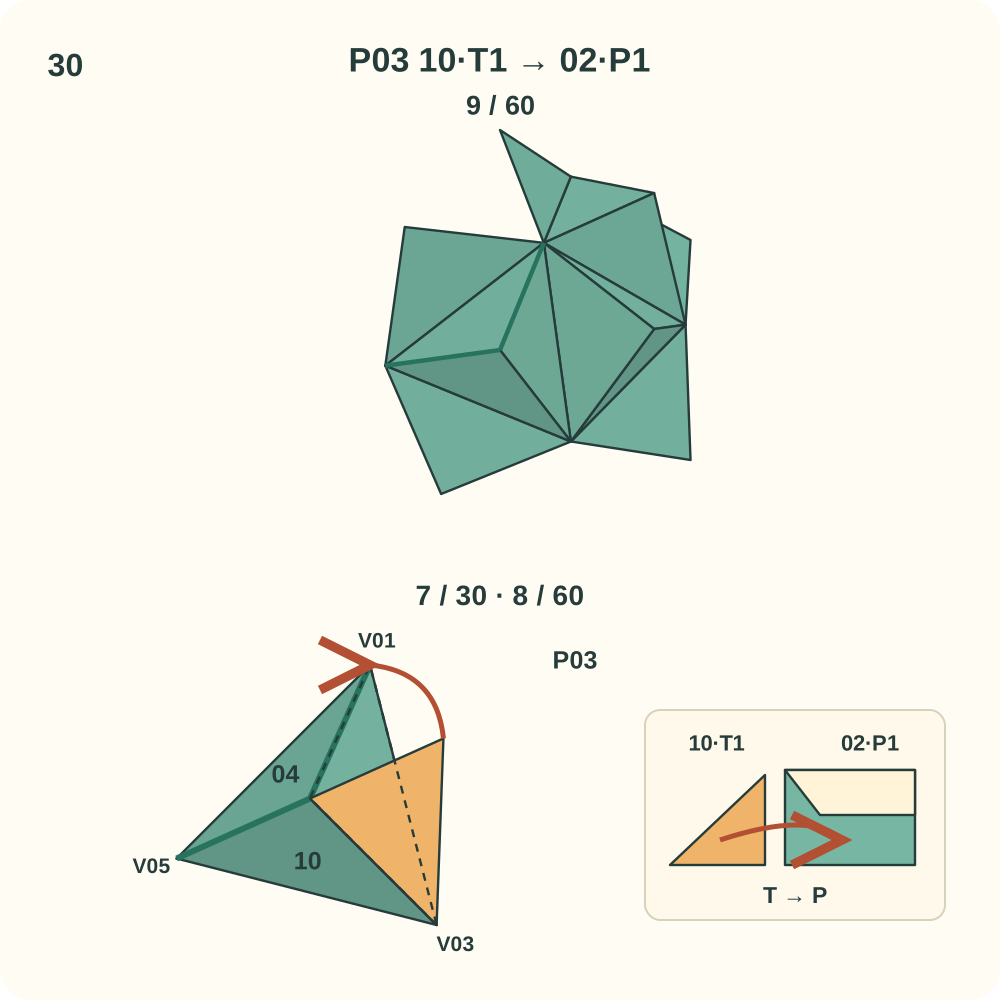
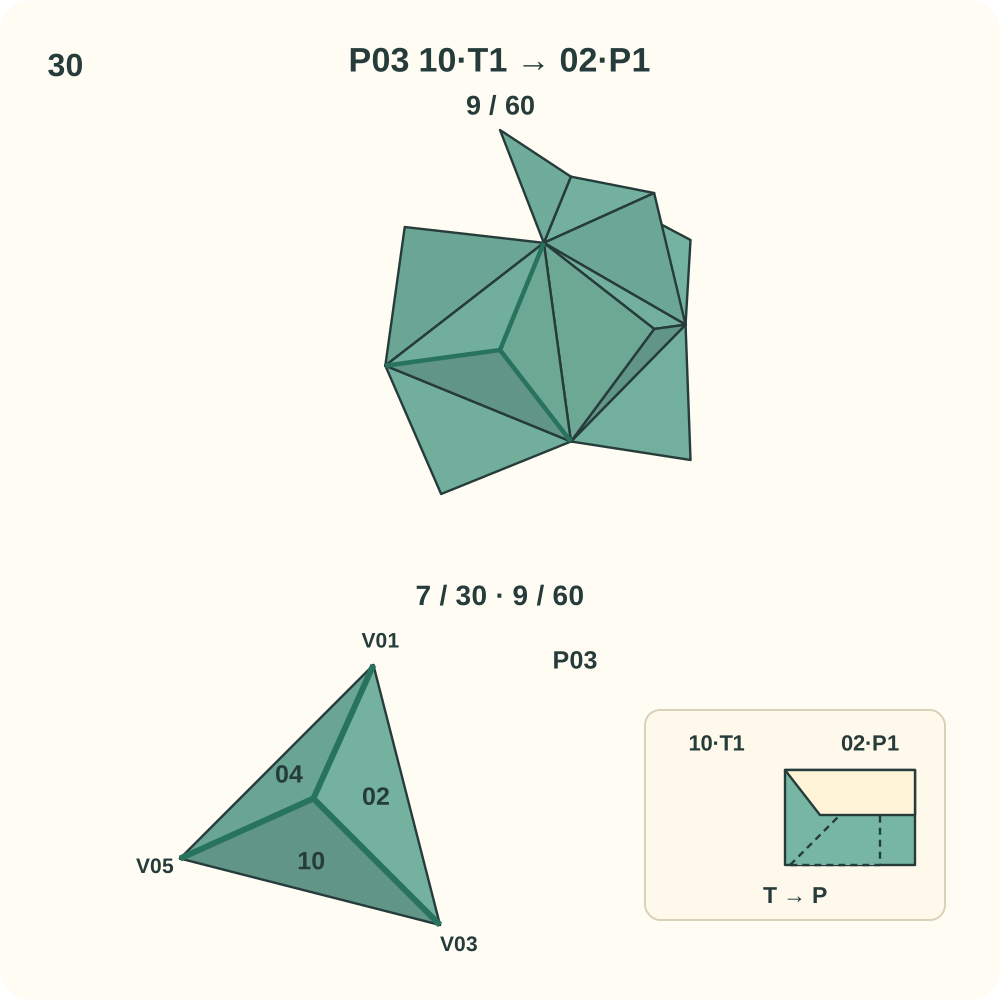
Join 9 of 60 is 10·T1 → 02·P1. Peak P03 now has its three directed joins.
Step 31: Join 03·T2 to 13·P2
Bring in unit 13. At peak P04, lift the lip of 13·P2 beside V04 and guide 03·T2 underneath it. The tab hinges along the edge from V04 to the peak; its far tip heads toward V07. Leave the other loose tabs free while positioning the three halves around P04. Support the growing structure with your hands; the positions in the drawing do not mean its other joins are already closed.
Orientation: 03 S=P04, L=V04, R=V01. 13 S=P04, L=V07, R=V04. Look toward P04; the lower left view enlarges this same peak. Orange marks only the moving tab.
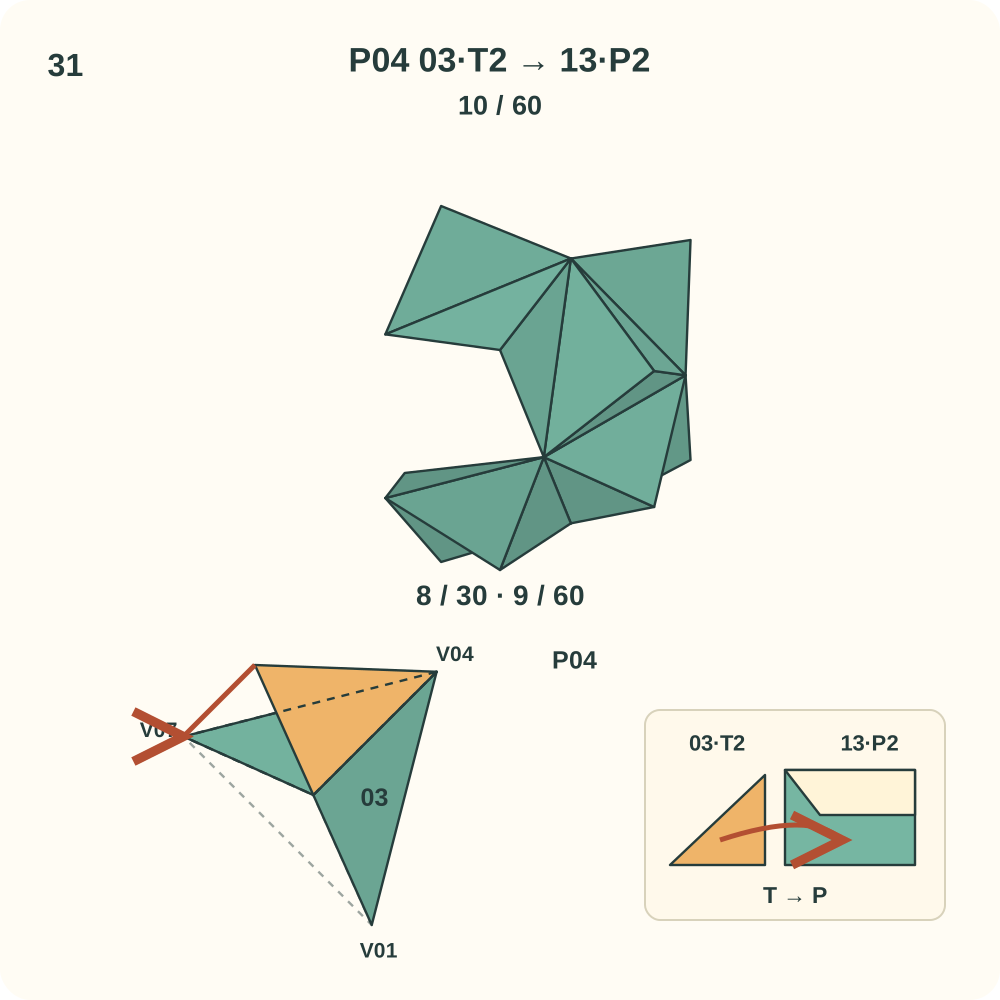
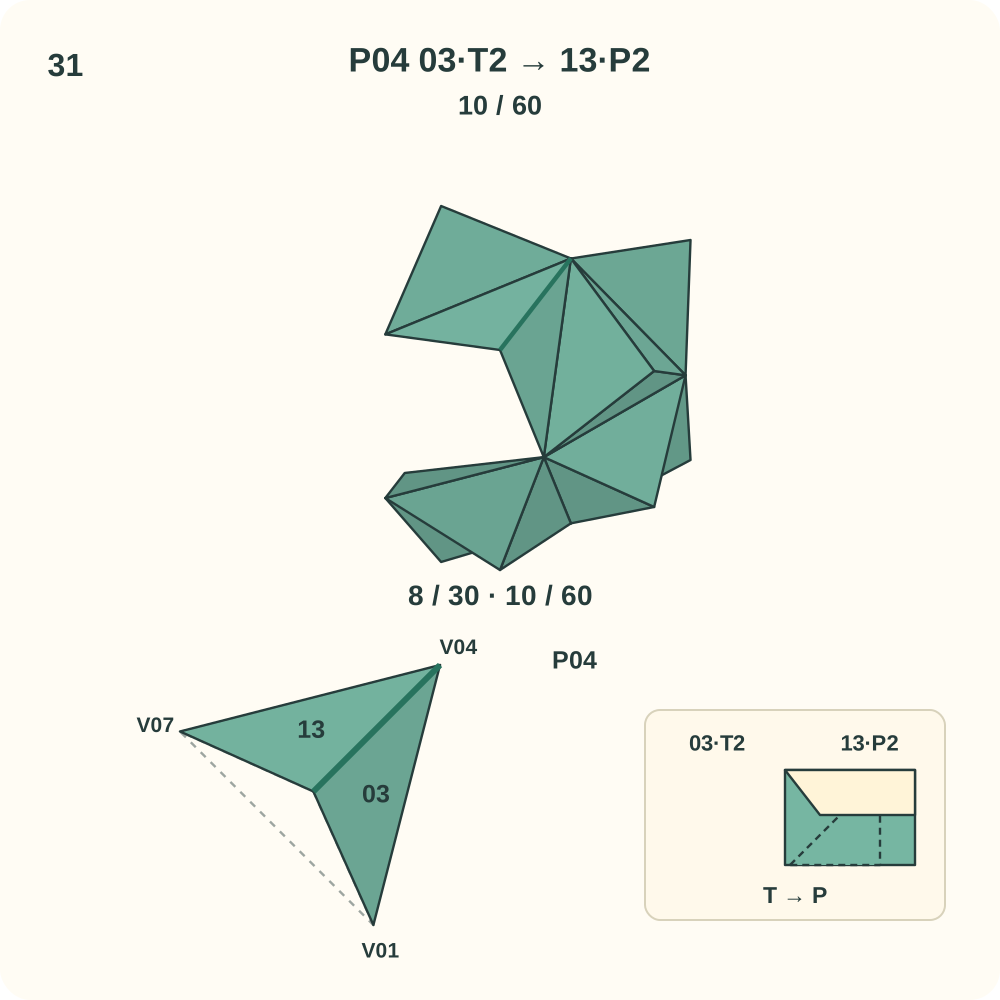
Join 10 of 60 is 03·T2 → 13·P2. Two other edges of this peak may still need a connection.
Step 32: Join 13·T2 to 05·P1
Bring in unit 05. At peak P04, lift the lip of 05·P1 beside V07 and guide 13·T2 underneath it. The tab hinges along the edge from V07 to the peak; its far tip heads toward V01. Leave the other loose tabs free while positioning the three halves around P04. Support the growing structure with your hands; the positions in the drawing do not mean its other joins are already closed.
Orientation: 13 S=P04, L=V07, R=V04. 05 Q=P04, R=V01, L=V07. Look toward P04; the lower left view enlarges this same peak. Orange marks only the moving tab.
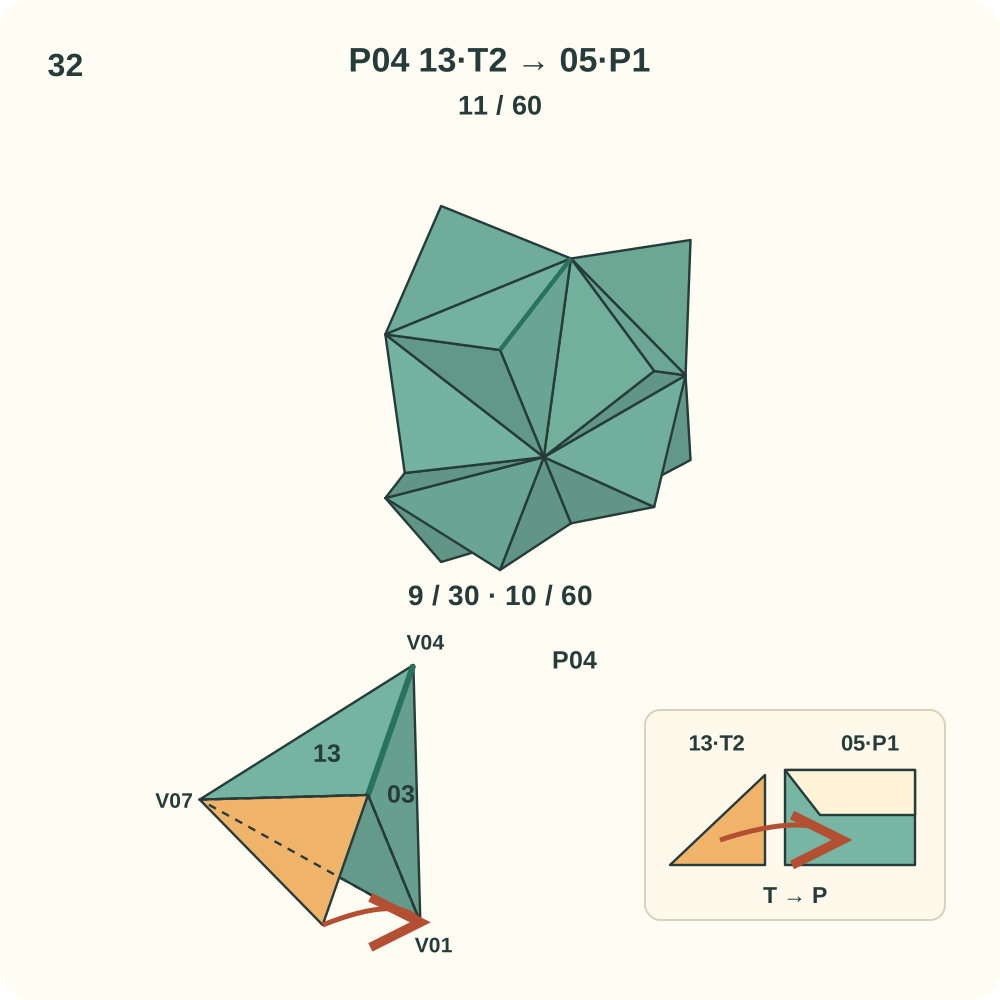
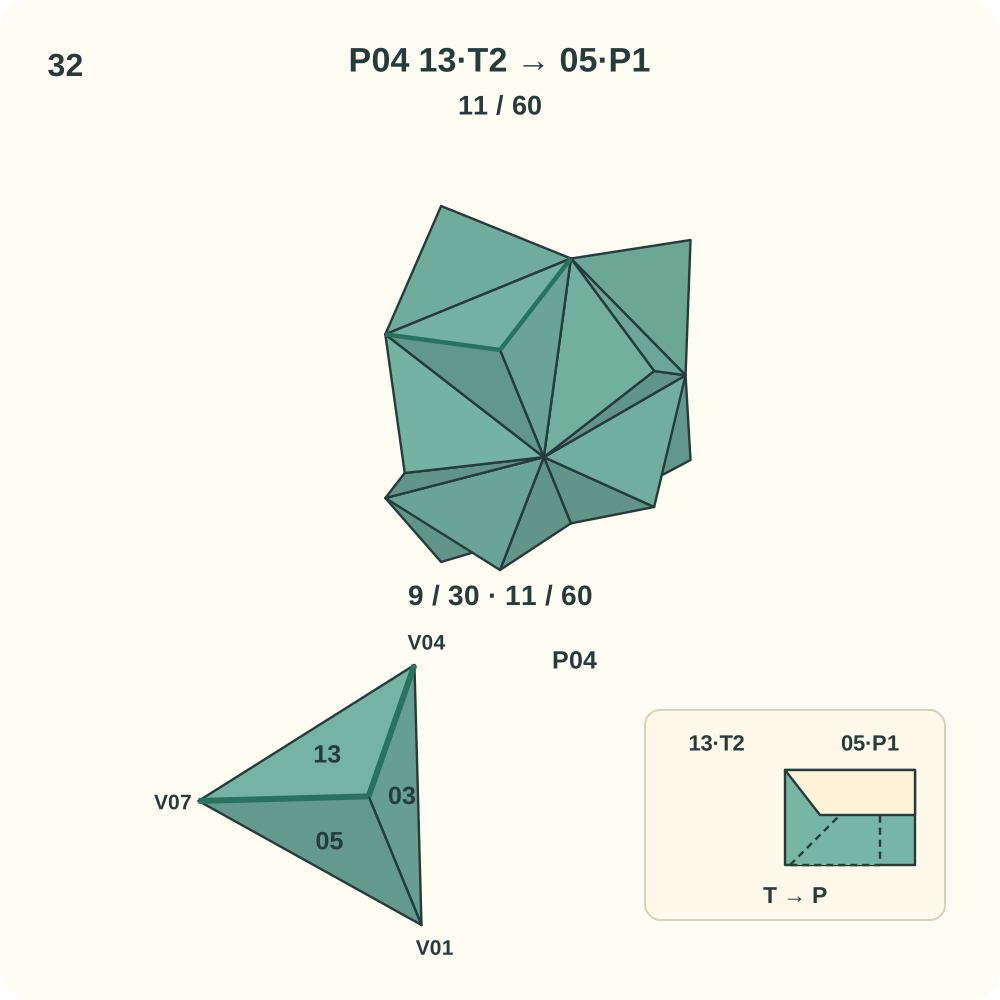
Join 11 of 60 is 13·T2 → 05·P1. Two other edges of this peak may still need a connection.
Step 33: Join 05·T1 to 03·P2
Keep the existing units in place. At peak P04, lift the lip of 03·P2 beside V01 and guide 05·T1 underneath it. The tab hinges along the edge from V01 to the peak; its far tip heads toward V04. This is the third join around P04; curve its three halves into one raised trihedral peak as you close the loop. Support the growing structure with your hands; the positions in the drawing do not mean its other joins are already closed.
Orientation: 05 Q=P04, R=V01, L=V07. 03 S=P04, L=V04, R=V01. Look toward P04; the lower left view enlarges this same peak. Orange marks only the moving tab.
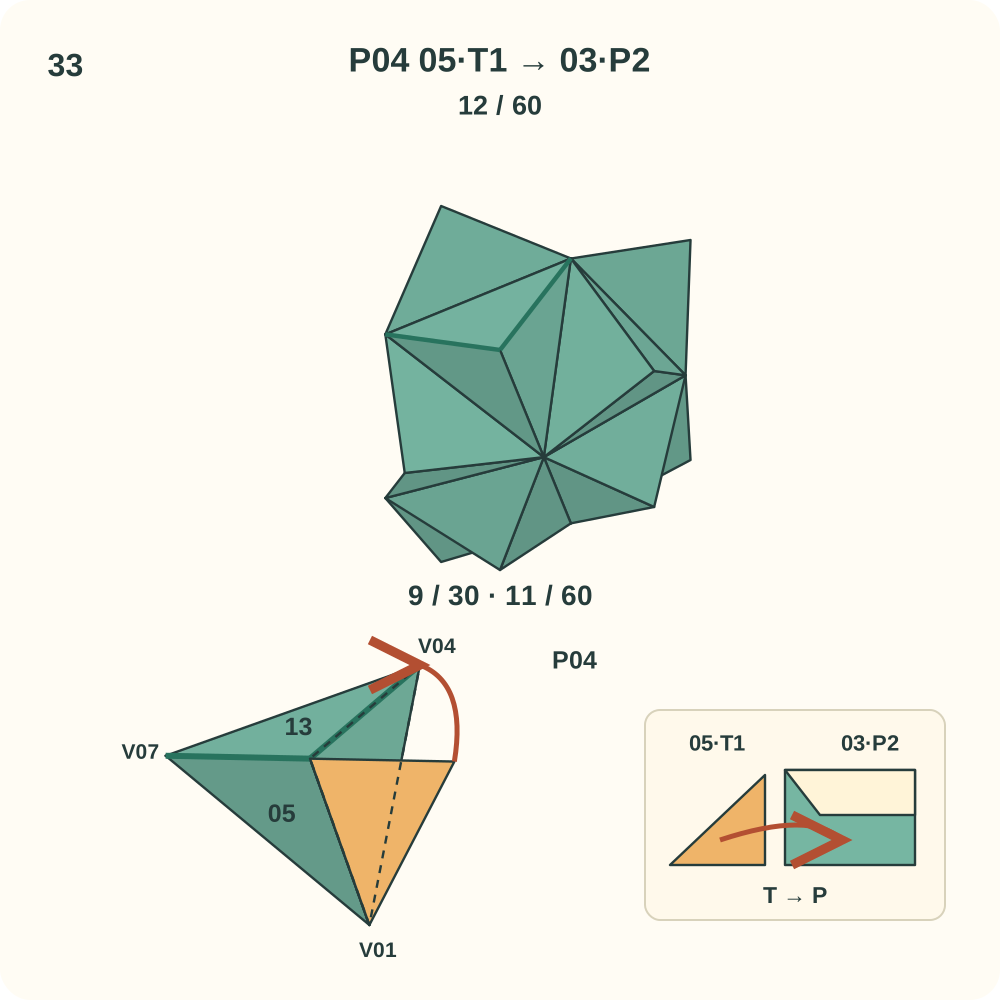
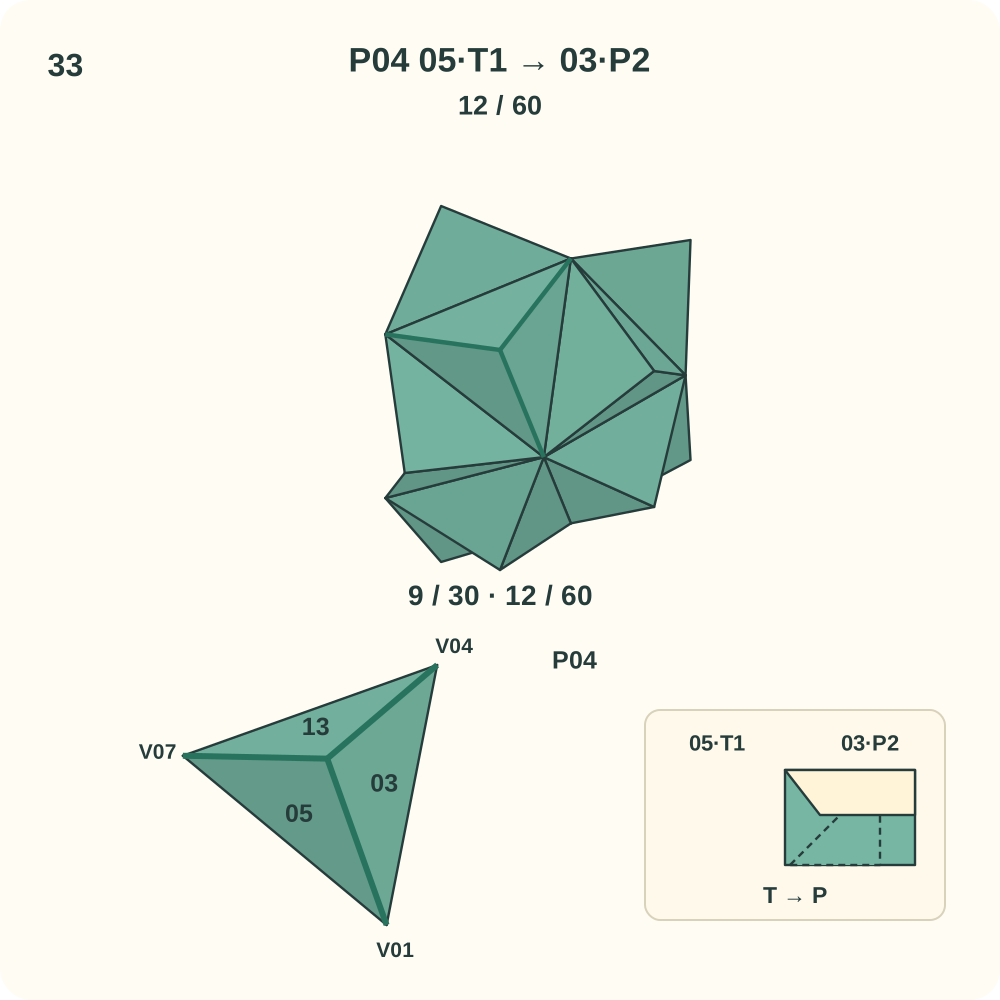
Join 12 of 60 is 05·T1 → 03·P2. Peak P04 now has its three directed joins.
Step 34: Join 05·T2 to 16·P1
Bring in unit 16. At peak P05, lift the lip of 16·P1 beside V07 and guide 05·T2 underneath it. The tab hinges along the edge from V07 to the peak; its far tip heads toward V05. Leave the other loose tabs free while positioning the three halves around P05. Support the growing structure with your hands; the positions in the drawing do not mean its other joins are already closed.
Orientation: 05 S=P05, L=V07, R=V01. 16 Q=P05, R=V05, L=V07. Look toward P05; the lower left view enlarges this same peak. Orange marks only the moving tab.
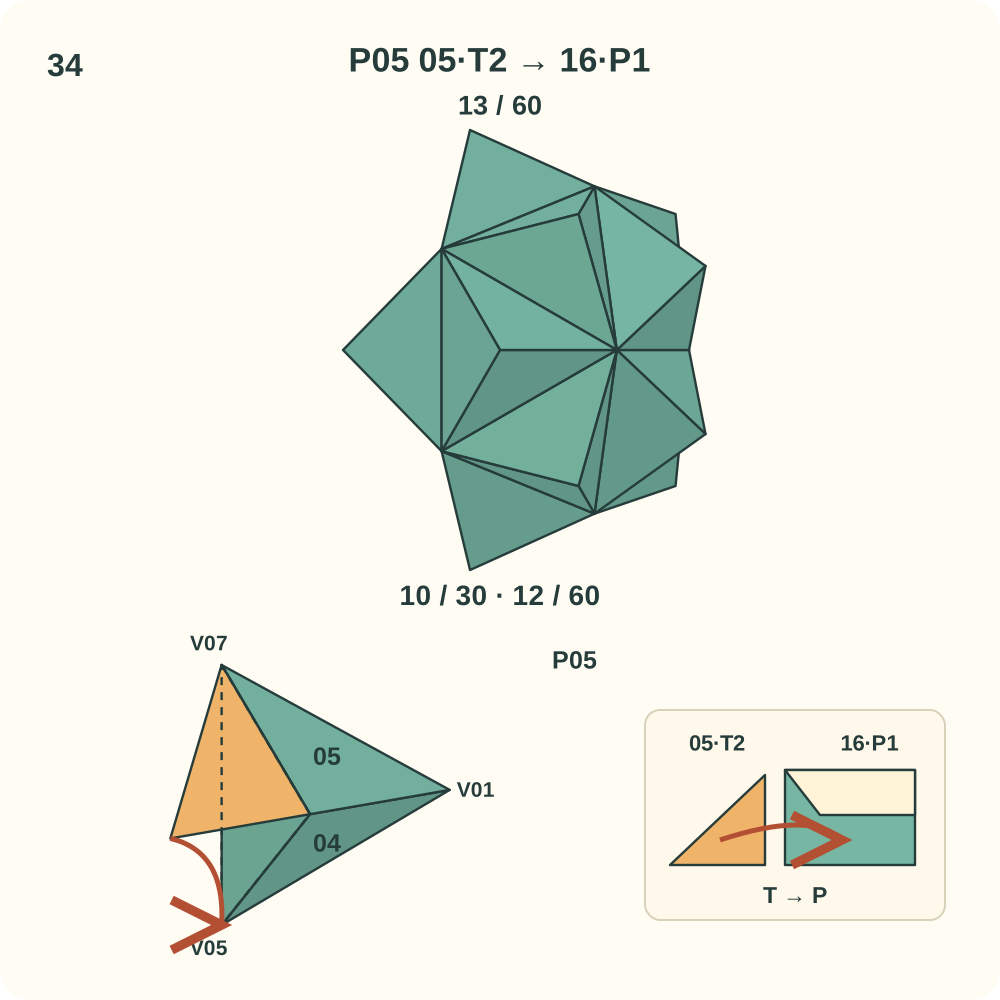
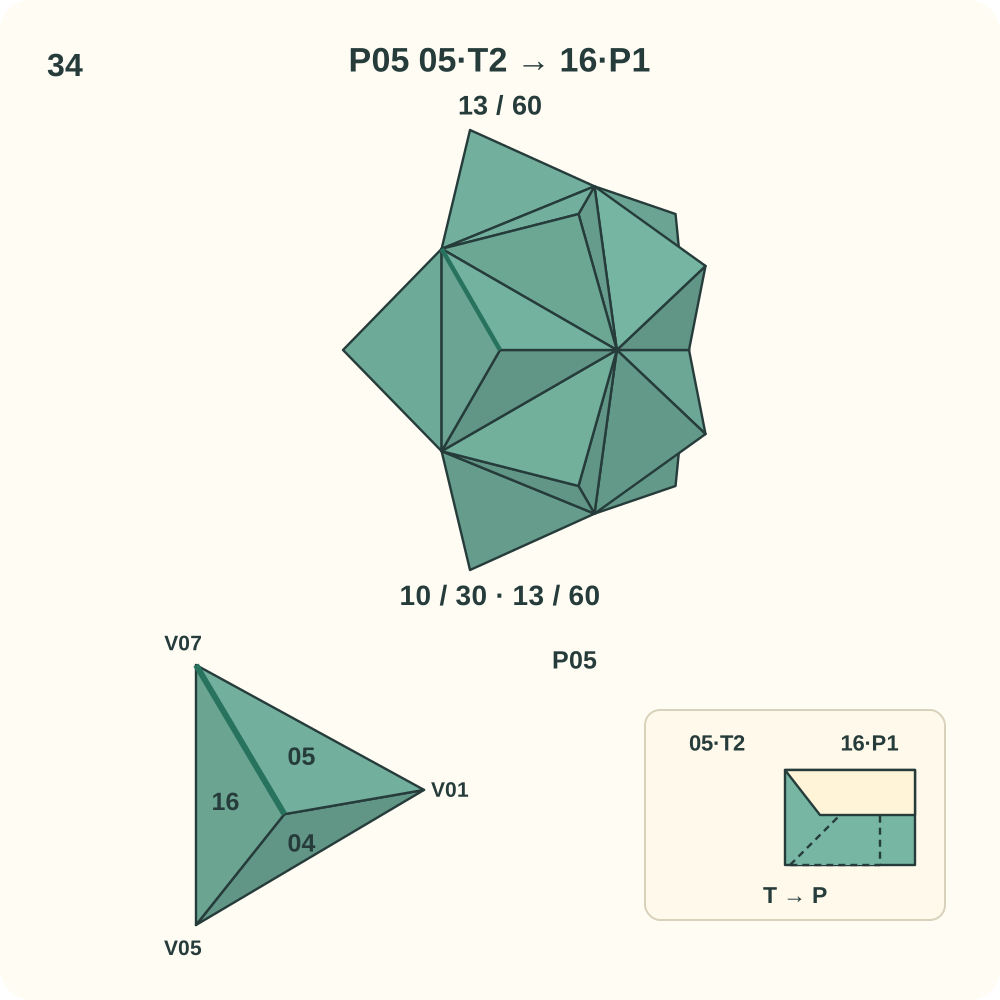
Join 13 of 60 is 05·T2 → 16·P1. Two other edges of this peak may still need a connection.
Step 35: Join 16·T1 to 04·P1
Keep the existing units in place. At peak P05, lift the lip of 04·P1 beside V05 and guide 16·T1 underneath it. The tab hinges along the edge from V05 to the peak; its far tip heads toward V01. Leave the other loose tabs free while positioning the three halves around P05. Support the growing structure with your hands; the positions in the drawing do not mean its other joins are already closed.
Orientation: 16 Q=P05, R=V05, L=V07. 04 Q=P05, R=V01, L=V05. Look toward P05; the lower left view enlarges this same peak. Orange marks only the moving tab.
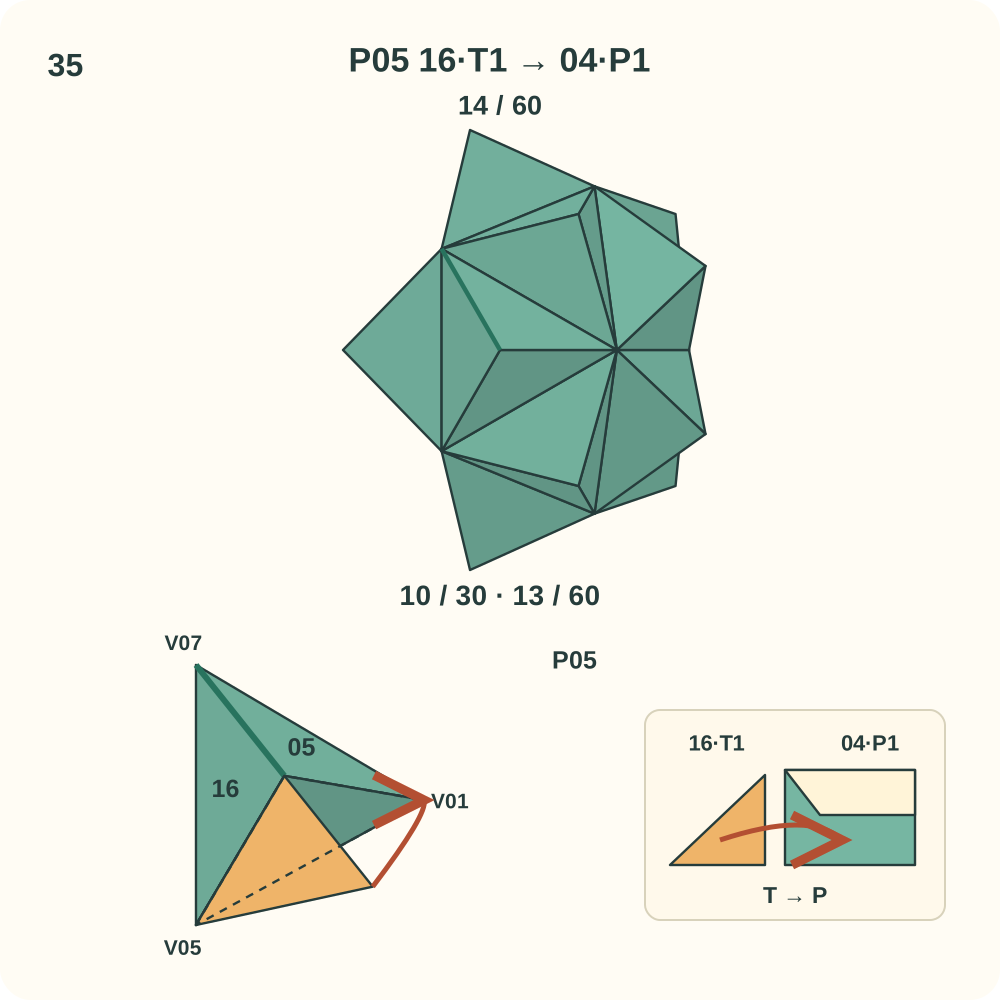
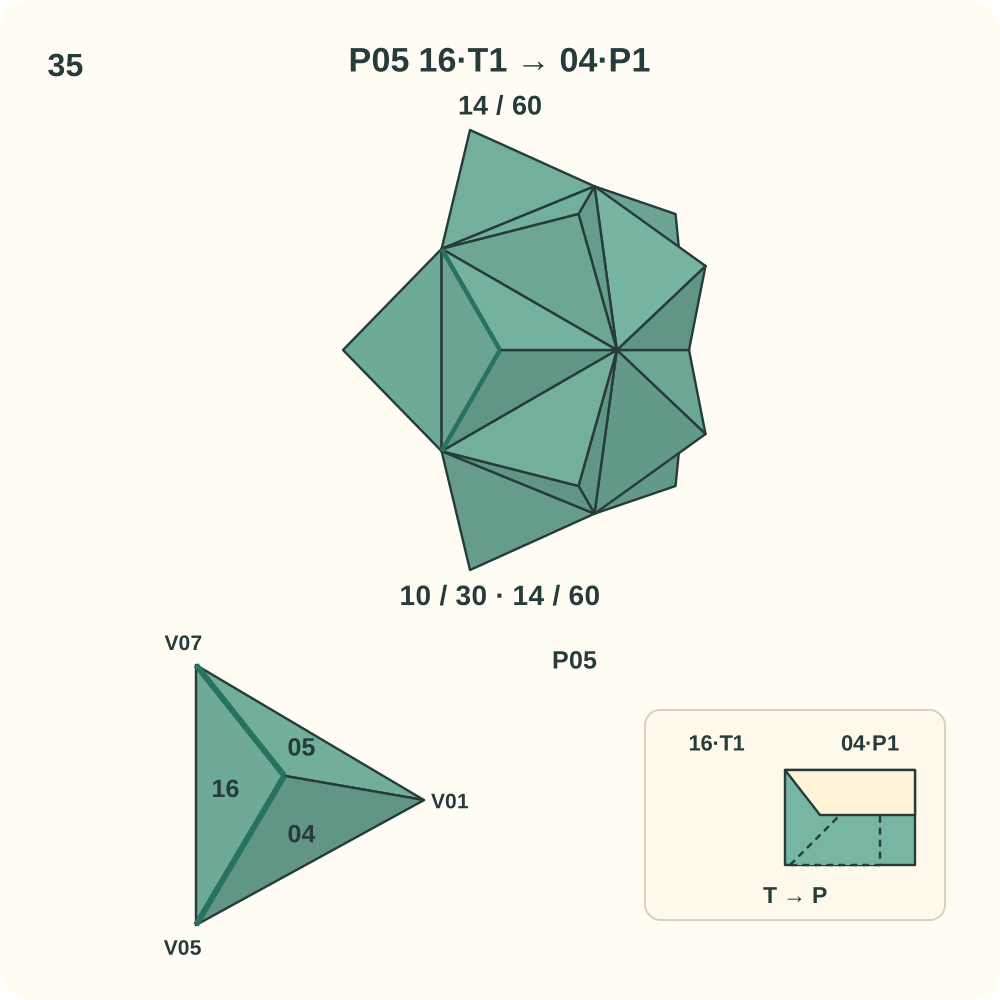
Join 14 of 60 is 16·T1 → 04·P1. Two other edges of this peak may still need a connection.
Step 36: Join 04·T1 to 05·P2
Keep the existing units in place. At peak P05, lift the lip of 05·P2 beside V01 and guide 04·T1 underneath it. The tab hinges along the edge from V01 to the peak; its far tip heads toward V07. This is the third join around P05; curve its three halves into one raised trihedral peak as you close the loop. Support the growing structure with your hands; the positions in the drawing do not mean its other joins are already closed.
Orientation: 04 Q=P05, R=V01, L=V05. 05 S=P05, L=V07, R=V01. Look toward P05; the lower left view enlarges this same peak. Orange marks only the moving tab.
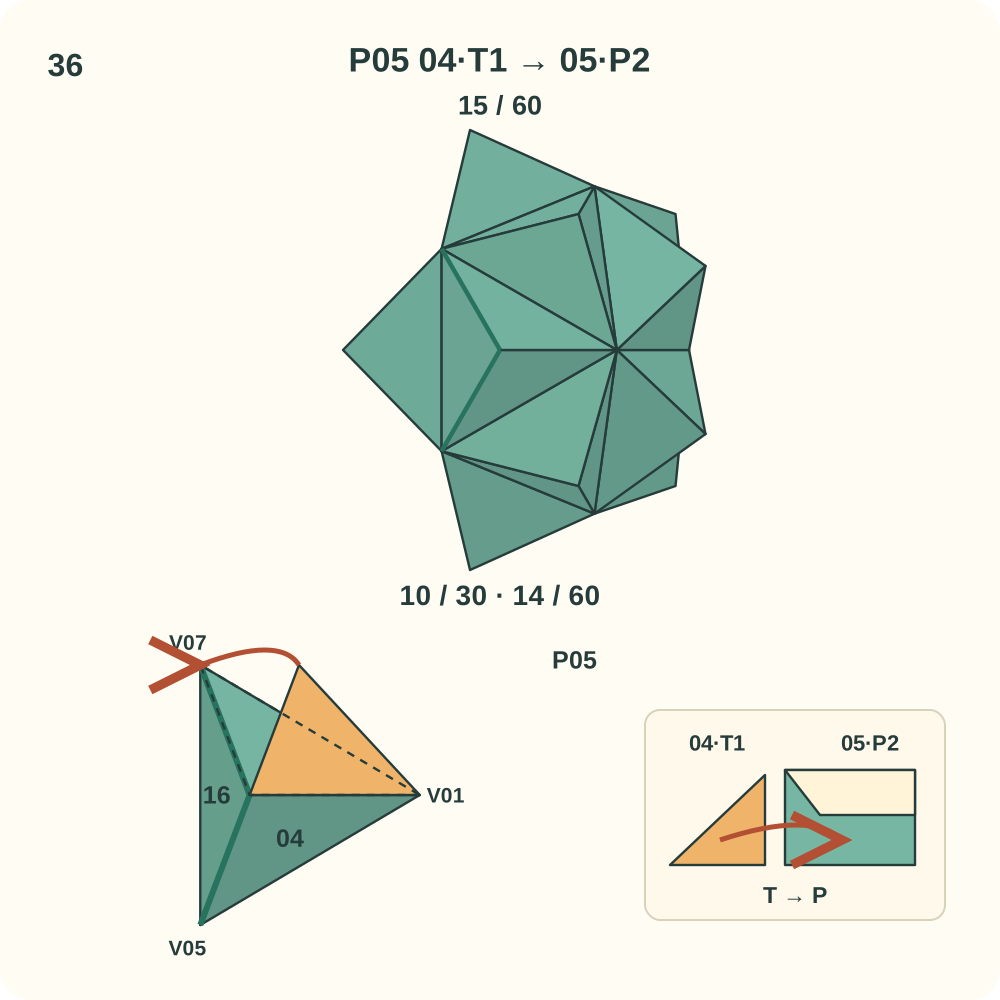
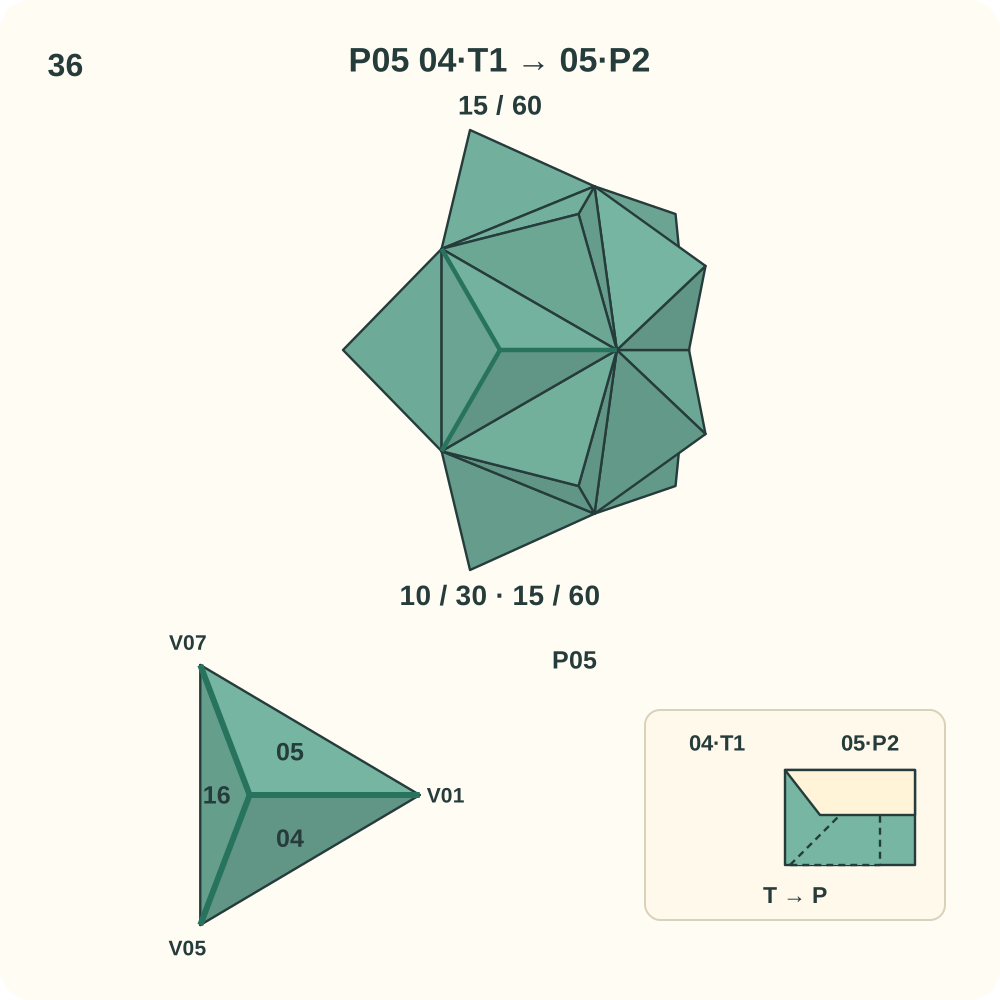
Join 15 of 60 is 04·T1 → 05·P2. Peak P05 now has its three directed joins.
Step 37: Join 06·T2 to 11·P2
Bring in unit 11. At peak P06, lift the lip of 11·P2 beside V03 and guide 06·T2 underneath it. The tab hinges along the edge from V03 to the peak; its far tip heads toward V06. Leave the other loose tabs free while positioning the three halves around P06. Support the growing structure with your hands; the positions in the drawing do not mean its other joins are already closed.
Orientation: 06 S=P06, L=V03, R=V02. 11 S=P06, L=V06, R=V03. Look toward P06; the lower left view enlarges this same peak. Orange marks only the moving tab.
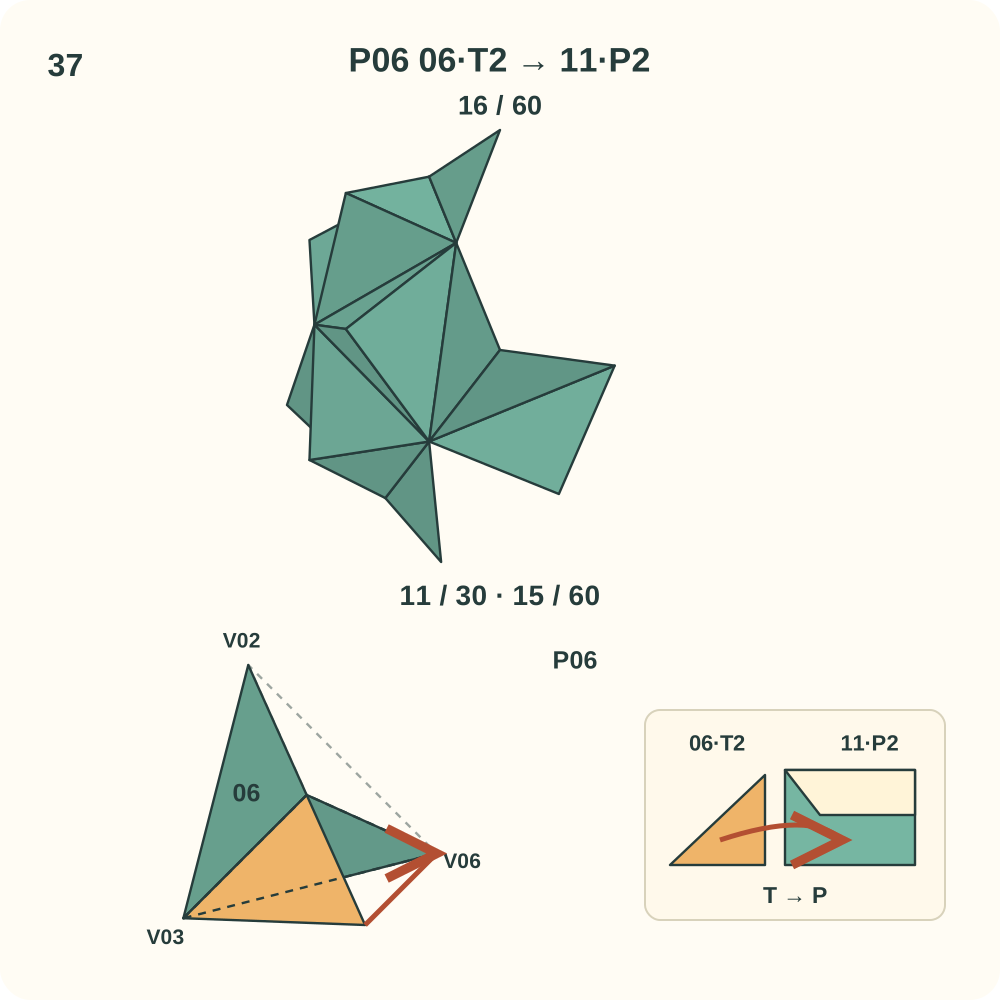
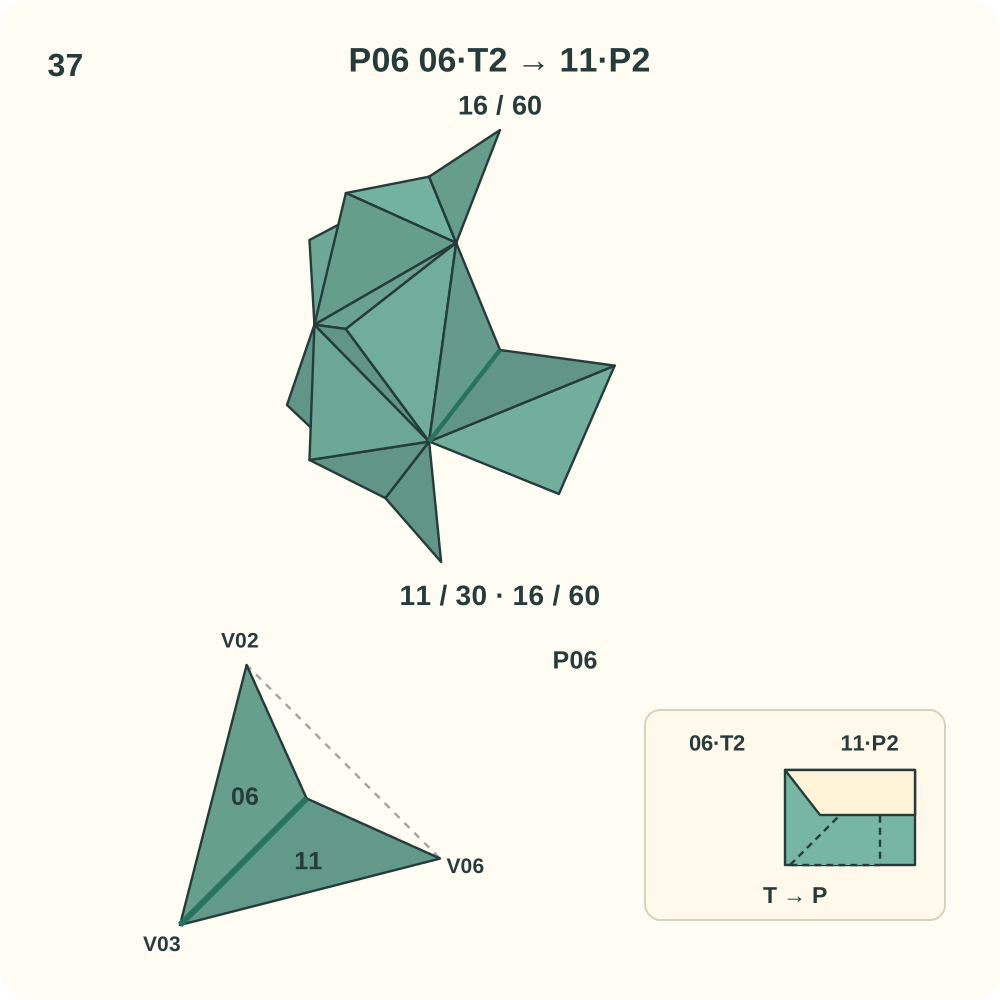
Join 16 of 60 is 06·T2 → 11·P2. Two other edges of this peak may still need a connection.
Step 38: Join 11·T2 to 08·P1
Bring in unit 08. At peak P06, lift the lip of 08·P1 beside V06 and guide 11·T2 underneath it. The tab hinges along the edge from V06 to the peak; its far tip heads toward V02. Leave the other loose tabs free while positioning the three halves around P06. Support the growing structure with your hands; the positions in the drawing do not mean its other joins are already closed.
Orientation: 11 S=P06, L=V06, R=V03. 08 Q=P06, R=V02, L=V06. Look toward P06; the lower left view enlarges this same peak. Orange marks only the moving tab.
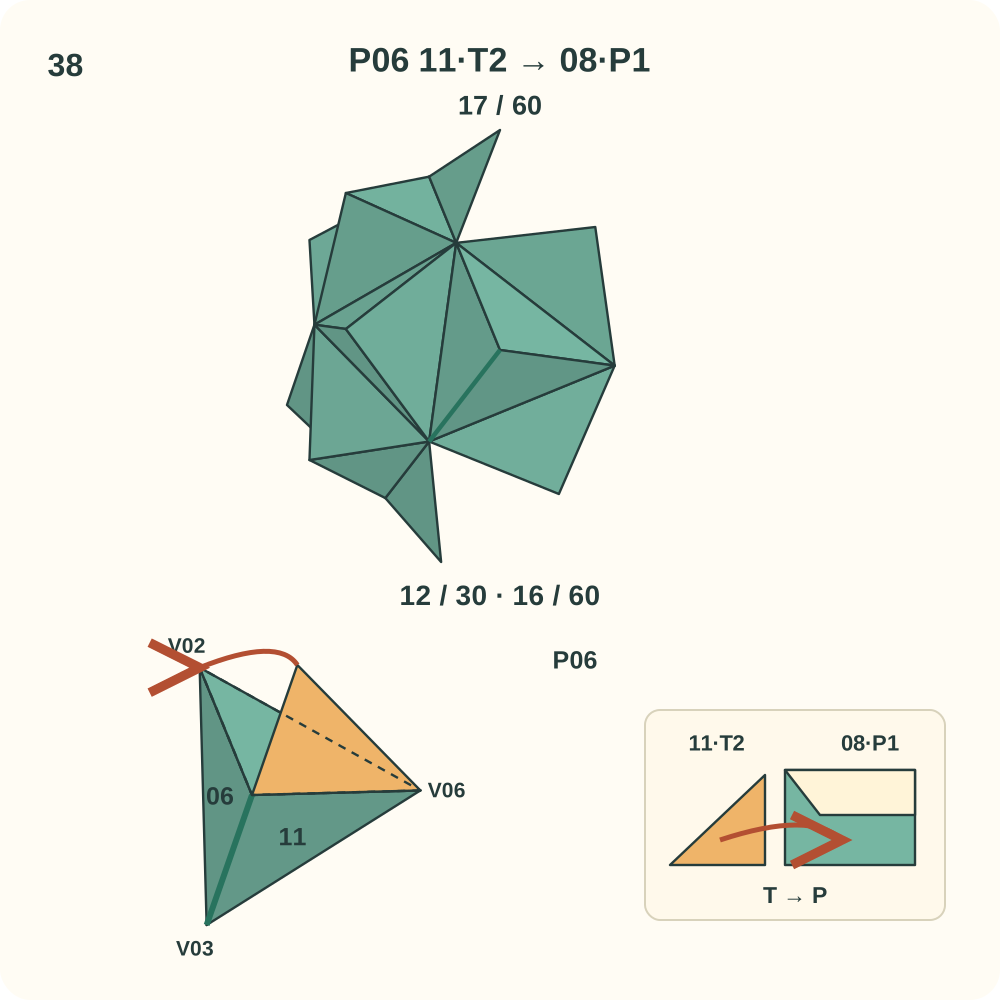
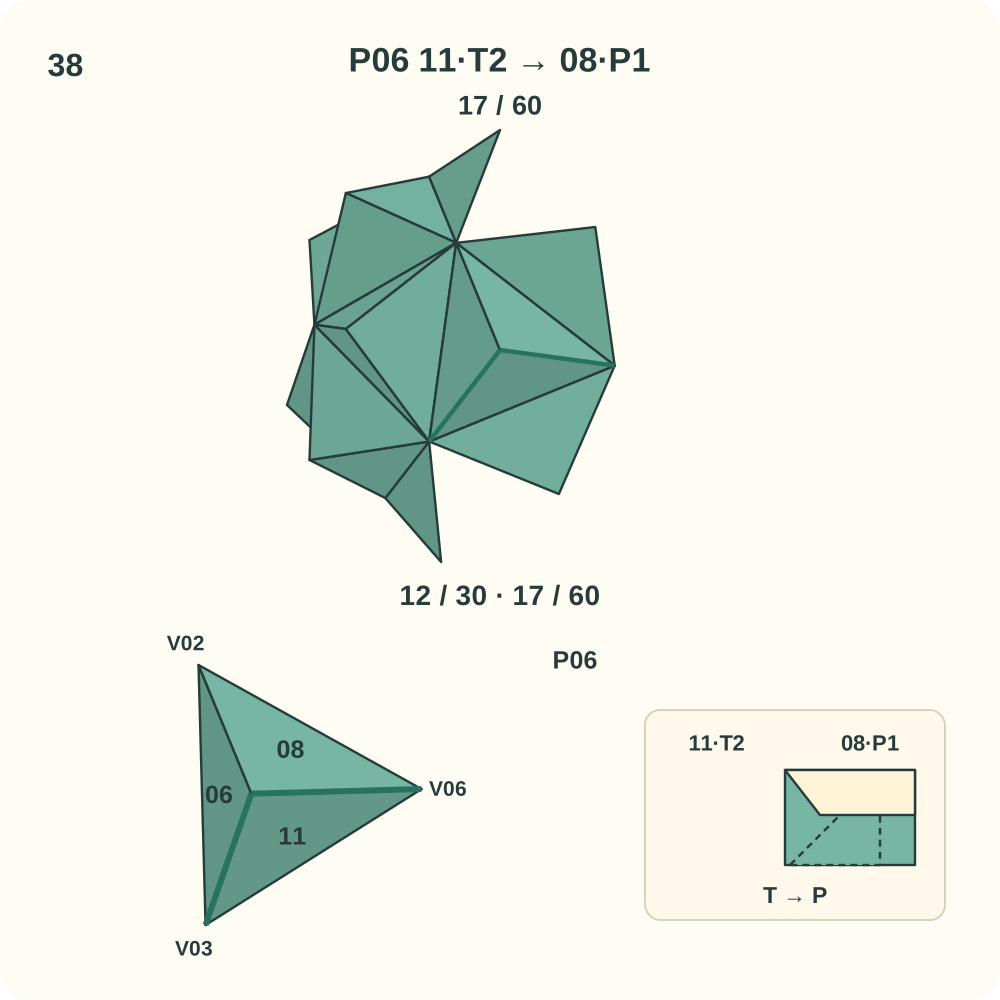
Join 17 of 60 is 11·T2 → 08·P1. Two other edges of this peak may still need a connection.
Step 39: Join 08·T1 to 06·P2
Keep the existing units in place. At peak P06, lift the lip of 06·P2 beside V02 and guide 08·T1 underneath it. The tab hinges along the edge from V02 to the peak; its far tip heads toward V03. This is the third join around P06; curve its three halves into one raised trihedral peak as you close the loop. Support the growing structure with your hands; the positions in the drawing do not mean its other joins are already closed.
Orientation: 08 Q=P06, R=V02, L=V06. 06 S=P06, L=V03, R=V02. Look toward P06; the lower left view enlarges this same peak. Orange marks only the moving tab.
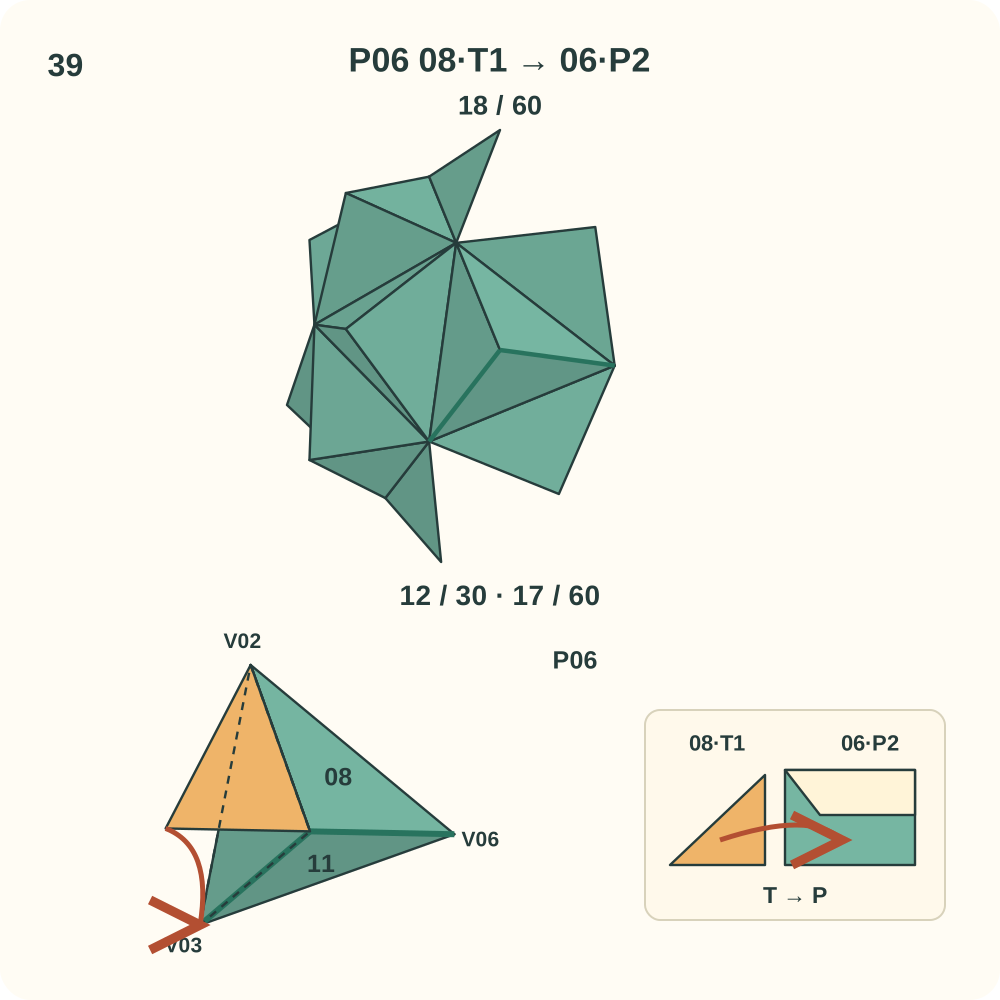
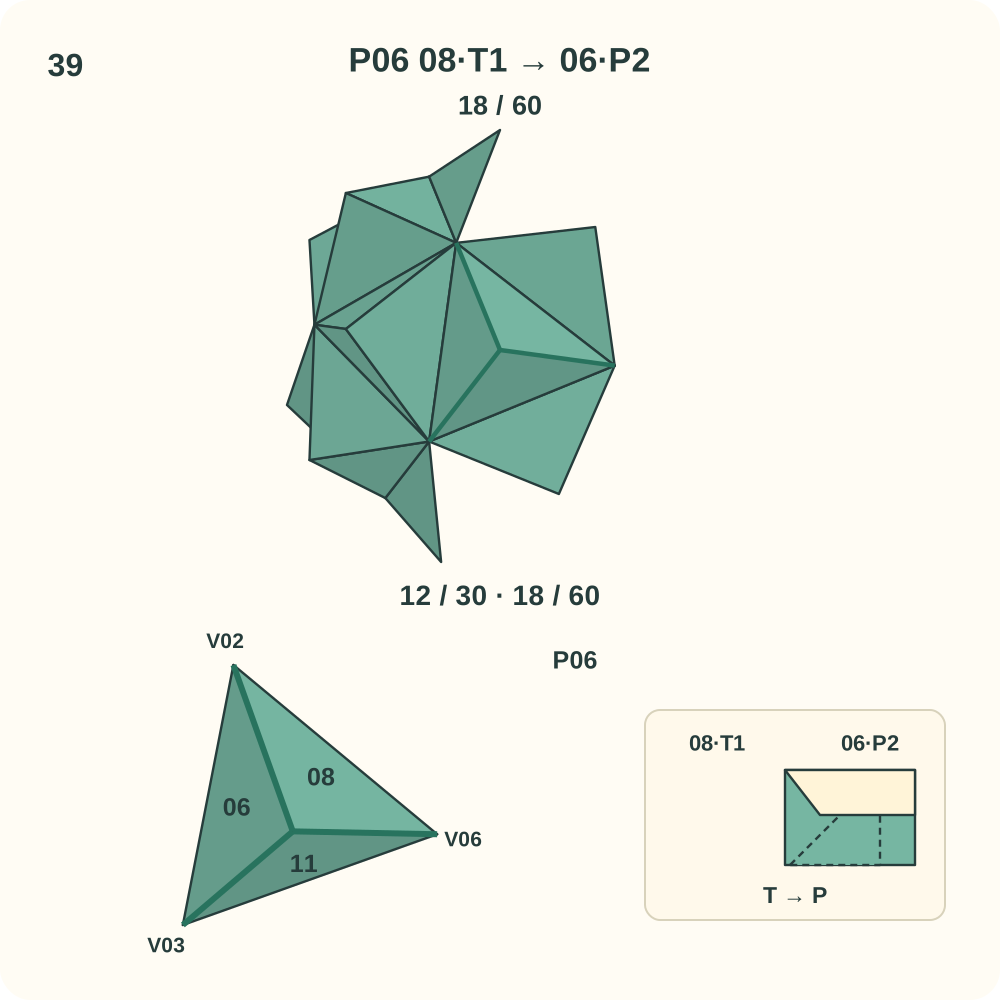
Join 18 of 60 is 08·T1 → 06·P2. Peak P06 now has its three directed joins.
Step 40: Join 07·T1 to 09·P2
Bring in unit 09. At peak P07, lift the lip of 09·P2 beside V02 and guide 07·T1 underneath it. The tab hinges along the edge from V02 to the peak; its far tip heads toward V08. Leave the other loose tabs free while positioning the three halves around P07. Support the growing structure with your hands; the positions in the drawing do not mean its other joins are already closed.
Orientation: 07 Q=P07, R=V02, L=V04. 09 S=P07, L=V08, R=V02. Look toward P07; the lower left view enlarges this same peak. Orange marks only the moving tab.
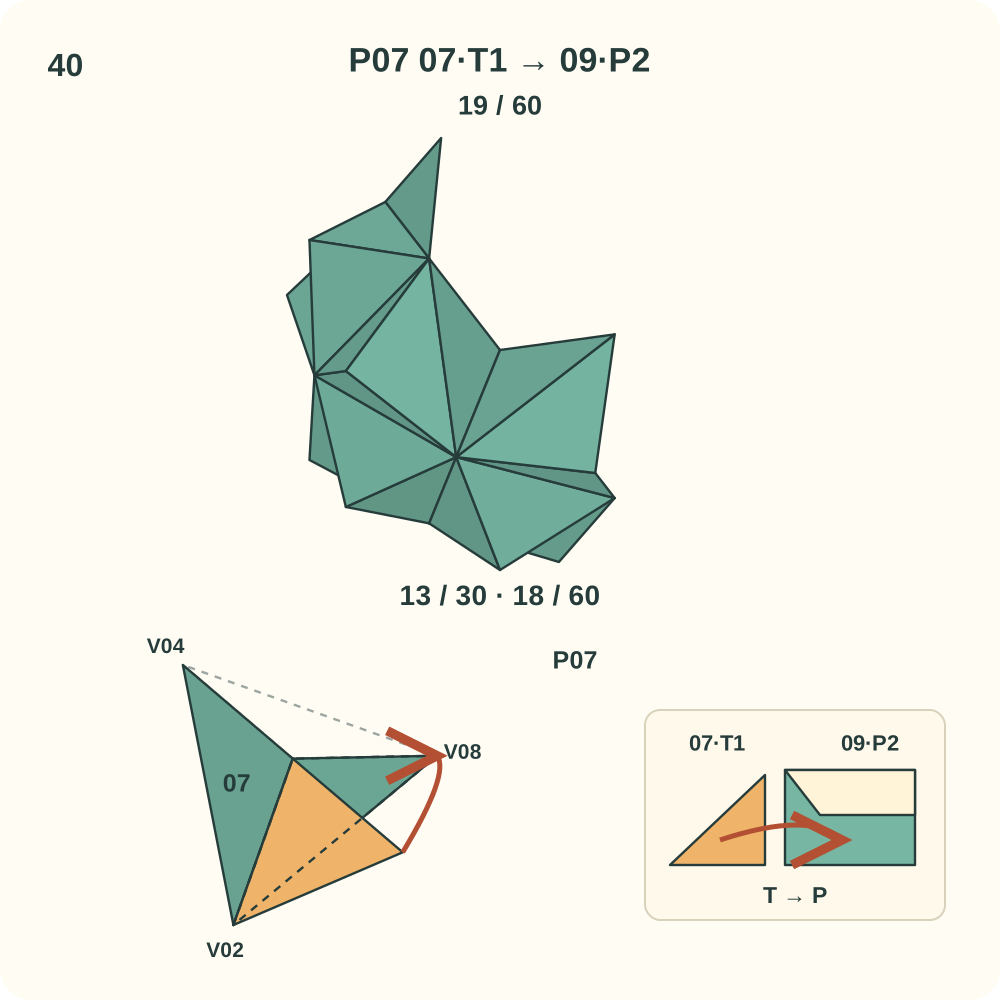
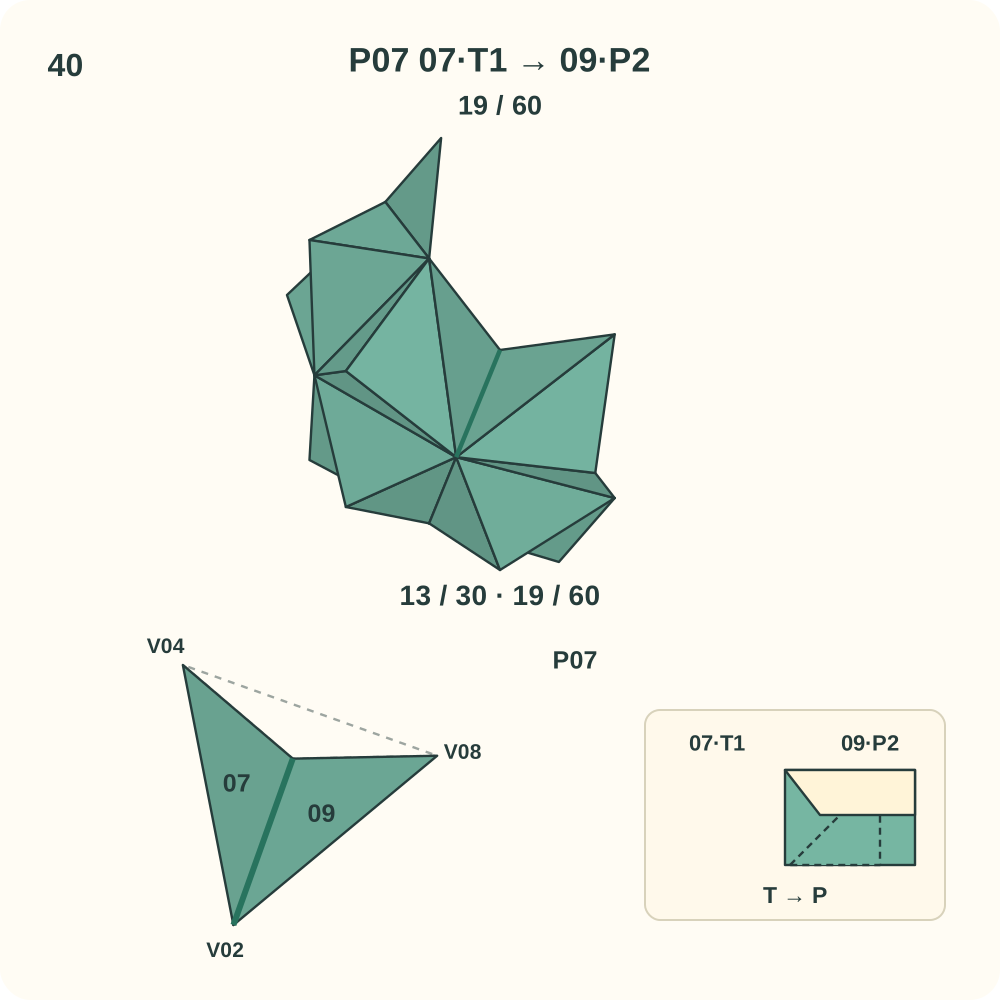
Join 19 of 60 is 07·T1 → 09·P2. Two other edges of this peak may still need a connection.
Step 41: Join 09·T2 to 14·P1
Bring in unit 14. At peak P07, lift the lip of 14·P1 beside V08 and guide 09·T2 underneath it. The tab hinges along the edge from V08 to the peak; its far tip heads toward V04. Leave the other loose tabs free while positioning the three halves around P07. Support the growing structure with your hands; the positions in the drawing do not mean its other joins are already closed.
Orientation: 09 S=P07, L=V08, R=V02. 14 Q=P07, R=V04, L=V08. Look toward P07; the lower left view enlarges this same peak. Orange marks only the moving tab.
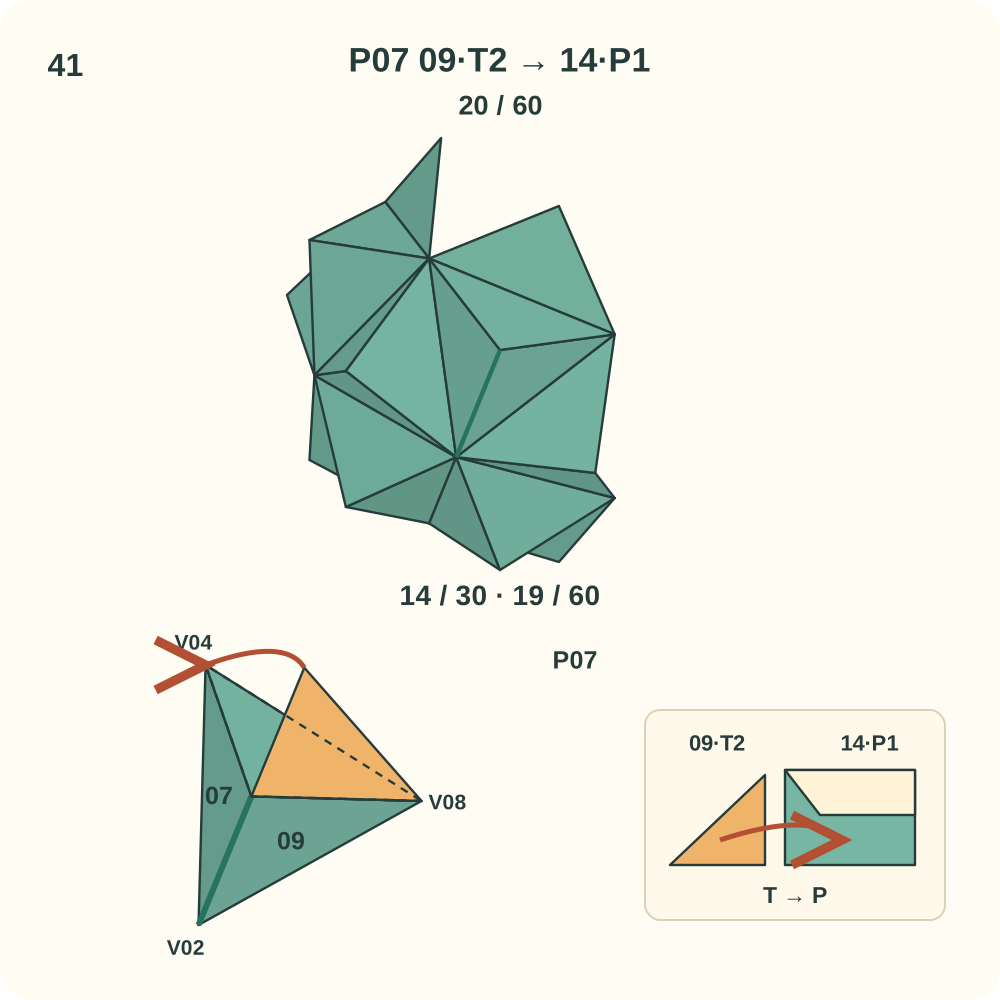
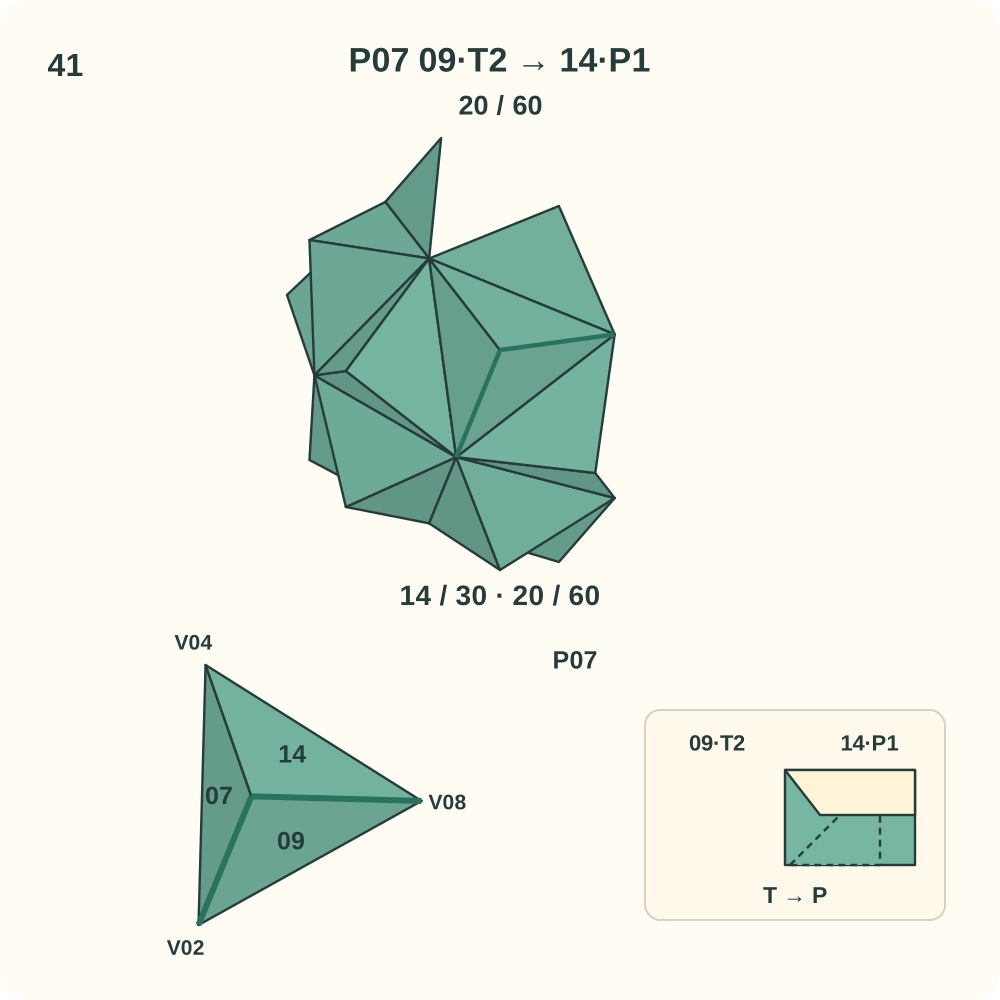
Join 20 of 60 is 09·T2 → 14·P1. Two other edges of this peak may still need a connection.
Step 42: Join 14·T1 to 07·P1
Keep the existing units in place. At peak P07, lift the lip of 07·P1 beside V04 and guide 14·T1 underneath it. The tab hinges along the edge from V04 to the peak; its far tip heads toward V02. This is the third join around P07; curve its three halves into one raised trihedral peak as you close the loop. Support the growing structure with your hands; the positions in the drawing do not mean its other joins are already closed.
Orientation: 14 Q=P07, R=V04, L=V08. 07 Q=P07, R=V02, L=V04. Look toward P07; the lower left view enlarges this same peak. Orange marks only the moving tab.
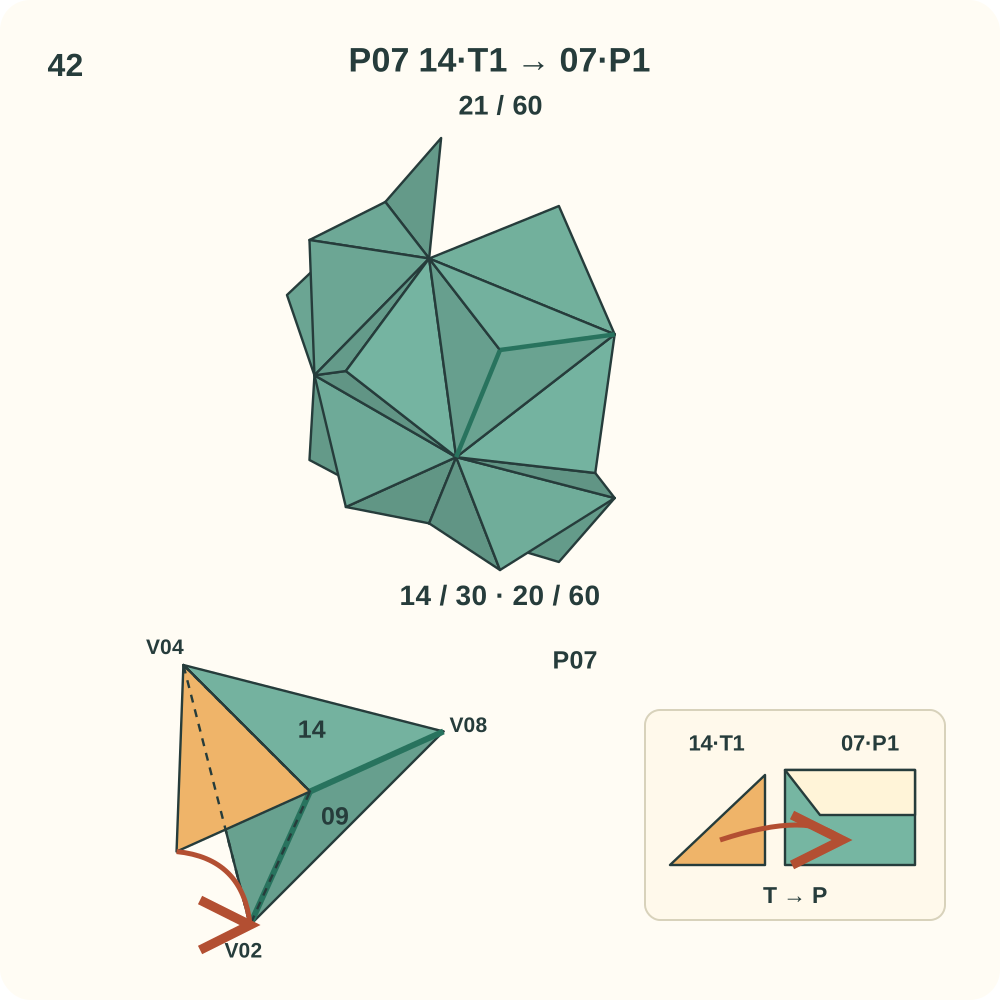
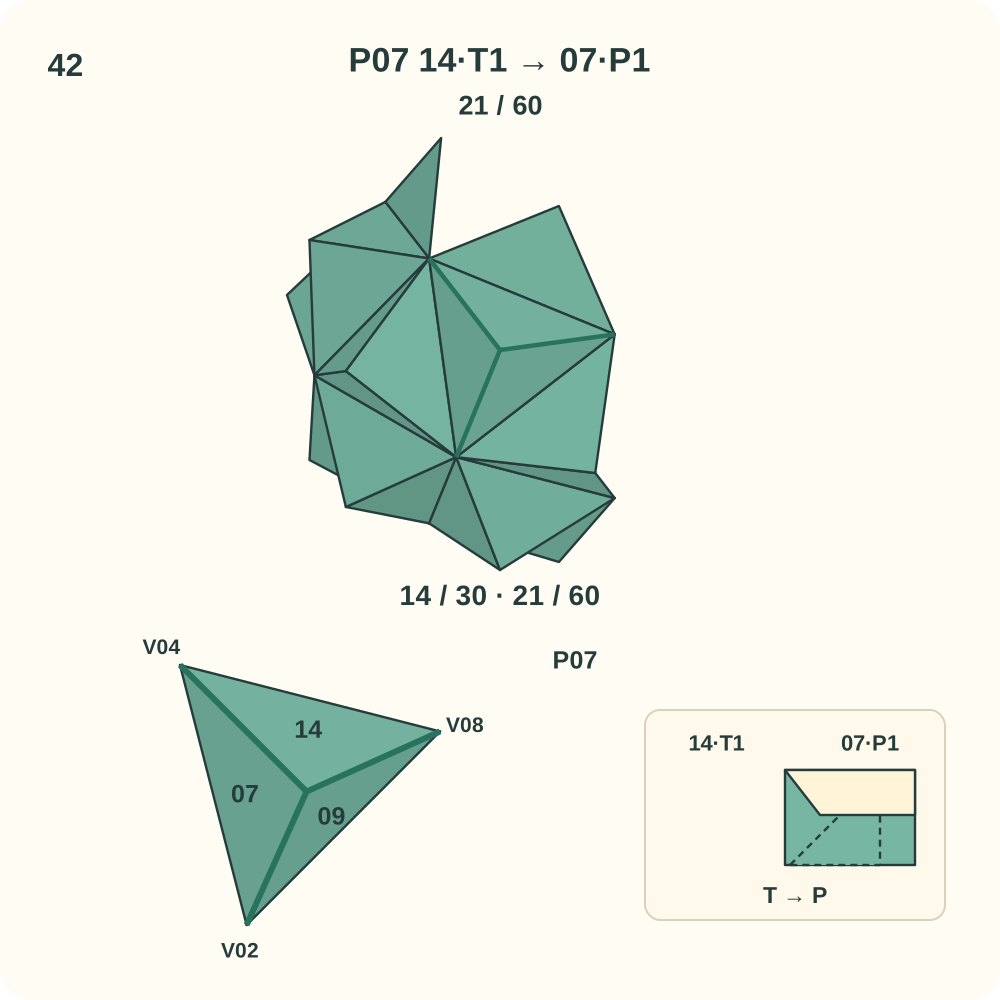
Join 21 of 60 is 14·T1 → 07·P1. Peak P07 now has its three directed joins.
Step 43: Join 08·T2 to 19·P2
Bring in unit 19. At peak P08, lift the lip of 19·P2 beside V06 and guide 08·T2 underneath it. The tab hinges along the edge from V06 to the peak; its far tip heads toward V08. Leave the other loose tabs free while positioning the three halves around P08. Support the growing structure with your hands; the positions in the drawing do not mean its other joins are already closed.
Orientation: 08 S=P08, L=V06, R=V02. 19 S=P08, L=V08, R=V06. Look toward P08; the lower left view enlarges this same peak. Orange marks only the moving tab.
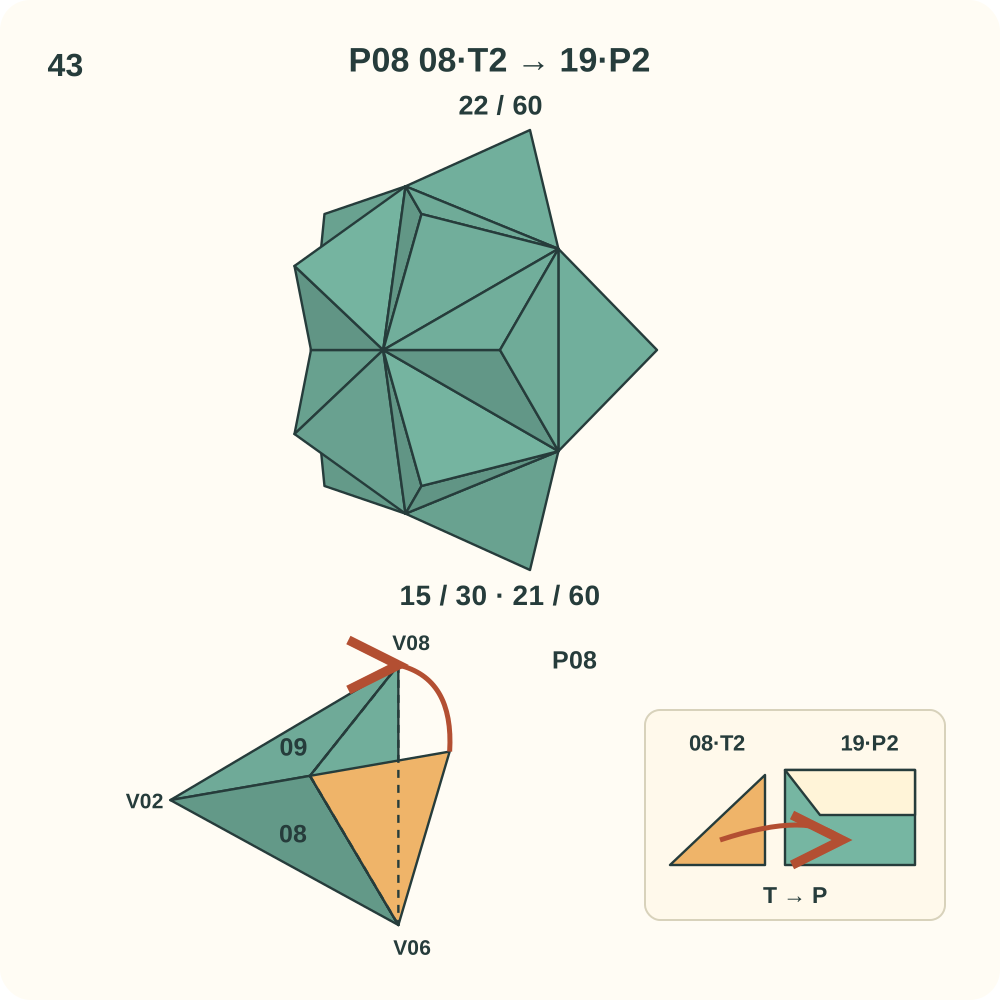
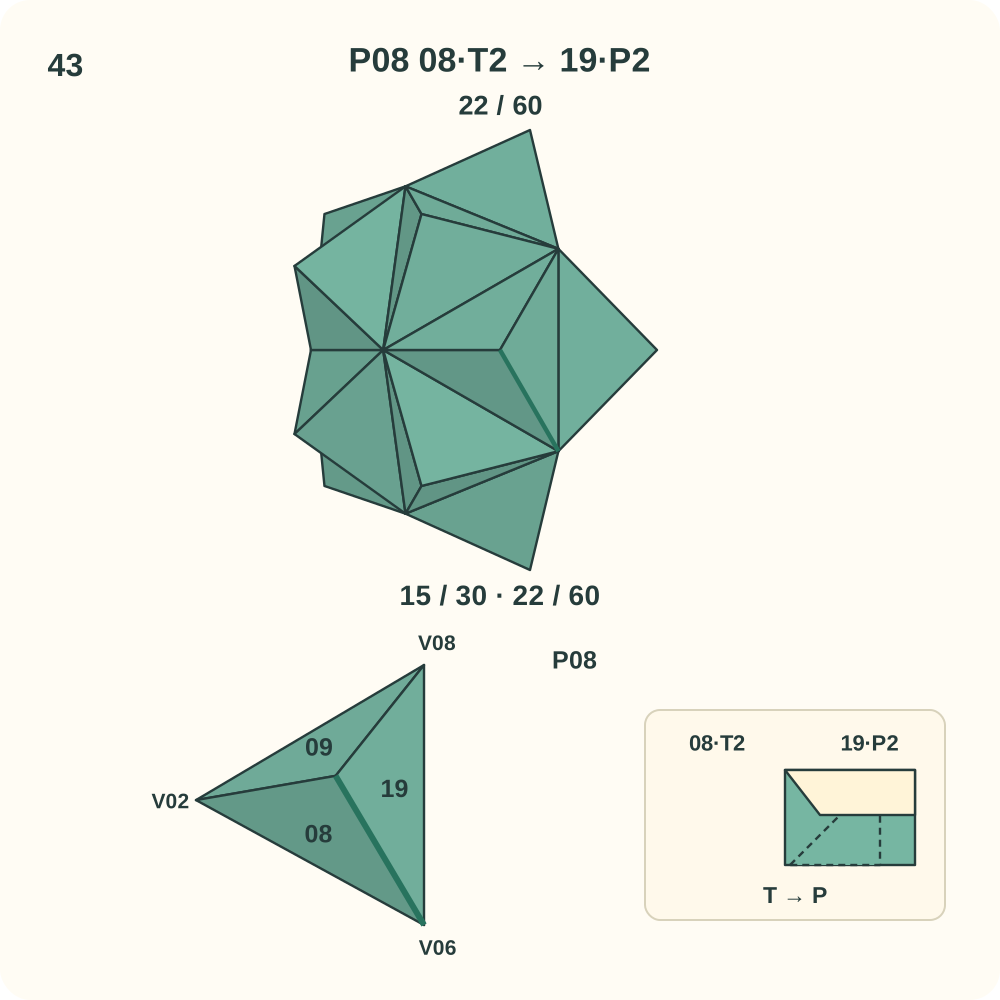
Join 22 of 60 is 08·T2 → 19·P2. Two other edges of this peak may still need a connection.
Step 44: Join 19·T2 to 09·P1
Keep the existing units in place. At peak P08, lift the lip of 09·P1 beside V08 and guide 19·T2 underneath it. The tab hinges along the edge from V08 to the peak; its far tip heads toward V02. Leave the other loose tabs free while positioning the three halves around P08. Support the growing structure with your hands; the positions in the drawing do not mean its other joins are already closed.
Orientation: 19 S=P08, L=V08, R=V06. 09 Q=P08, R=V02, L=V08. Look toward P08; the lower left view enlarges this same peak. Orange marks only the moving tab.
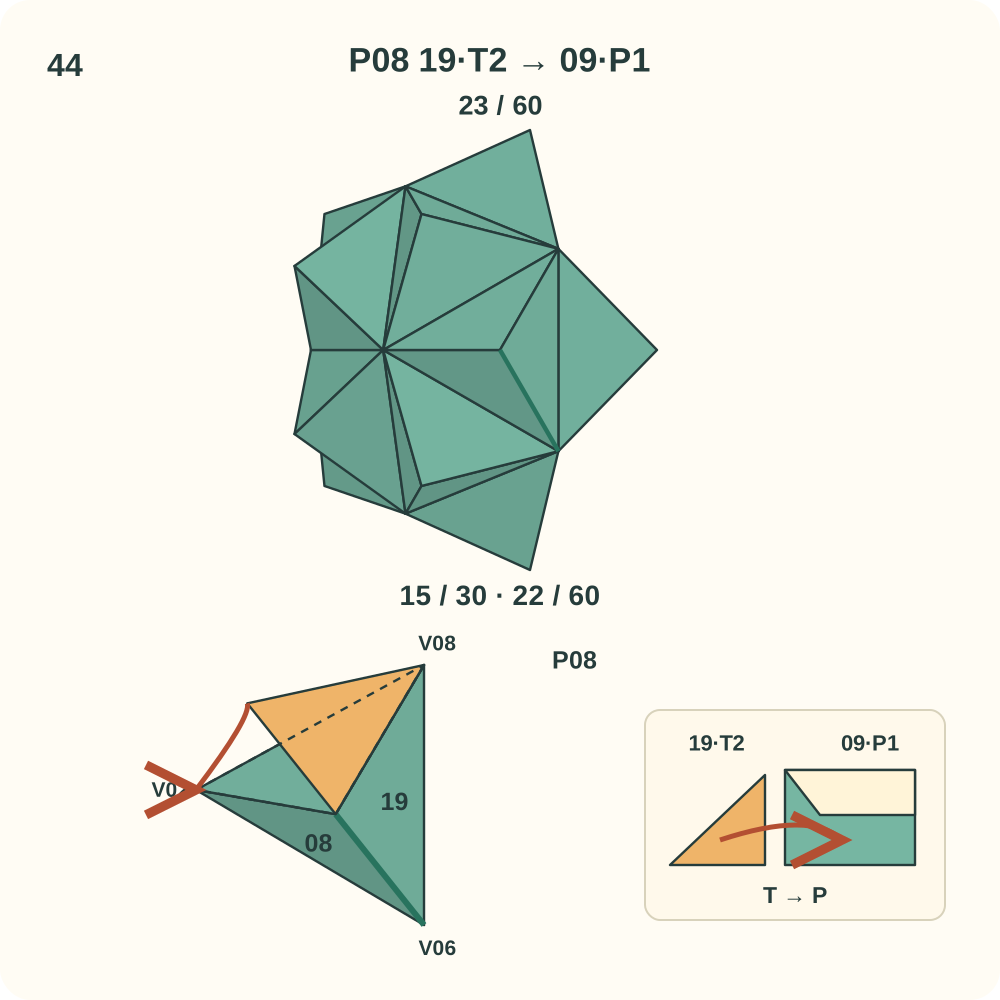
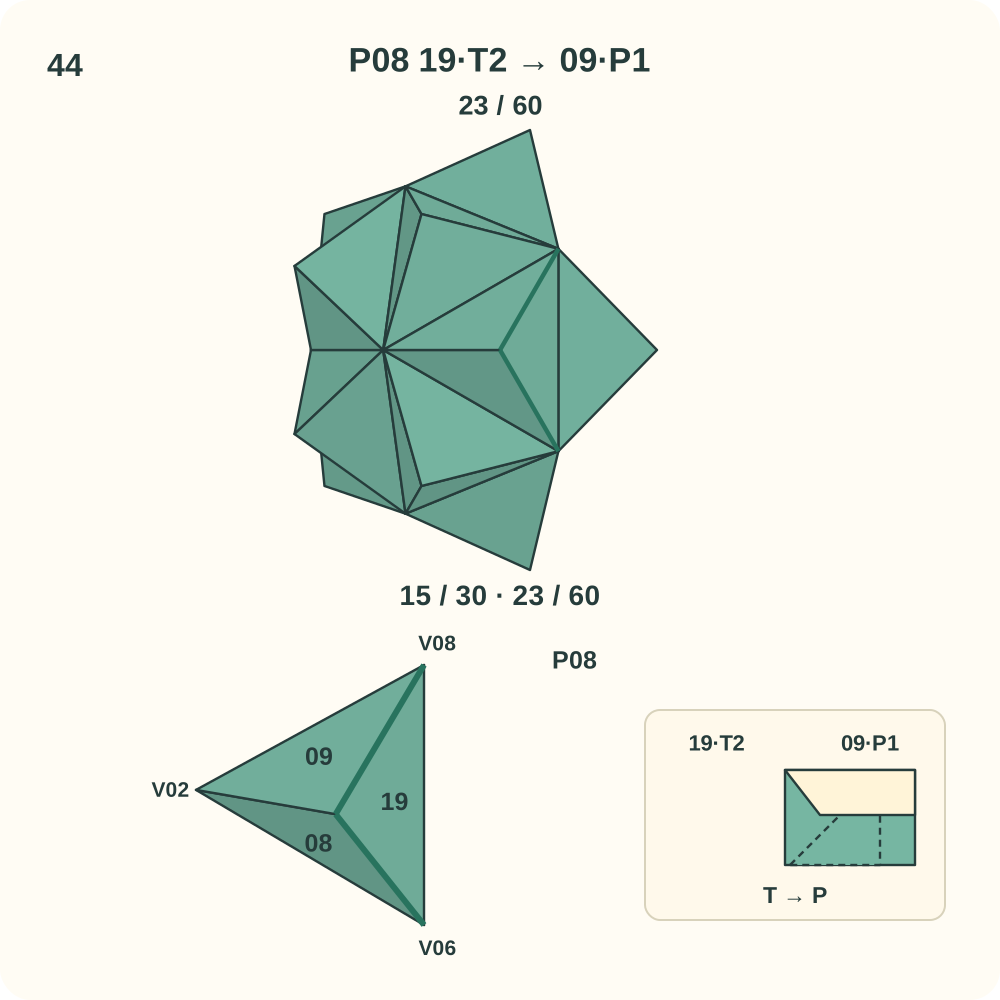
Join 23 of 60 is 19·T2 → 09·P1. Two other edges of this peak may still need a connection.
Step 45: Join 09·T1 to 08·P2
Keep the existing units in place. At peak P08, lift the lip of 08·P2 beside V02 and guide 09·T1 underneath it. The tab hinges along the edge from V02 to the peak; its far tip heads toward V06. This is the third join around P08; curve its three halves into one raised trihedral peak as you close the loop. Support the growing structure with your hands; the positions in the drawing do not mean its other joins are already closed.
Orientation: 09 Q=P08, R=V02, L=V08. 08 S=P08, L=V06, R=V02. Look toward P08; the lower left view enlarges this same peak. Orange marks only the moving tab.
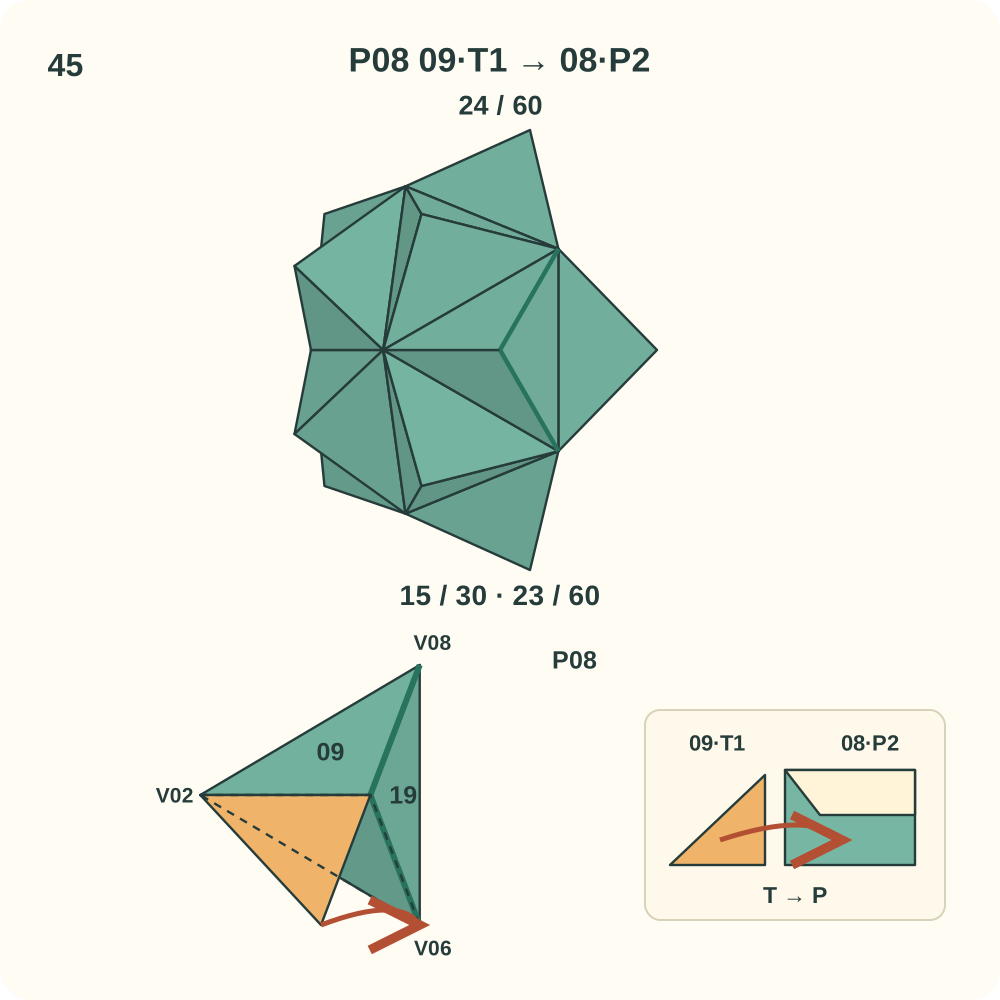
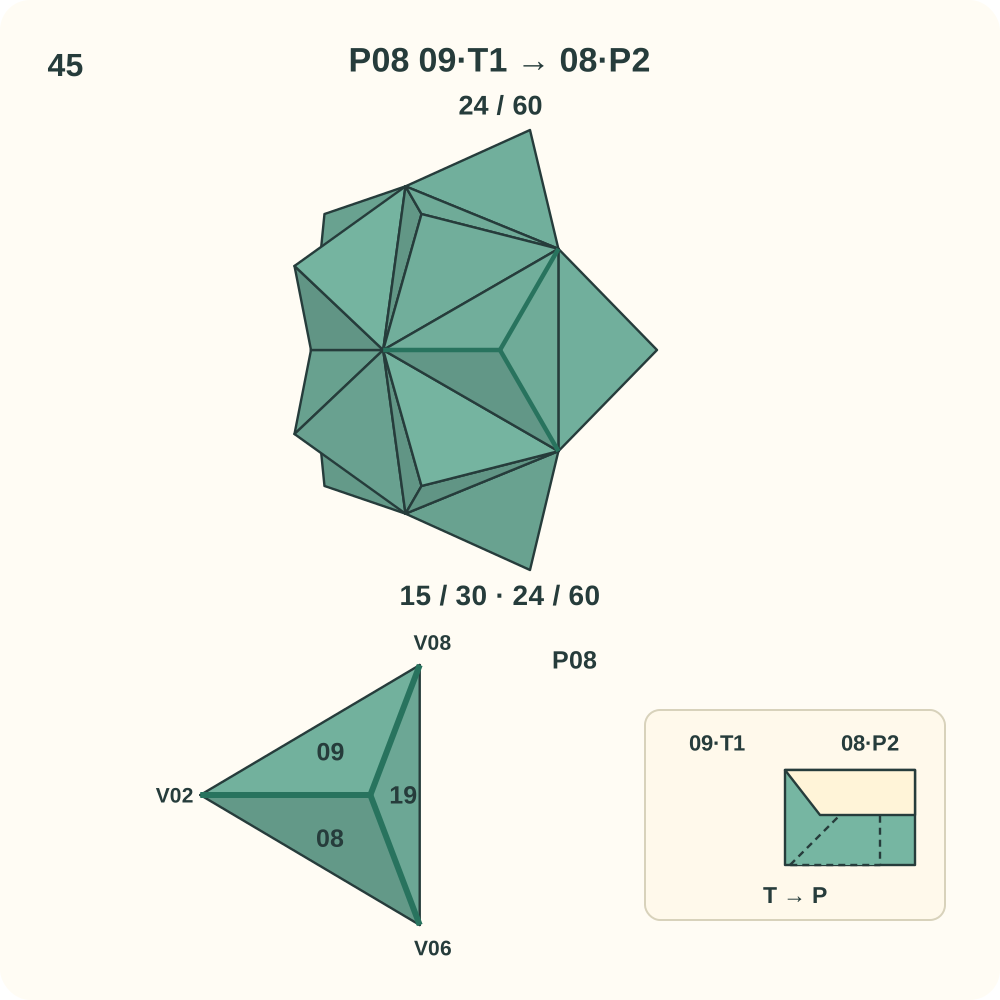
Join 24 of 60 is 09·T1 → 08·P2. Peak P08 now has its three directed joins.
Step 46: Join 10·T2 to 17·P2
Bring in unit 17. At peak P09, lift the lip of 17·P2 beside V05 and guide 10·T2 underneath it. The tab hinges along the edge from V05 to the peak; its far tip heads toward V09. Leave the other loose tabs free while positioning the three halves around P09. Support the growing structure with your hands; the positions in the drawing do not mean its other joins are already closed.
Orientation: 10 S=P09, L=V05, R=V03. 17 S=P09, L=V09, R=V05. Look toward P09; the lower left view enlarges this same peak. Orange marks only the moving tab.
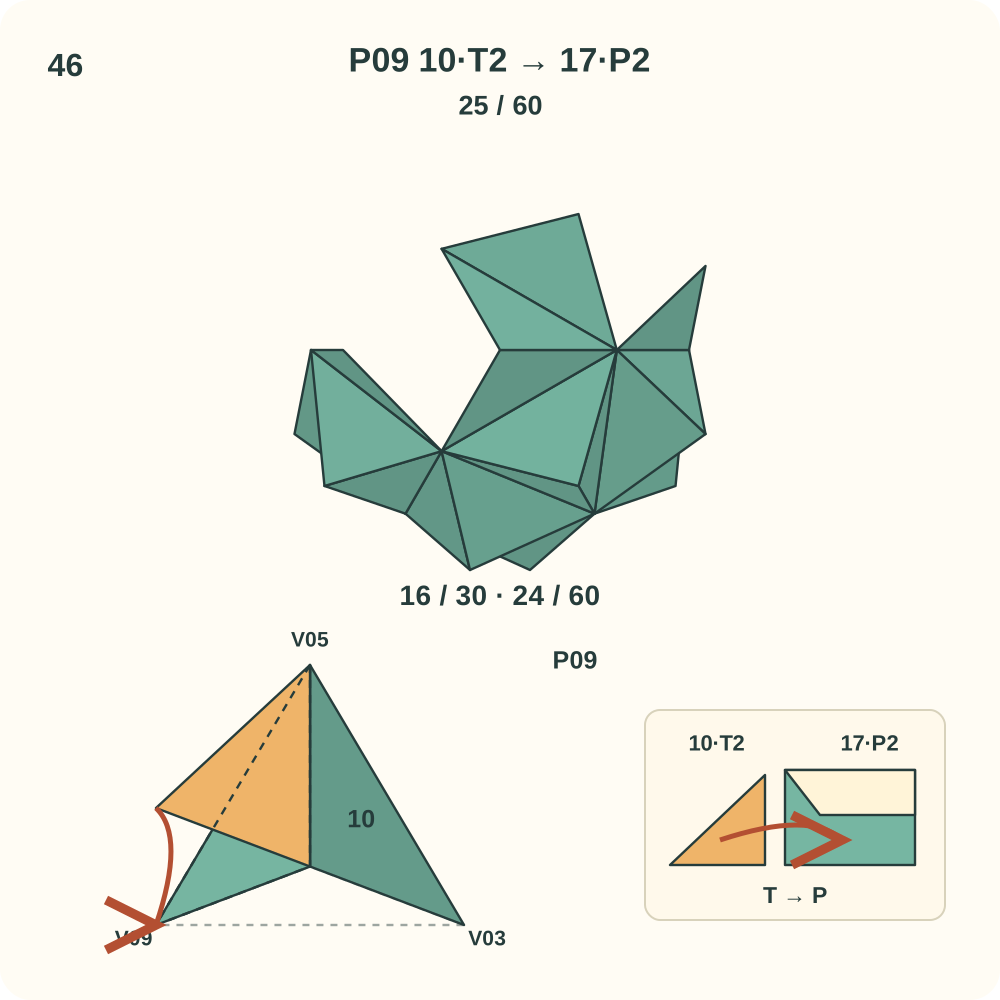
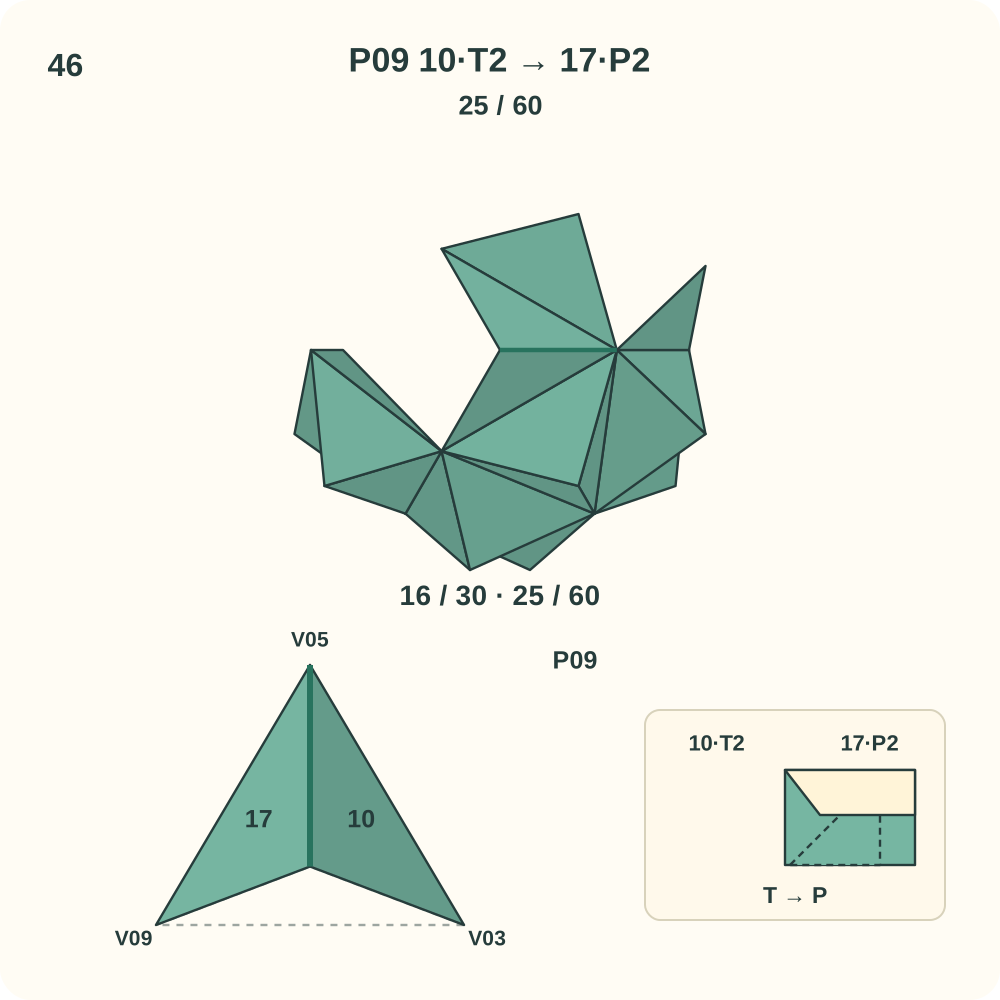
Join 25 of 60 is 10·T2 → 17·P2. Two other edges of this peak may still need a connection.
Step 47: Join 17·T2 to 12·P1
Bring in unit 12. At peak P09, lift the lip of 12·P1 beside V09 and guide 17·T2 underneath it. The tab hinges along the edge from V09 to the peak; its far tip heads toward V03. Leave the other loose tabs free while positioning the three halves around P09. Support the growing structure with your hands; the positions in the drawing do not mean its other joins are already closed.
Orientation: 17 S=P09, L=V09, R=V05. 12 Q=P09, R=V03, L=V09. Look toward P09; the lower left view enlarges this same peak. Orange marks only the moving tab.
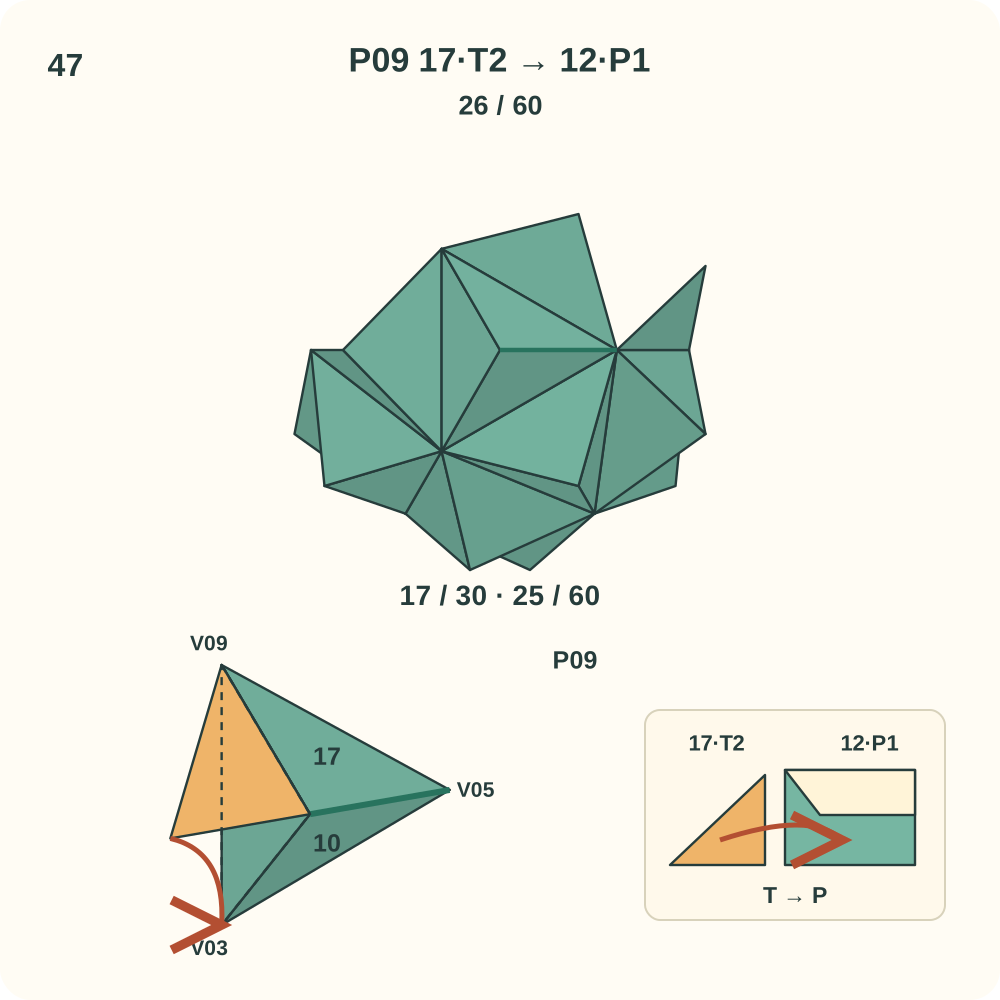
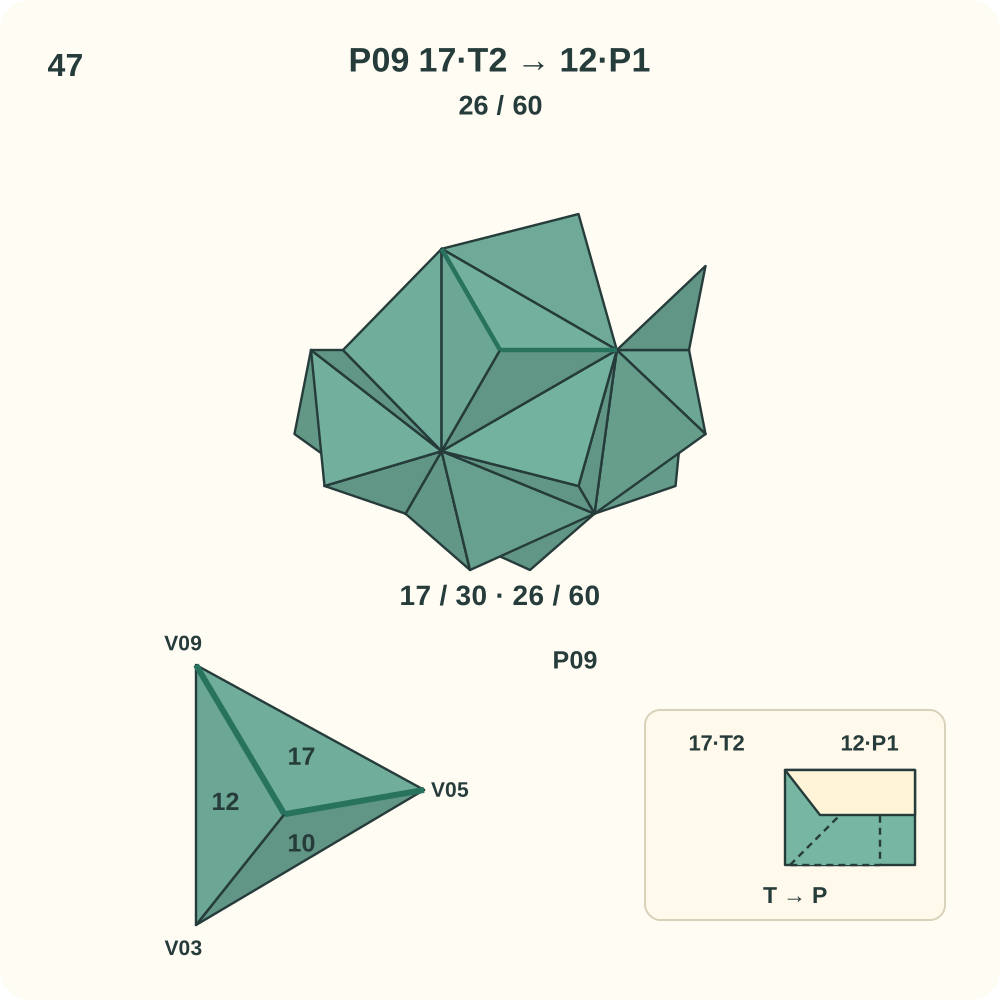
Join 26 of 60 is 17·T2 → 12·P1. Two other edges of this peak may still need a connection.
Step 48: Join 12·T1 to 10·P2
Keep the existing units in place. At peak P09, lift the lip of 10·P2 beside V03 and guide 12·T1 underneath it. The tab hinges along the edge from V03 to the peak; its far tip heads toward V05. This is the third join around P09; curve its three halves into one raised trihedral peak as you close the loop. Support the growing structure with your hands; the positions in the drawing do not mean its other joins are already closed.
Orientation: 12 Q=P09, R=V03, L=V09. 10 S=P09, L=V05, R=V03. Look toward P09; the lower left view enlarges this same peak. Orange marks only the moving tab.
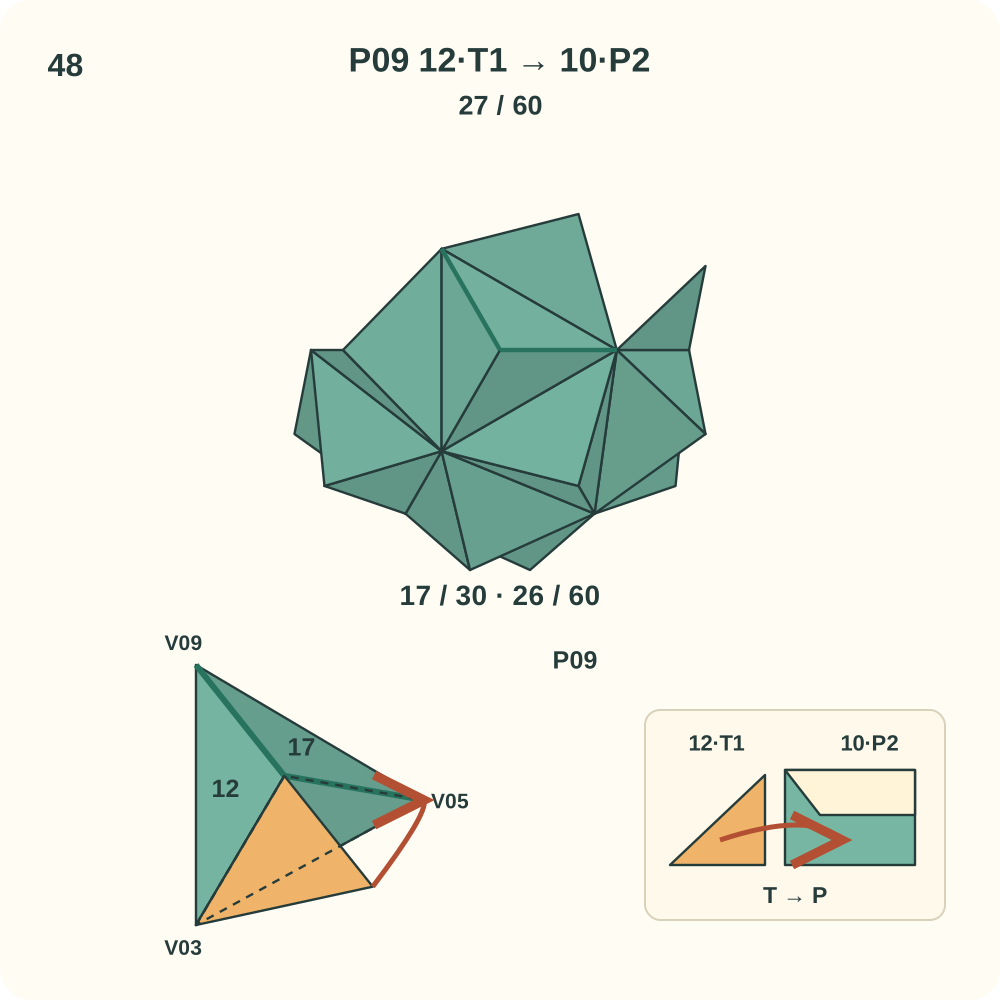
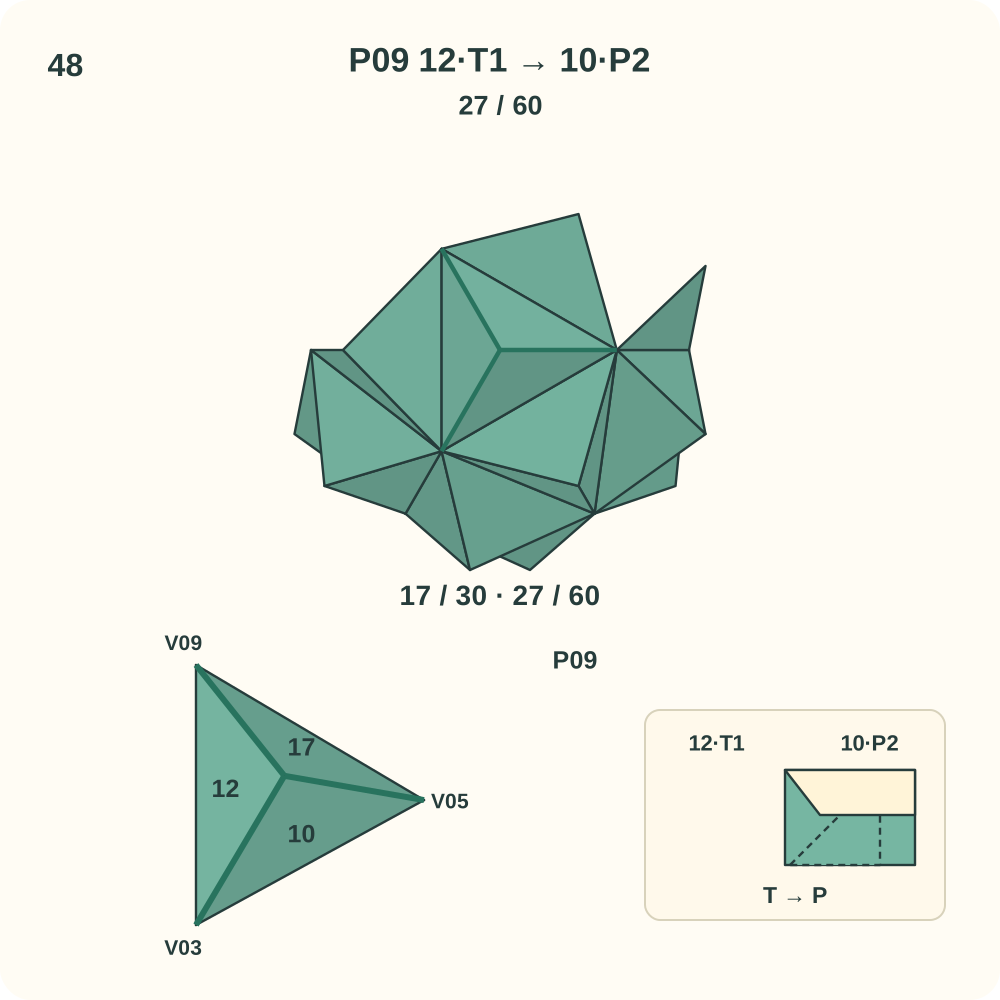
Join 27 of 60 is 12·T1 → 10·P2. Peak P09 now has its three directed joins.
Step 49: Join 12·T2 to 20·P1
Bring in unit 20. At peak P10, lift the lip of 20·P1 beside V09 and guide 12·T2 underneath it. The tab hinges along the edge from V09 to the peak; its far tip heads toward V06. Leave the other loose tabs free while positioning the three halves around P10. Support the growing structure with your hands; the positions in the drawing do not mean its other joins are already closed.
Orientation: 12 S=P10, L=V09, R=V03. 20 Q=P10, R=V06, L=V09. Look toward P10; the lower left view enlarges this same peak. Orange marks only the moving tab.
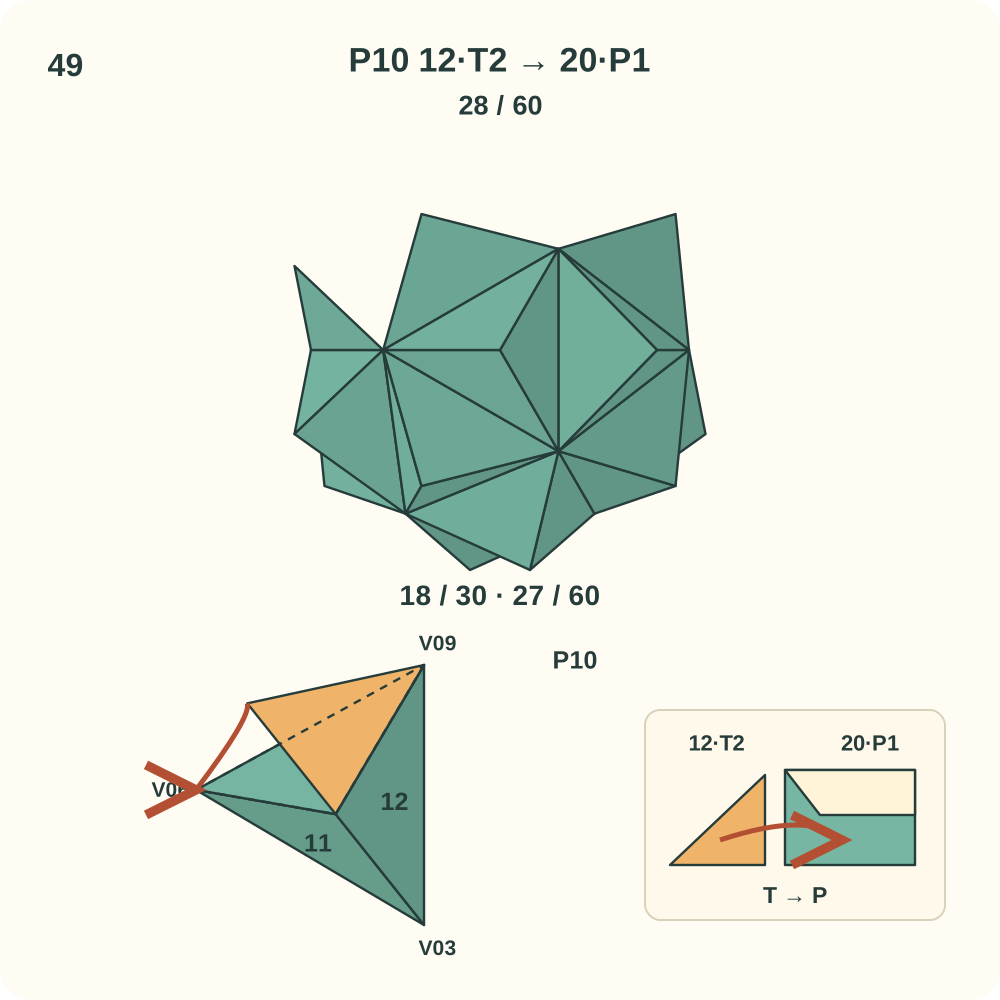
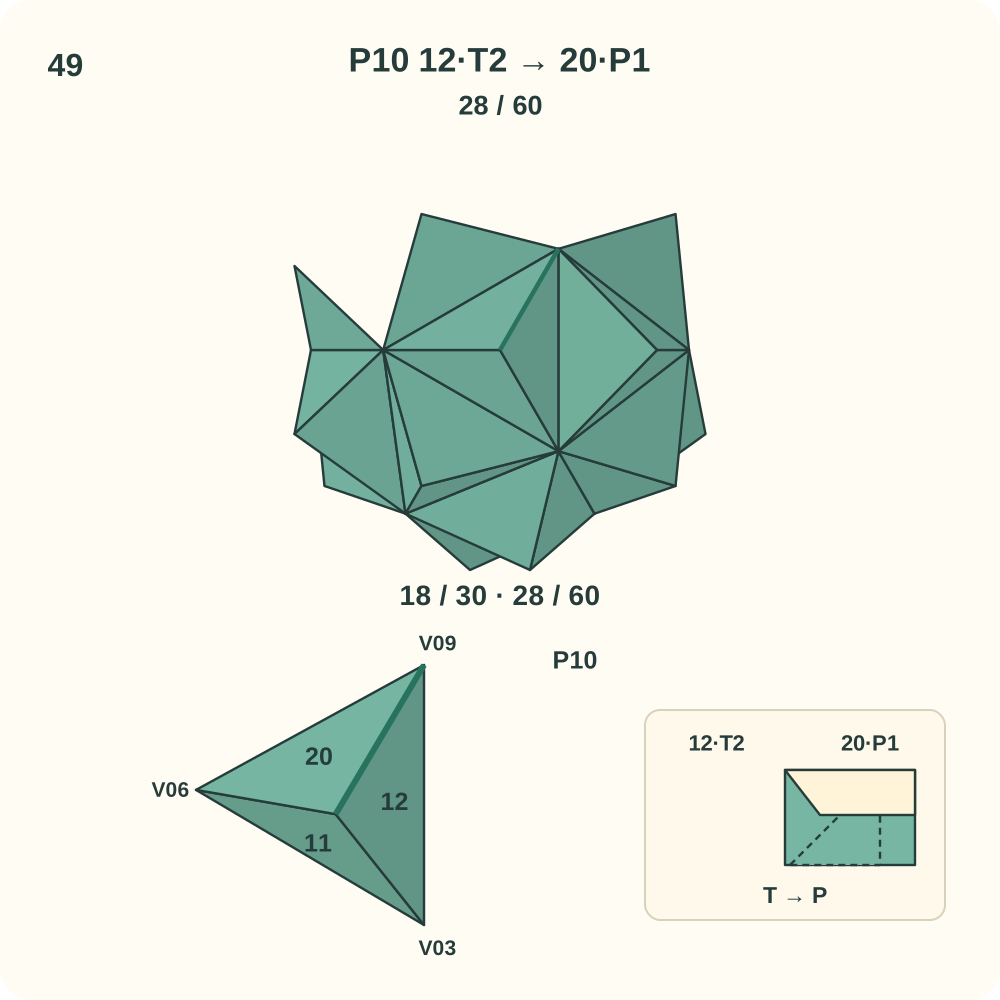
Join 28 of 60 is 12·T2 → 20·P1. Two other edges of this peak may still need a connection.
Step 50: Join 20·T1 to 11·P1
Keep the existing units in place. At peak P10, lift the lip of 11·P1 beside V06 and guide 20·T1 underneath it. The tab hinges along the edge from V06 to the peak; its far tip heads toward V03. Leave the other loose tabs free while positioning the three halves around P10. Support the growing structure with your hands; the positions in the drawing do not mean its other joins are already closed.
Orientation: 20 Q=P10, R=V06, L=V09. 11 Q=P10, R=V03, L=V06. Look toward P10; the lower left view enlarges this same peak. Orange marks only the moving tab.
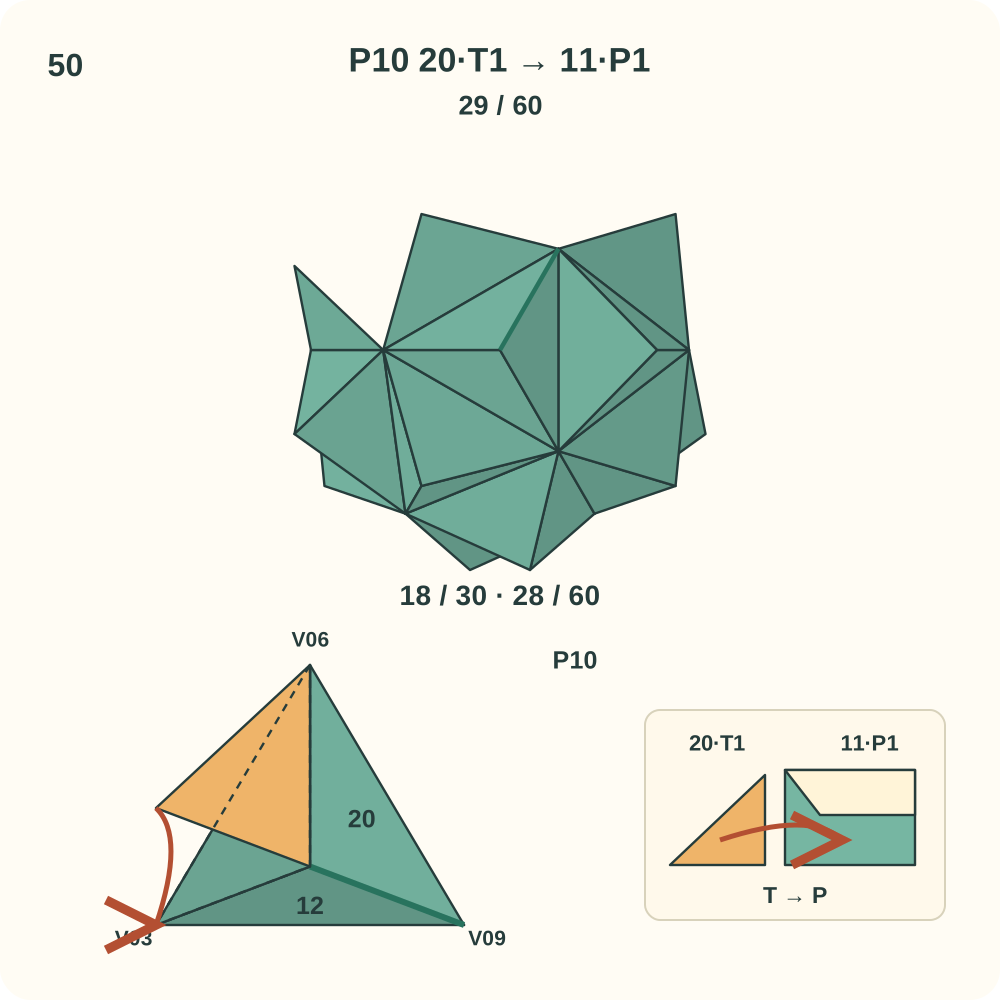
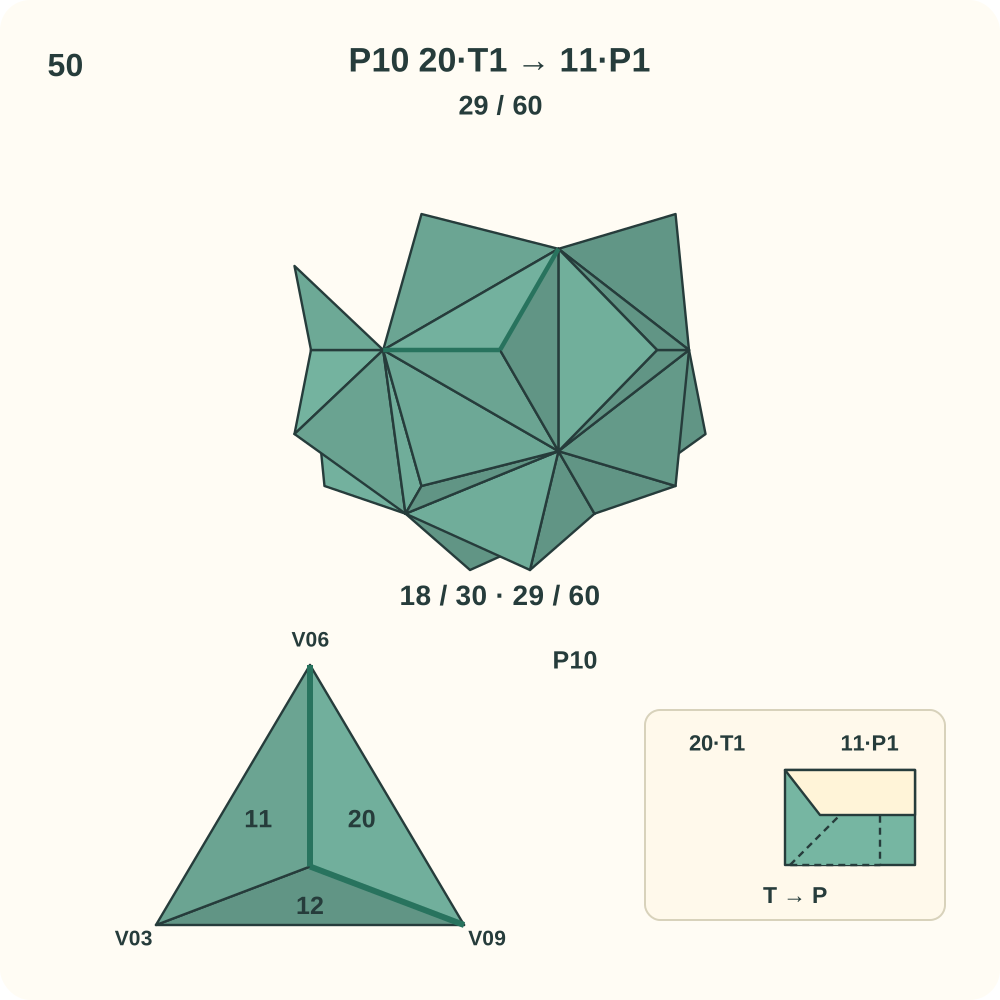
Join 29 of 60 is 20·T1 → 11·P1. Two other edges of this peak may still need a connection.
Step 51: Join 11·T1 to 12·P2
Keep the existing units in place. At peak P10, lift the lip of 12·P2 beside V03 and guide 11·T1 underneath it. The tab hinges along the edge from V03 to the peak; its far tip heads toward V09. This is the third join around P10; curve its three halves into one raised trihedral peak as you close the loop. Support the growing structure with your hands; the positions in the drawing do not mean its other joins are already closed.
Orientation: 11 Q=P10, R=V03, L=V06. 12 S=P10, L=V09, R=V03. Look toward P10; the lower left view enlarges this same peak. Orange marks only the moving tab.
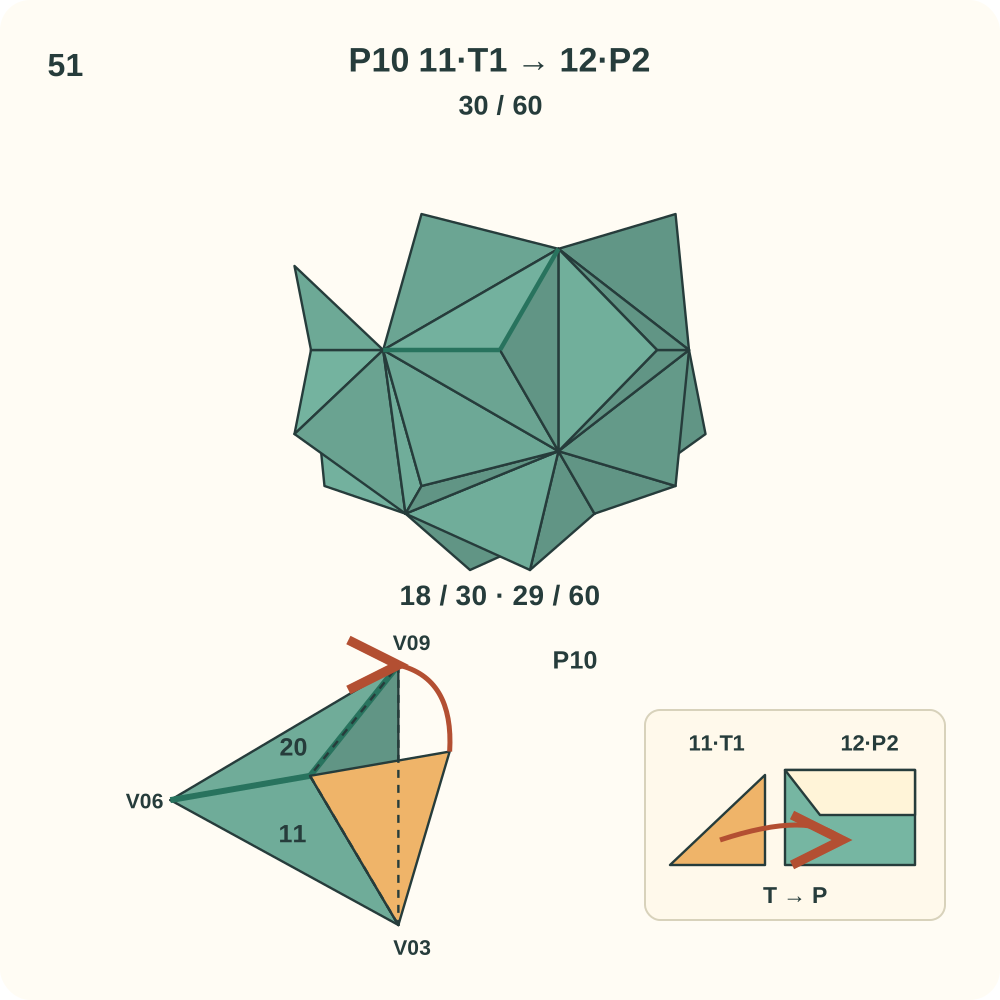
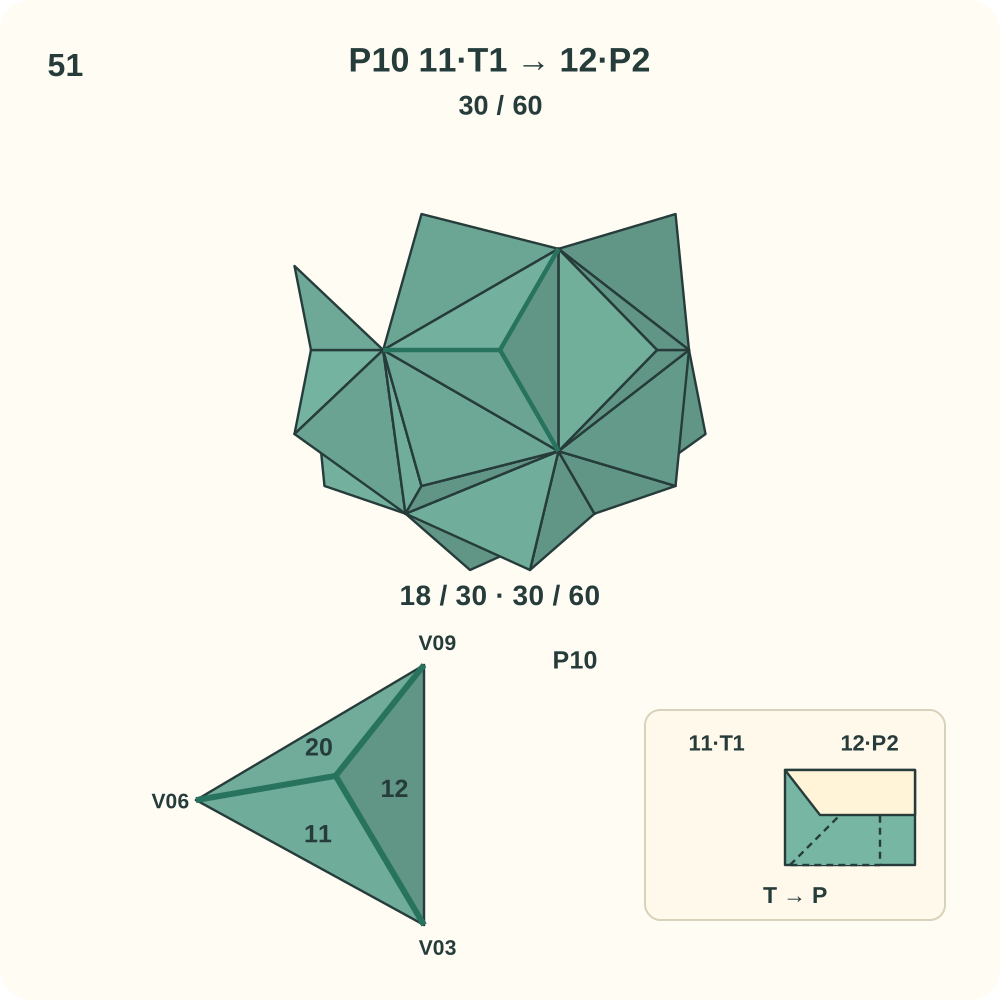
Join 30 of 60 is 11·T1 → 12·P2. Peak P10 now has its three directed joins.
Step 52: Join 13·T1 to 15·P2
Bring in unit 15. At peak P11, lift the lip of 15·P2 beside V04 and guide 13·T1 underneath it. The tab hinges along the edge from V04 to the peak; its far tip heads toward V10. Leave the other loose tabs free while positioning the three halves around P11. Support the growing structure with your hands; the positions in the drawing do not mean its other joins are already closed.
Orientation: 13 Q=P11, R=V04, L=V07. 15 S=P11, L=V10, R=V04. Look toward P11; the lower left view enlarges this same peak. Orange marks only the moving tab.
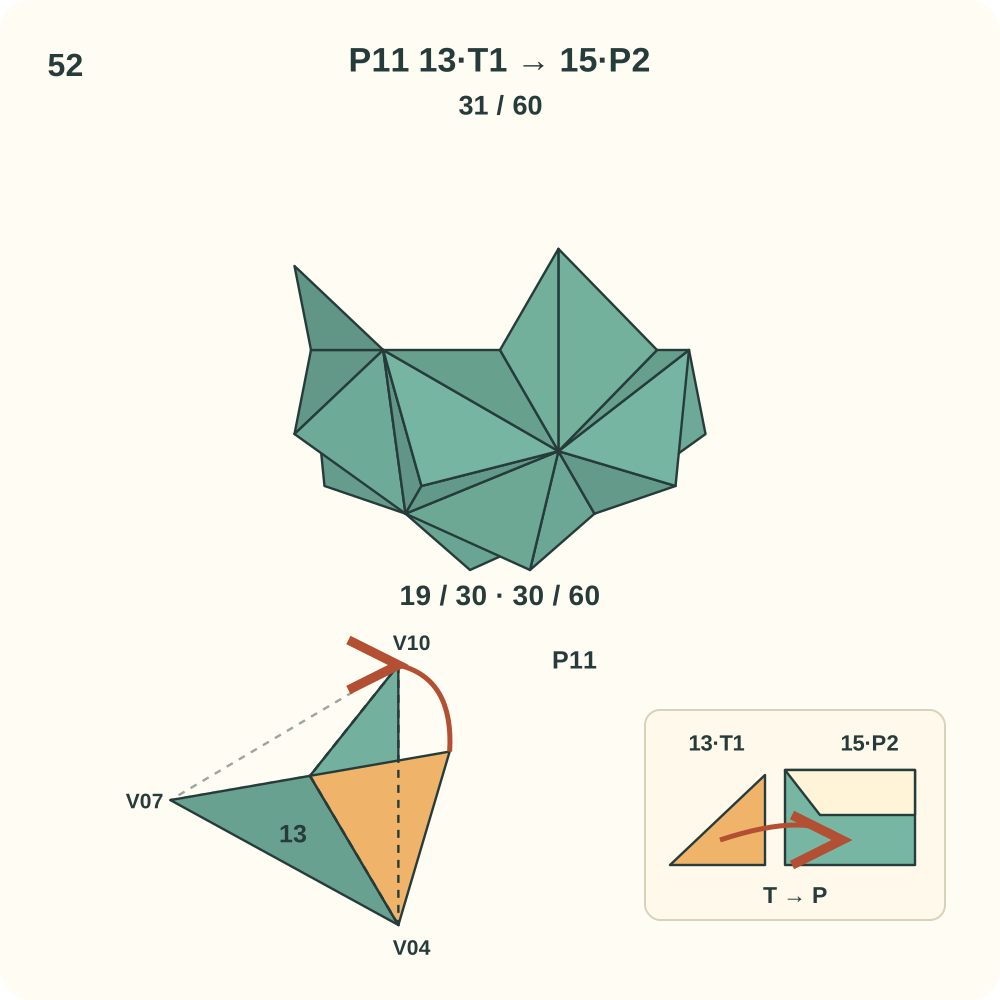
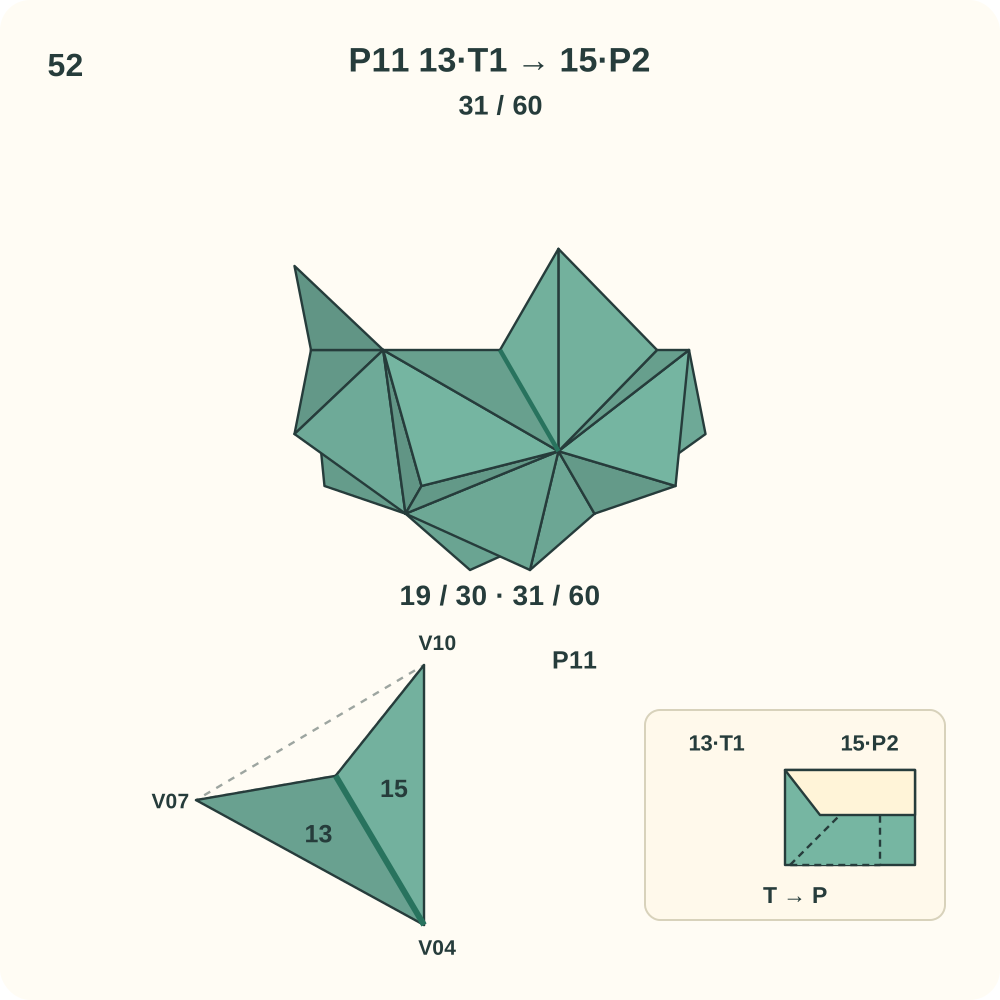
Join 31 of 60 is 13·T1 → 15·P2. Two other edges of this peak may still need a connection.
Step 53: Join 15·T2 to 22·P1
Bring in unit 22. At peak P11, lift the lip of 22·P1 beside V10 and guide 15·T2 underneath it. The tab hinges along the edge from V10 to the peak; its far tip heads toward V07. Leave the other loose tabs free while positioning the three halves around P11. Support the growing structure with your hands; the positions in the drawing do not mean its other joins are already closed.
Orientation: 15 S=P11, L=V10, R=V04. 22 Q=P11, R=V07, L=V10. Look toward P11; the lower left view enlarges this same peak. Orange marks only the moving tab.
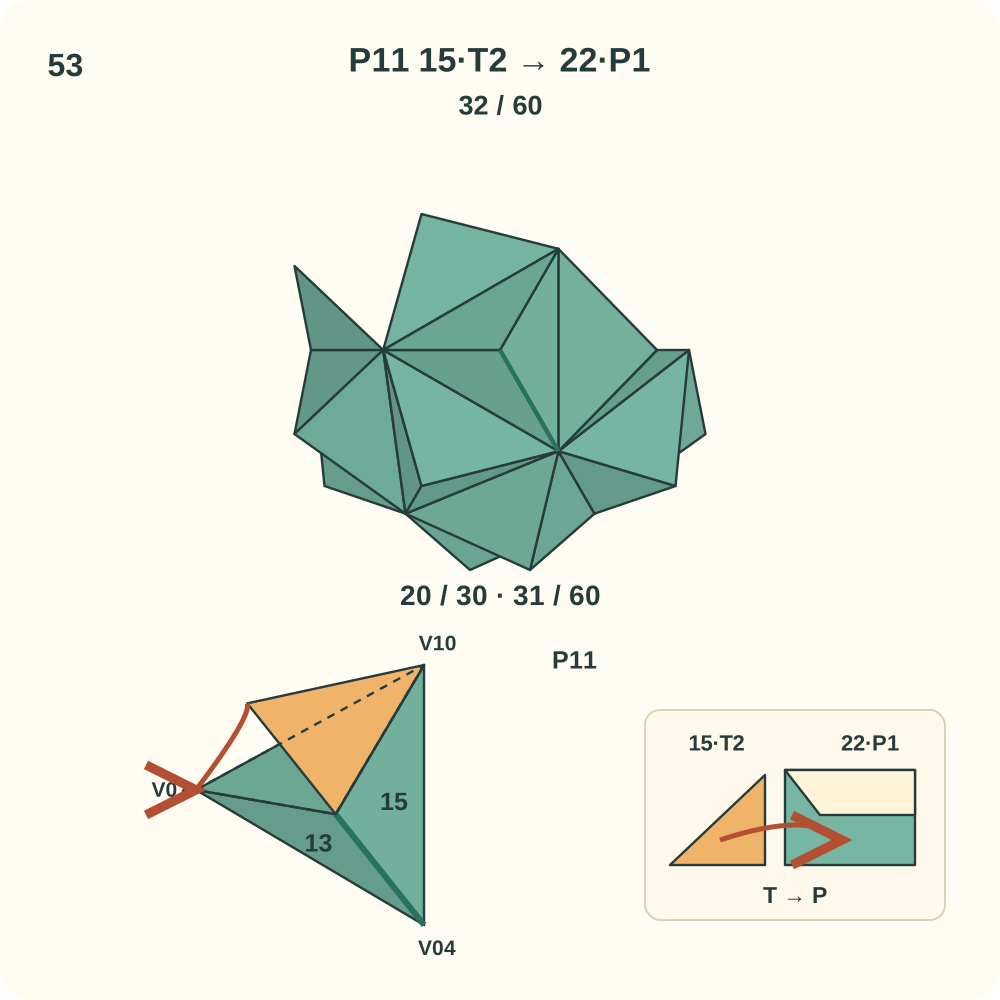
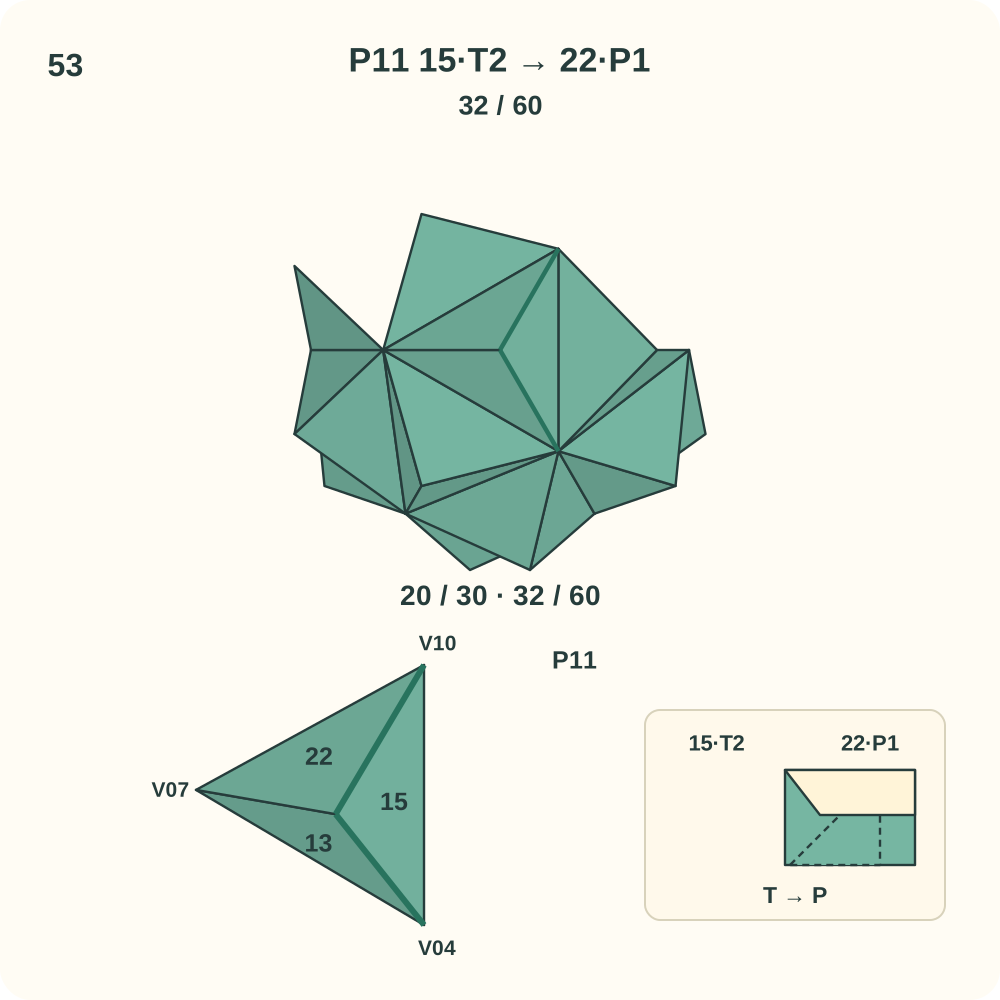
Join 32 of 60 is 15·T2 → 22·P1. Two other edges of this peak may still need a connection.
Step 54: Join 22·T1 to 13·P1
Keep the existing units in place. At peak P11, lift the lip of 13·P1 beside V07 and guide 22·T1 underneath it. The tab hinges along the edge from V07 to the peak; its far tip heads toward V04. This is the third join around P11; curve its three halves into one raised trihedral peak as you close the loop. Support the growing structure with your hands; the positions in the drawing do not mean its other joins are already closed.
Orientation: 22 Q=P11, R=V07, L=V10. 13 Q=P11, R=V04, L=V07. Look toward P11; the lower left view enlarges this same peak. Orange marks only the moving tab.
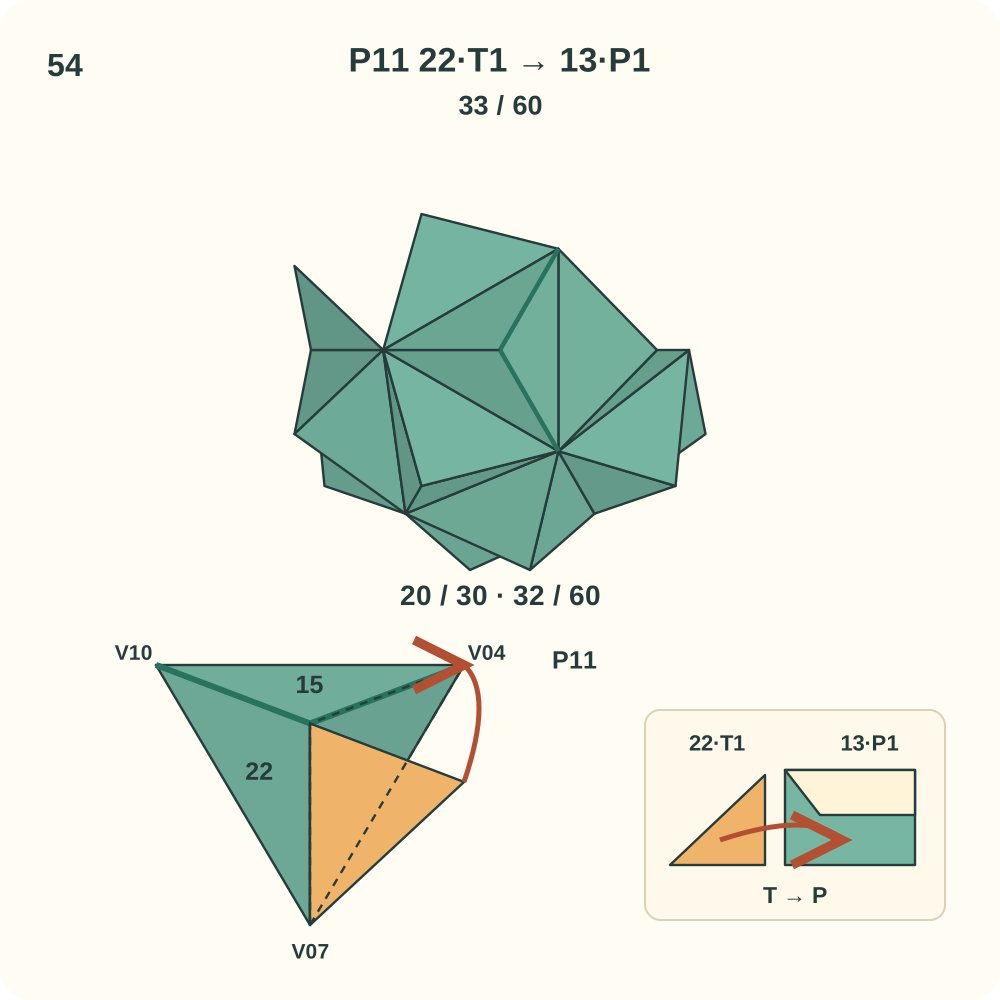
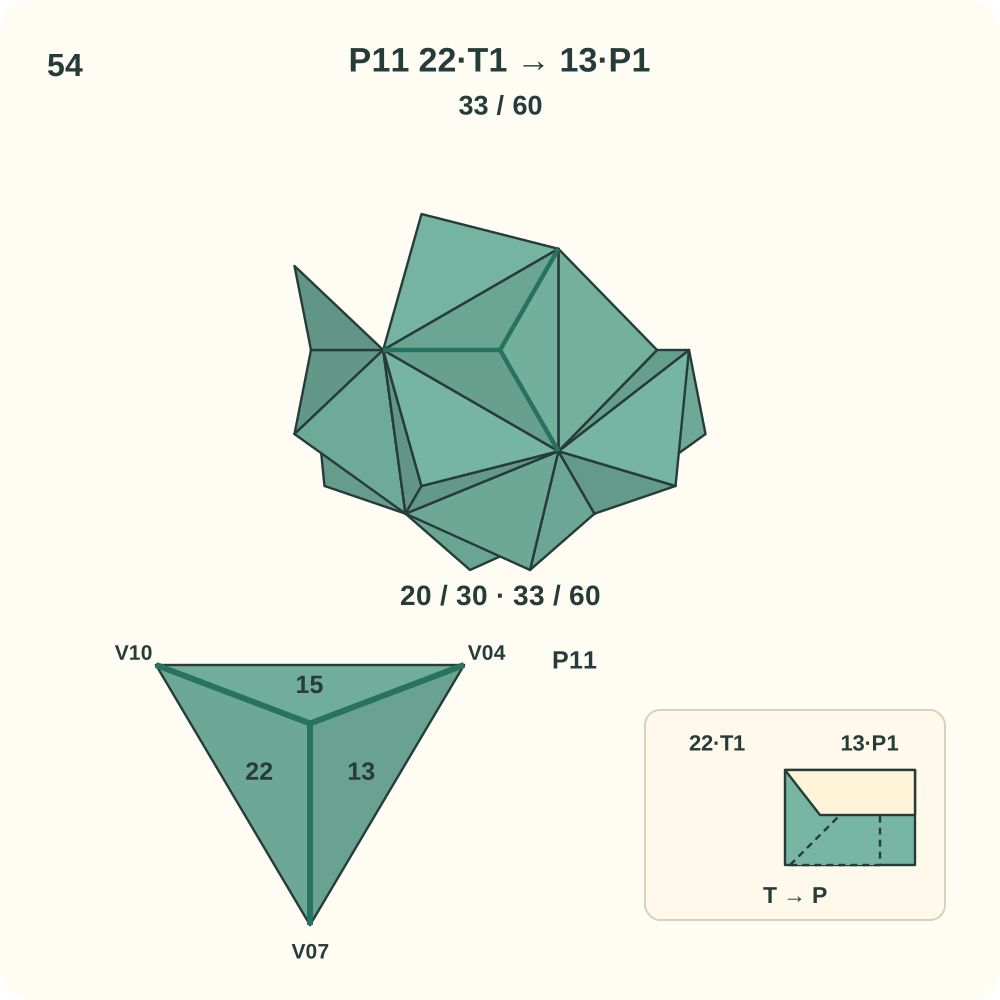
Join 33 of 60 is 22·T1 → 13·P1. Peak P11 now has its three directed joins.
Step 55: Join 14·T2 to 24·P2
Bring in unit 24. At peak P12, lift the lip of 24·P2 beside V08 and guide 14·T2 underneath it. The tab hinges along the edge from V08 to the peak; its far tip heads toward V10. Leave the other loose tabs free while positioning the three halves around P12. Support the growing structure with your hands; the positions in the drawing do not mean its other joins are already closed.
Orientation: 14 S=P12, L=V08, R=V04. 24 S=P12, L=V10, R=V08. Look toward P12; the lower left view enlarges this same peak. Orange marks only the moving tab.
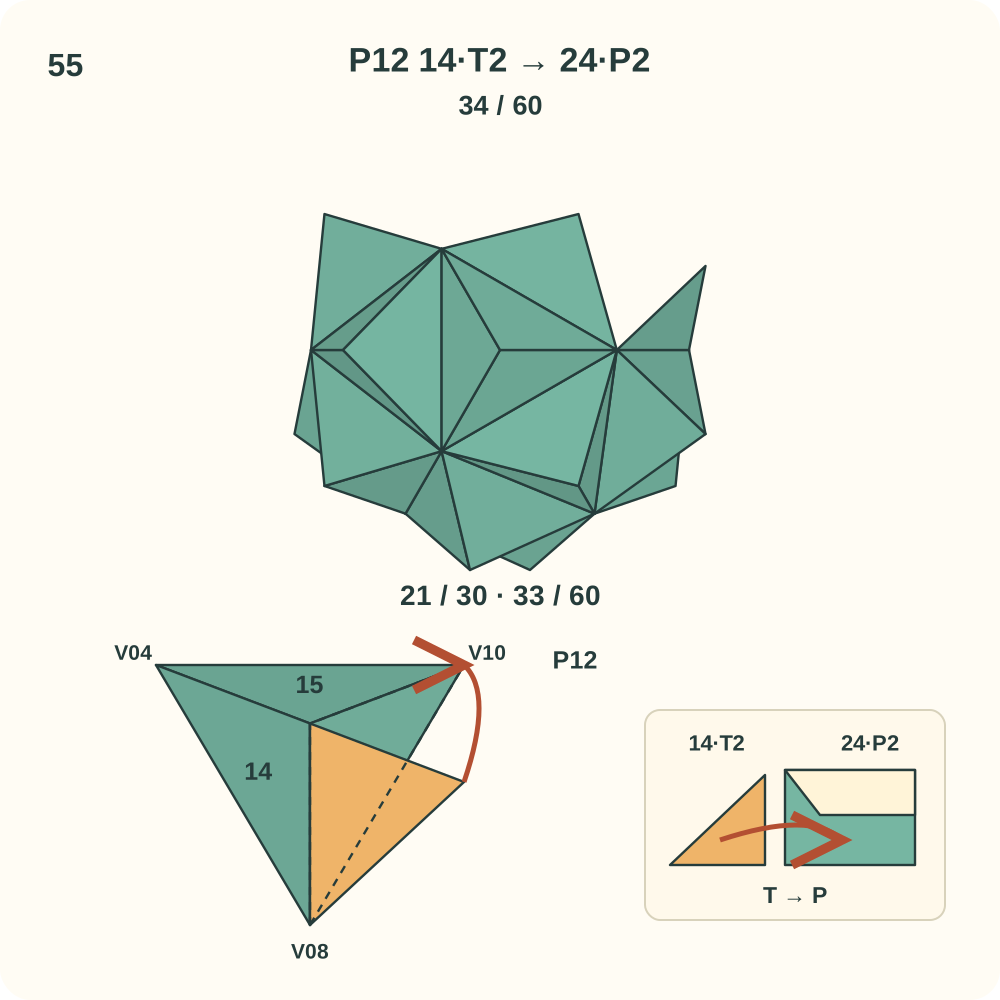
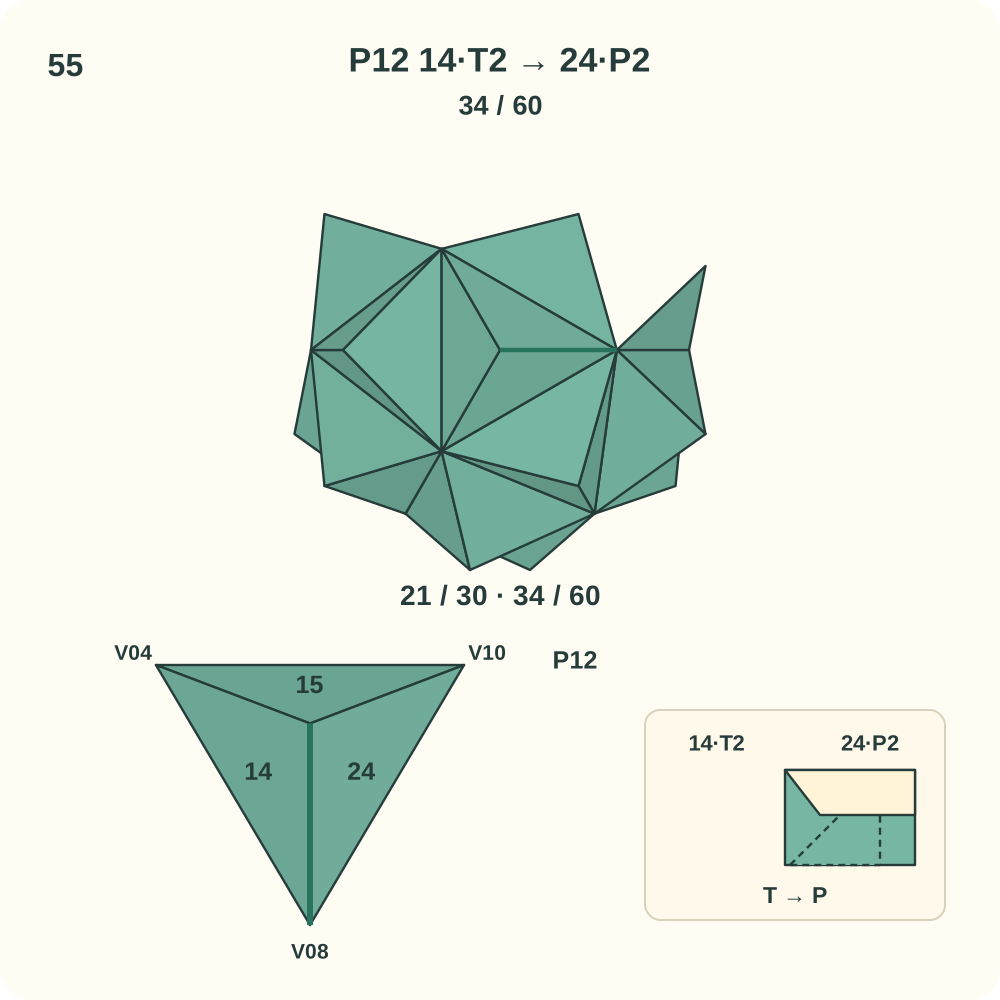
Join 34 of 60 is 14·T2 → 24·P2. Two other edges of this peak may still need a connection.
Step 56: Join 24·T2 to 15·P1
Keep the existing units in place. At peak P12, lift the lip of 15·P1 beside V10 and guide 24·T2 underneath it. The tab hinges along the edge from V10 to the peak; its far tip heads toward V04. Leave the other loose tabs free while positioning the three halves around P12. Support the growing structure with your hands; the positions in the drawing do not mean its other joins are already closed.
Orientation: 24 S=P12, L=V10, R=V08. 15 Q=P12, R=V04, L=V10. Look toward P12; the lower left view enlarges this same peak. Orange marks only the moving tab.
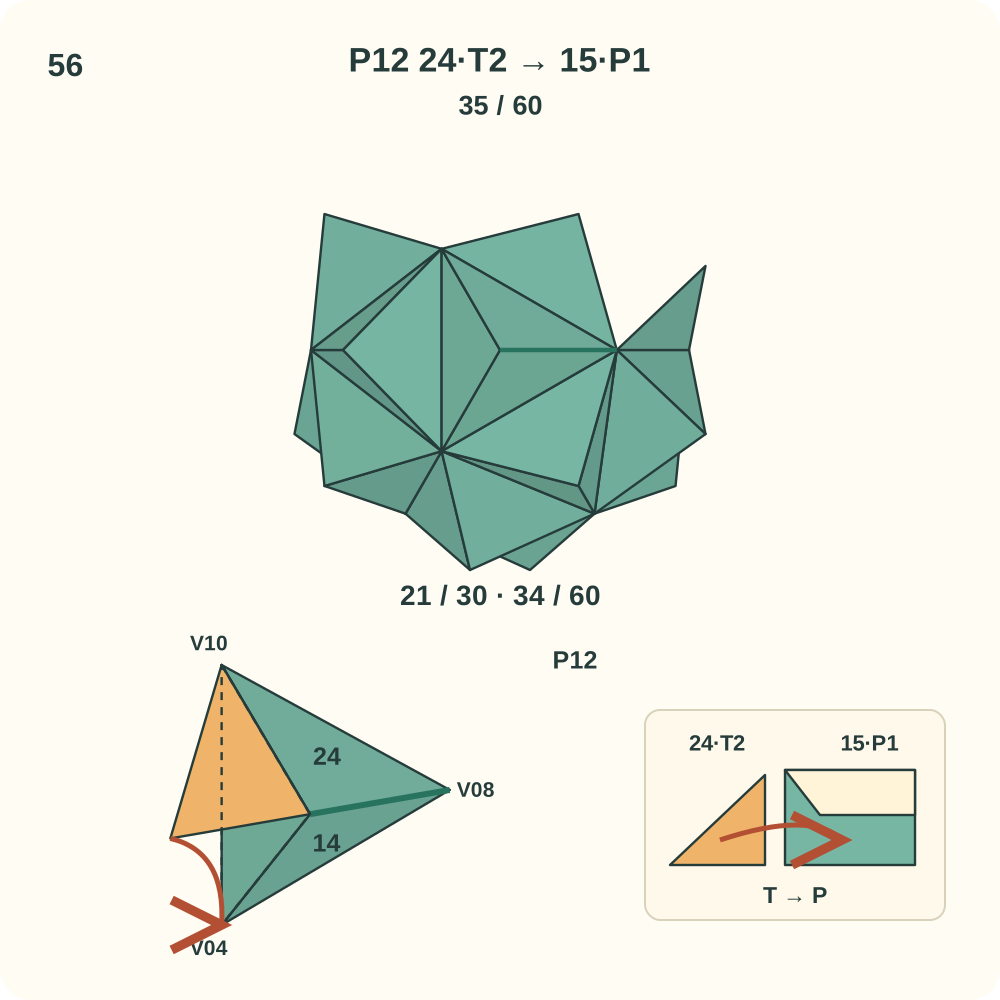
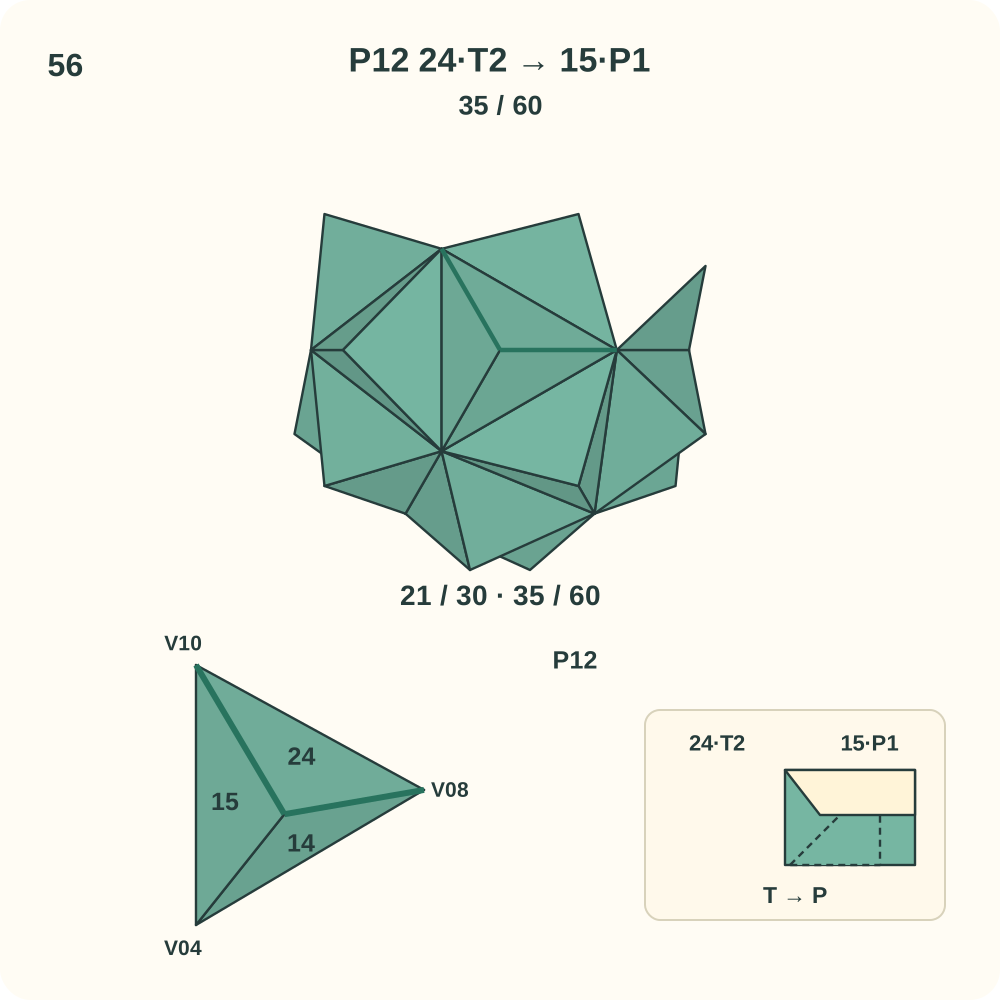
Join 35 of 60 is 24·T2 → 15·P1. Two other edges of this peak may still need a connection.
Step 57: Join 15·T1 to 14·P2
Keep the existing units in place. At peak P12, lift the lip of 14·P2 beside V04 and guide 15·T1 underneath it. The tab hinges along the edge from V04 to the peak; its far tip heads toward V08. This is the third join around P12; curve its three halves into one raised trihedral peak as you close the loop. Support the growing structure with your hands; the positions in the drawing do not mean its other joins are already closed.
Orientation: 15 Q=P12, R=V04, L=V10. 14 S=P12, L=V08, R=V04. Look toward P12; the lower left view enlarges this same peak. Orange marks only the moving tab.
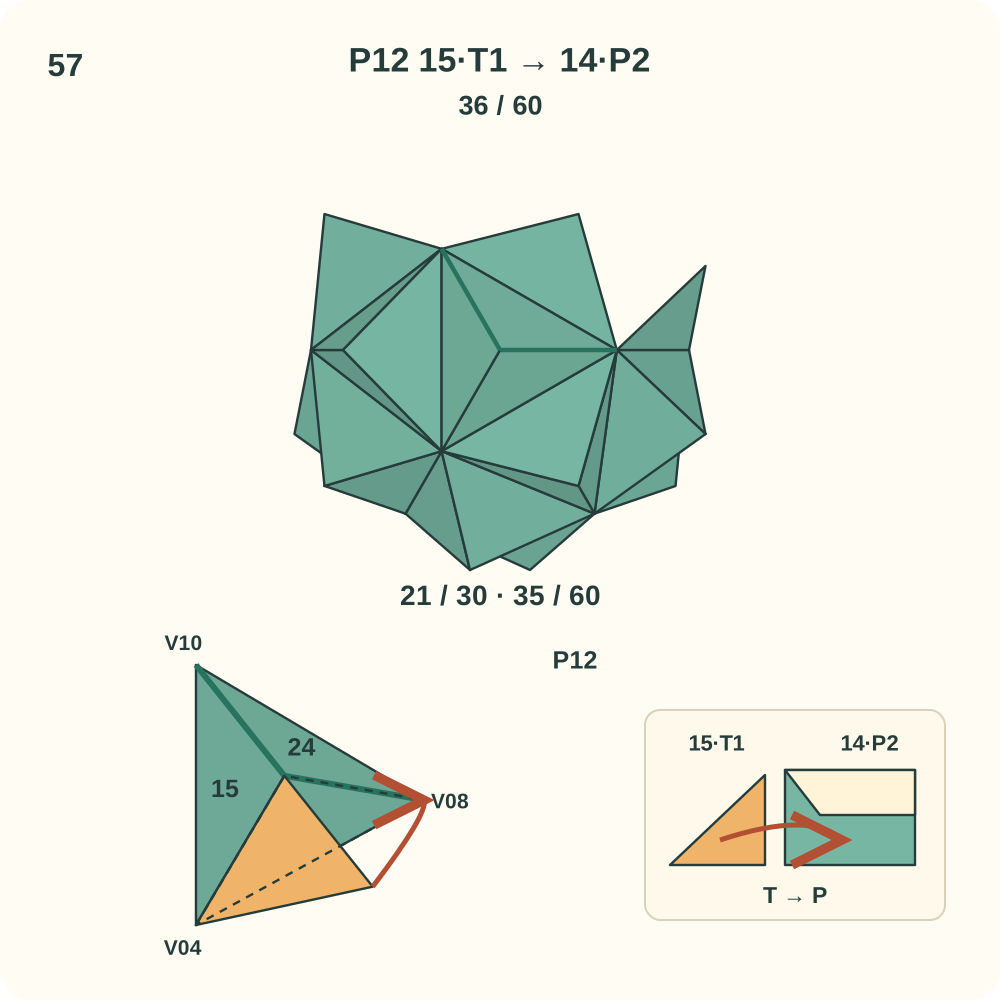
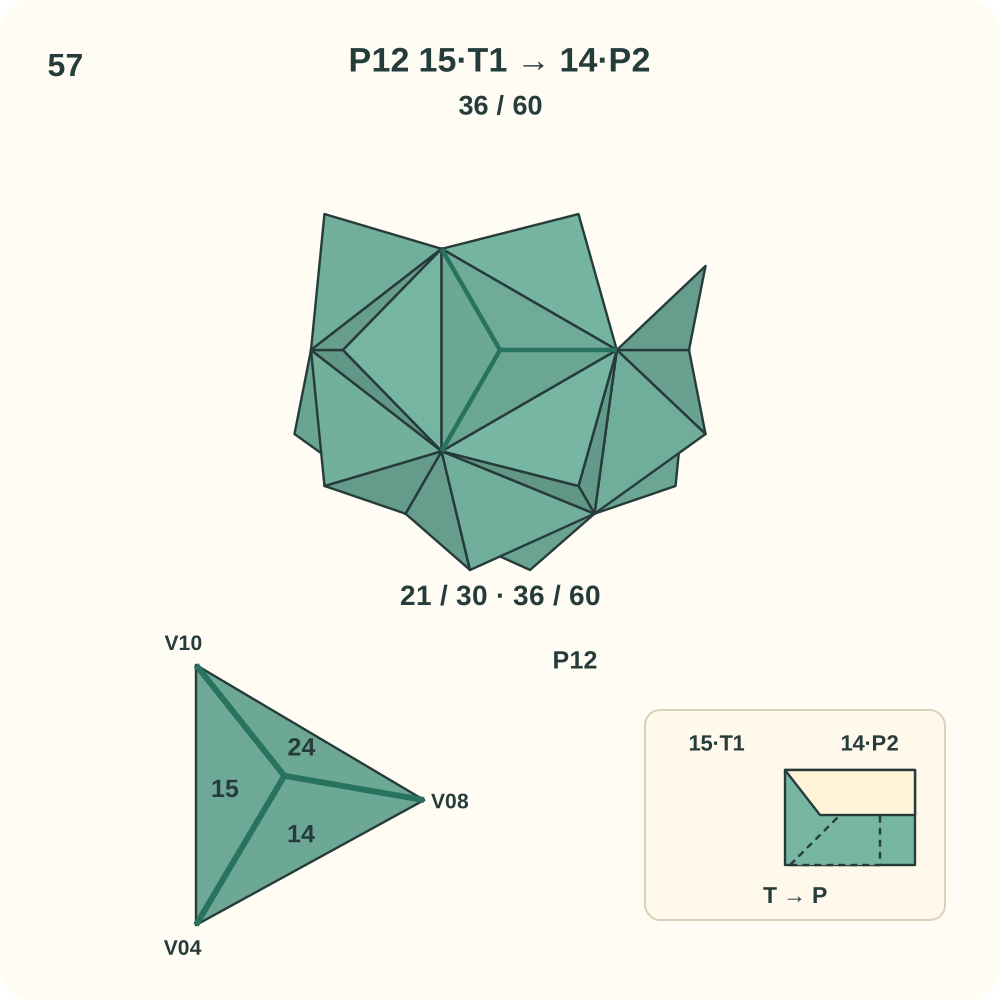
Join 36 of 60 is 15·T1 → 14·P2. Peak P12 now has its three directed joins.
Step 58: Join 16·T2 to 23·P2
Bring in unit 23. At peak P13, lift the lip of 23·P2 beside V07 and guide 16·T2 underneath it. The tab hinges along the edge from V07 to the peak; its far tip heads toward V11. Leave the other loose tabs free while positioning the three halves around P13. Support the growing structure with your hands; the positions in the drawing do not mean its other joins are already closed.
Orientation: 16 S=P13, L=V07, R=V05. 23 S=P13, L=V11, R=V07. Look toward P13; the lower left view enlarges this same peak. Orange marks only the moving tab.
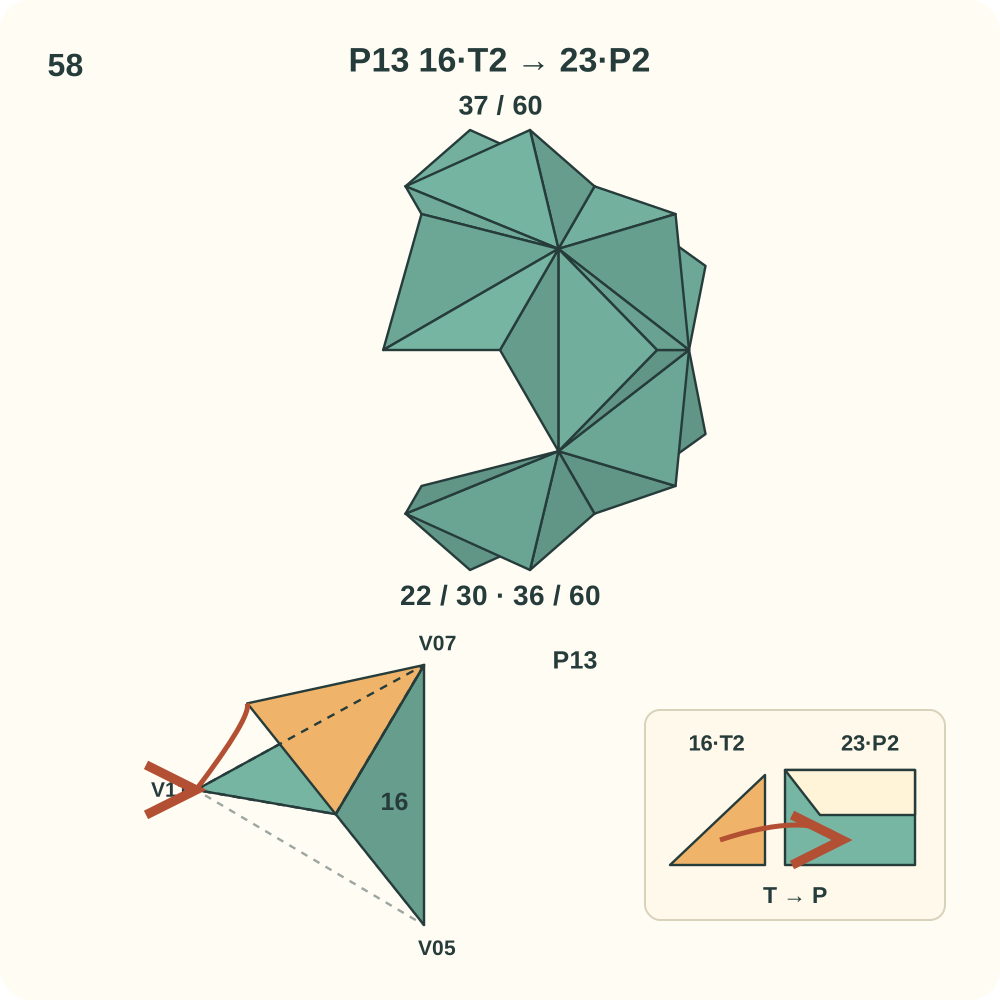
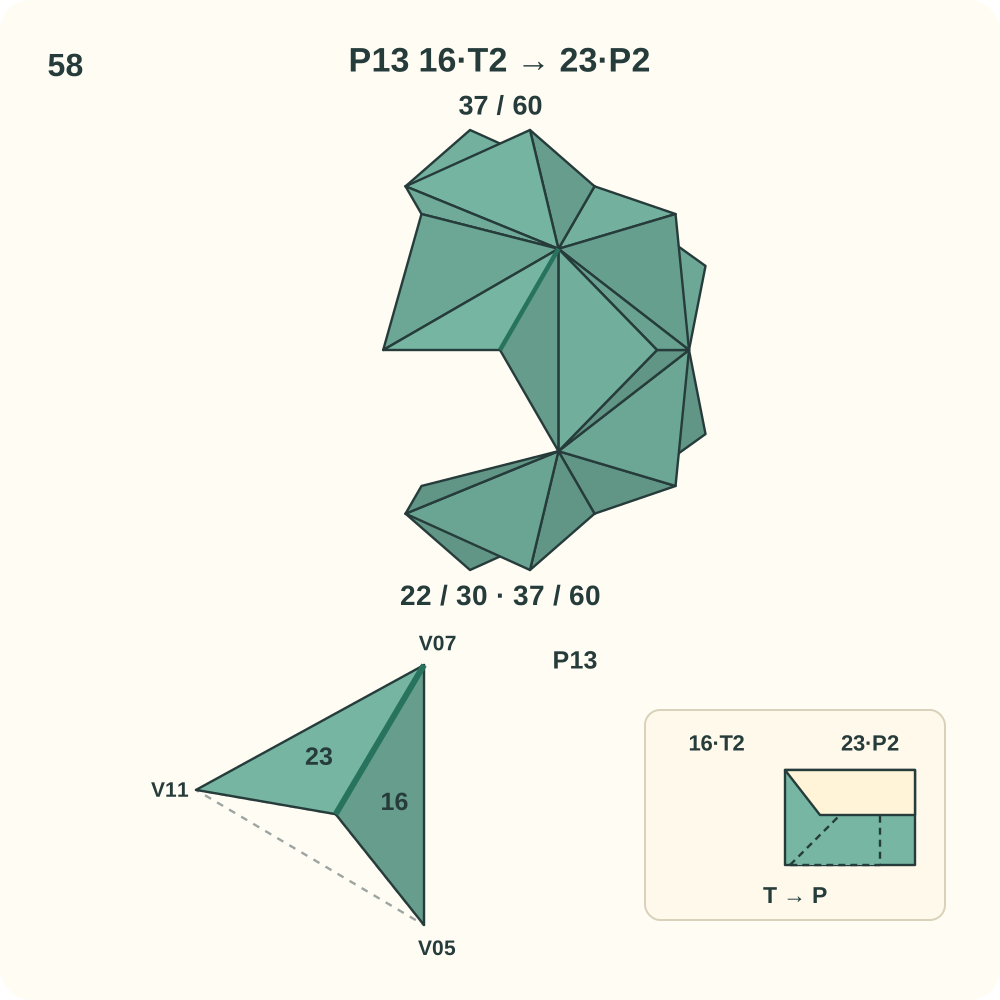
Join 37 of 60 is 16·T2 → 23·P2. Two other edges of this peak may still need a connection.
Step 59: Join 23·T2 to 18·P1
Bring in unit 18. At peak P13, lift the lip of 18·P1 beside V11 and guide 23·T2 underneath it. The tab hinges along the edge from V11 to the peak; its far tip heads toward V05. Leave the other loose tabs free while positioning the three halves around P13. Support the growing structure with your hands; the positions in the drawing do not mean its other joins are already closed.
Orientation: 23 S=P13, L=V11, R=V07. 18 Q=P13, R=V05, L=V11. Look toward P13; the lower left view enlarges this same peak. Orange marks only the moving tab.
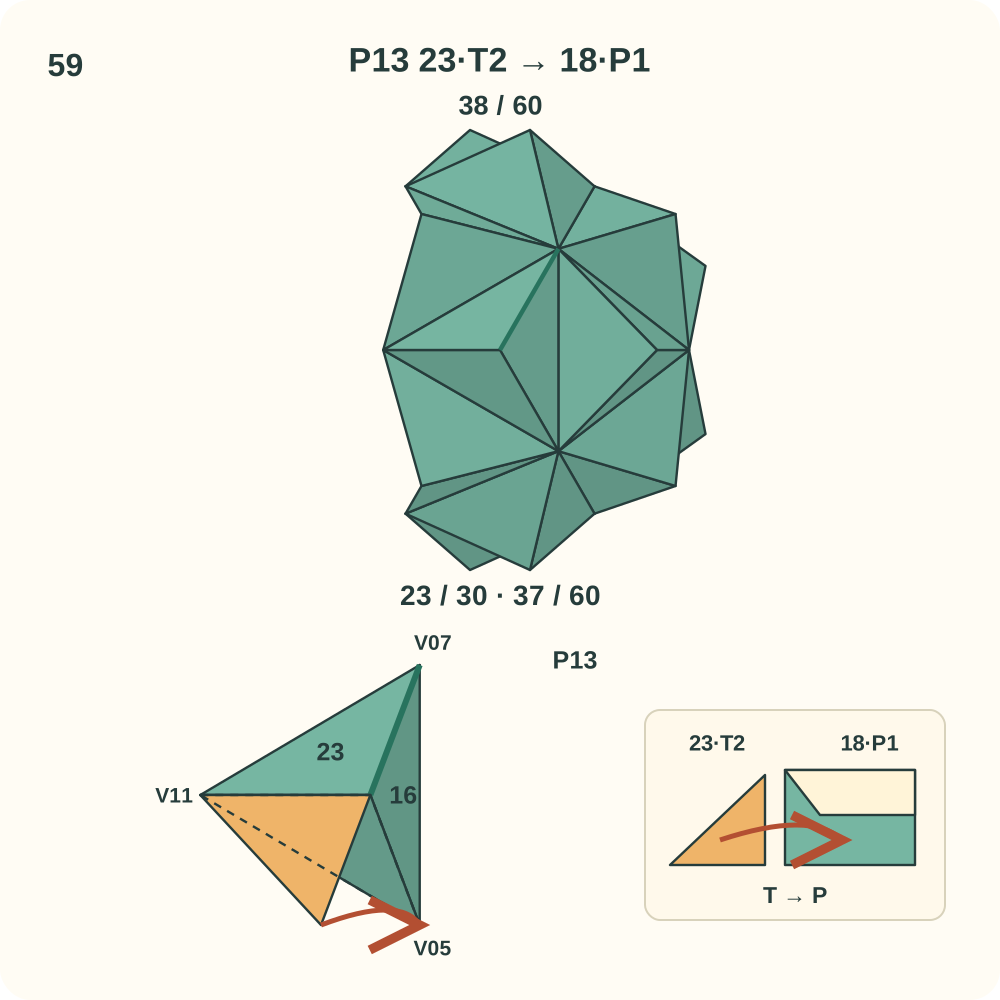
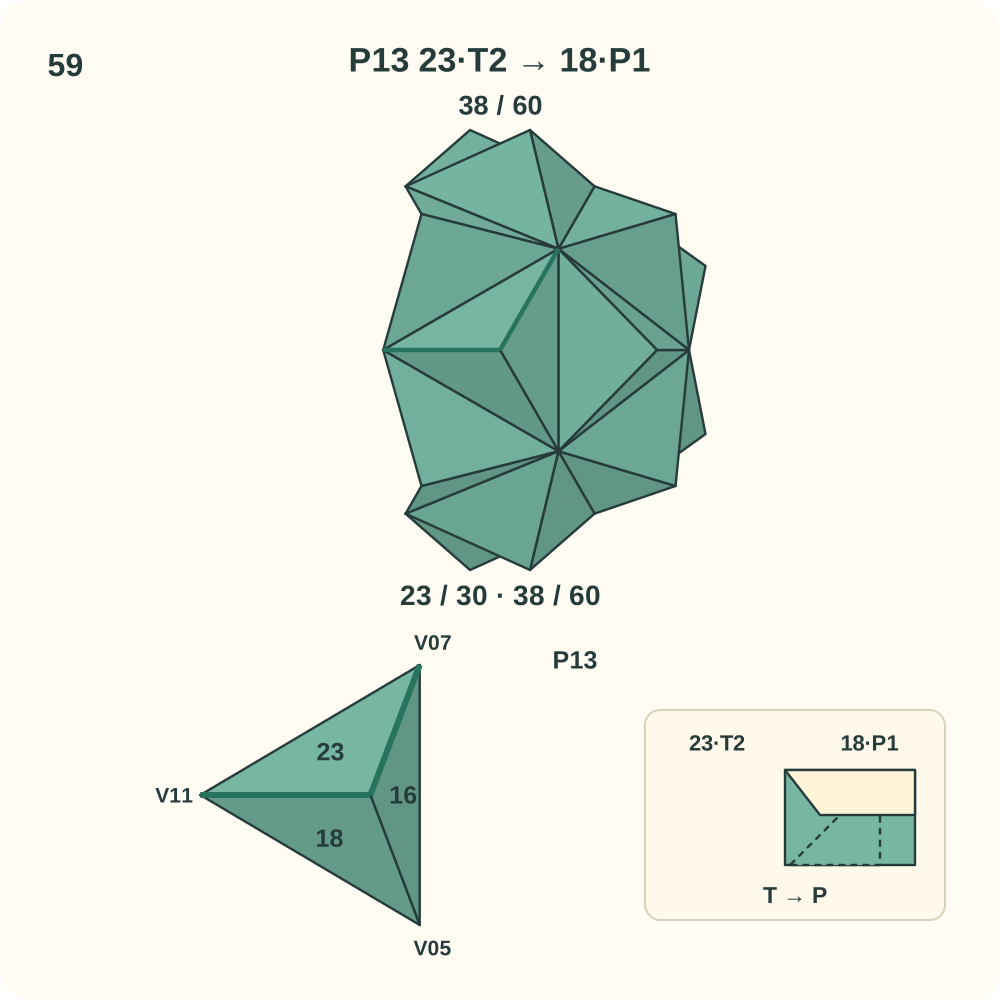
Join 38 of 60 is 23·T2 → 18·P1. Two other edges of this peak may still need a connection.
Step 60: Join 18·T1 to 16·P2
Keep the existing units in place. At peak P13, lift the lip of 16·P2 beside V05 and guide 18·T1 underneath it. The tab hinges along the edge from V05 to the peak; its far tip heads toward V07. This is the third join around P13; curve its three halves into one raised trihedral peak as you close the loop. Support the growing structure with your hands; the positions in the drawing do not mean its other joins are already closed.
Orientation: 18 Q=P13, R=V05, L=V11. 16 S=P13, L=V07, R=V05. Look toward P13; the lower left view enlarges this same peak. Orange marks only the moving tab.
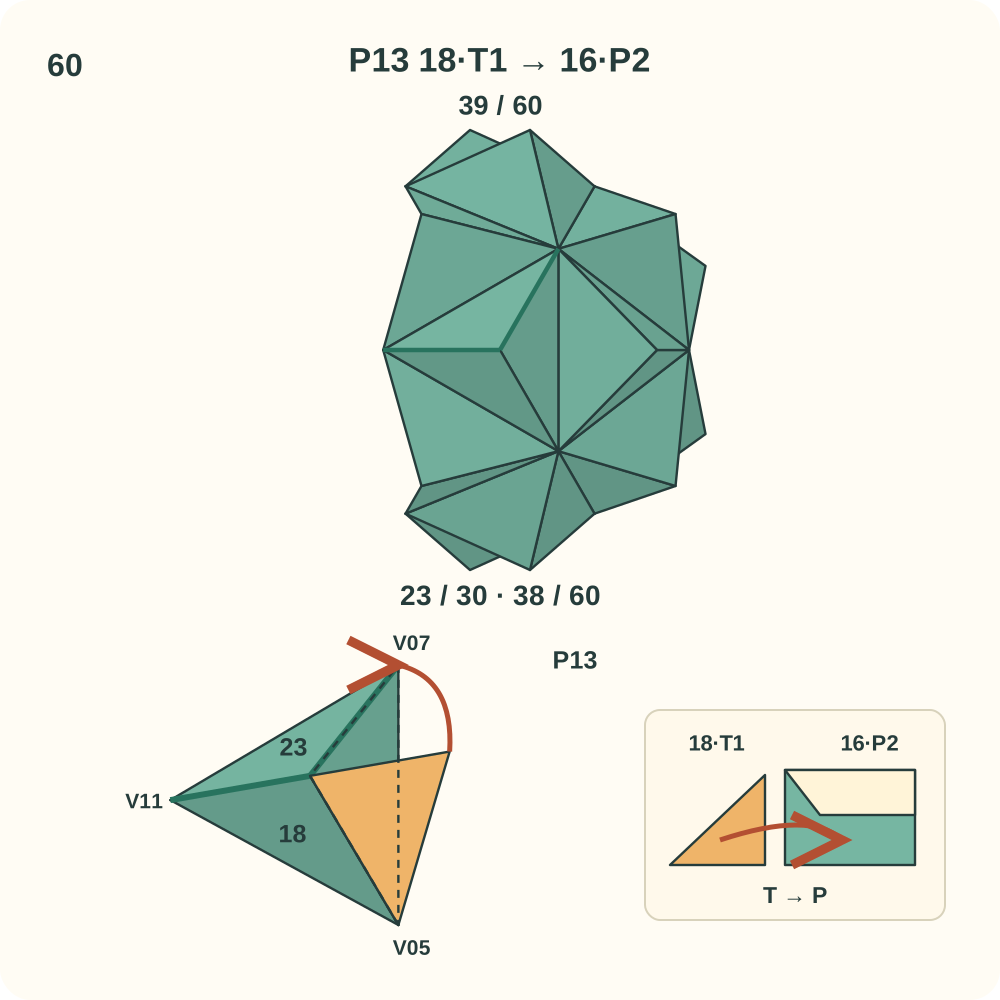
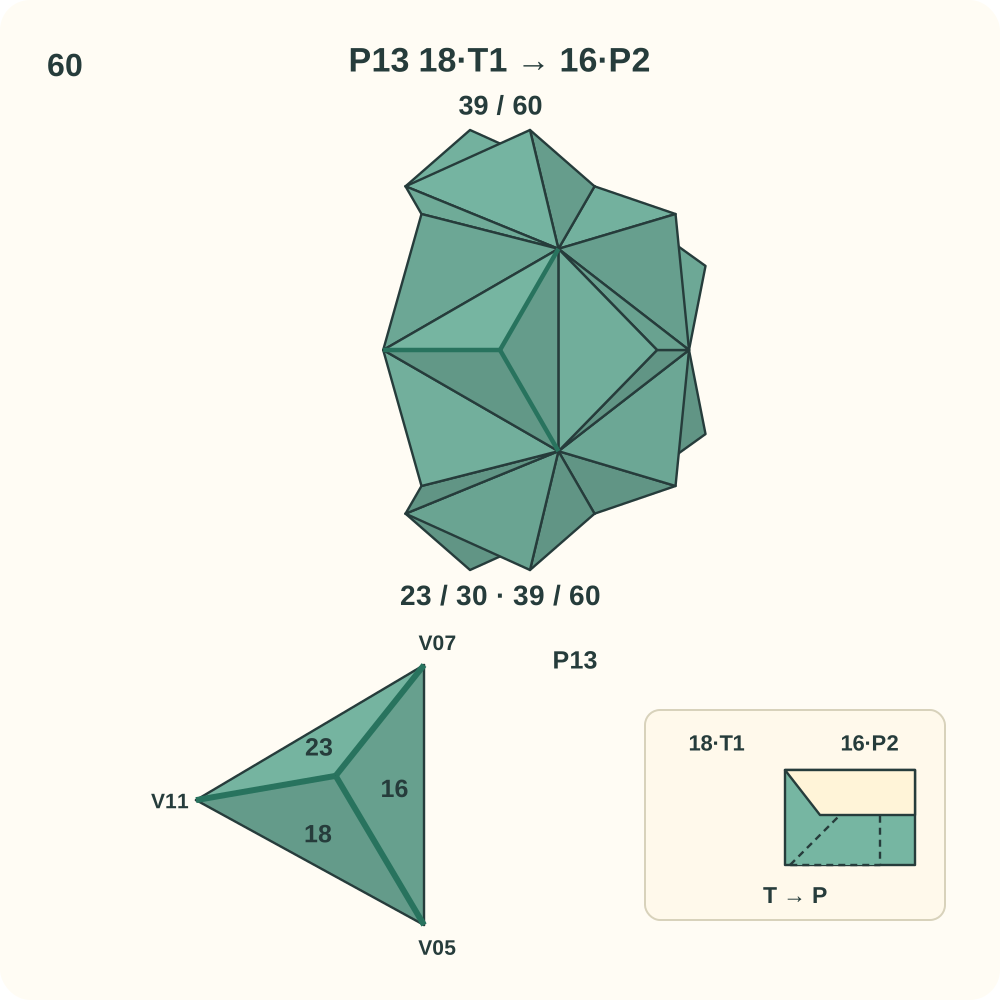
Join 39 of 60 is 18·T1 → 16·P2. Peak P13 now has its three directed joins.
Step 61: Join 18·T2 to 26·P1
Bring in unit 26. At peak P14, lift the lip of 26·P1 beside V11 and guide 18·T2 underneath it. The tab hinges along the edge from V11 to the peak; its far tip heads toward V09. Leave the other loose tabs free while positioning the three halves around P14. Support the growing structure with your hands; the positions in the drawing do not mean its other joins are already closed.
Orientation: 18 S=P14, L=V11, R=V05. 26 Q=P14, R=V09, L=V11. Look toward P14; the lower left view enlarges this same peak. Orange marks only the moving tab.
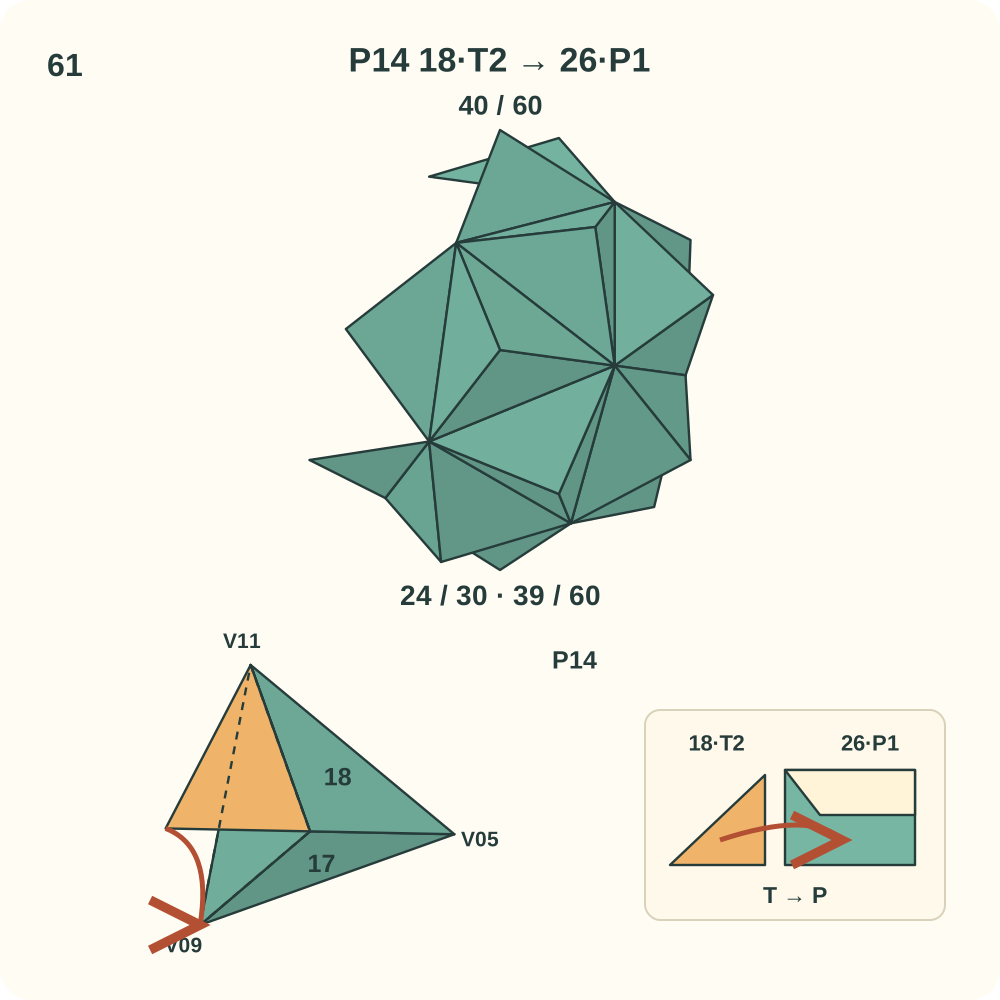
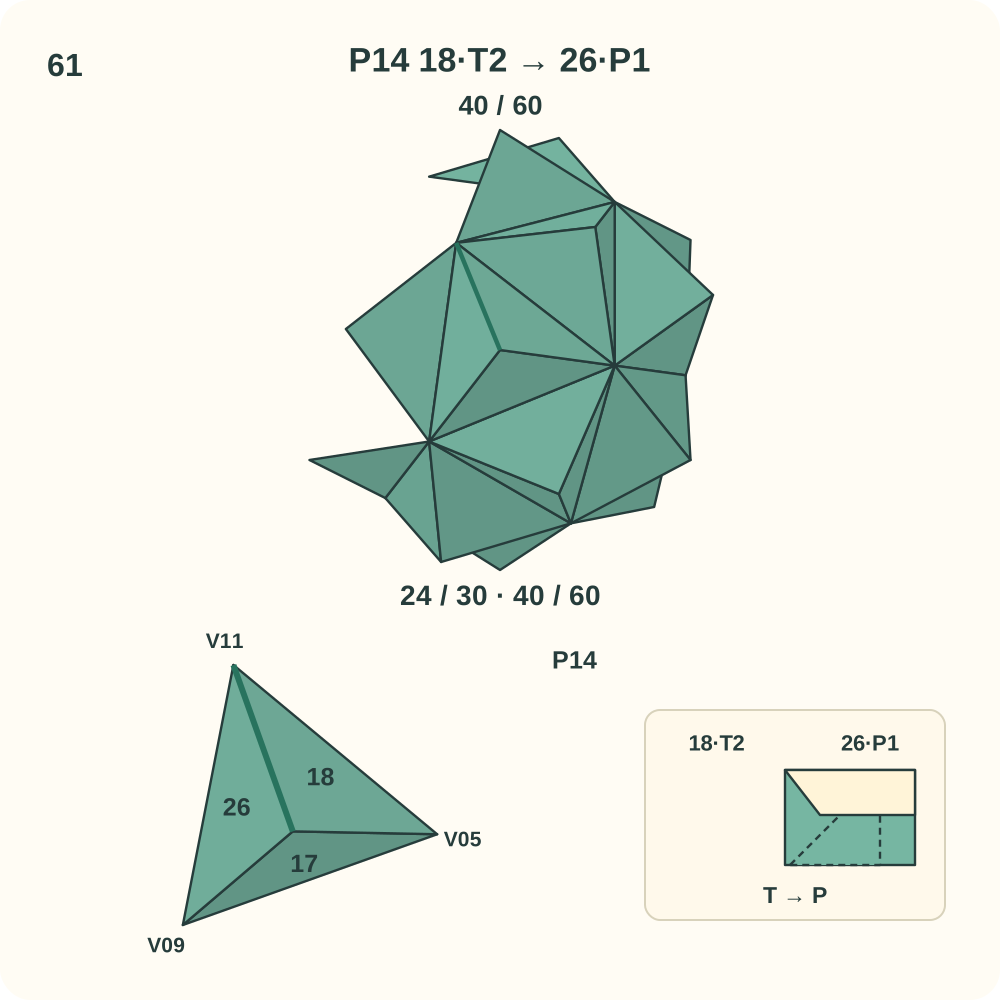
Join 40 of 60 is 18·T2 → 26·P1. Two other edges of this peak may still need a connection.
Step 62: Join 26·T1 to 17·P1
Keep the existing units in place. At peak P14, lift the lip of 17·P1 beside V09 and guide 26·T1 underneath it. The tab hinges along the edge from V09 to the peak; its far tip heads toward V05. Leave the other loose tabs free while positioning the three halves around P14. Support the growing structure with your hands; the positions in the drawing do not mean its other joins are already closed.
Orientation: 26 Q=P14, R=V09, L=V11. 17 Q=P14, R=V05, L=V09. Look toward P14; the lower left view enlarges this same peak. Orange marks only the moving tab.
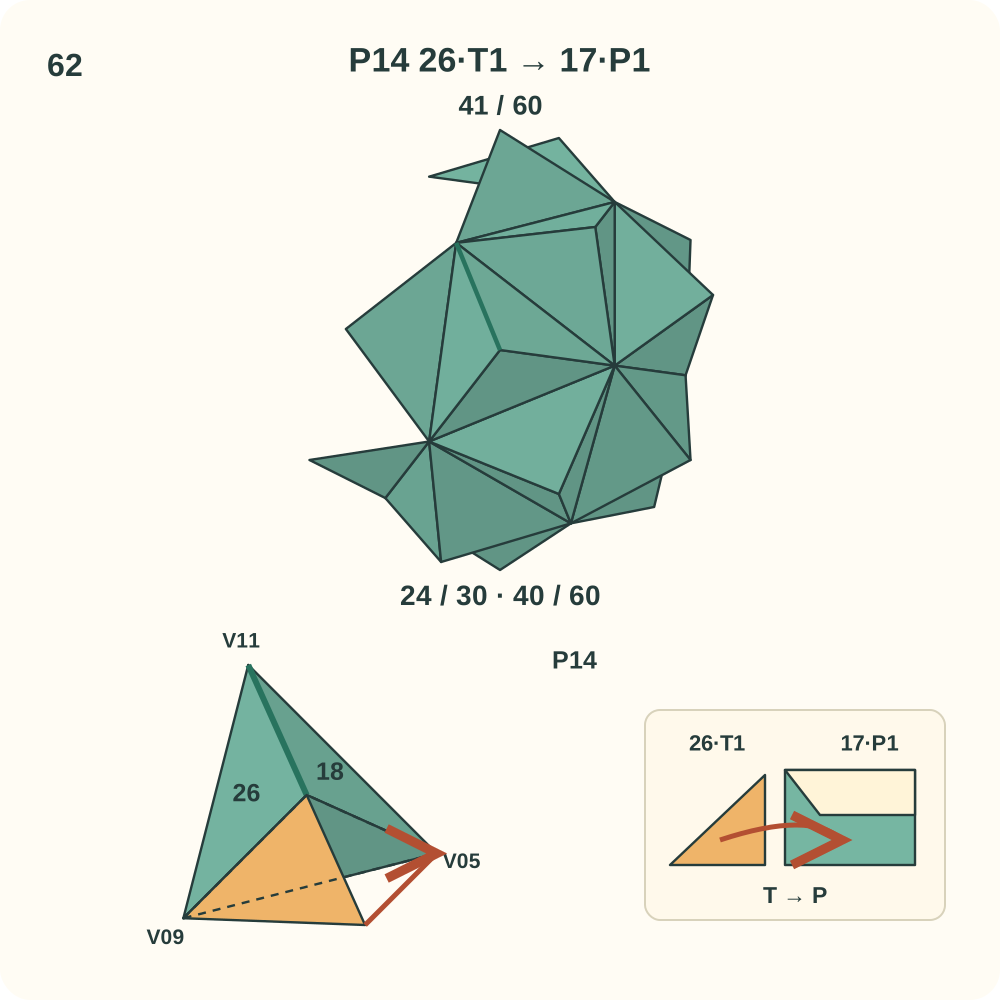
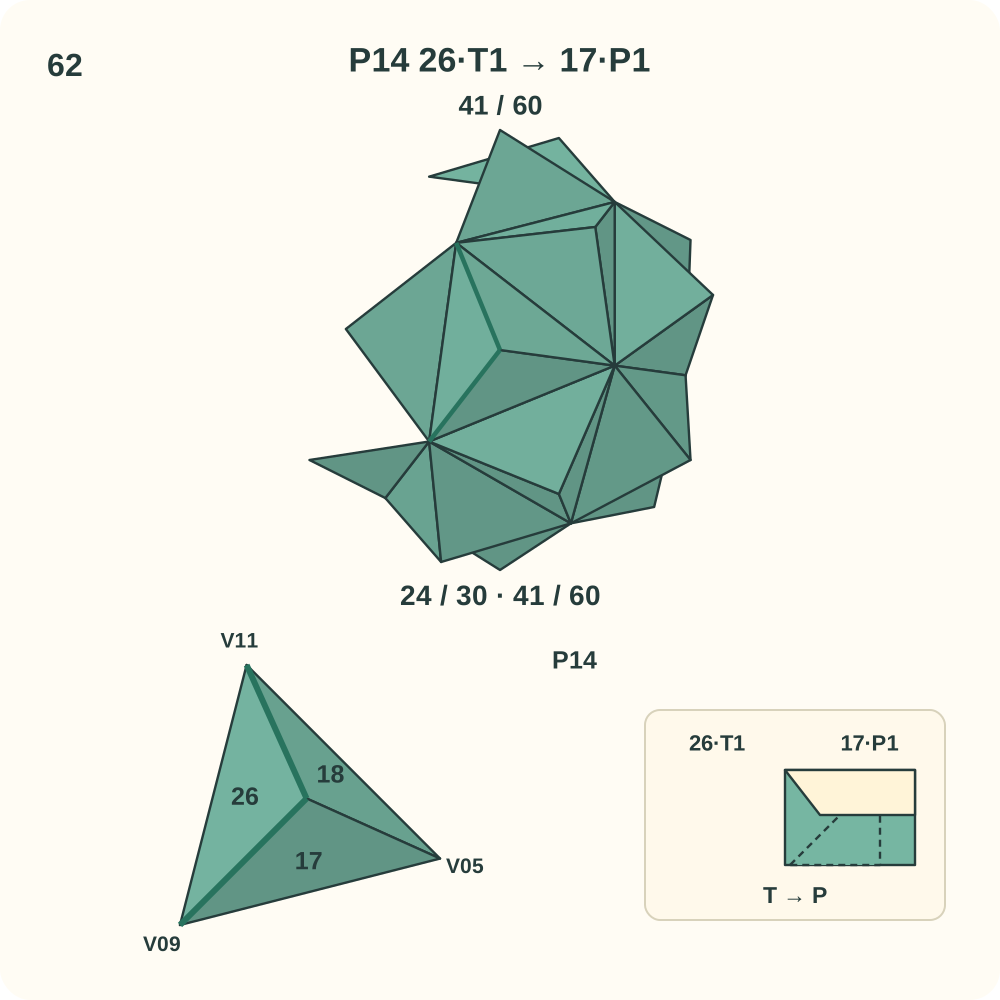
Join 41 of 60 is 26·T1 → 17·P1. Two other edges of this peak may still need a connection.
Step 63: Join 17·T1 to 18·P2
Keep the existing units in place. At peak P14, lift the lip of 18·P2 beside V05 and guide 17·T1 underneath it. The tab hinges along the edge from V05 to the peak; its far tip heads toward V11. This is the third join around P14; curve its three halves into one raised trihedral peak as you close the loop. Support the growing structure with your hands; the positions in the drawing do not mean its other joins are already closed.
Orientation: 17 Q=P14, R=V05, L=V09. 18 S=P14, L=V11, R=V05. Look toward P14; the lower left view enlarges this same peak. Orange marks only the moving tab.
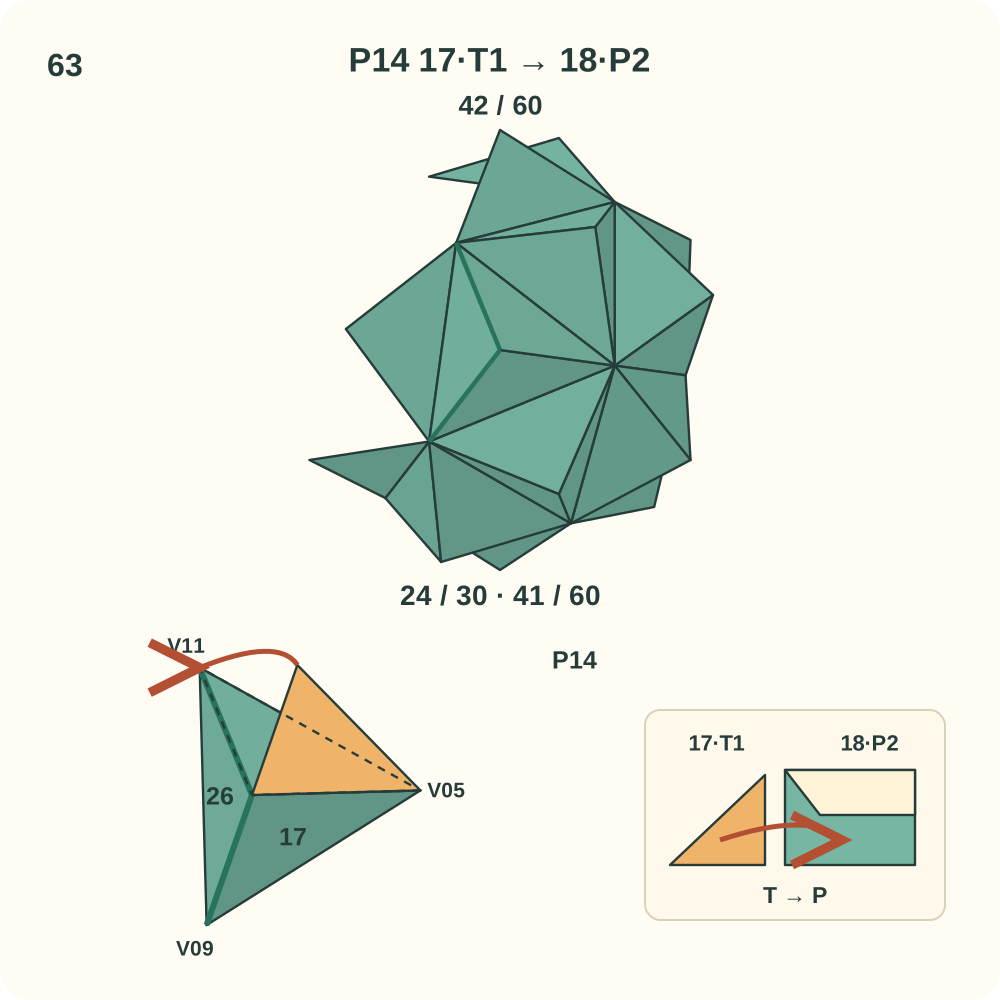
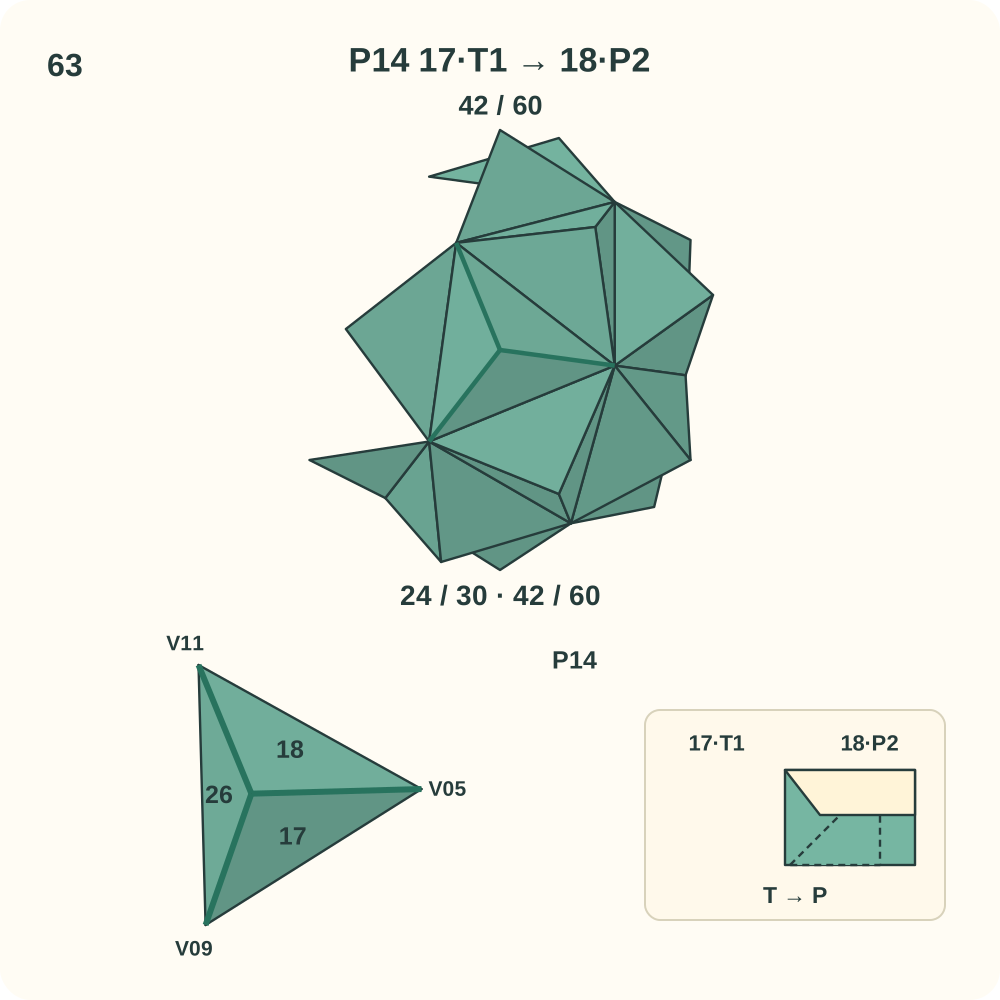
Join 42 of 60 is 17·T1 → 18·P2. Peak P14 now has its three directed joins.
Step 64: Join 19·T1 to 21·P2
Bring in unit 21. At peak P15, lift the lip of 21·P2 beside V06 and guide 19·T1 underneath it. The tab hinges along the edge from V06 to the peak; its far tip heads toward V12. Leave the other loose tabs free while positioning the three halves around P15. Support the growing structure with your hands; the positions in the drawing do not mean its other joins are already closed.
Orientation: 19 Q=P15, R=V06, L=V08. 21 S=P15, L=V12, R=V06. Look toward P15; the lower left view enlarges this same peak. Orange marks only the moving tab.
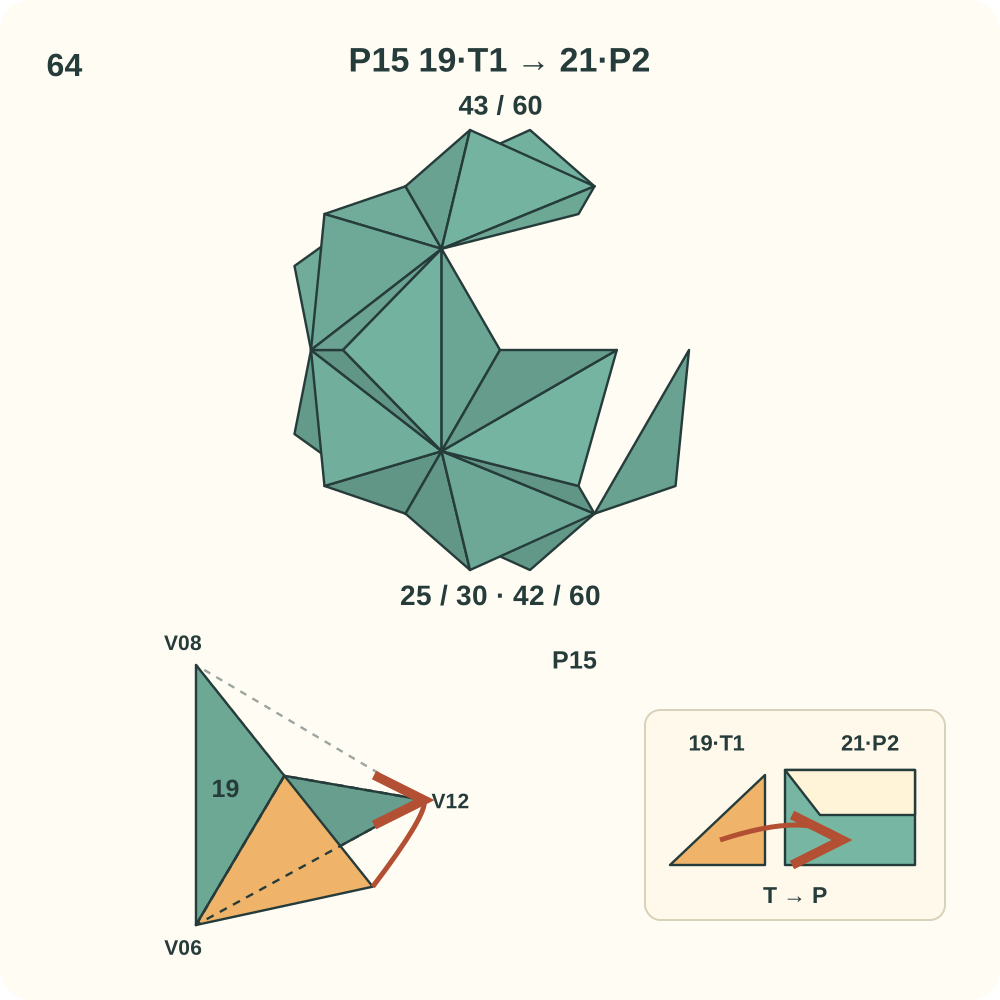
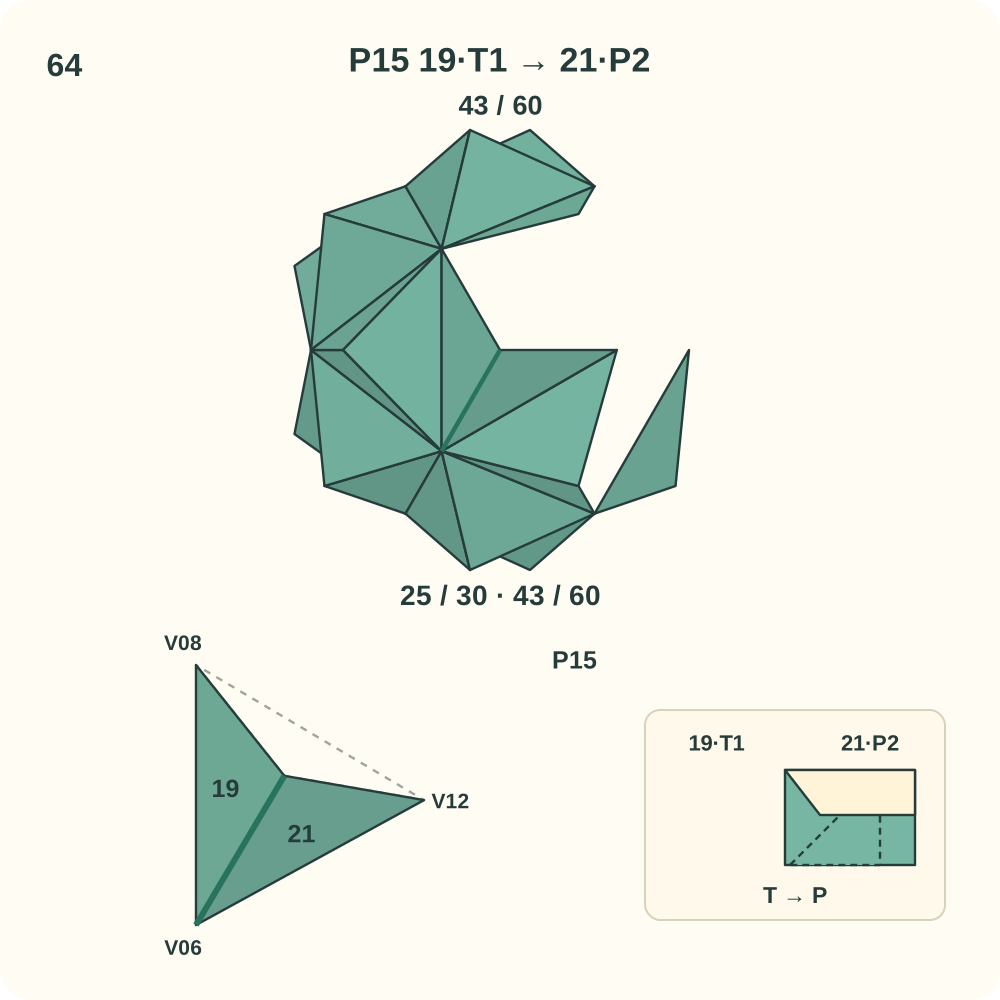
Join 43 of 60 is 19·T1 → 21·P2. Two other edges of this peak may still need a connection.
Step 65: Join 21·T2 to 25·P1
Bring in unit 25. At peak P15, lift the lip of 25·P1 beside V12 and guide 21·T2 underneath it. The tab hinges along the edge from V12 to the peak; its far tip heads toward V08. Leave the other loose tabs free while positioning the three halves around P15. Support the growing structure with your hands; the positions in the drawing do not mean its other joins are already closed.
Orientation: 21 S=P15, L=V12, R=V06. 25 Q=P15, R=V08, L=V12. Look toward P15; the lower left view enlarges this same peak. Orange marks only the moving tab.
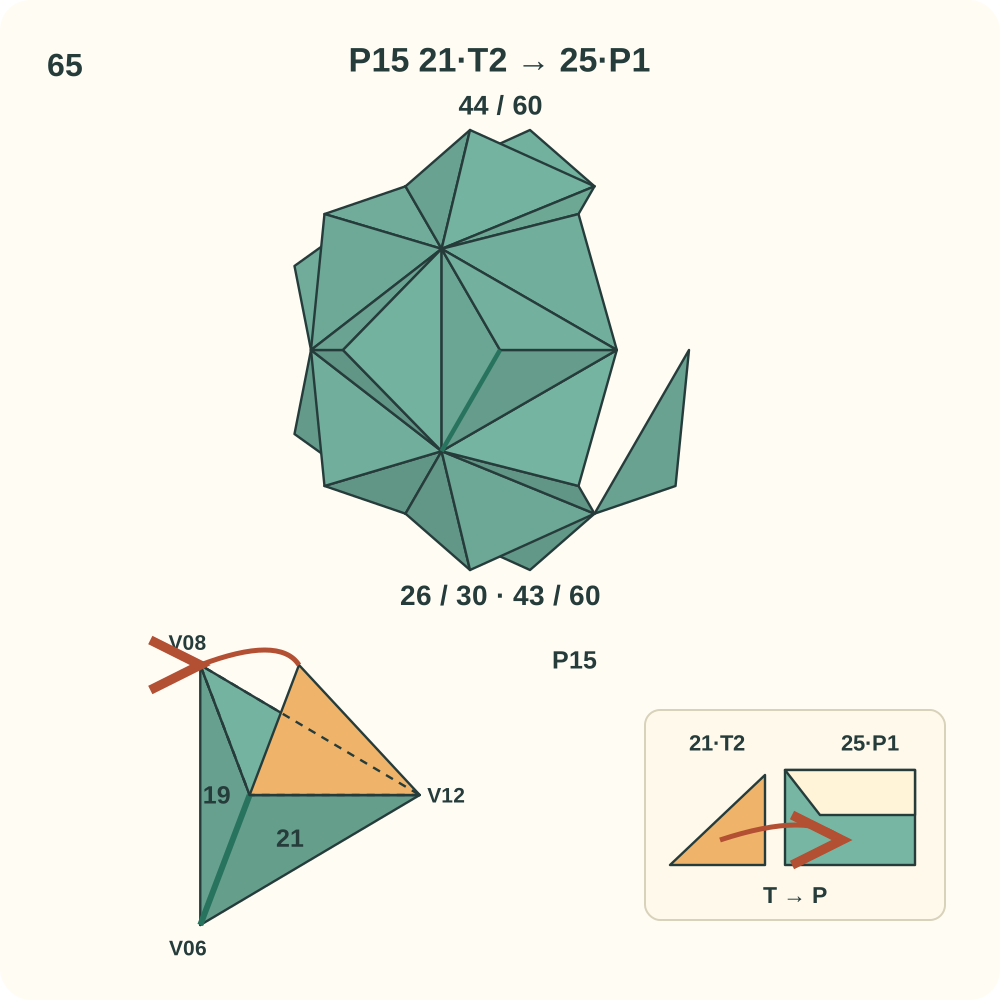
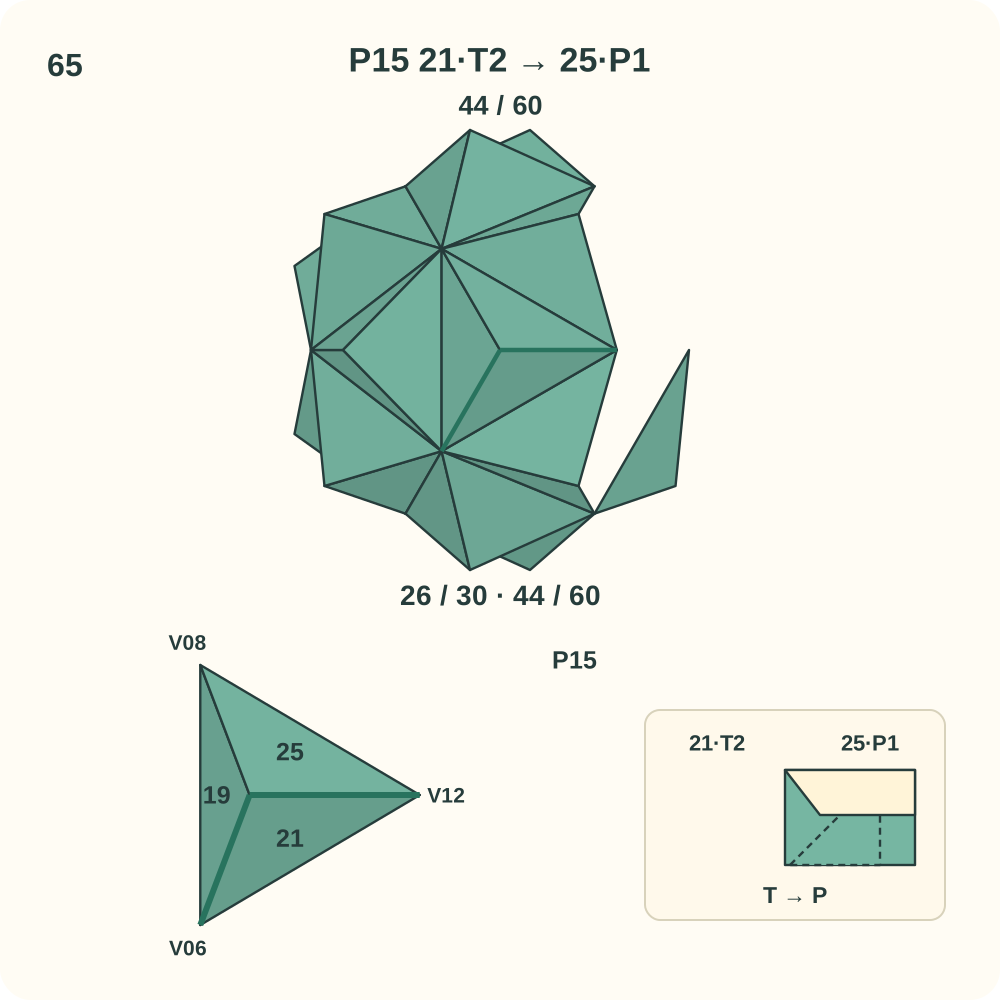
Join 44 of 60 is 21·T2 → 25·P1. Two other edges of this peak may still need a connection.
Step 66: Join 25·T1 to 19·P1
Keep the existing units in place. At peak P15, lift the lip of 19·P1 beside V08 and guide 25·T1 underneath it. The tab hinges along the edge from V08 to the peak; its far tip heads toward V06. This is the third join around P15; curve its three halves into one raised trihedral peak as you close the loop. Support the growing structure with your hands; the positions in the drawing do not mean its other joins are already closed.
Orientation: 25 Q=P15, R=V08, L=V12. 19 Q=P15, R=V06, L=V08. Look toward P15; the lower left view enlarges this same peak. Orange marks only the moving tab.
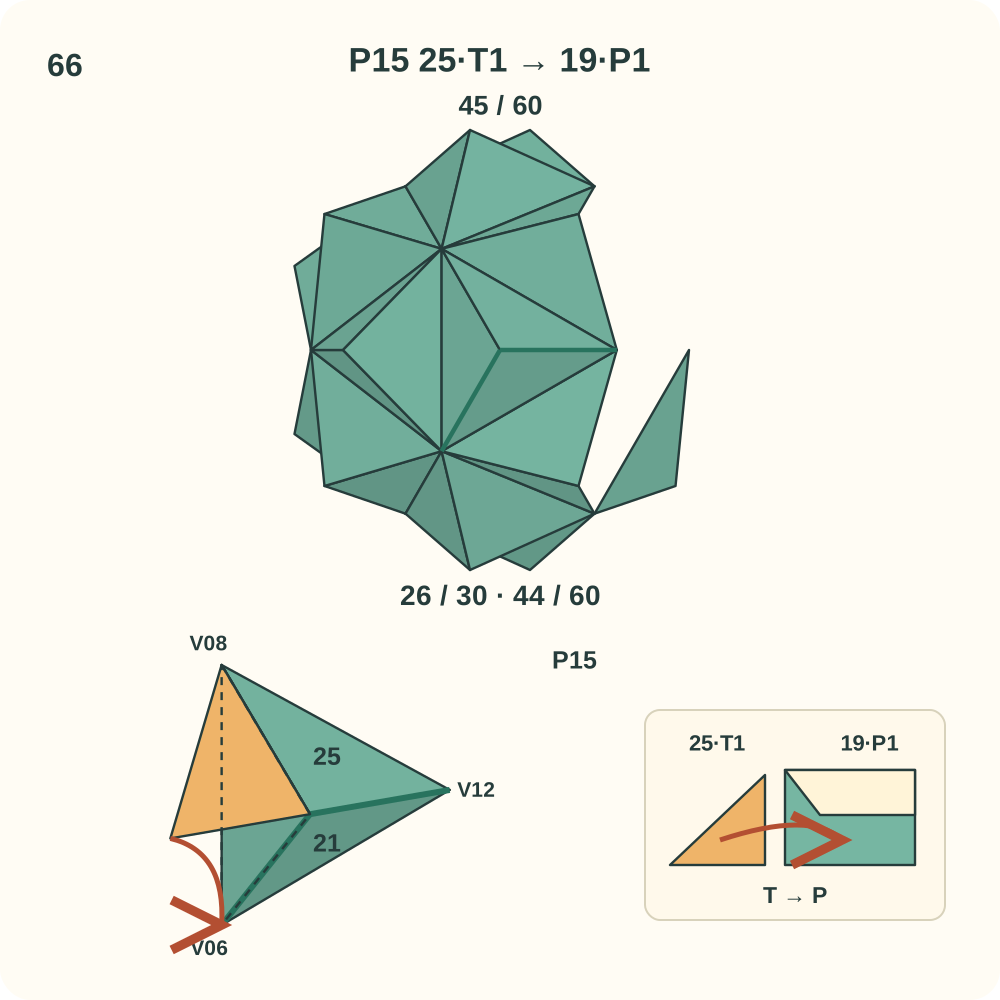
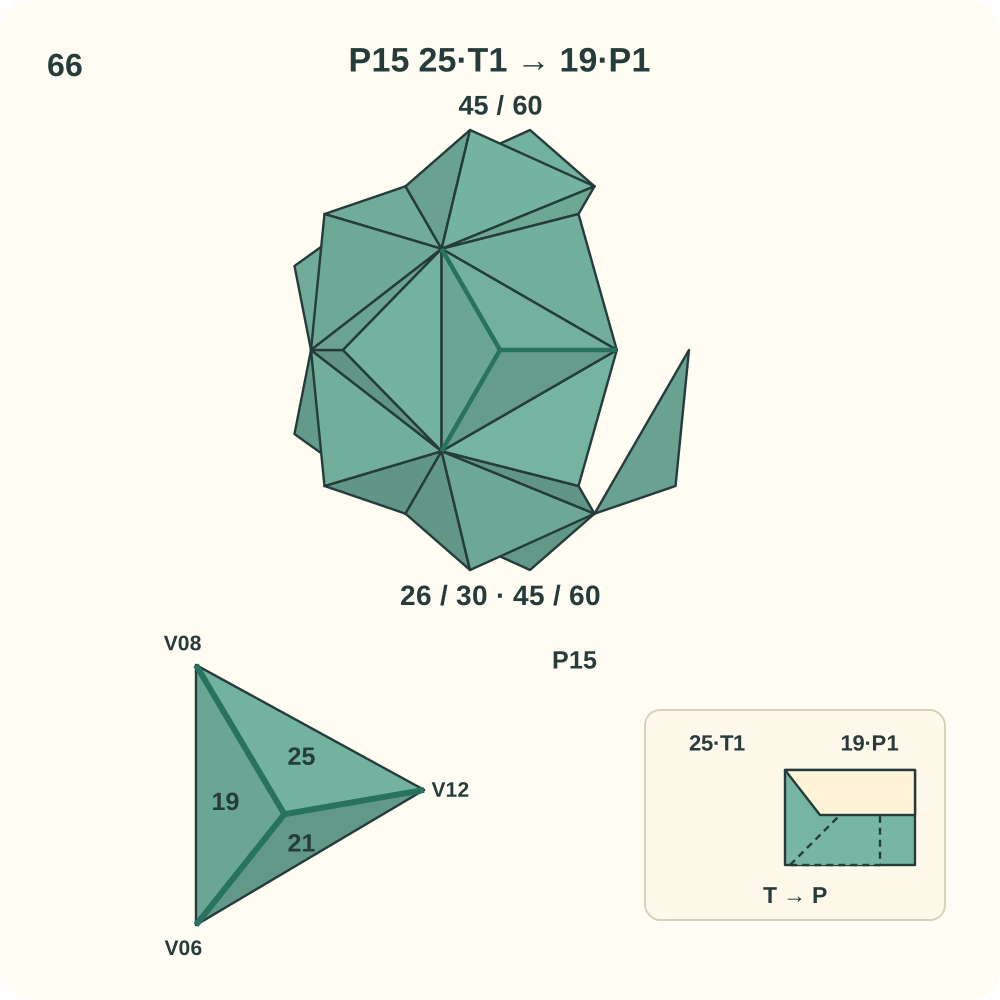
Join 45 of 60 is 25·T1 → 19·P1. Peak P15 now has its three directed joins.
Step 67: Join 20·T2 to 27·P2
Bring in unit 27. At peak P16, lift the lip of 27·P2 beside V09 and guide 20·T2 underneath it. The tab hinges along the edge from V09 to the peak; its far tip heads toward V12. Leave the other loose tabs free while positioning the three halves around P16. Support the growing structure with your hands; the positions in the drawing do not mean its other joins are already closed.
Orientation: 20 S=P16, L=V09, R=V06. 27 S=P16, L=V12, R=V09. Look toward P16; the lower left view enlarges this same peak. Orange marks only the moving tab.
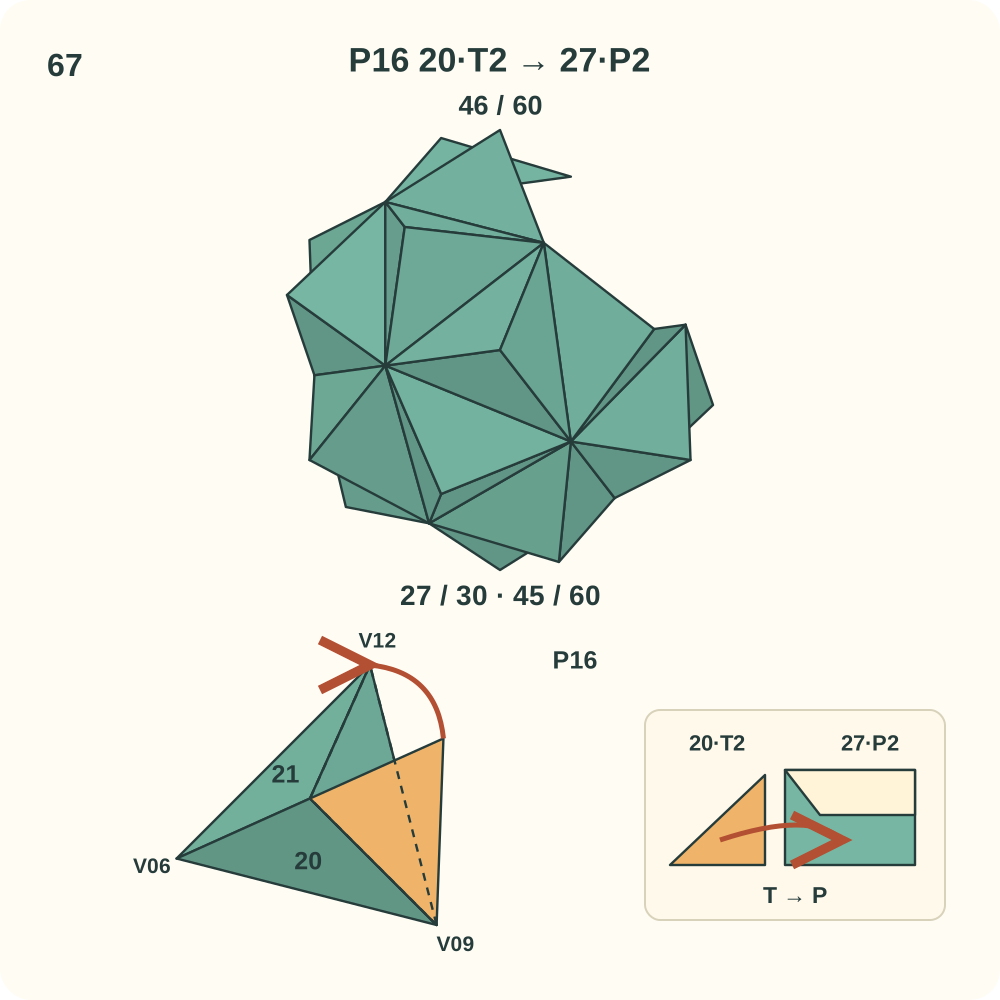
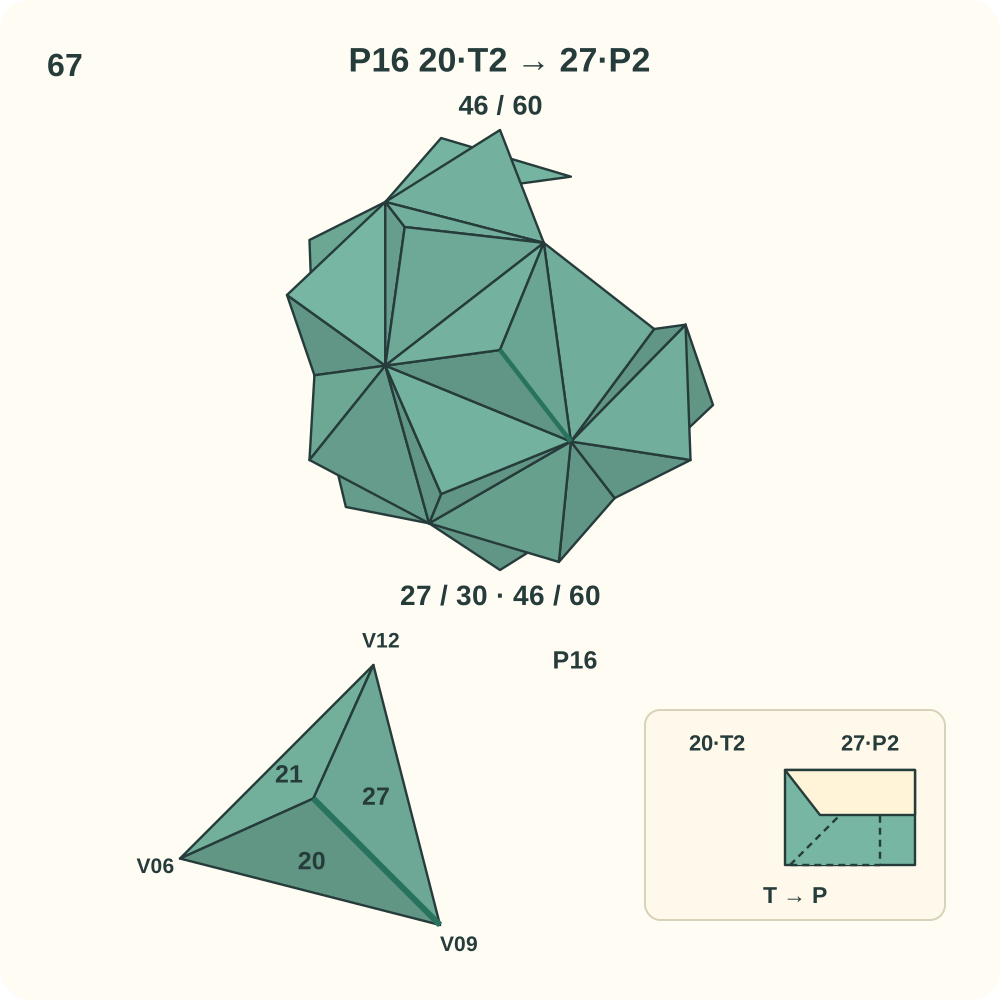
Join 46 of 60 is 20·T2 → 27·P2. Two other edges of this peak may still need a connection.
Step 68: Join 27·T2 to 21·P1
Keep the existing units in place. At peak P16, lift the lip of 21·P1 beside V12 and guide 27·T2 underneath it. The tab hinges along the edge from V12 to the peak; its far tip heads toward V06. Leave the other loose tabs free while positioning the three halves around P16. Support the growing structure with your hands; the positions in the drawing do not mean its other joins are already closed.
Orientation: 27 S=P16, L=V12, R=V09. 21 Q=P16, R=V06, L=V12. Look toward P16; the lower left view enlarges this same peak. Orange marks only the moving tab.
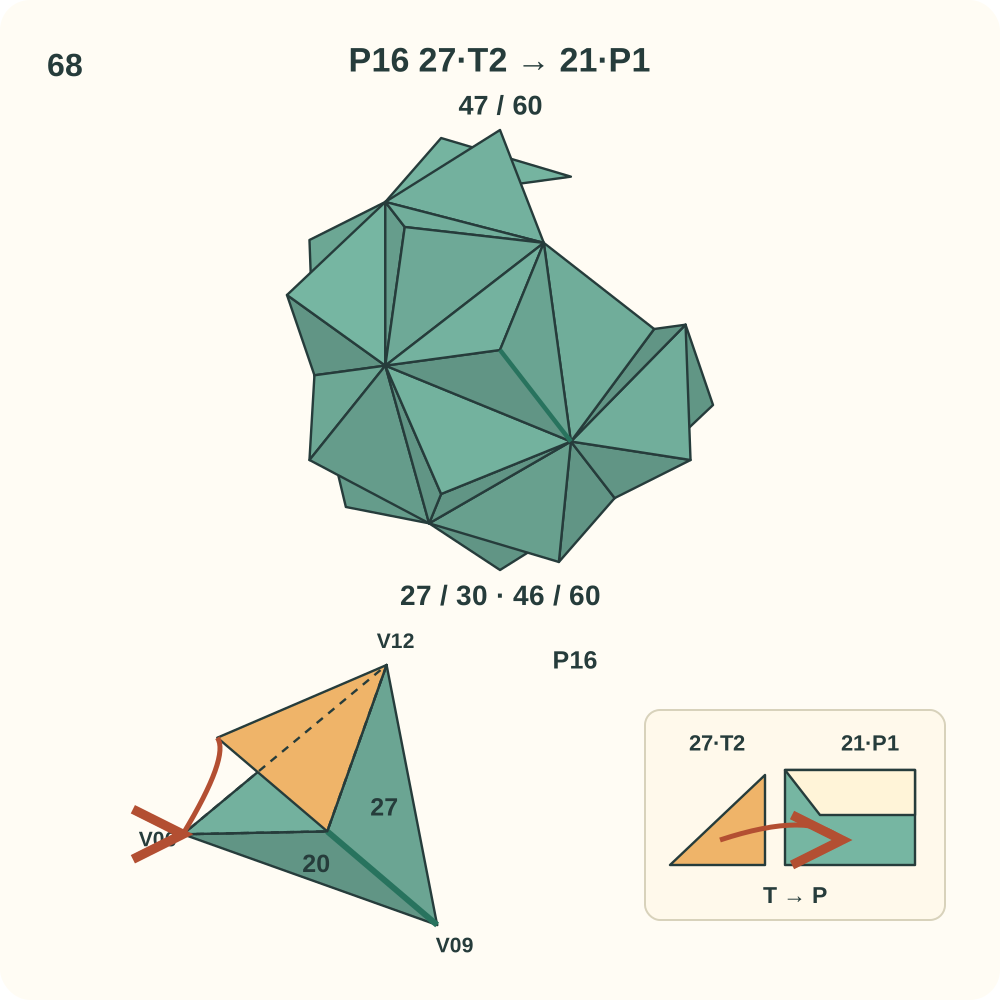
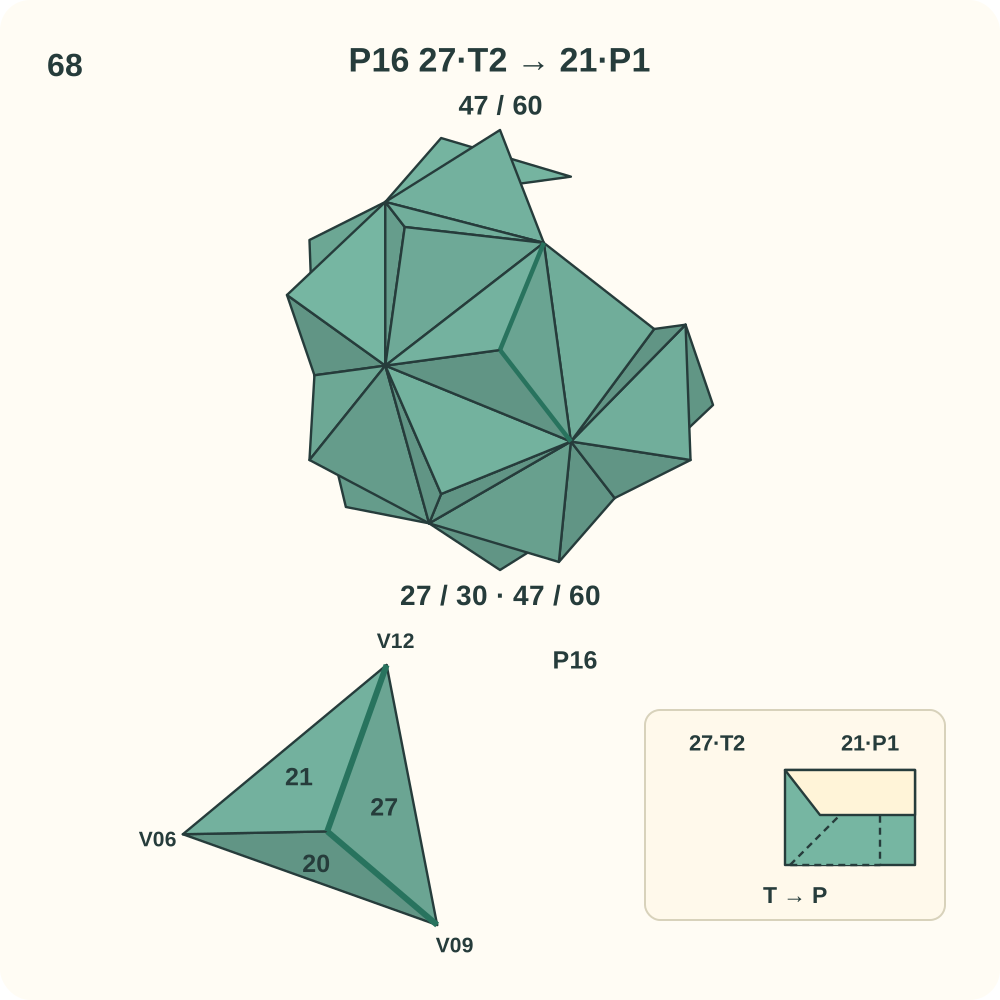
Join 47 of 60 is 27·T2 → 21·P1. Two other edges of this peak may still need a connection.
Step 69: Join 21·T1 to 20·P2
Keep the existing units in place. At peak P16, lift the lip of 20·P2 beside V06 and guide 21·T1 underneath it. The tab hinges along the edge from V06 to the peak; its far tip heads toward V09. This is the third join around P16; curve its three halves into one raised trihedral peak as you close the loop. Support the growing structure with your hands; the positions in the drawing do not mean its other joins are already closed.
Orientation: 21 Q=P16, R=V06, L=V12. 20 S=P16, L=V09, R=V06. Look toward P16; the lower left view enlarges this same peak. Orange marks only the moving tab.
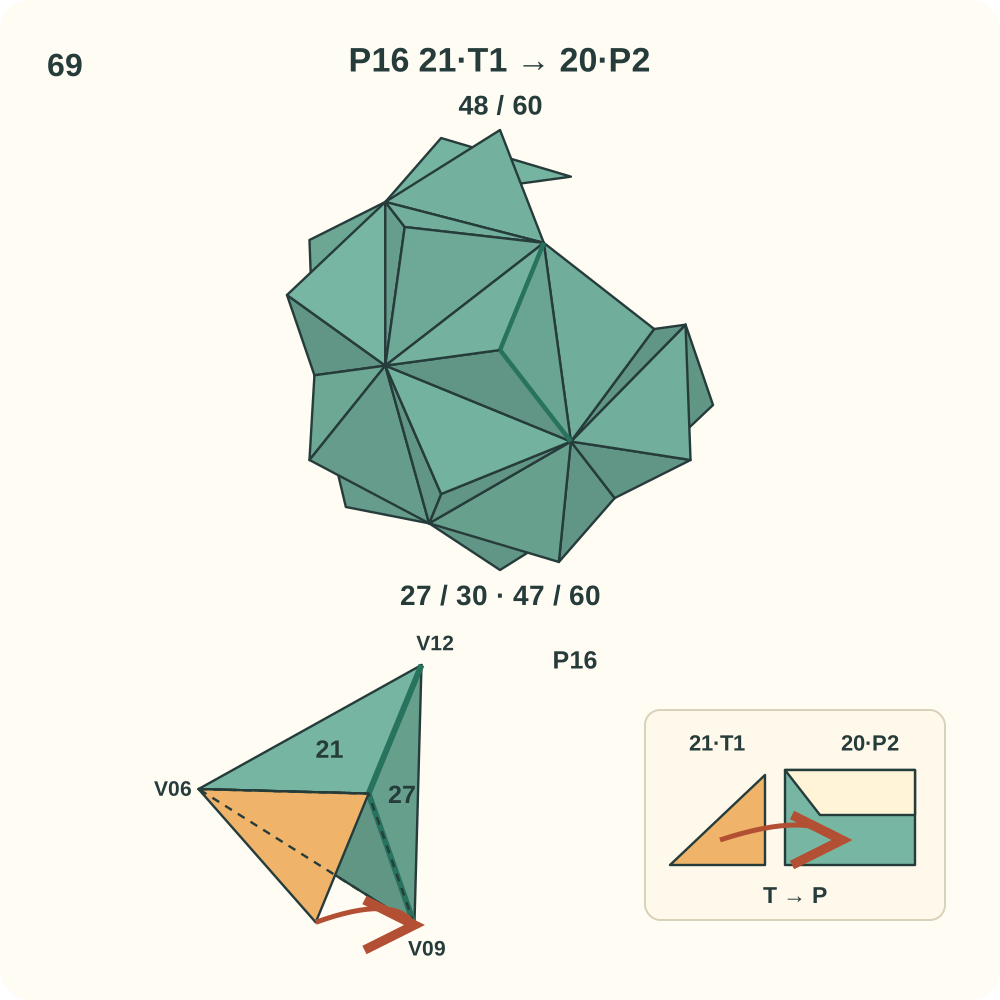
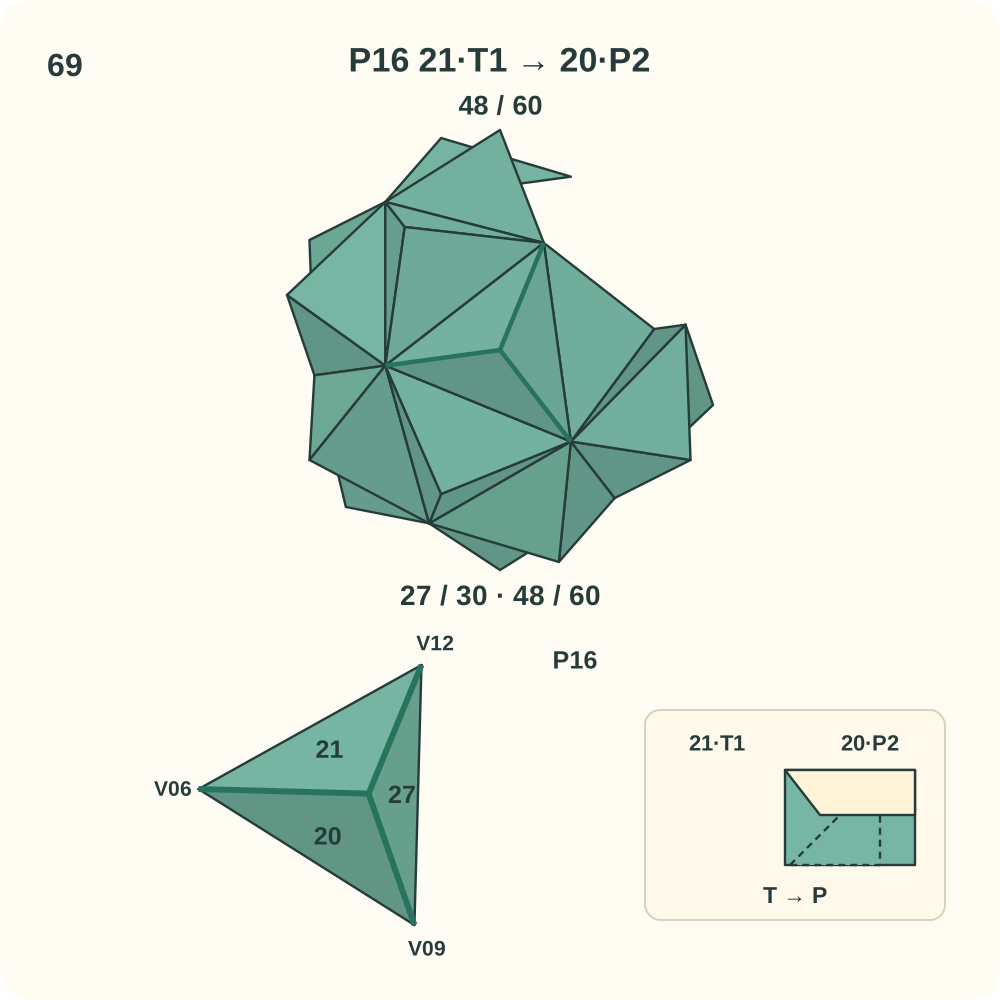
Join 48 of 60 is 21·T1 → 20·P2. Peak P16 now has its three directed joins.
Step 70: Join 22·T2 to 28·P2
Bring in unit 28. At peak P17, lift the lip of 28·P2 beside V10 and guide 22·T2 underneath it. The tab hinges along the edge from V10 to the peak; its far tip heads toward V11. Leave the other loose tabs free while positioning the three halves around P17. Support the growing structure with your hands; the positions in the drawing do not mean its other joins are already closed.
Orientation: 22 S=P17, L=V10, R=V07. 28 S=P17, L=V11, R=V10. Look toward P17; the lower left view enlarges this same peak. Orange marks only the moving tab.
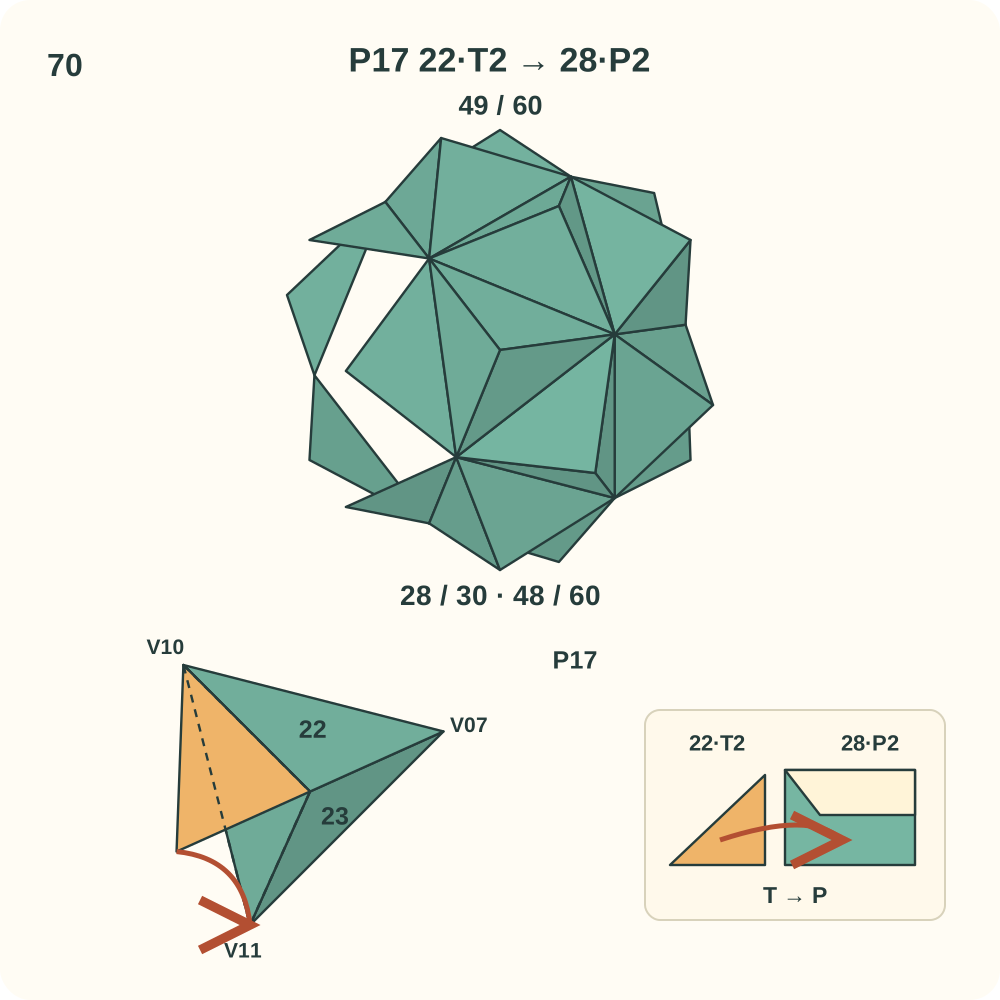
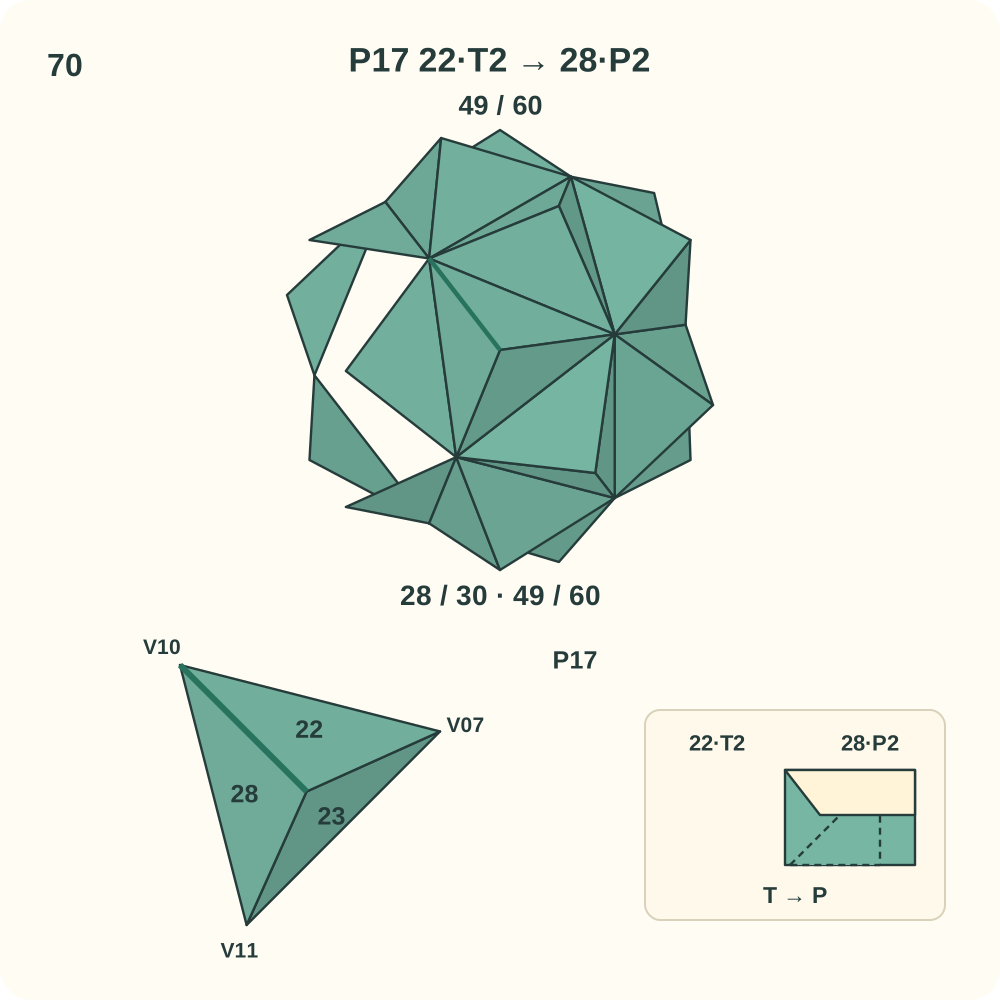
Join 49 of 60 is 22·T2 → 28·P2. Two other edges of this peak may still need a connection.
Step 71: Join 28·T2 to 23·P1
Keep the existing units in place. At peak P17, lift the lip of 23·P1 beside V11 and guide 28·T2 underneath it. The tab hinges along the edge from V11 to the peak; its far tip heads toward V07. Leave the other loose tabs free while positioning the three halves around P17. Support the growing structure with your hands; the positions in the drawing do not mean its other joins are already closed.
Orientation: 28 S=P17, L=V11, R=V10. 23 Q=P17, R=V07, L=V11. Look toward P17; the lower left view enlarges this same peak. Orange marks only the moving tab.
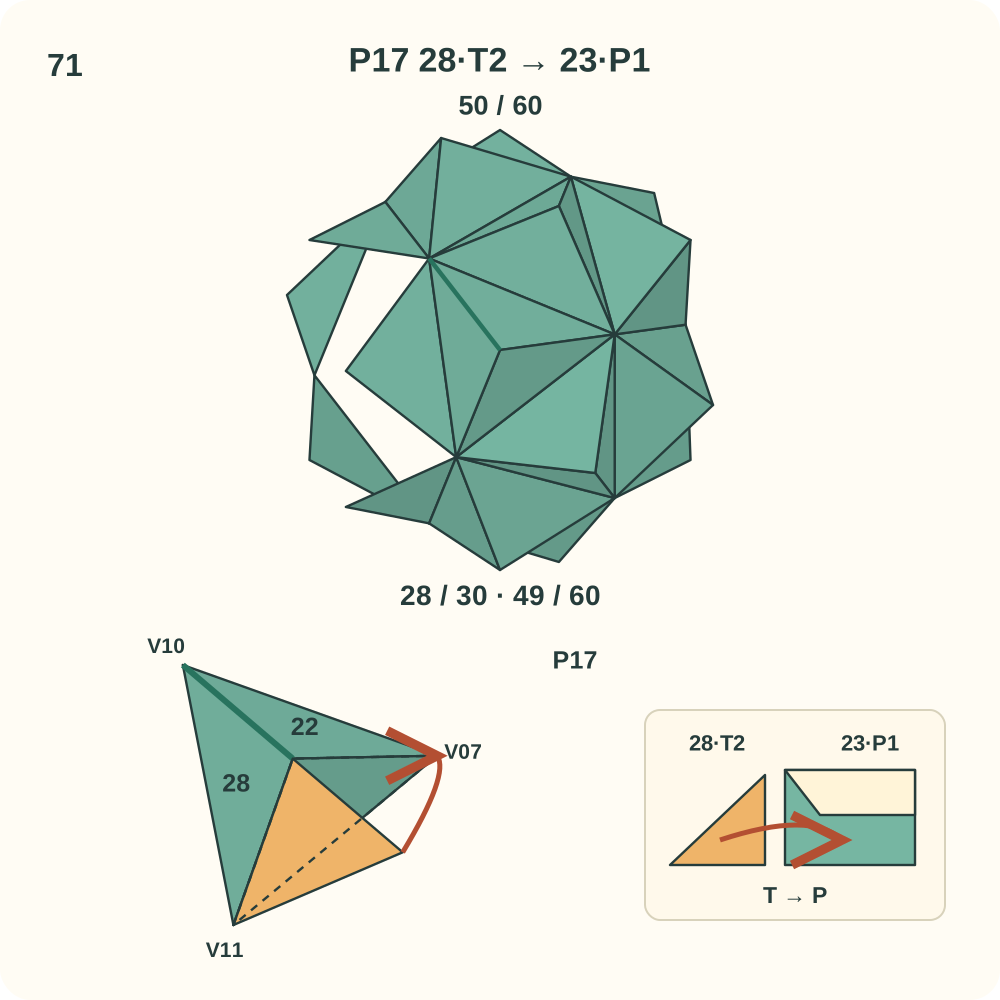
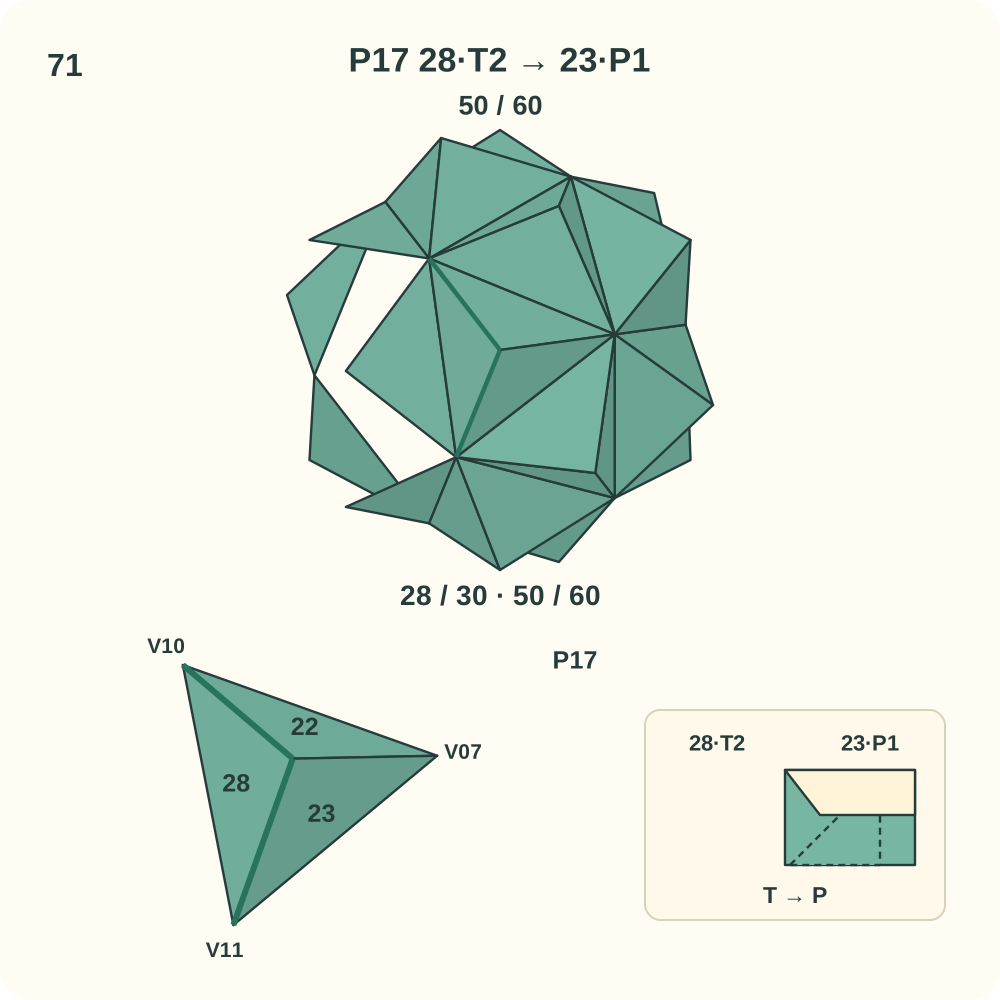
Join 50 of 60 is 28·T2 → 23·P1. Two other edges of this peak may still need a connection.
Step 72: Join 23·T1 to 22·P2
Keep the existing units in place. At peak P17, lift the lip of 22·P2 beside V07 and guide 23·T1 underneath it. The tab hinges along the edge from V07 to the peak; its far tip heads toward V10. This is the third join around P17; curve its three halves into one raised trihedral peak as you close the loop. Support the growing structure with your hands; the positions in the drawing do not mean its other joins are already closed.
Orientation: 23 Q=P17, R=V07, L=V11. 22 S=P17, L=V10, R=V07. Look toward P17; the lower left view enlarges this same peak. Orange marks only the moving tab.
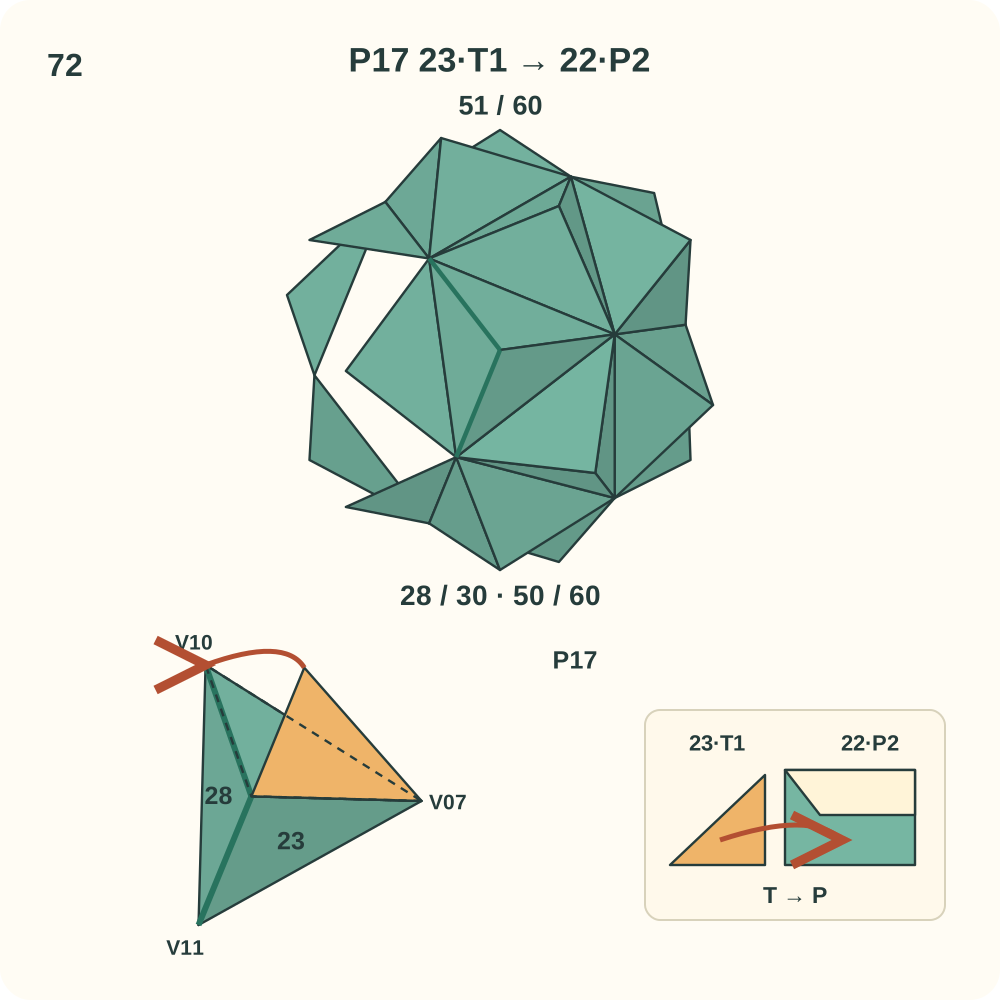
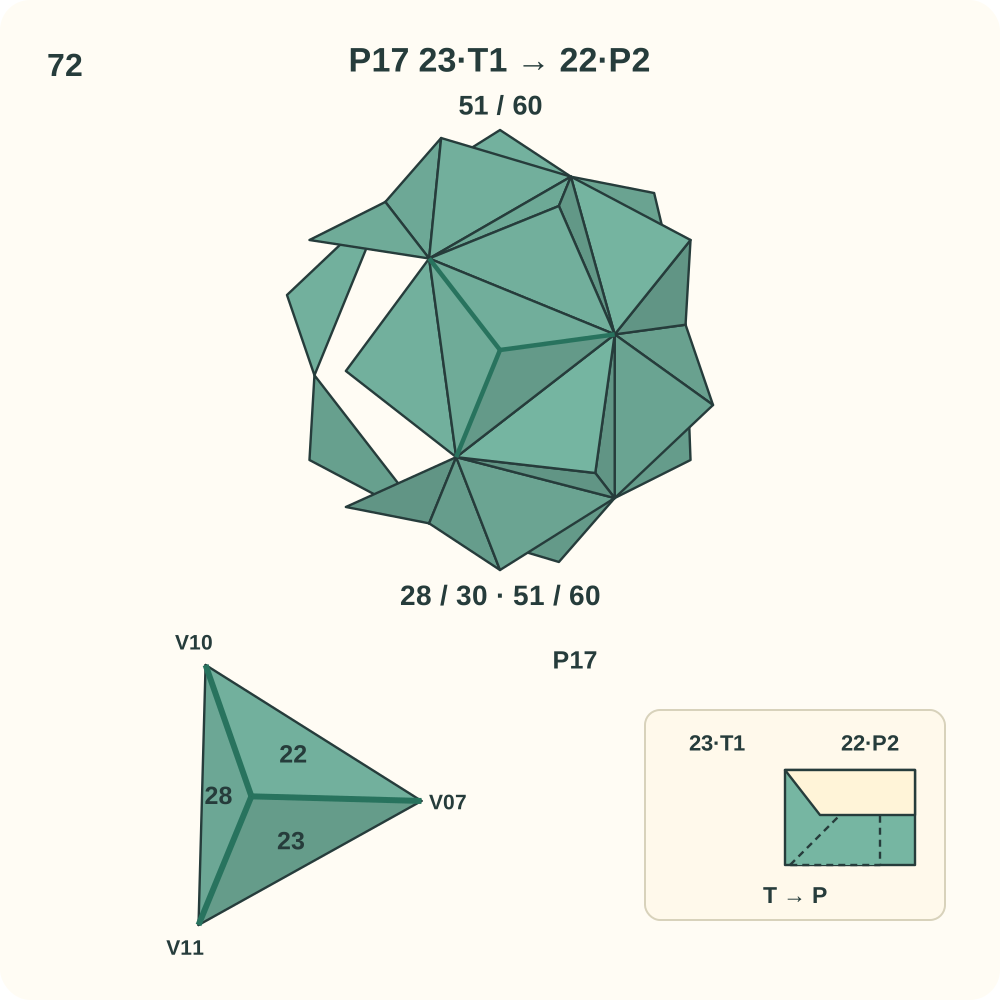
Join 51 of 60 is 23·T1 → 22·P2. Peak P17 now has its three directed joins.
Step 73: Join 25·T2 to 29·P1
Bring in unit 29. At peak P18, lift the lip of 29·P1 beside V12 and guide 25·T2 underneath it. The tab hinges along the edge from V12 to the peak; its far tip heads toward V10. Leave the other loose tabs free while positioning the three halves around P18. Support the growing structure with your hands; the positions in the drawing do not mean its other joins are already closed.
Orientation: 25 S=P18, L=V12, R=V08. 29 Q=P18, R=V10, L=V12. Look toward P18; the lower left view enlarges this same peak. Orange marks only the moving tab.
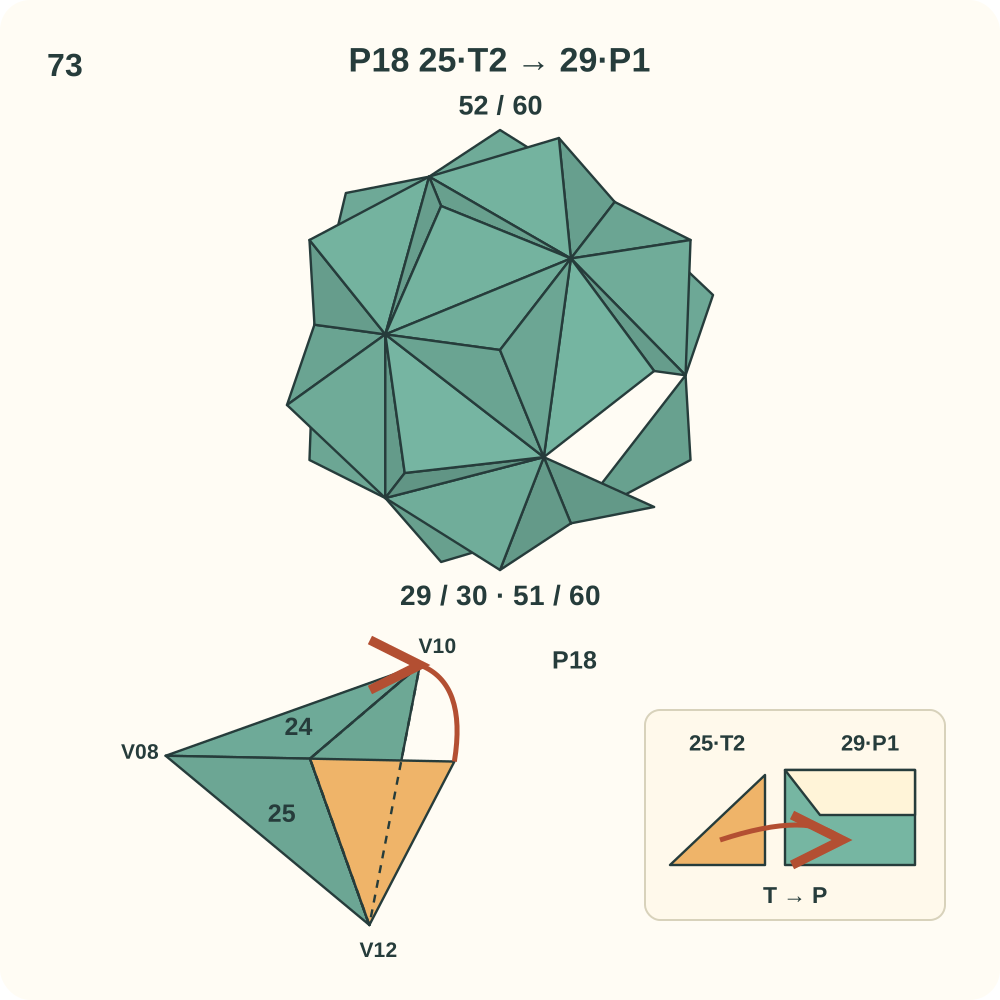
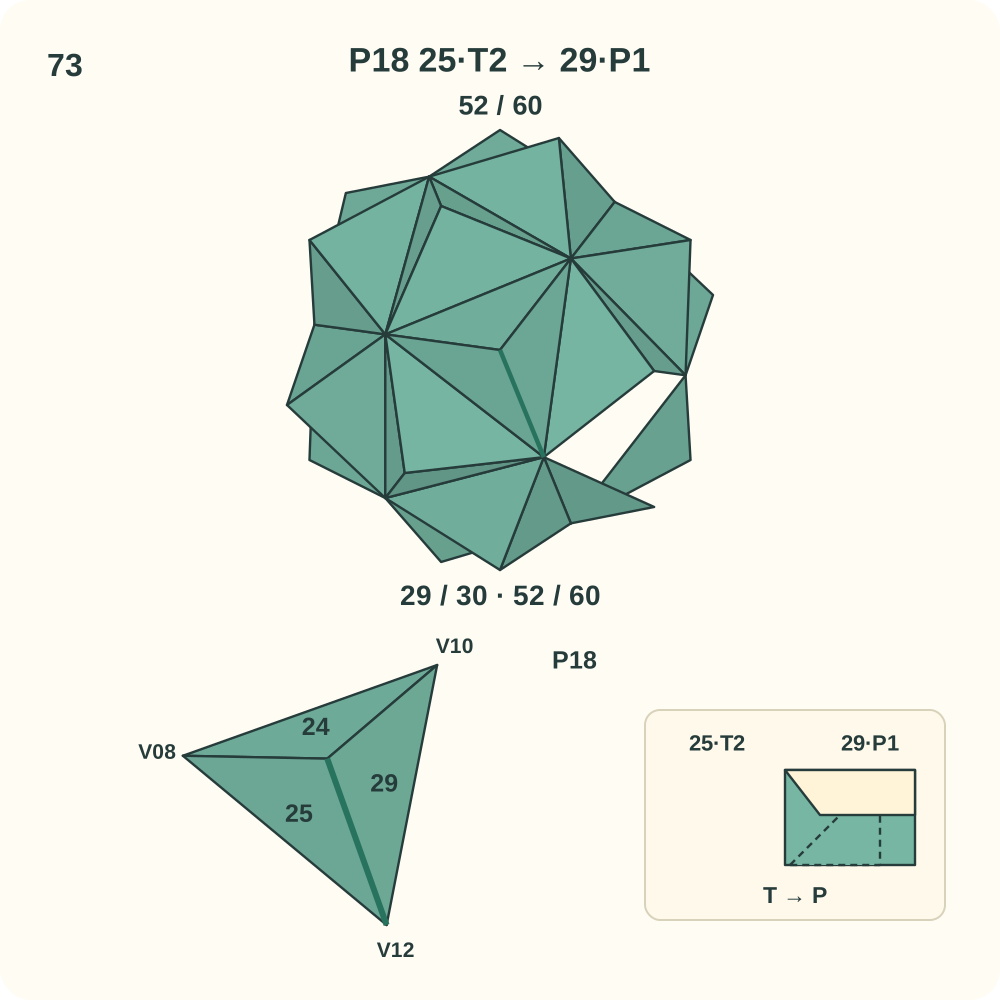
Join 52 of 60 is 25·T2 → 29·P1. Two other edges of this peak may still need a connection.
Step 74: Join 29·T1 to 24·P1
Keep the existing units in place. At peak P18, lift the lip of 24·P1 beside V10 and guide 29·T1 underneath it. The tab hinges along the edge from V10 to the peak; its far tip heads toward V08. Leave the other loose tabs free while positioning the three halves around P18. Support the growing structure with your hands; the positions in the drawing do not mean its other joins are already closed.
Orientation: 29 Q=P18, R=V10, L=V12. 24 Q=P18, R=V08, L=V10. Look toward P18; the lower left view enlarges this same peak. Orange marks only the moving tab.
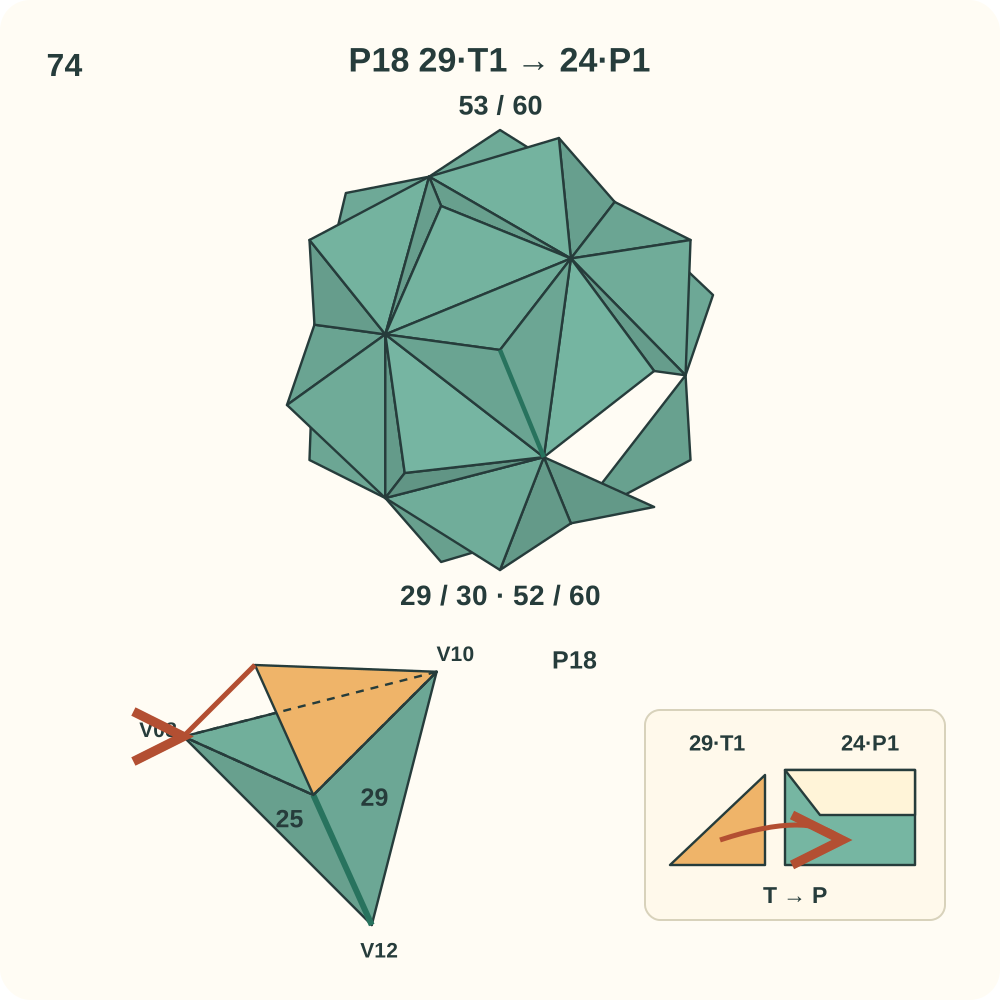
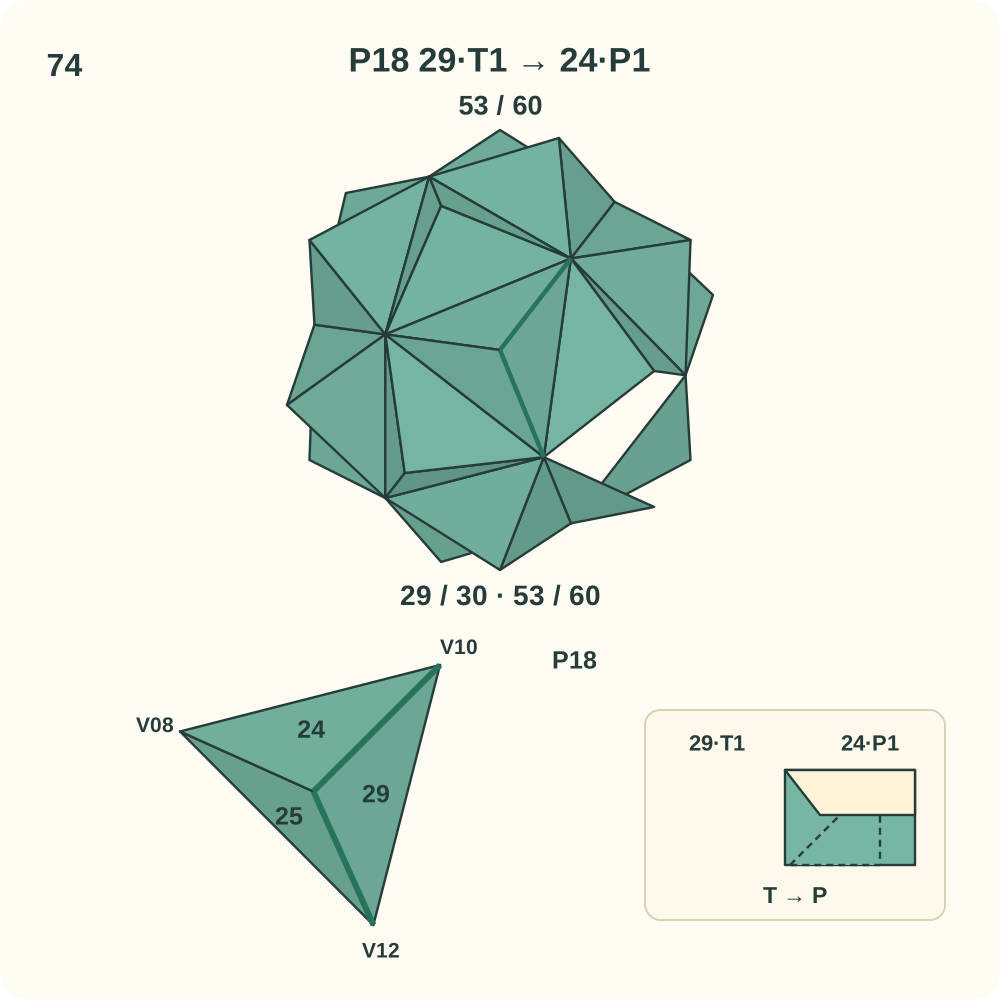
Join 53 of 60 is 29·T1 → 24·P1. Two other edges of this peak may still need a connection.
Step 75: Join 24·T1 to 25·P2
Keep the existing units in place. At peak P18, lift the lip of 25·P2 beside V08 and guide 24·T1 underneath it. The tab hinges along the edge from V08 to the peak; its far tip heads toward V12. This is the third join around P18; curve its three halves into one raised trihedral peak as you close the loop. Support the growing structure with your hands; the positions in the drawing do not mean its other joins are already closed.
Orientation: 24 Q=P18, R=V08, L=V10. 25 S=P18, L=V12, R=V08. Look toward P18; the lower left view enlarges this same peak. Orange marks only the moving tab.
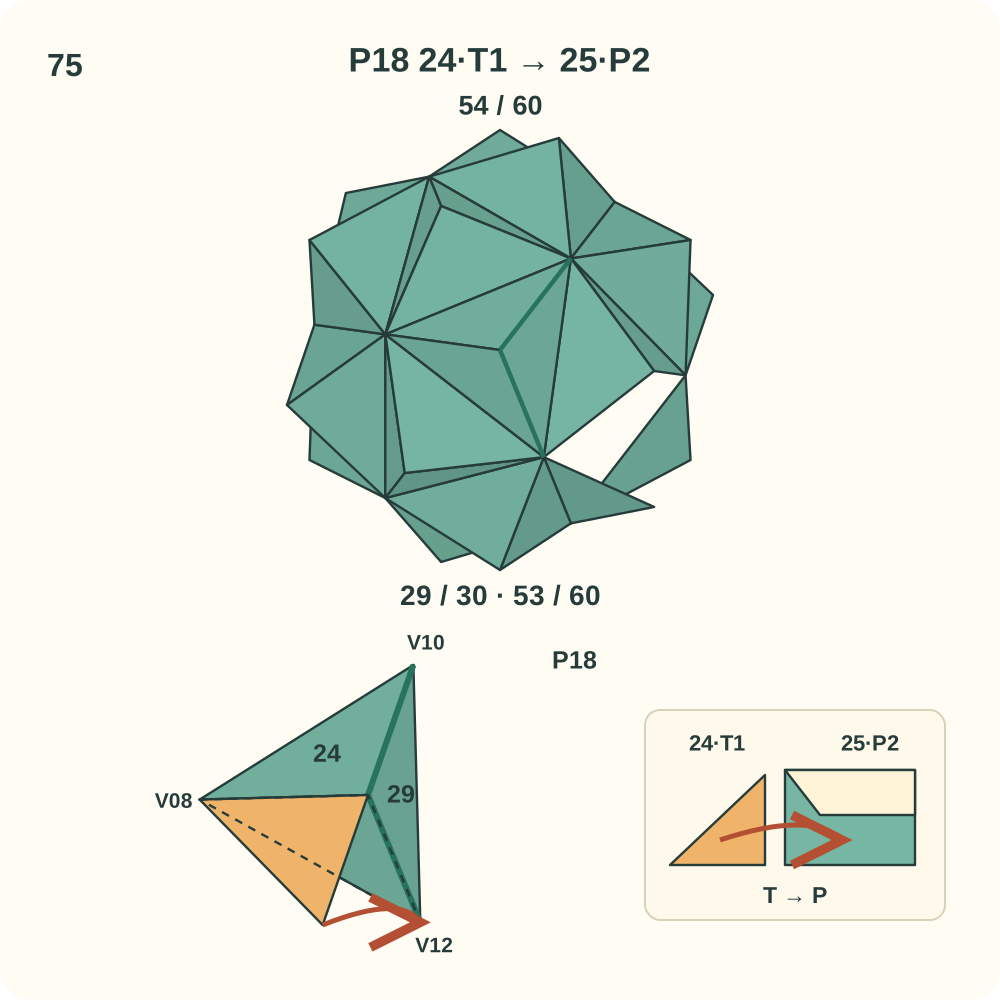
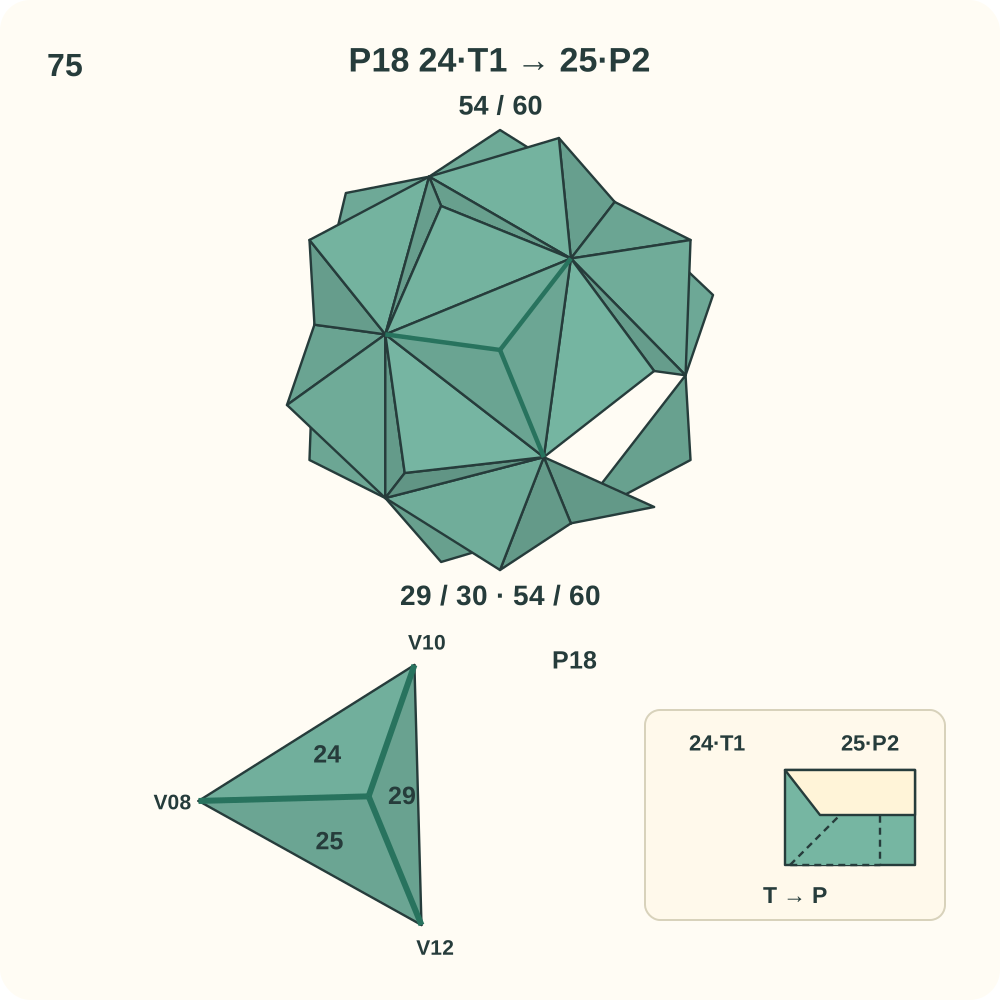
Join 54 of 60 is 24·T1 → 25·P2. Peak P18 now has its three directed joins.
Step 76: Join 26·T2 to 30·P2
Bring in unit 30. At peak P19, lift the lip of 30·P2 beside V11 and guide 26·T2 underneath it. The tab hinges along the edge from V11 to the peak; its far tip heads toward V12. Leave the other loose tabs free while positioning the three halves around P19. Support the growing structure with your hands; the positions in the drawing do not mean its other joins are already closed.
Orientation: 26 S=P19, L=V11, R=V09. 30 S=P19, L=V12, R=V11. Look toward P19; the lower left view enlarges this same peak. Orange marks only the moving tab.
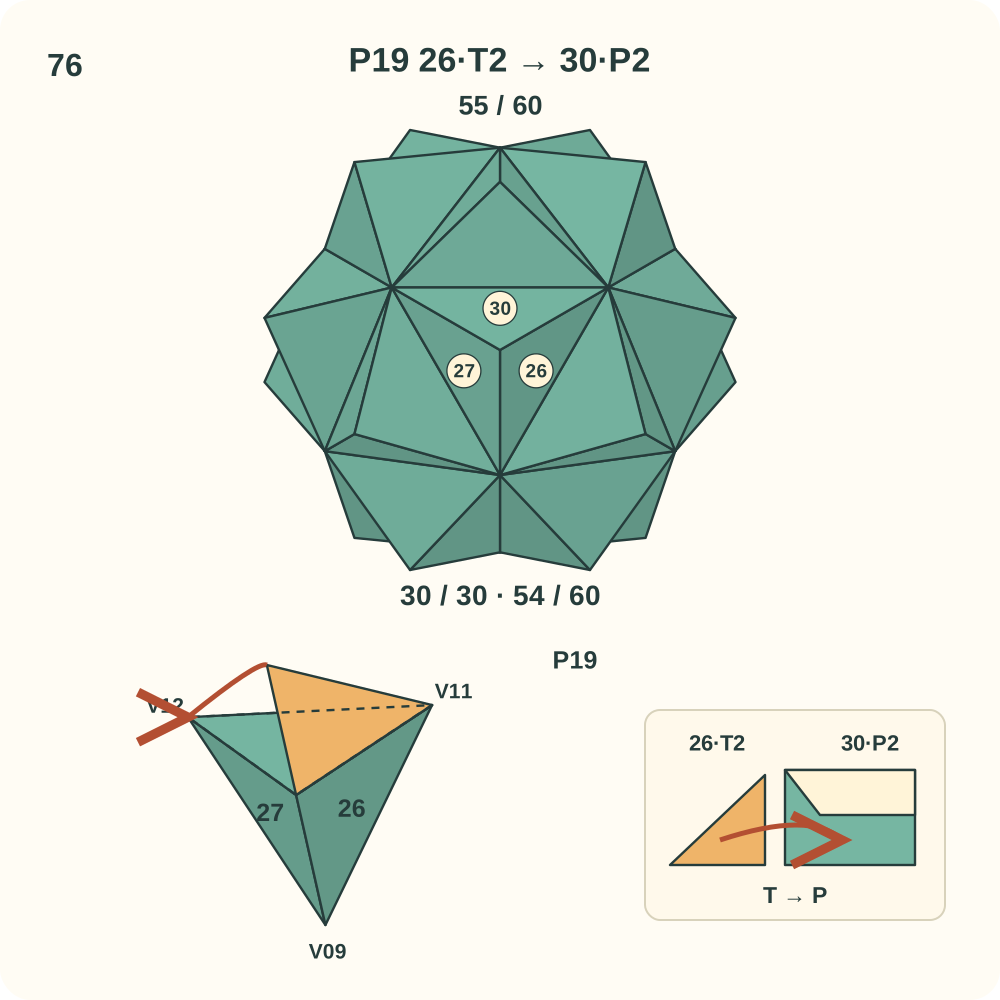
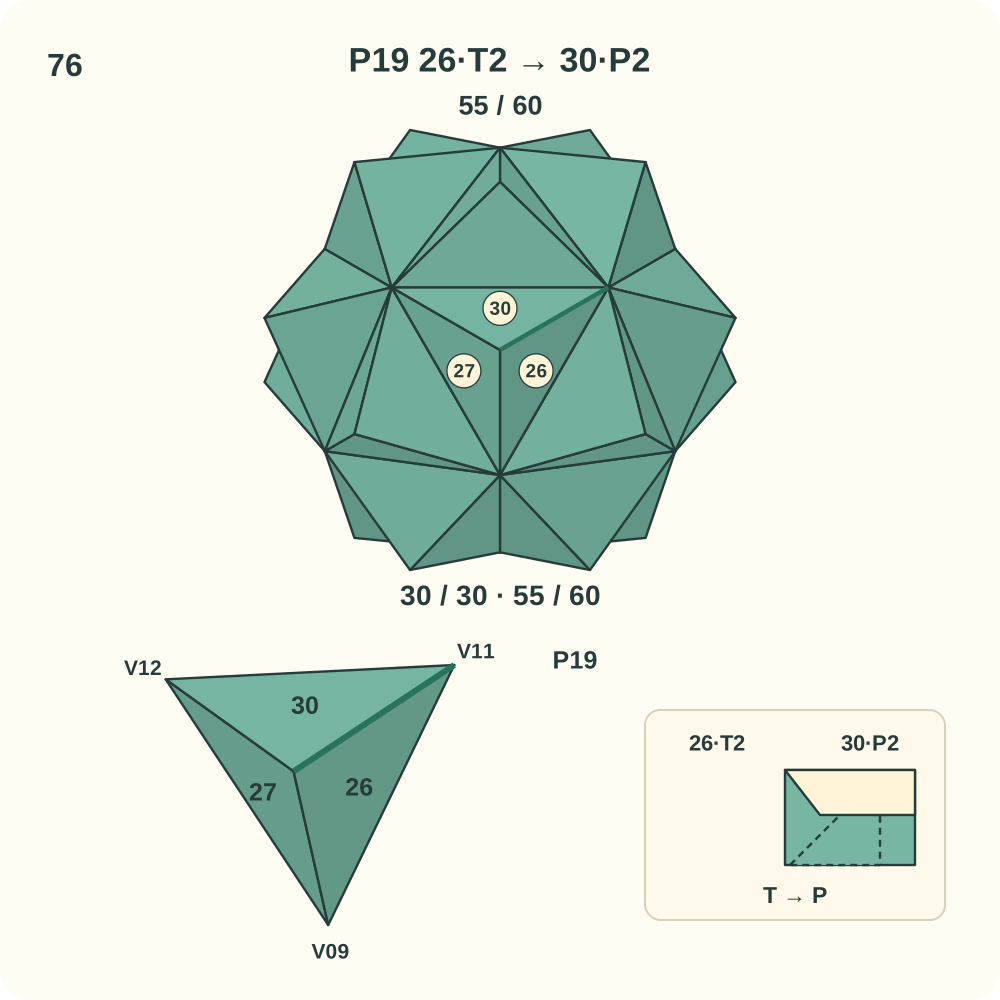
Join 55 of 60 is 26·T2 → 30·P2. Two other edges of this peak may still need a connection.
Step 77: Join 30·T2 to 27·P1
Keep the existing units in place. At peak P19, lift the lip of 27·P1 beside V12 and guide 30·T2 underneath it. The tab hinges along the edge from V12 to the peak; its far tip heads toward V09. Leave the other loose tabs free while positioning the three halves around P19. Support the growing structure with your hands; the positions in the drawing do not mean its other joins are already closed.
Orientation: 30 S=P19, L=V12, R=V11. 27 Q=P19, R=V09, L=V12. Look toward P19; the lower left view enlarges this same peak. Orange marks only the moving tab.
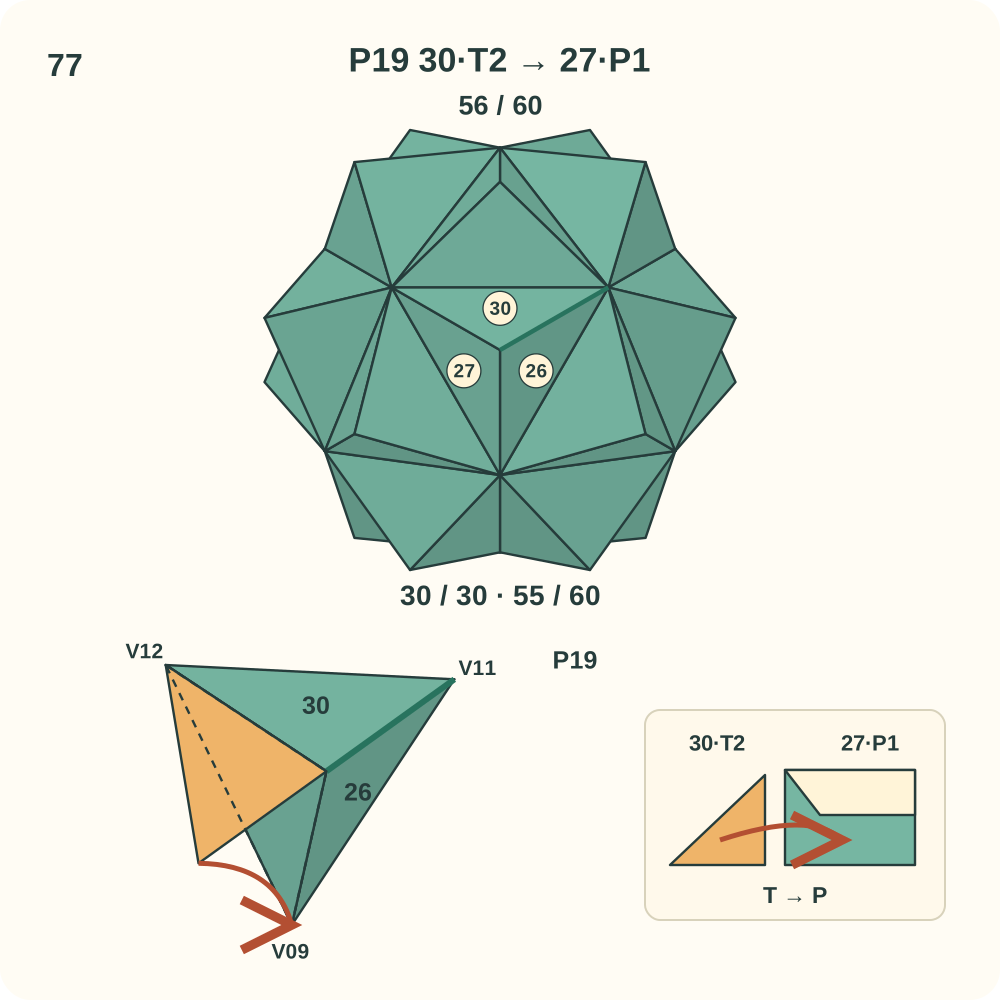
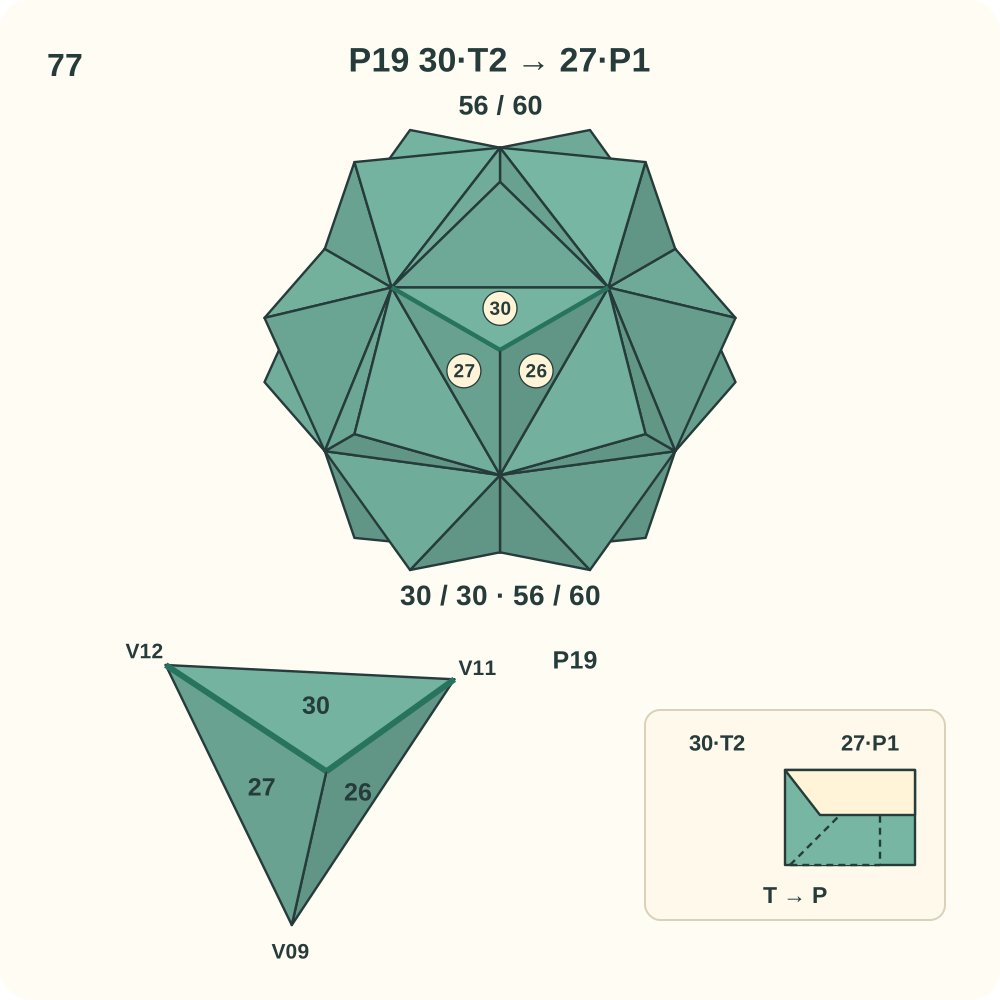
Join 56 of 60 is 30·T2 → 27·P1. Two other edges of this peak may still need a connection.
Step 78: Join 27·T1 to 26·P2
Keep the existing units in place. At peak P19, lift the lip of 26·P2 beside V09 and guide 27·T1 underneath it. The tab hinges along the edge from V09 to the peak; its far tip heads toward V11. This is the third join around P19; curve its three halves into one raised trihedral peak as you close the loop. Support the growing structure with your hands; the positions in the drawing do not mean its other joins are already closed.
Orientation: 27 Q=P19, R=V09, L=V12. 26 S=P19, L=V11, R=V09. Look toward P19; the lower left view enlarges this same peak. Orange marks only the moving tab.
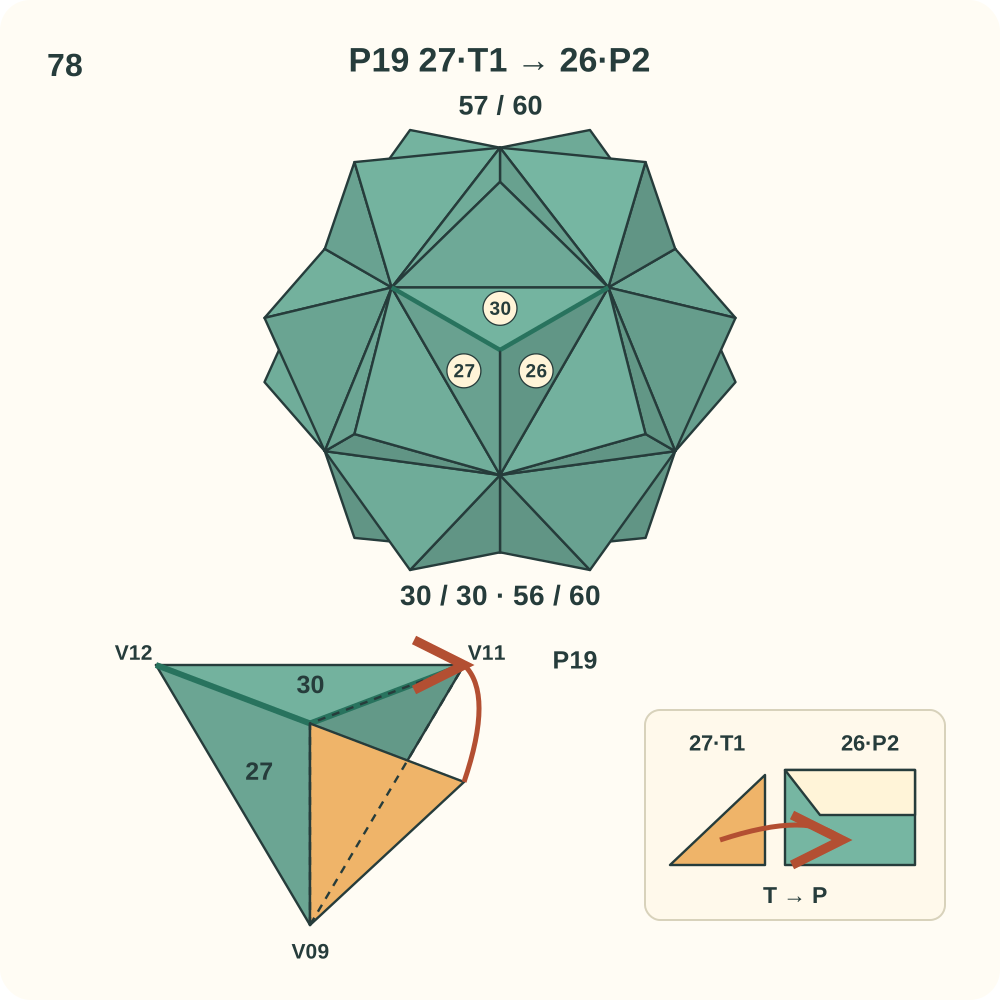
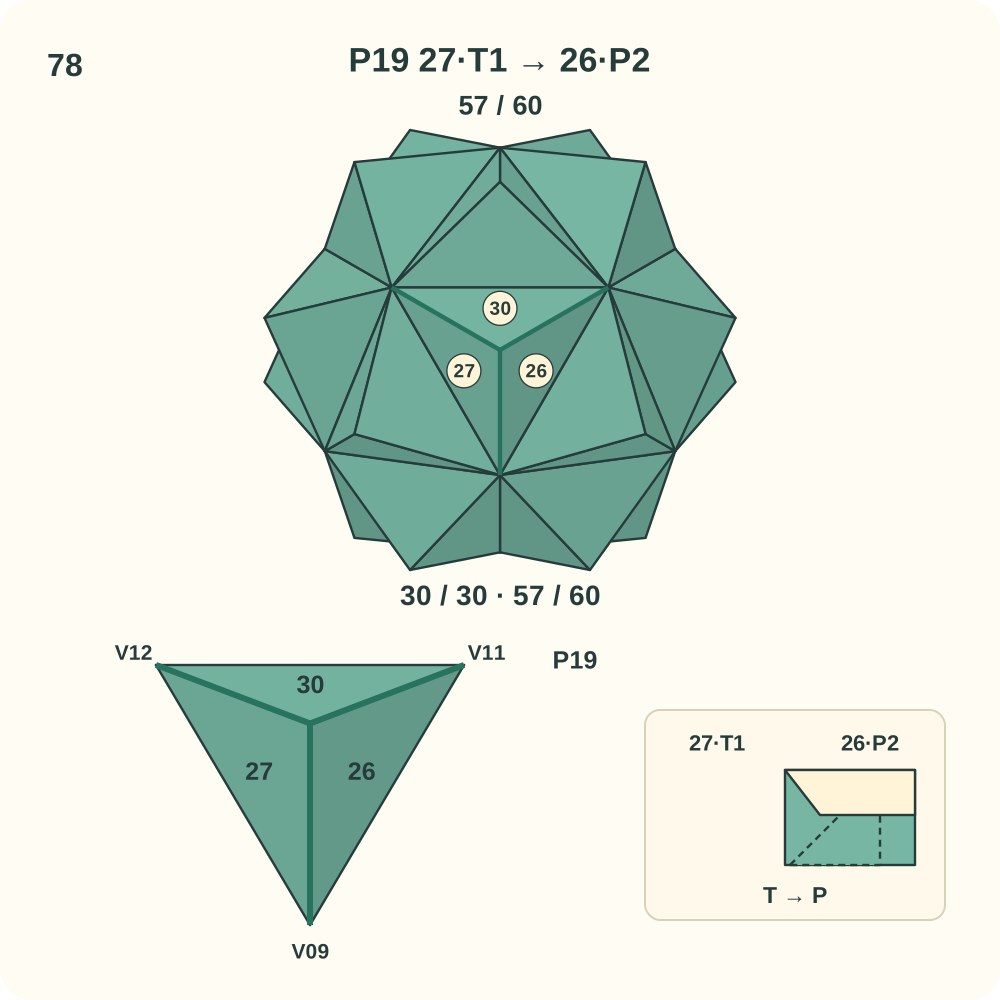
Join 57 of 60 is 27·T1 → 26·P2. Peak P19 now has its three directed joins.
Step 79: Join 29·T2 to 30·P1
Keep the existing units in place. At peak P20, lift the lip of 30·P1 beside V12 and guide 29·T2 underneath it. The tab hinges along the edge from V12 to the peak; its far tip heads toward V11. Leave the other loose tabs free while positioning the three halves around P20. Support the growing structure with your hands; the positions in the drawing do not mean its other joins are already closed.
Orientation: 29 S=P20, L=V12, R=V10. 30 Q=P20, R=V11, L=V12. Look toward P20; the lower left view enlarges this same peak. Orange marks only the moving tab.
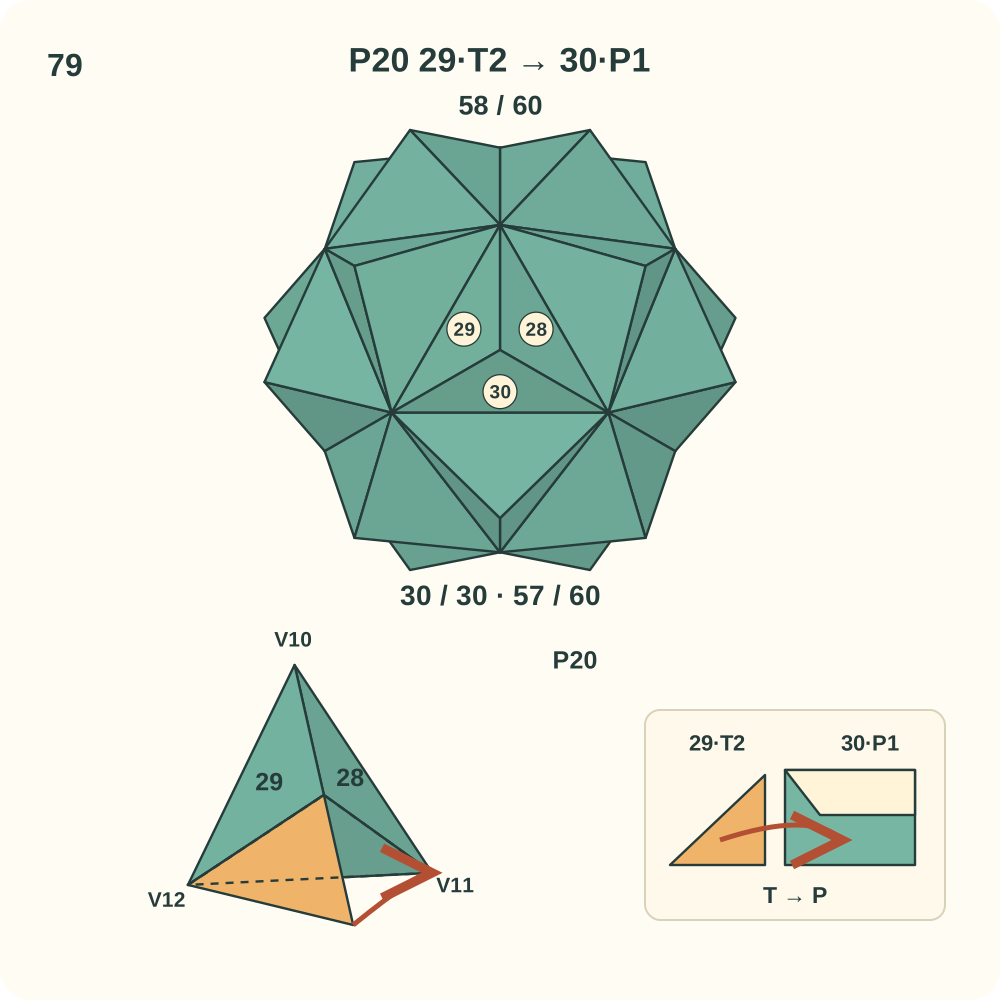
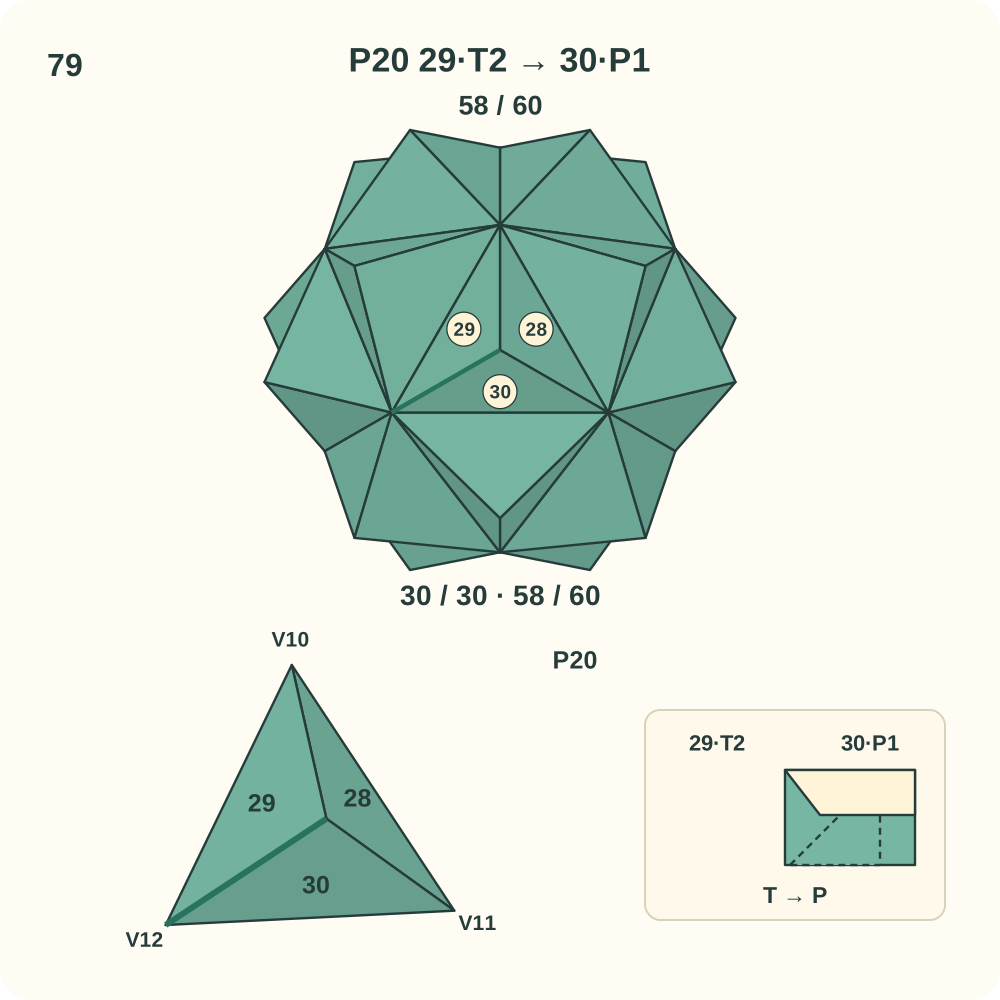
Join 58 of 60 is 29·T2 → 30·P1. Two other edges of this peak may still need a connection.
Step 80: Join 30·T1 to 28·P1
Keep the existing units in place. At peak P20, lift the lip of 28·P1 beside V11 and guide 30·T1 underneath it. The tab hinges along the edge from V11 to the peak; its far tip heads toward V10. Leave the other loose tabs free while positioning the three halves around P20. Support the growing structure with your hands; the positions in the drawing do not mean its other joins are already closed.
Orientation: 30 Q=P20, R=V11, L=V12. 28 Q=P20, R=V10, L=V11. Look toward P20; the lower left view enlarges this same peak. Orange marks only the moving tab.
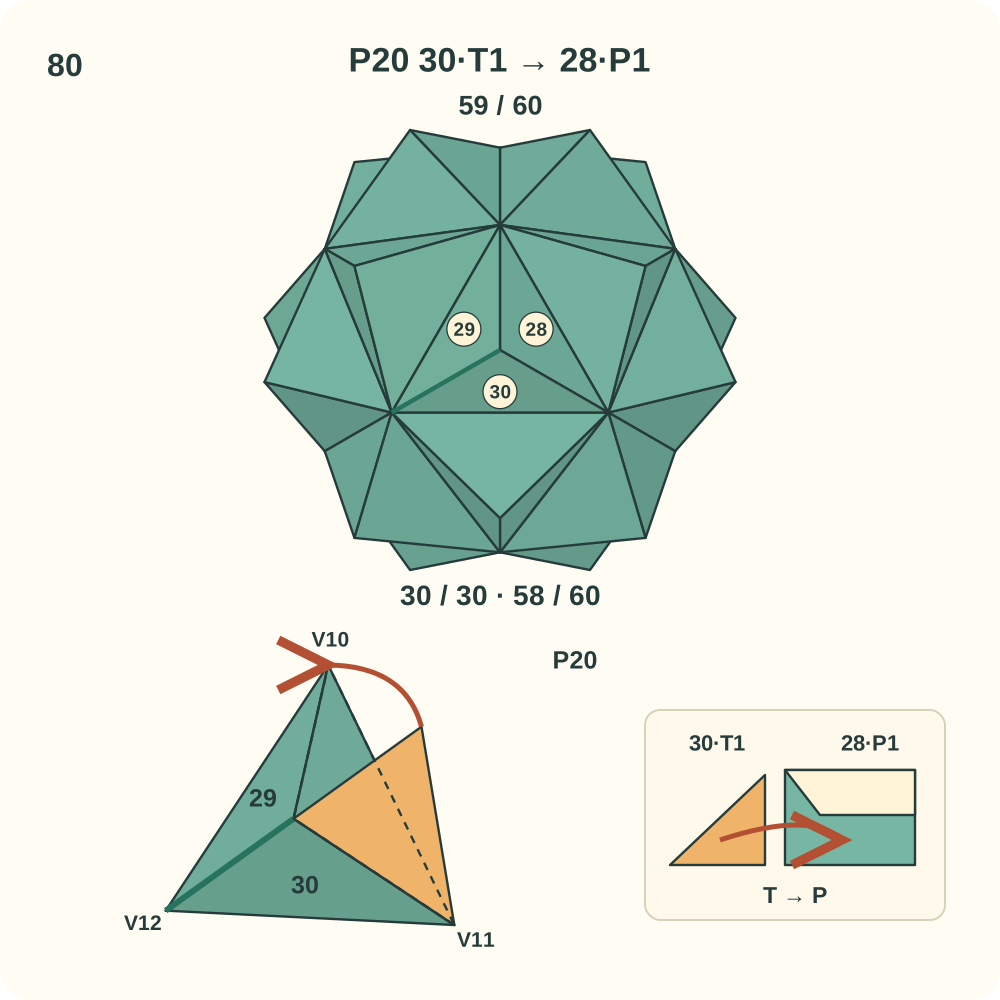
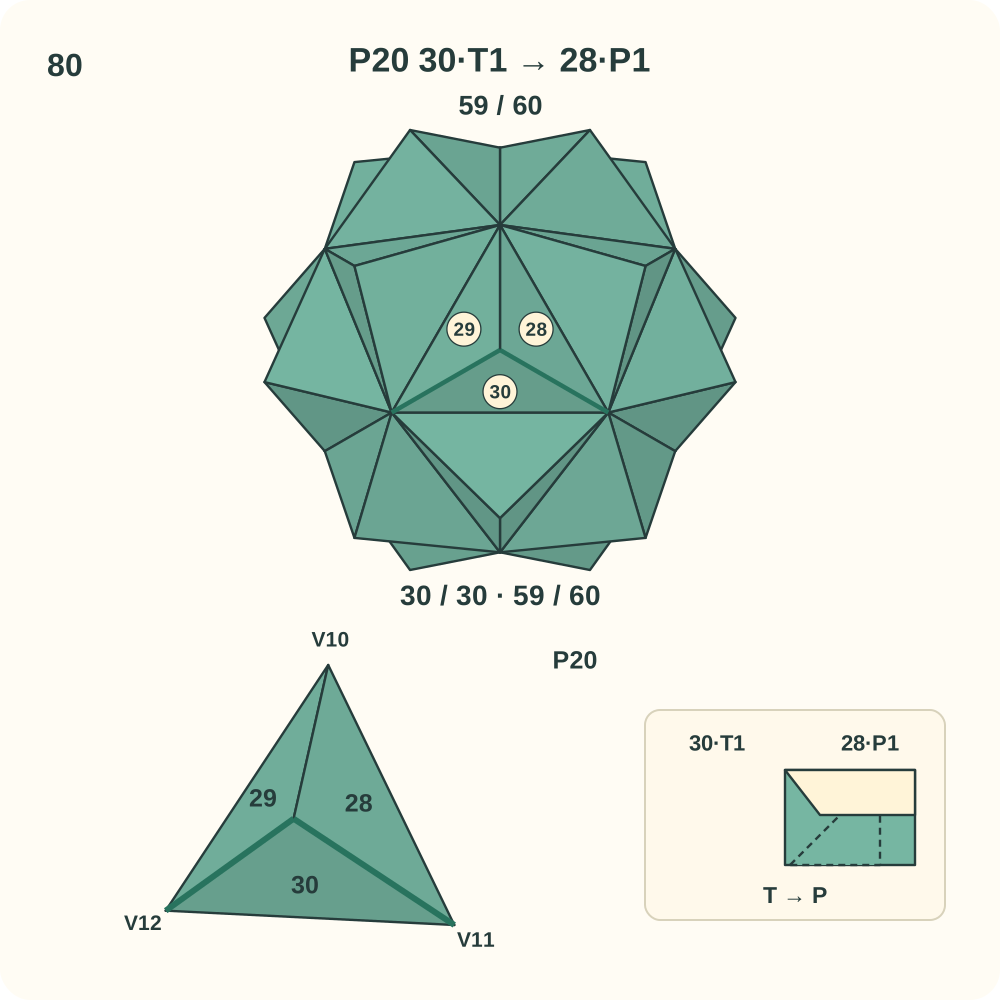
Join 59 of 60 is 30·T1 → 28·P1. Two other edges of this peak may still need a connection.
Step 81: Join 28·T1 to 29·P2
Keep the existing units in place. At peak P20, lift the lip of 29·P2 beside V10 and guide 28·T1 underneath it. The tab hinges along the edge from V10 to the peak; its far tip heads toward V12. This is the third join around P20; curve its three halves into one raised trihedral peak as you close the loop. Support the growing structure with your hands; the positions in the drawing do not mean its other joins are already closed.
Orientation: 28 Q=P20, R=V10, L=V11. 29 S=P20, L=V12, R=V10. Look toward P20; the lower left view enlarges this same peak. Orange marks only the moving tab.
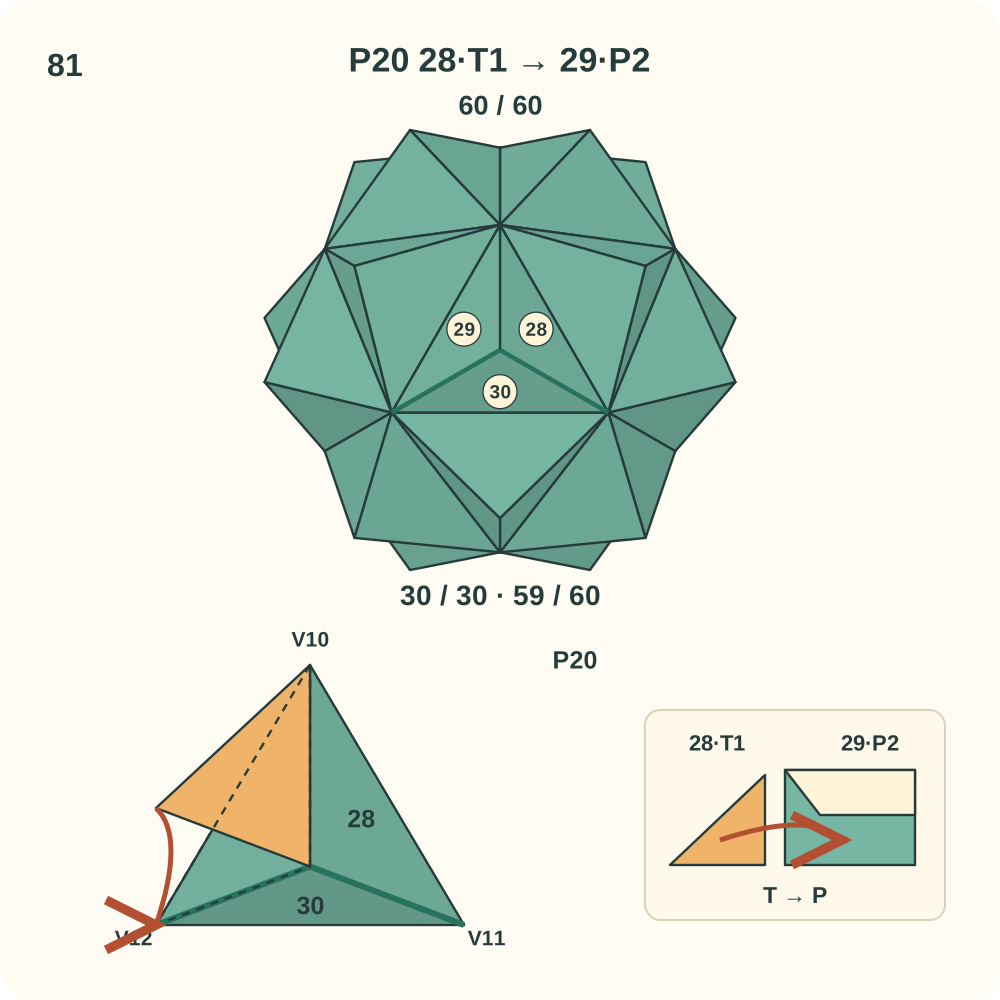
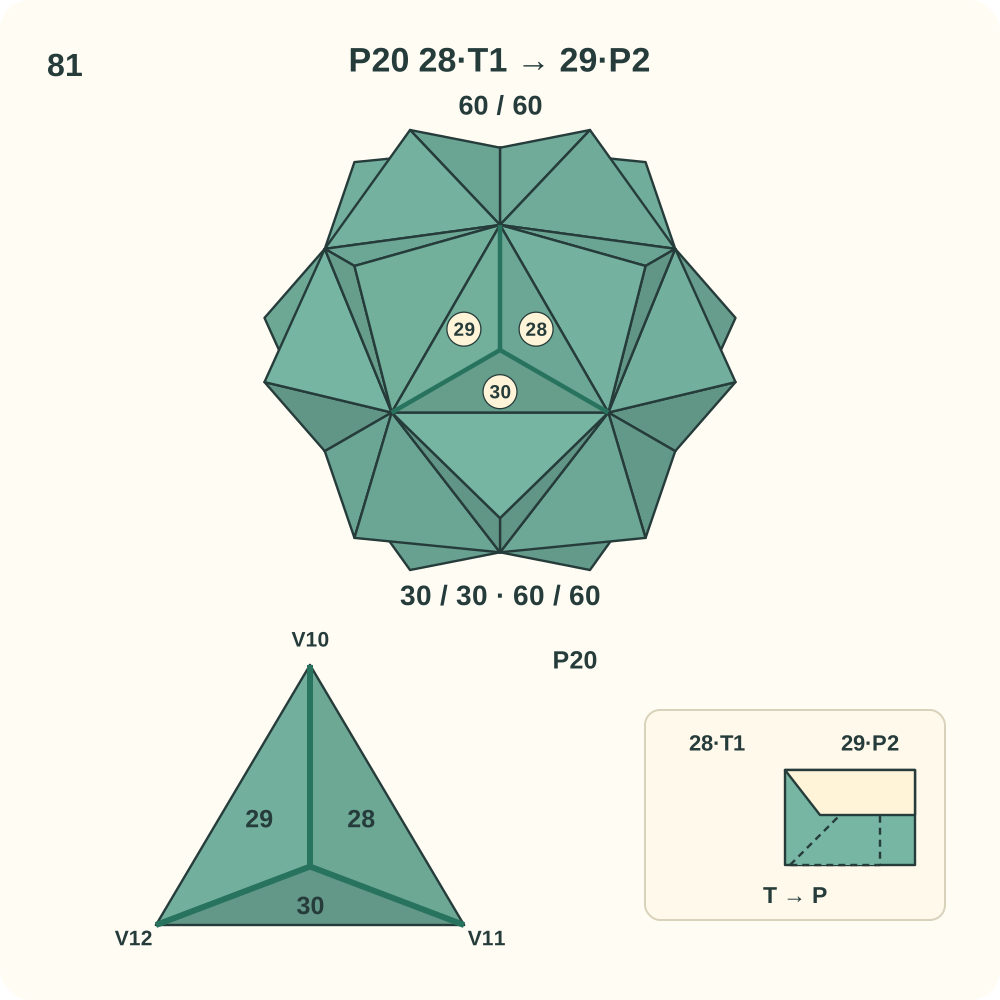
Join 60 of 60 is 28·T1 → 29·P2. Peak P20 now has its three directed joins.
Step 82: Audit the thirty-unit star
Count thirty units and twenty raised three-piece peaks. Around each recessed vertex, five peaks meet. Check that each unit sends both tabs to different neighbours and receives one tab in each pocket. If a loop will not close without crumpling, reopen the last insertion and compare the unit orientation and label map; do not glue over a mismatch.
Orientation: The illustration looks toward three nearby peaks. Hidden peaks and units are behind the visible surface; the view cannot show all sixty joins at once.
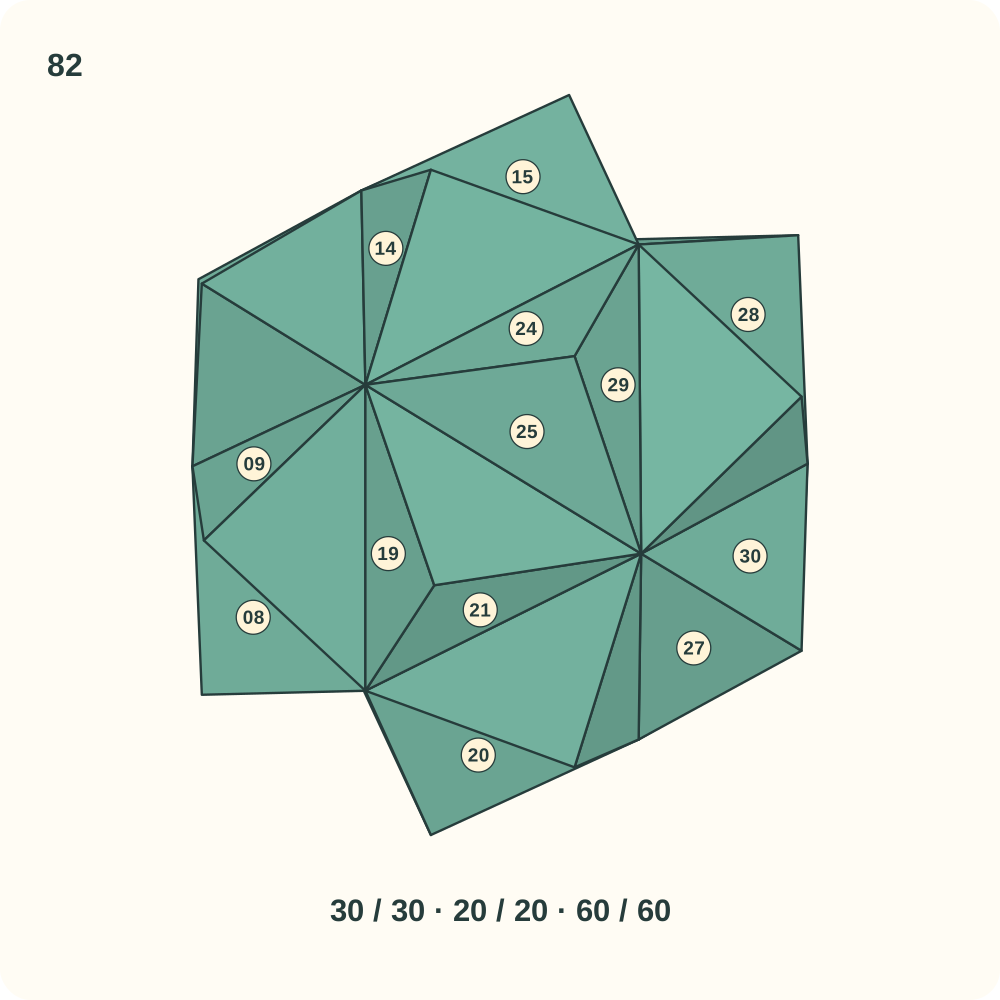
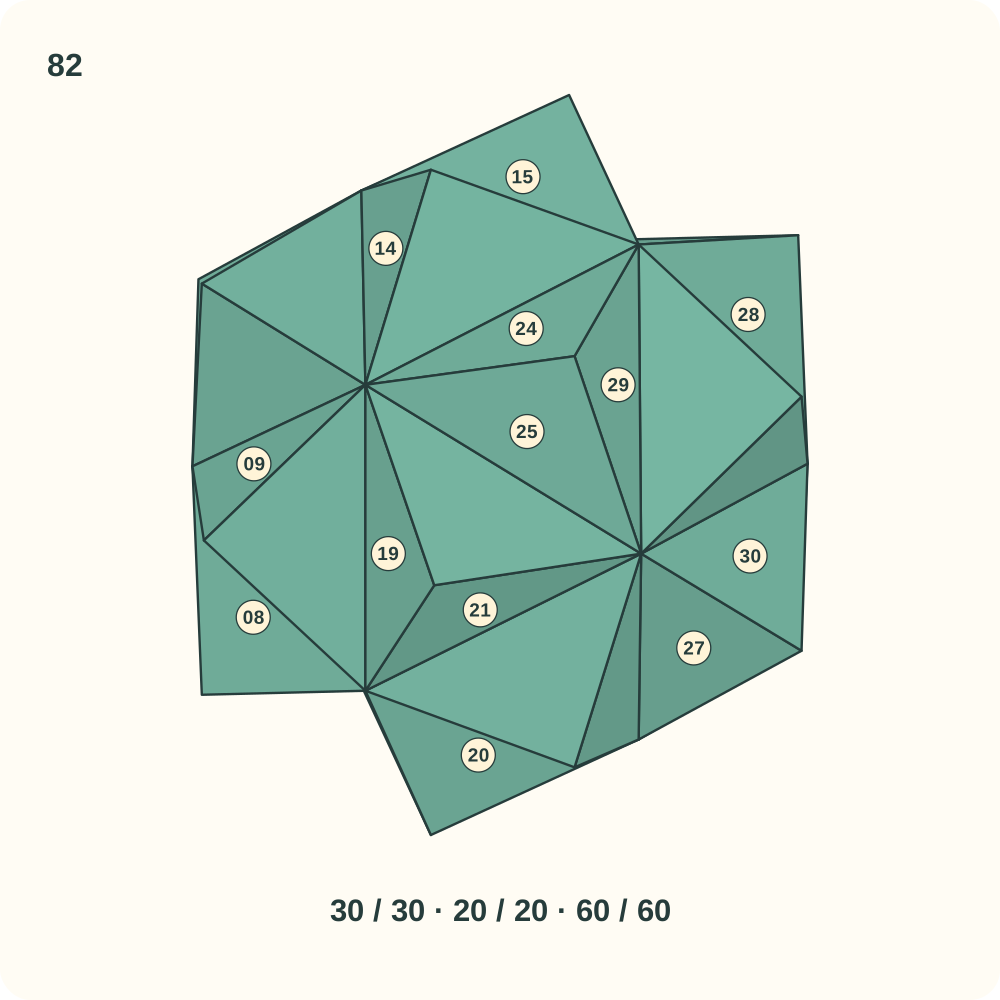
The illustrated Sonobe star is a stellated icosahedron with thirty sheets, twenty trihedral peaks and sixty directed tab-to-pocket joins.
Expert challenge checks and recovery
- Before joining, compare every unit with instruction 21. All thirty must have the same corner selection, pockets outside and a valley along L–R. A mirrored unit cannot be corrected by simply turning it over.
- Treat each peak as a three-unit directed cycle. Add units to the growing structure as instructed; do not make twenty independent three-piece pyramids and attempt to connect them afterward. Each unit belongs to two peaks.
- Check each tab against the label beside its receiving pocket. T1 and T2 use different halves of the same unit; the coloured face and pocket opening must face the same side as the drawing.
- The third insertion of each peak closes a cycle. Keep nearby free tabs accessible, lift only the existing pocket lip and tab hinge, and withdraw a blocked tip before it crumples. Physical access to the final loops still needs a hands-on trial.
- There are five peaks around each of twelve recessed vertices. A ring of four or six peaks changes the geometry; retrace the numbered sequence instead of forcing the last gap.
- Digital checks prove the icosahedral edge/face map and the ideal ninety-degree tab rotation onto a receiving triangle. They do not prove paper clearance, friction, durability, a practical assembly angle or the proposed paper size.
The thirty-unit Sonobe star
The completed geometric illustration has twenty raised trihedral peaks over the twenty faces of an icosahedron. Thirty bent units straddle its thirty original edges, and sixty tabs occupy sixty pockets. All visible parts are green because every sheet has the same colour. This SVG is not a photograph or proof of a successful physical model. Folding, pocket access, material suitability, durability, working time and the expert rating remain untested.
Printable version pending the physical folding test.
Sonobe attribution and illustration licence
The Sonobe module is attributed to Mitsunobu Sonobe. Riverbend Community Math Center releases its own instruction diagrams to the public domain and explains that polyhedra may need an extra central diagonal. Stephan T. Lavavej documents a thirty-unit stellated icosahedron and the three-unit peak construction; none of his photographs or text is republished. OrigamiLove reused its own eighteen unit-fold instructions and created the new bilingual star sequence, exact icosahedral topology, projections and sixty insertion diagrams in 2026. Our new wording and SVG are CC BY 4.0. The source release is not evidence that the underlying Sonobe invention has no rights, and no source endorses this website.