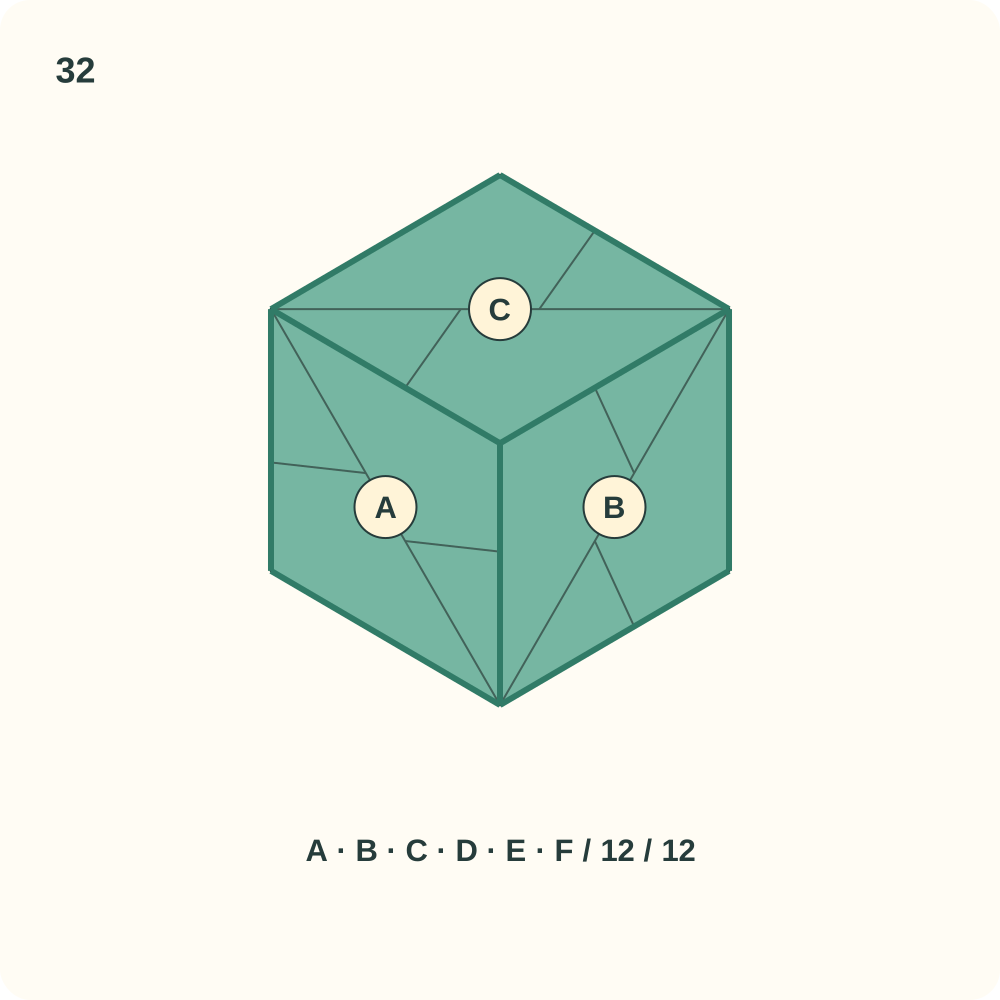
Prepare your paper
Six equal squares and a clear working space
- Six 15 × 15 cm squares of thin folding paper, proposed for a first trial. All six must be the same size; physical paper choice and fit have not been tested.
- Use six sheets of the same colour and paper type, each with a cream or white reverse. All six illustrated units are green; letters A–F track the positions.
- A flat surface and room to arrange all six units. No scissors, glue, staples or added weights are used in this sequence.
- Optional small pencil marks or loose letter notes to identify A–F. The letters are assembly aids and do not indicate cuts.
- Dashed line: New fold or an obscured construction edge
- Thin line: Existing crease, layer edge or pocket lip
- Arrow: Move the indicated part. During assembly orange highlights the moving tab, not the paper colour
- A–F: Units. T: Tab. P: Pocket. Small detail: Layers separated to explain insertion
Instructions 1–18 make one unit; 19 prepares all six. In 15 and 18 turn the unit over explicitly. Assembly drawings use a fixed six-face assignment, while each text states the viewing side. Hidden cube edges are dashed. The square panels locate the central part of each unit; a full panel can be held in position before all its tabs are connected. Dark green edge lines mark completed insertions. The lower count gives units present out of six and the upper count identifies the illustrated insertion out of twelve. Assembly drawings show the currently moving tab; other free tabs are omitted for clarity, rather than shown as already inserted. The little T → P detail is schematic and enlarges the gap between layers; it does not show a cut or a hole through paper.
Read the complete paper & materials guide ↗Unit folds and cube assembly
Step 1: Place the first square
Set one square on the table with its cream reverse facing you. Keep a side horizontal; the coloured front is underneath. Use this first sheet to learn the unit before repeating it.
Orientation: Cream side up. Top means the edge farthest from you.
One complete square, with no cuts or creases.
Step 2: Mark the vertical centre
Bring the left edge onto the right edge, crease the vertical halfway line, then unfold the sheet completely. This temporary fold supplies the centre reference.
Orientation: Keep the top edge away from you.
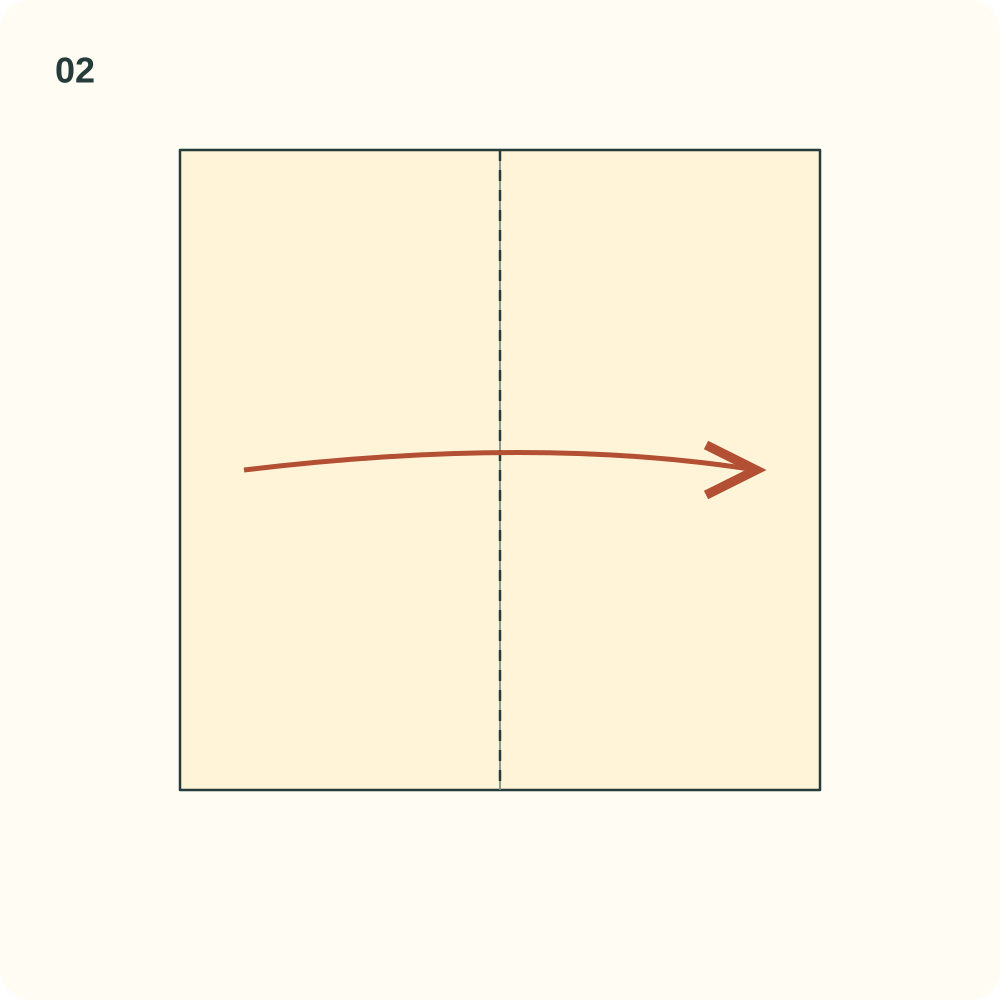
The open square has one vertical centre crease.
Step 3: Mark the left quarter
Bring the left edge onto the centre crease. Mark the new crease and reopen that strip.
Orientation: The cream side still faces up.
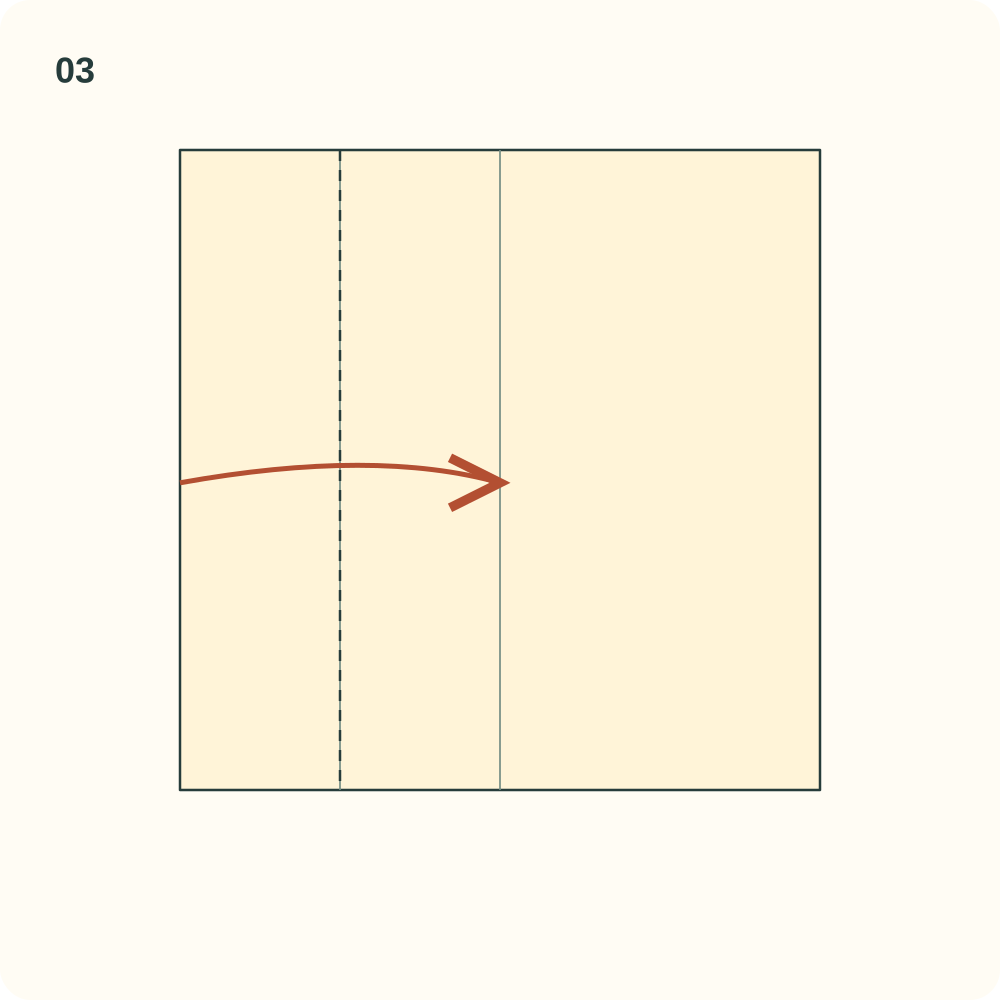
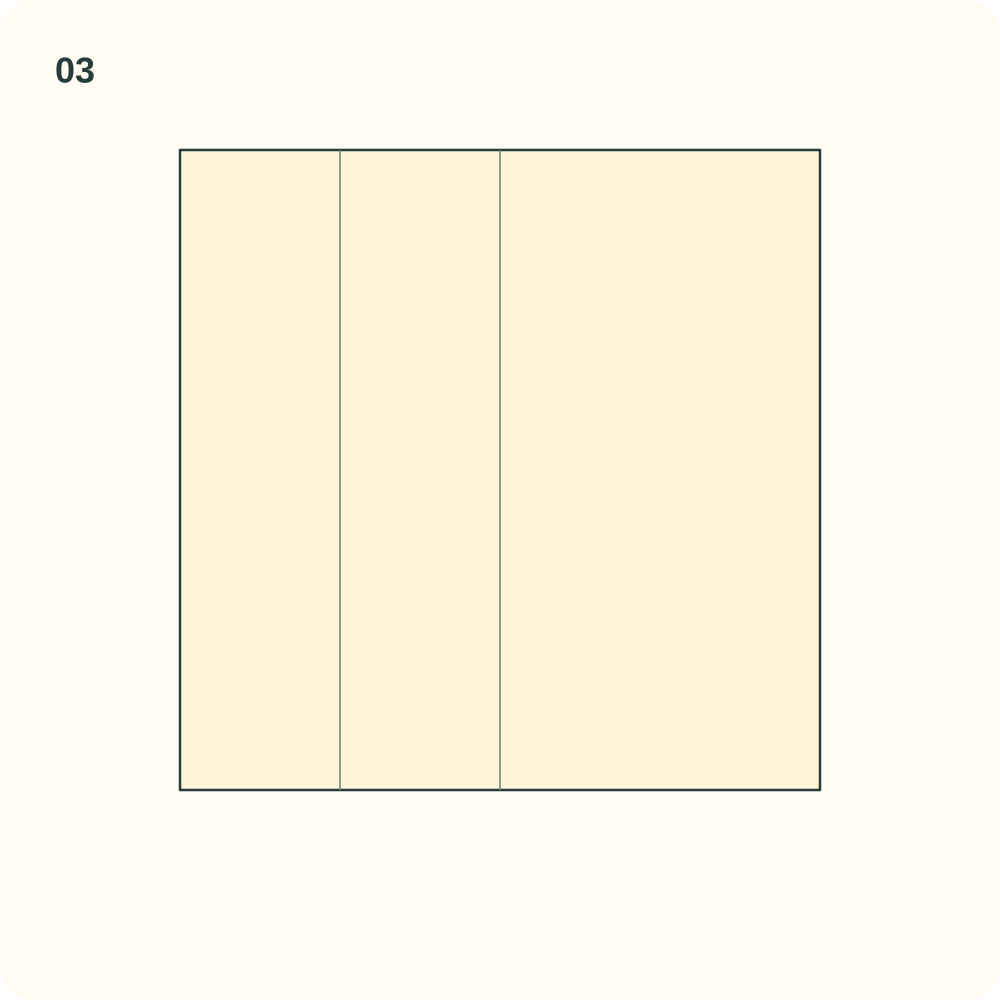
A second vertical line lies halfway between the left edge and the centre.
Step 4: Mark the right quarter
Bring the right edge onto the centre crease. Mark the new crease and reopen it.
Orientation: Do not turn the paper over.
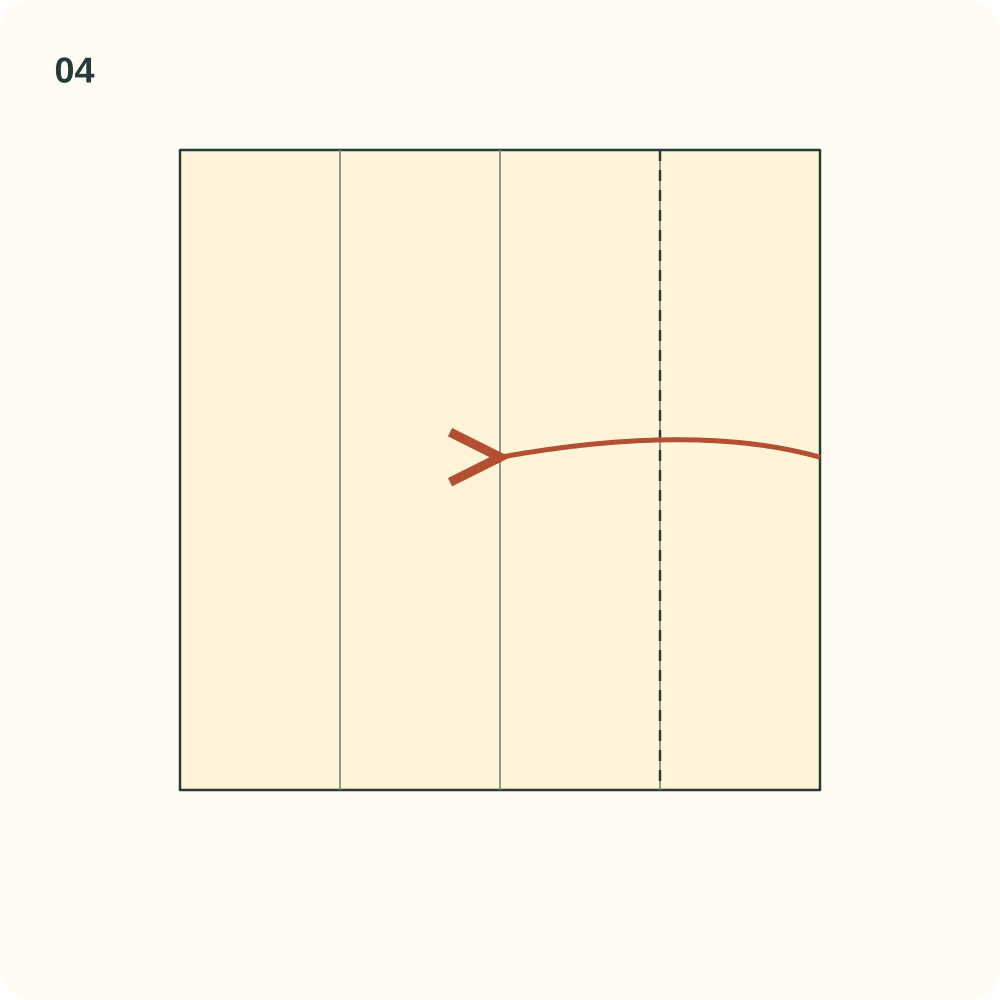
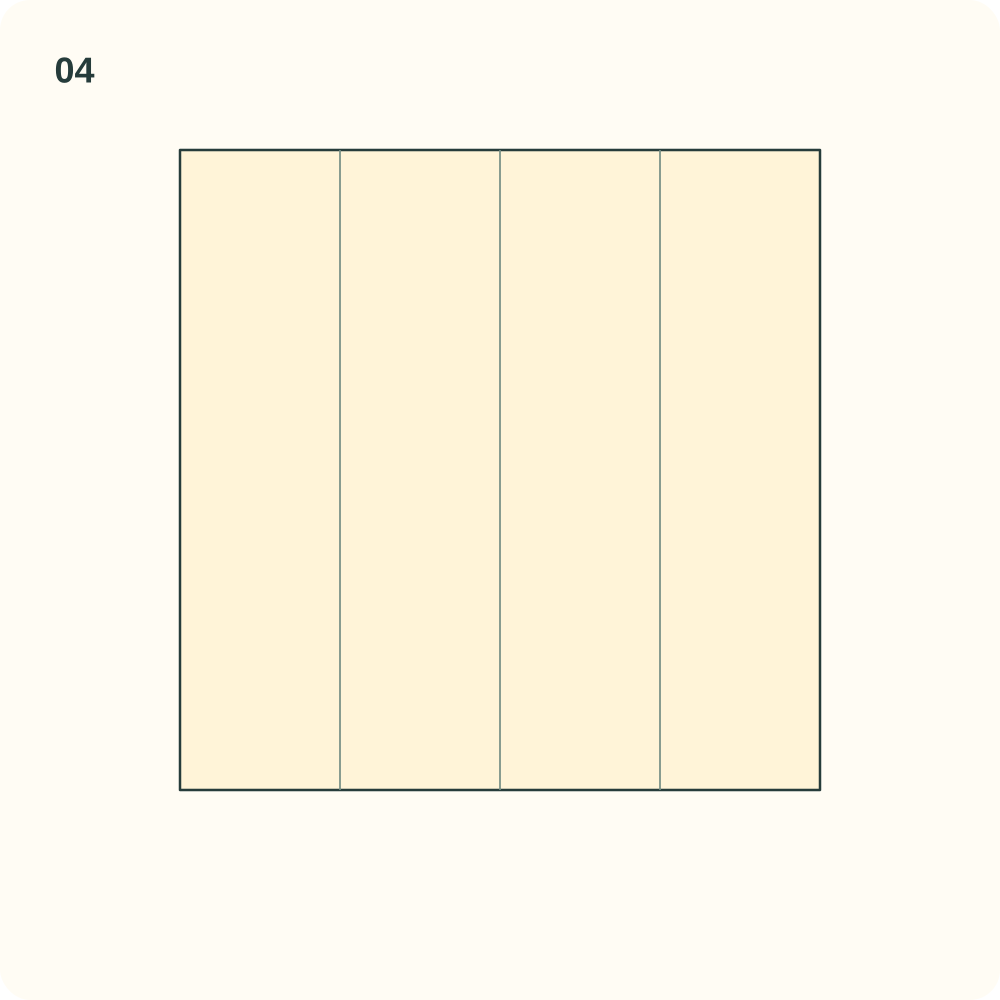
Three parallel creases divide the square into four equal strips.
Step 5: Fold the upper right corner
Fold the upper right corner diagonally inward so the top edge of the outer right strip lies along that strip’s left boundary. The small triangle stays inside the outer quarter; leave it folded.
Orientation: Use the upper right corner, not the upper left.
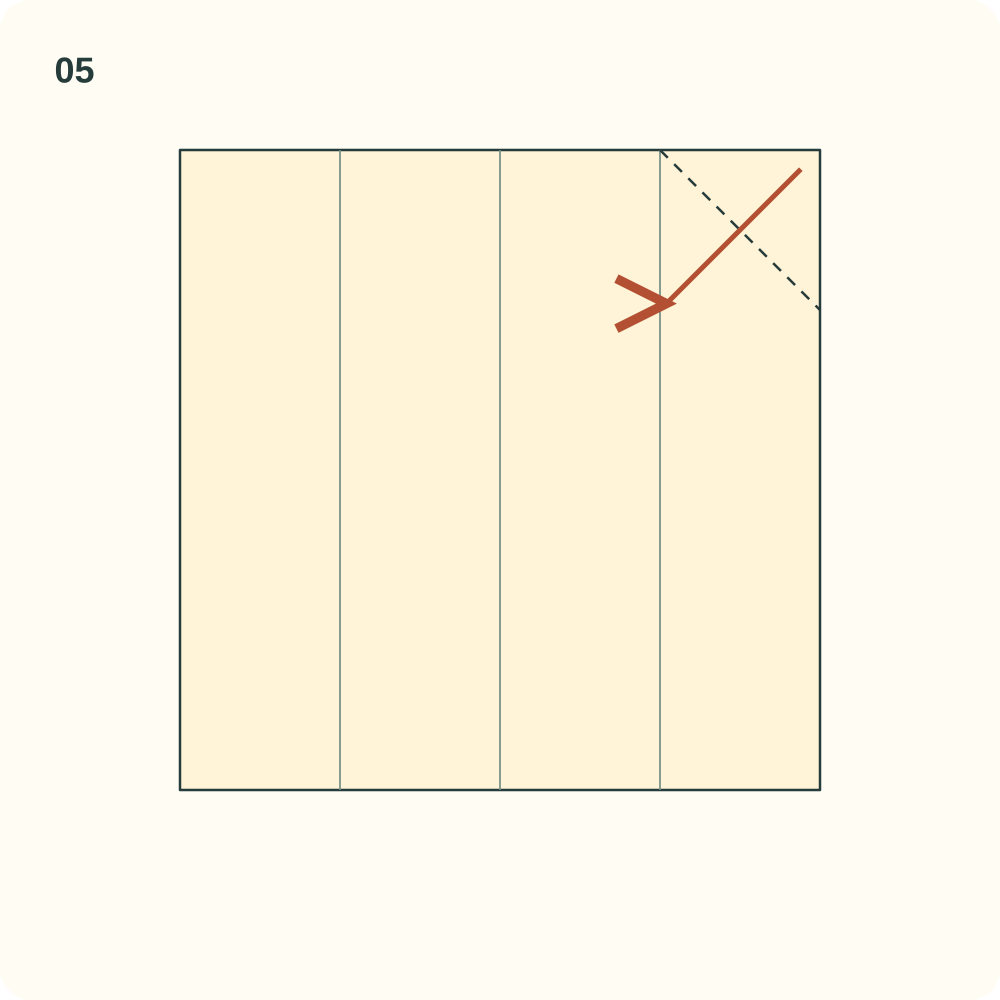
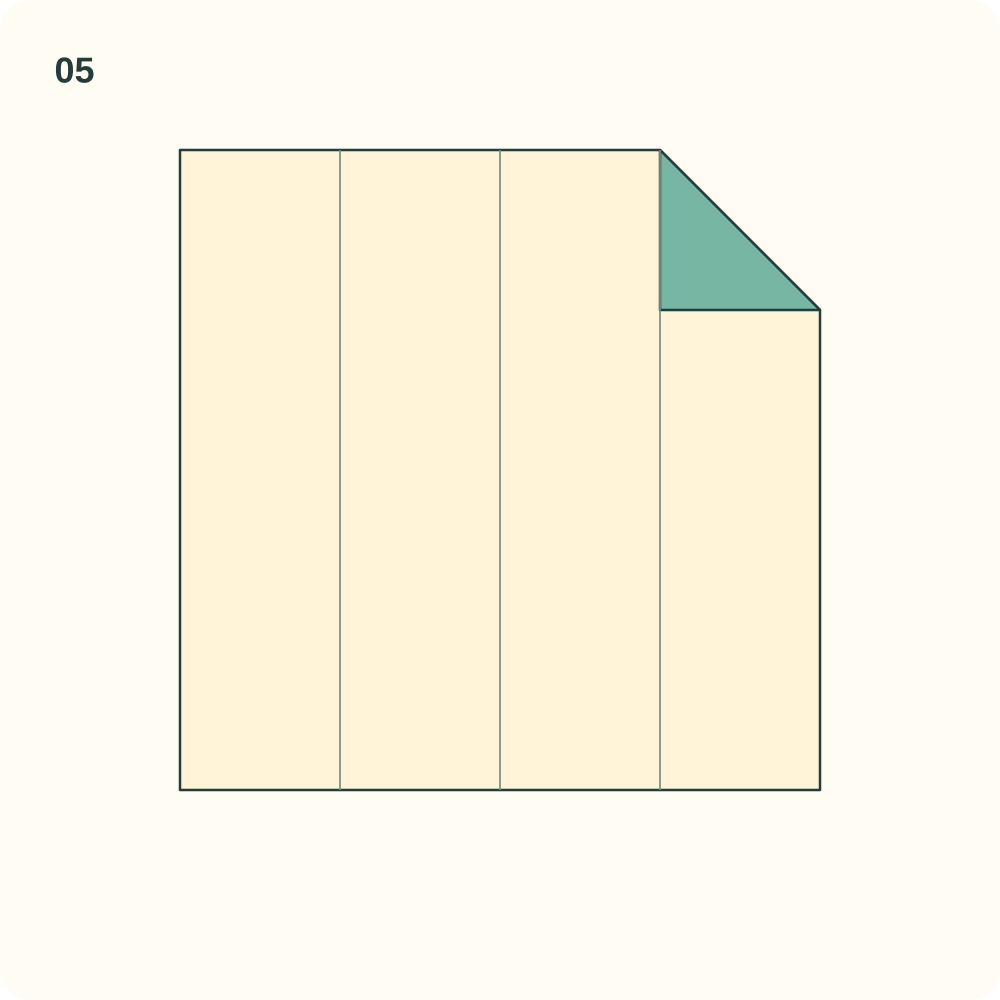
The upper right corner is a coloured triangle whose short edges lie on the quarter crease and a horizontal line.
Step 6: Fold the lower left corner
Fold the lower left corner inward in the corresponding way, putting the bottom edge of the outer left strip along its right boundary. Leave this triangle folded too.
Orientation: The two small triangles occupy opposite corners.
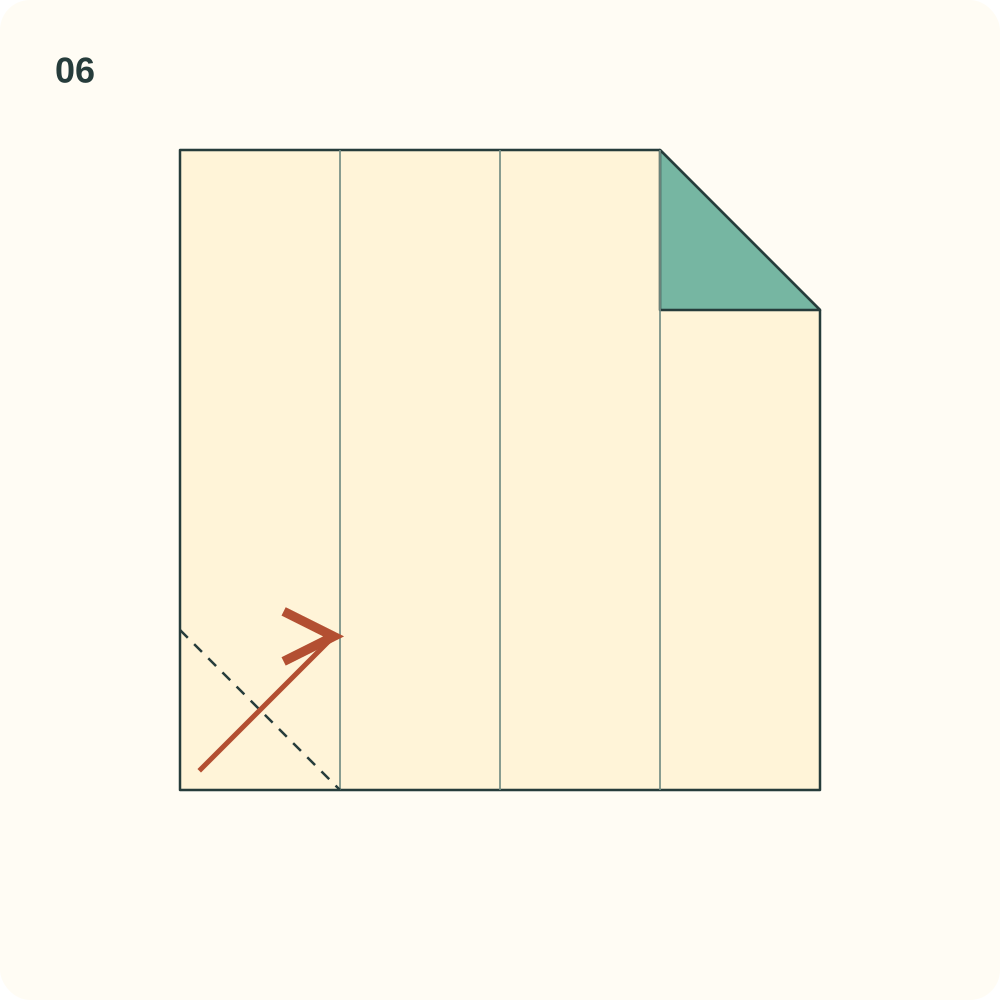
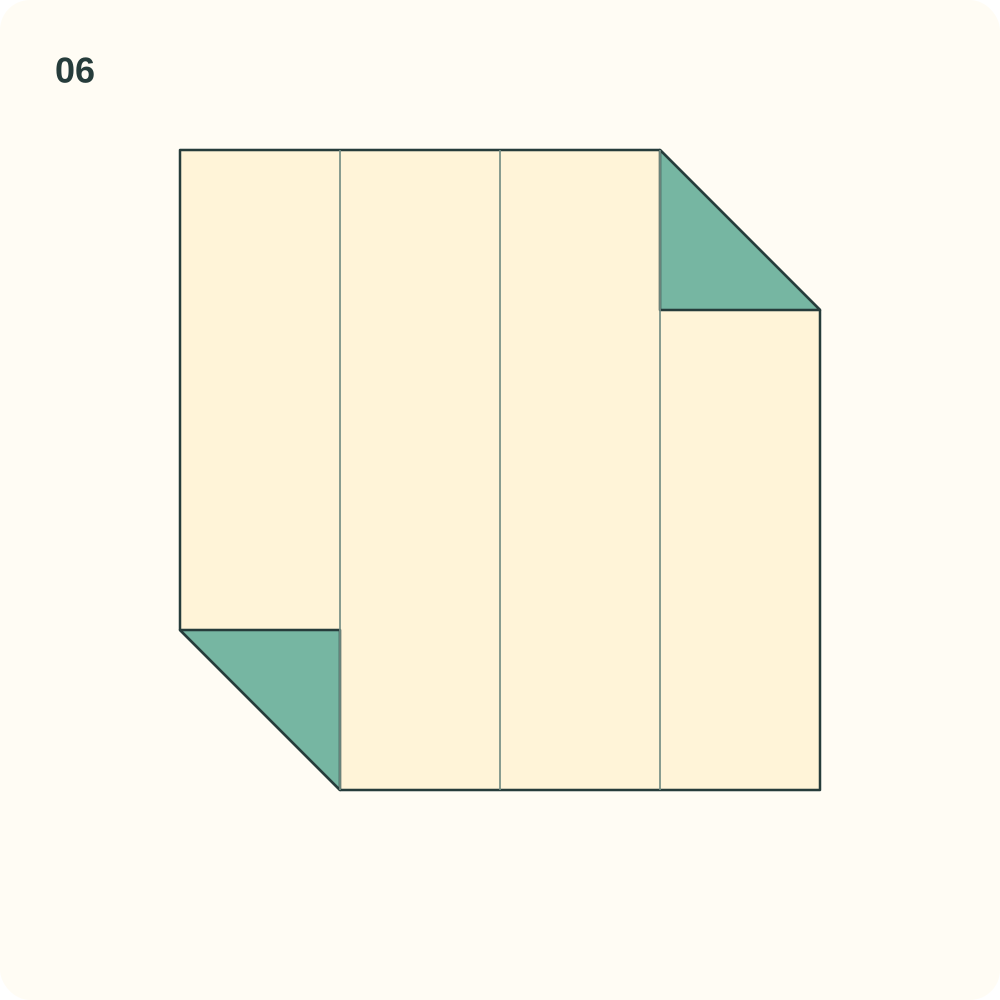
The upper right and lower left corners are folded; the other two corners remain square.
Step 7: Narrow the upper corner
Fold the sloping upper right edge inward onto the right quarter crease. Start at the top of that crease and move the whole attached corner, including its small folded layer. The new crease bisects the angle between the sloping edge and the vertical line.
Orientation: Keep all three vertical references upright.
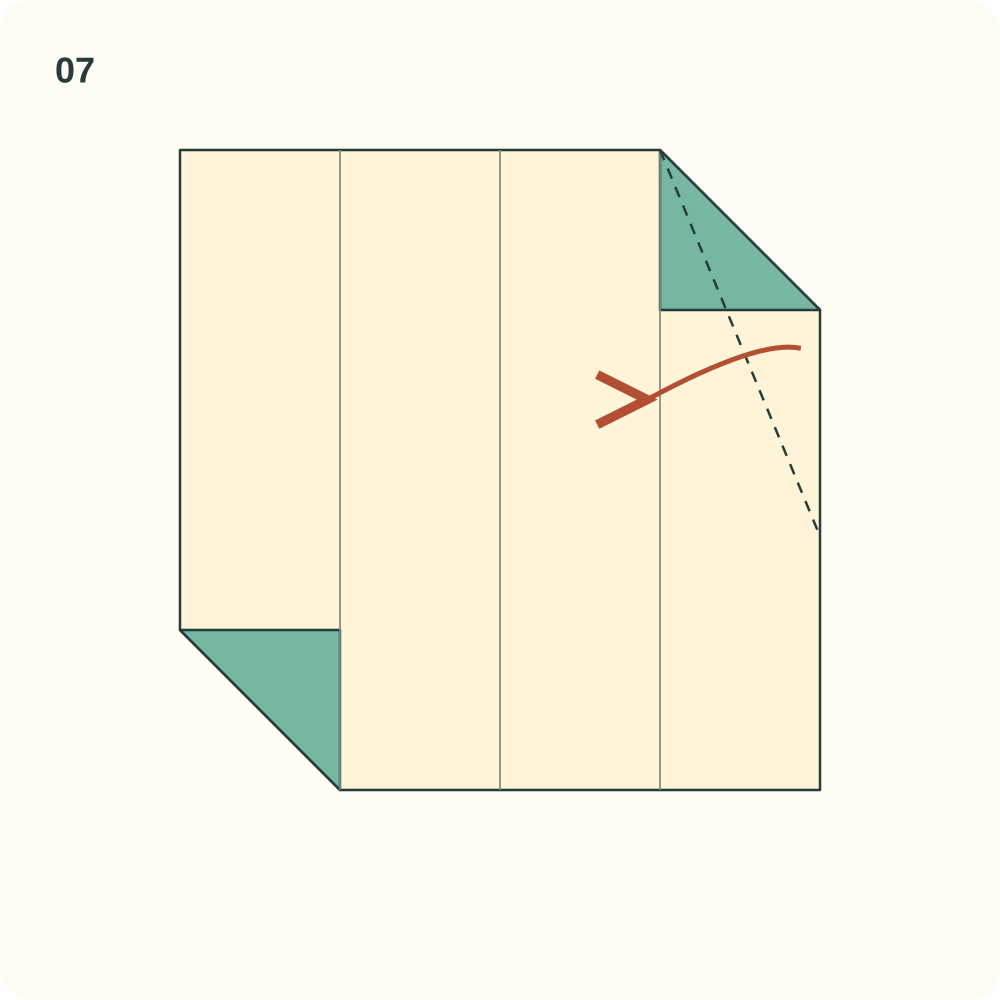
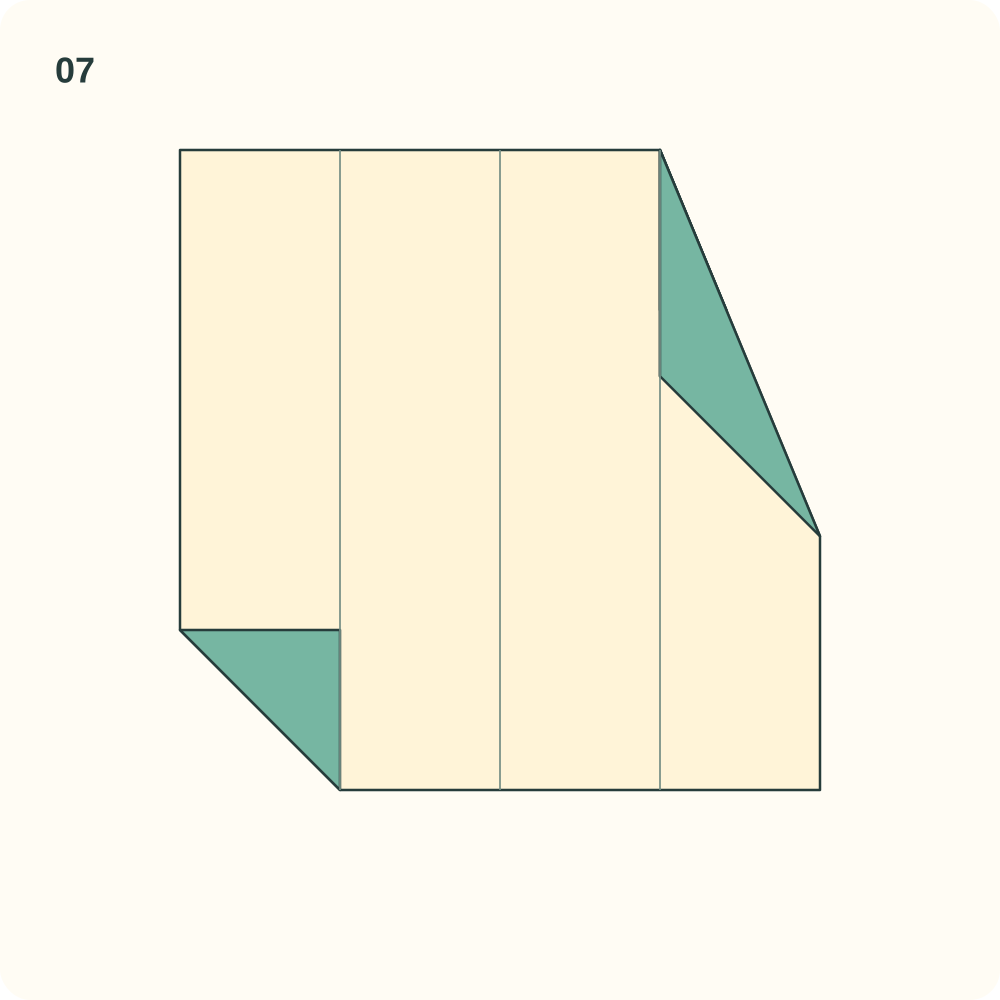
A long narrow corner replaces the short upper right triangle; its moved sloping edge now lies on the quarter crease.
Step 8: Narrow the lower corner
Fold the sloping lower left edge inward onto the left quarter crease, moving the whole attached corner. Make the same narrow shape at the opposite end.
Orientation: Do not mirror the choice of corners on later units.
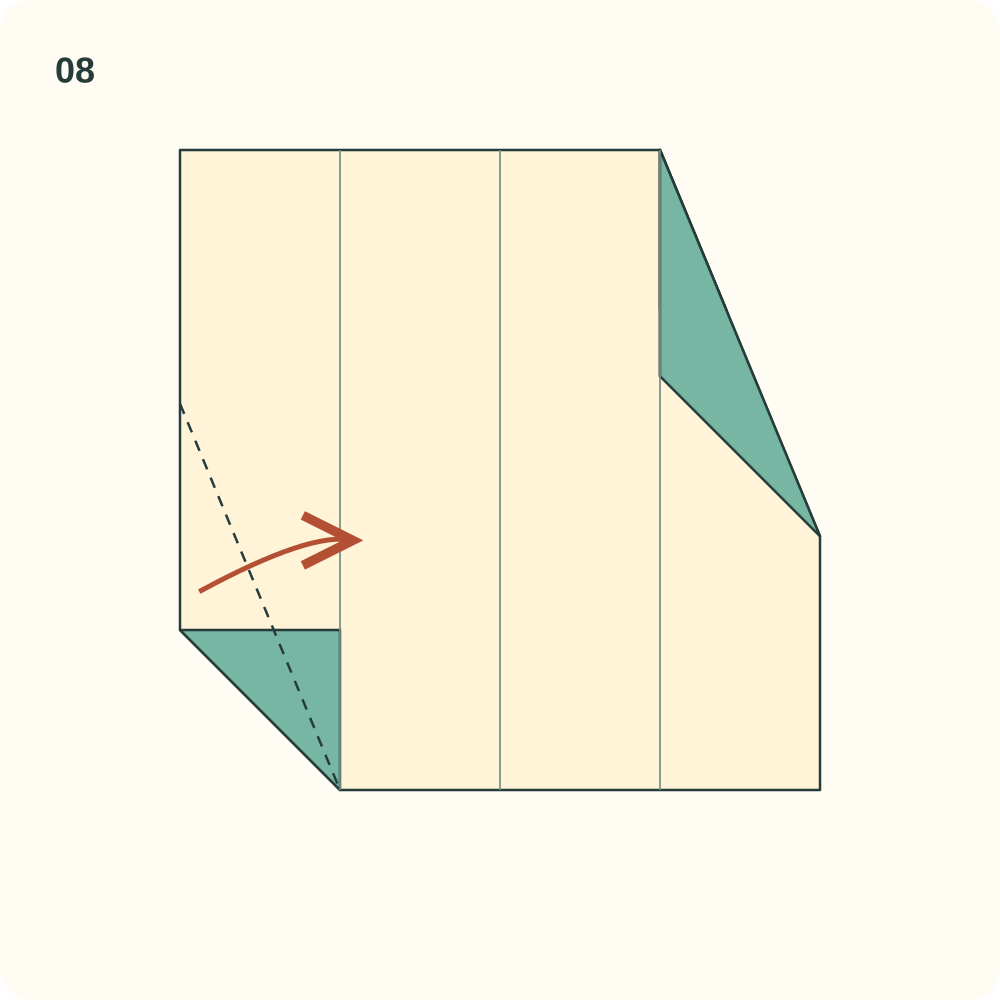
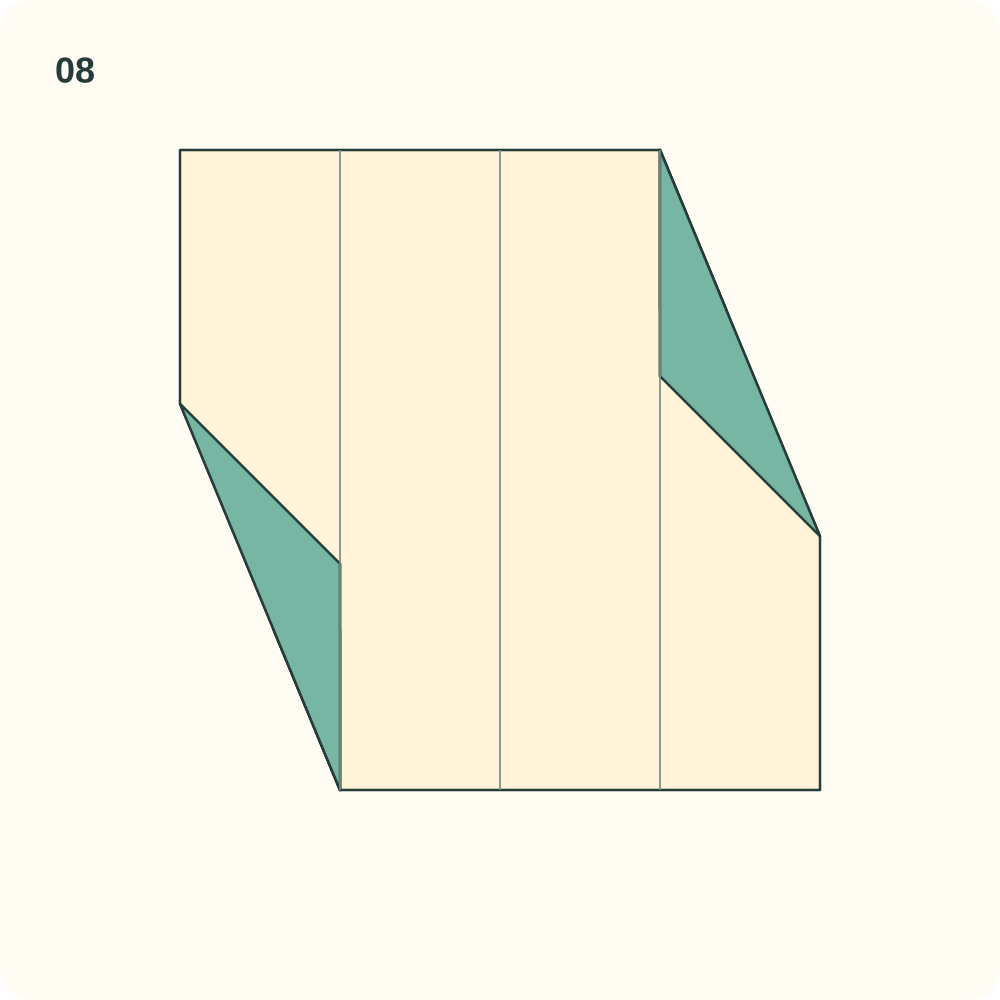
Both opposite corners are narrowed in the same handed arrangement.
Step 9: Close the left strip
Refold the left quarter strip inward along its existing vertical crease so its original outer edge meets the centre. Move its narrowed corner with the strip.
Orientation: The right quarter is still open.
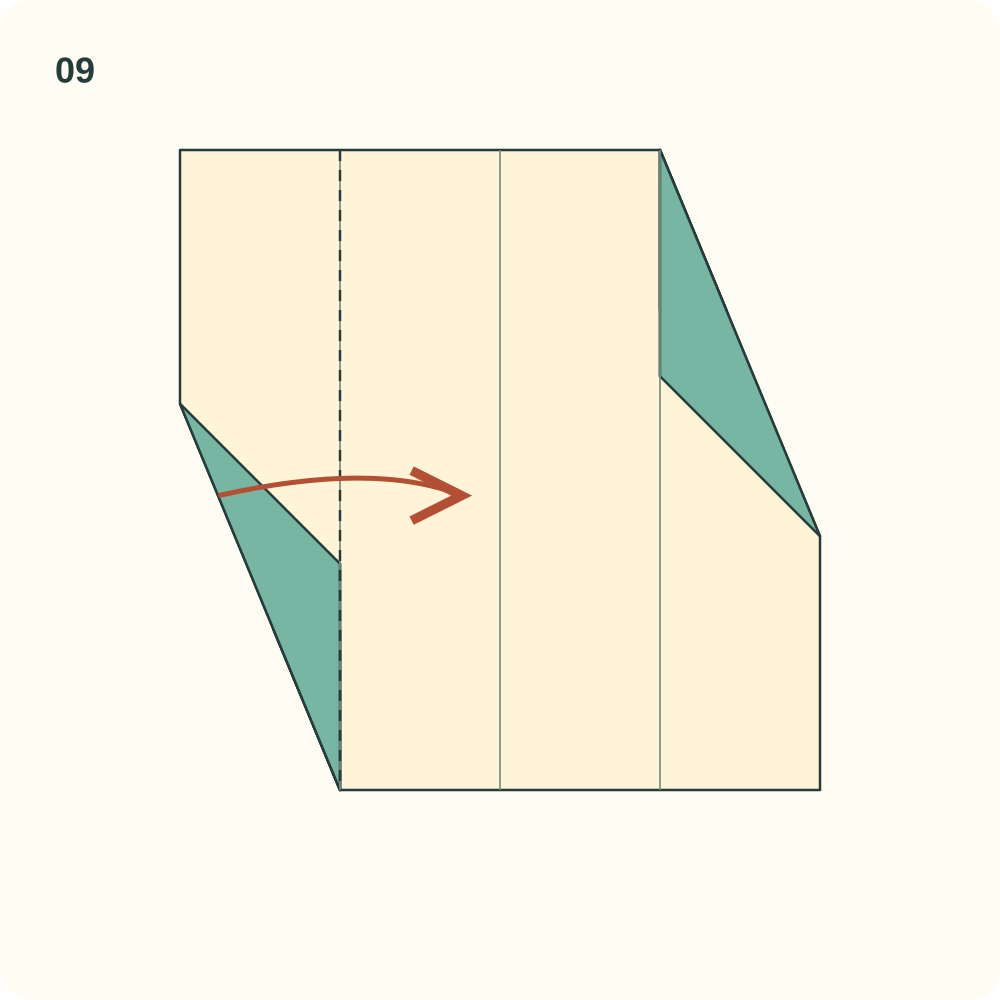
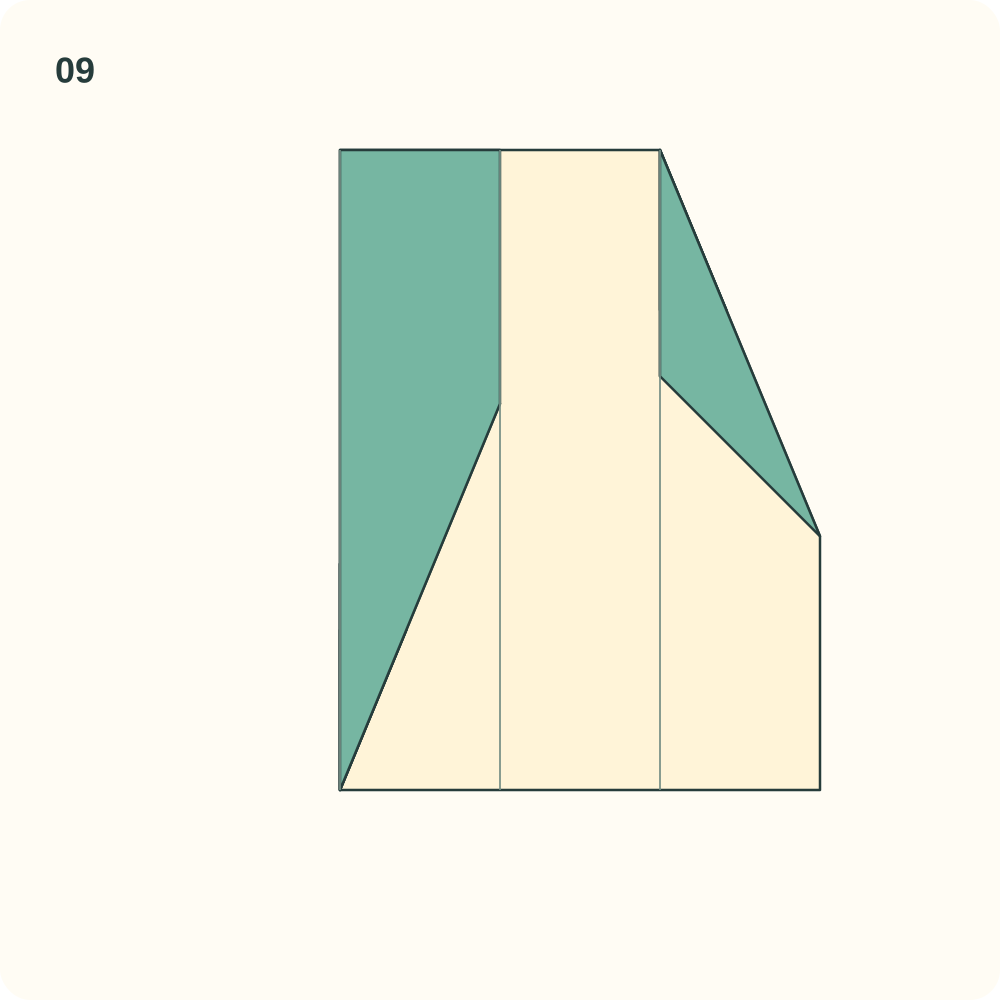
The left strip covers the left half of the central region.
Step 10: Close the right strip
Refold the right quarter strip inward so its original outer edge meets the centre beside the first strip.
Orientation: The result is a vertical rectangle half as wide as the starting square.
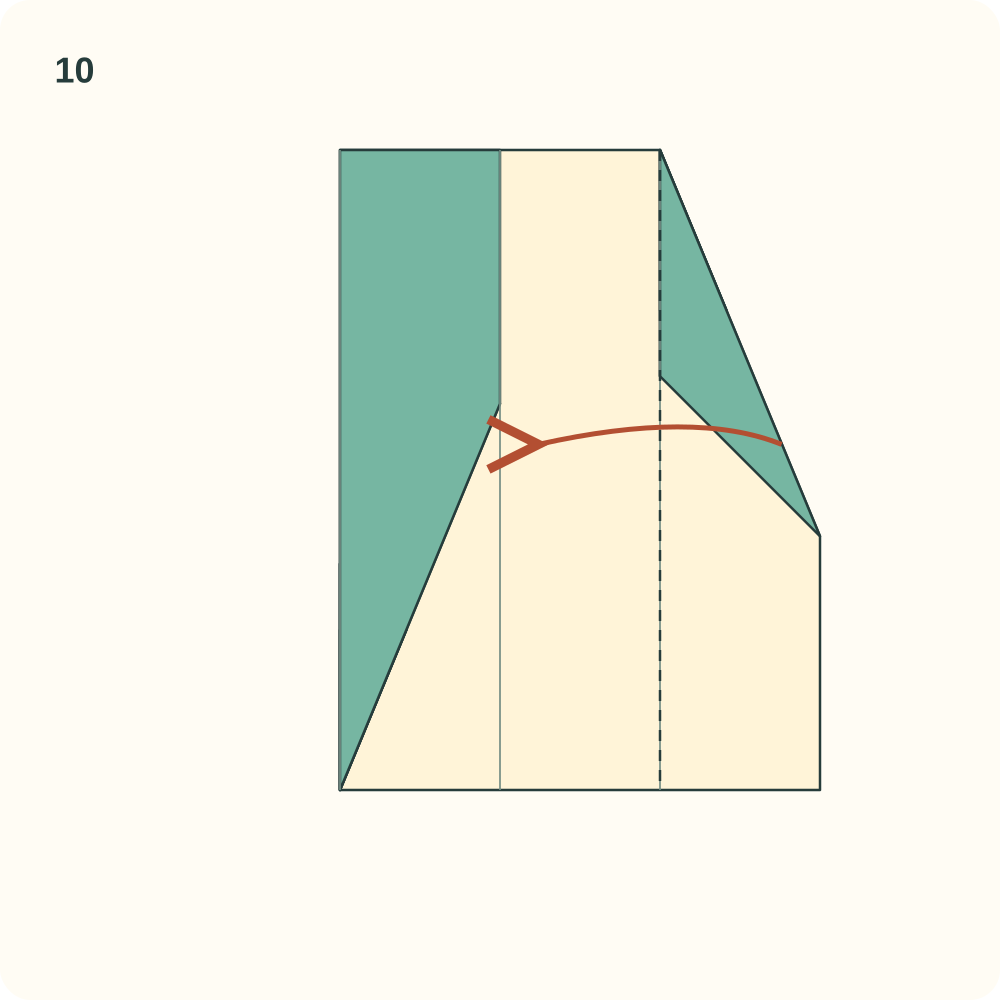
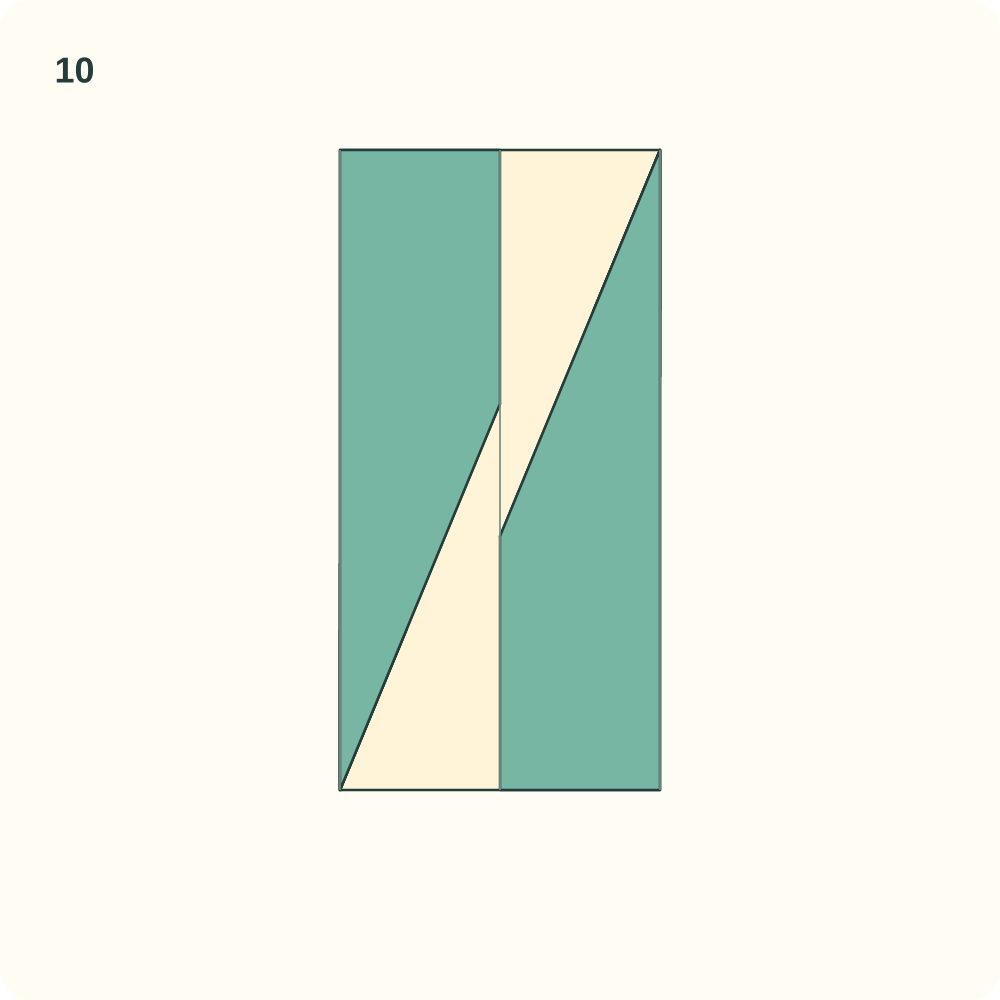
The two strips meet without intentional overlap; their narrowed corner layers remain inside.
Step 11: Rehearse the upper diagonal
Bring the upper left corner of the rectangle down to the right edge, making its top edge align with the right edge. Mark the diagonal from the upper right corner to the midpoint of the left edge, then reopen only this large triangle.
Orientation: Keep the two quarter strips closed.
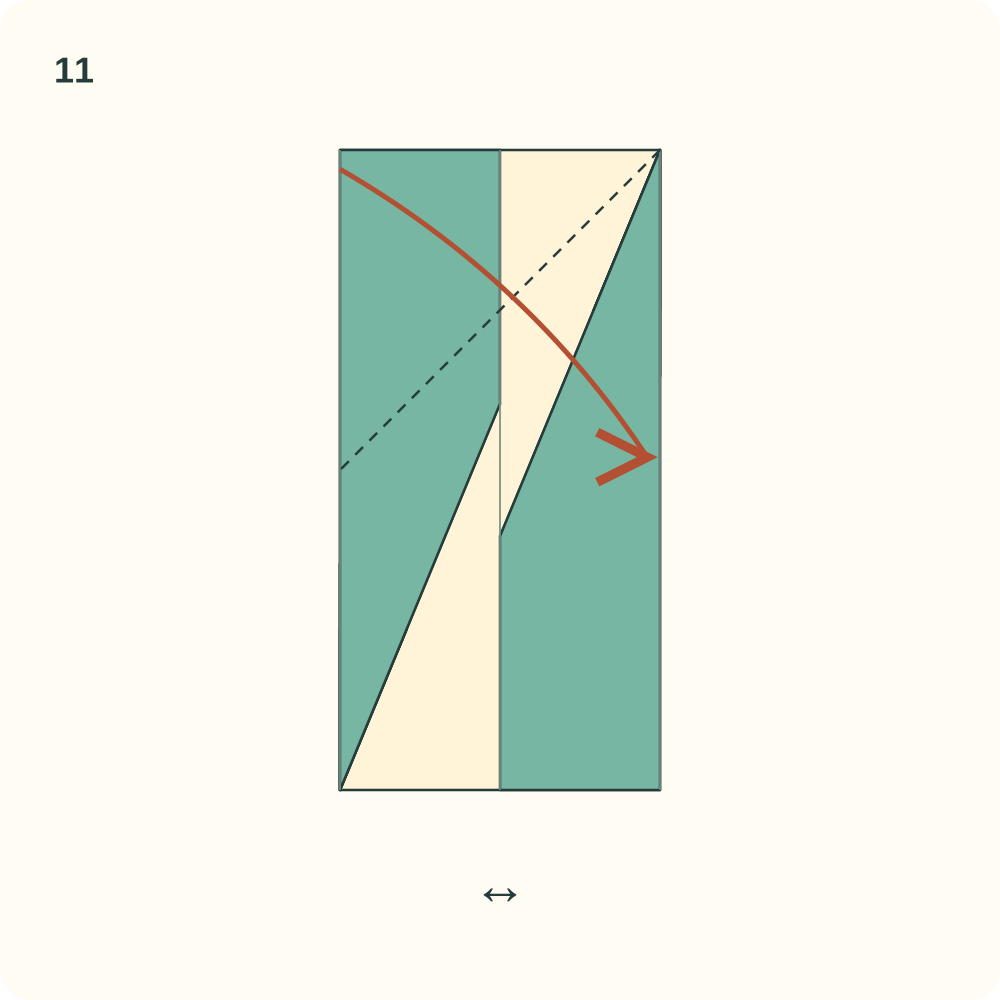
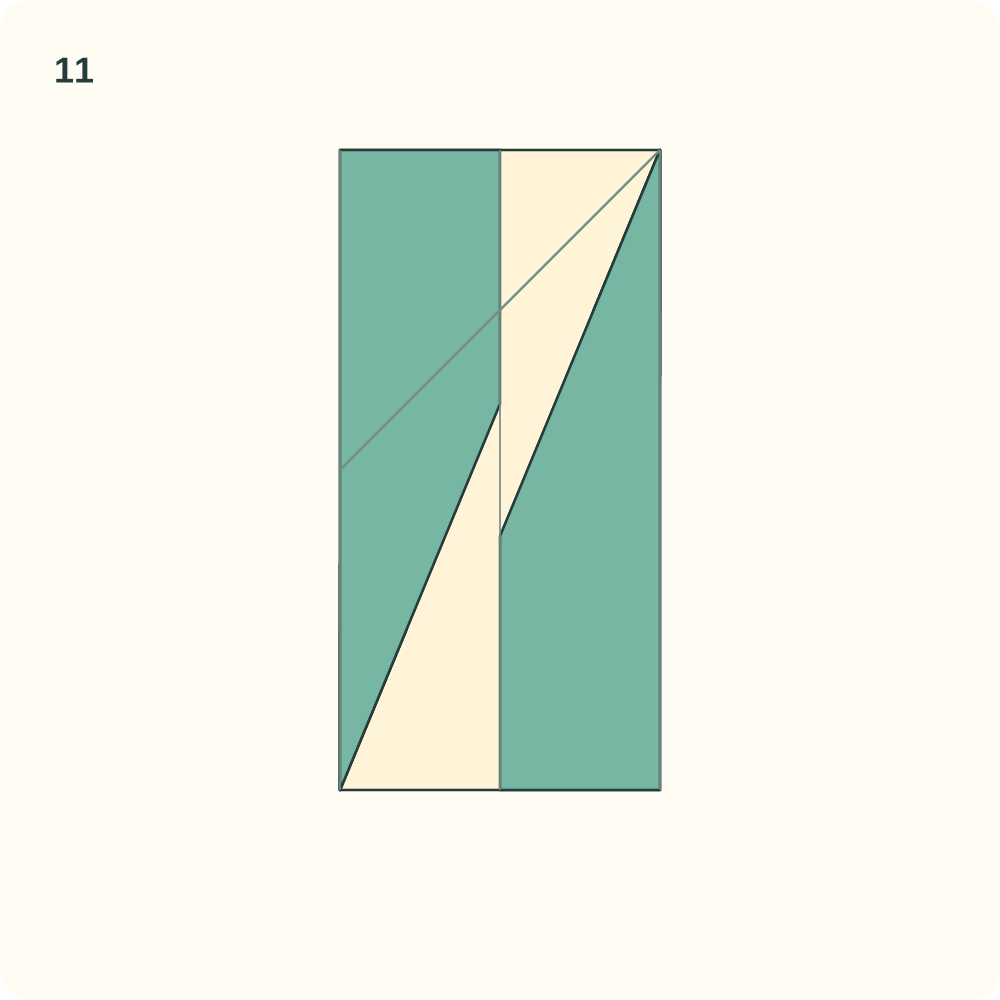
The rectangle is restored with a diagonal guide across its upper half.
Step 12: Rehearse the lower diagonal
Bring the lower right corner up to the left edge, aligning its bottom edge with the left edge. Mark the diagonal across the lower half, then reopen only this large triangle.
Orientation: The new diagonal is parallel to the previous one.
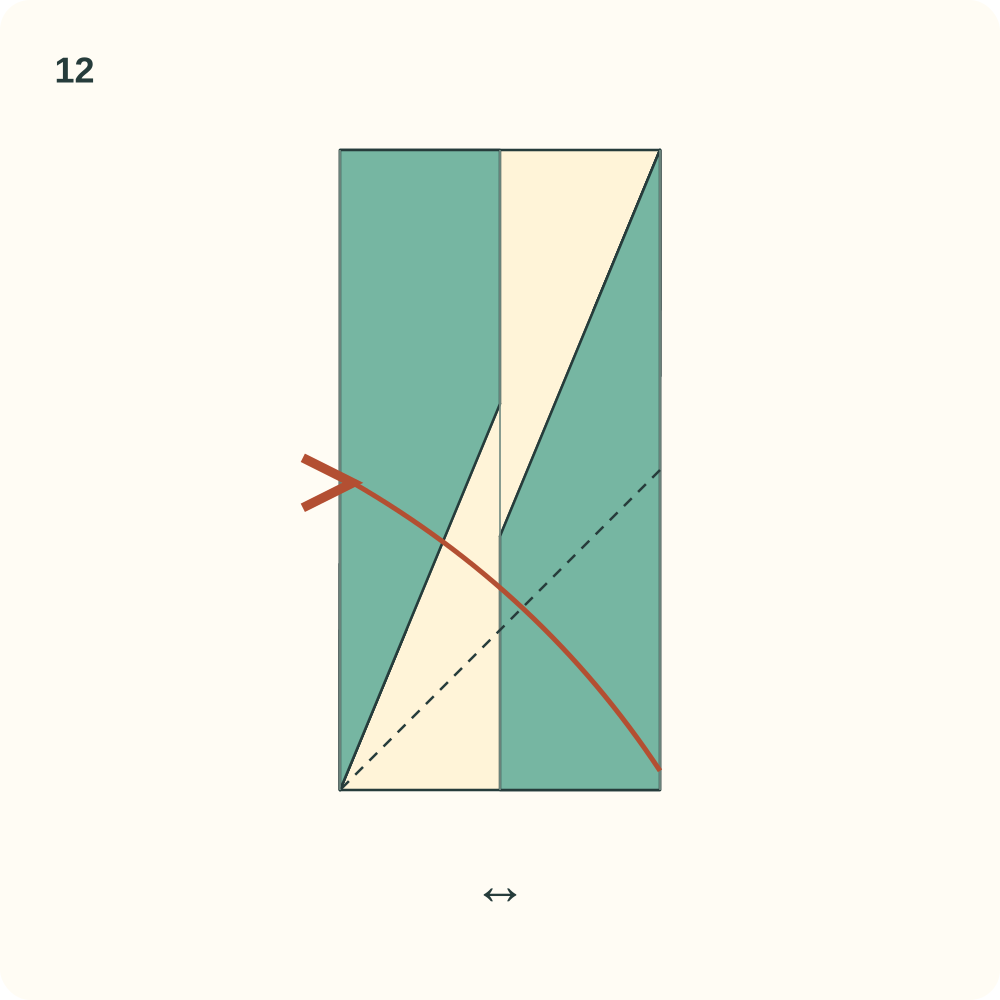
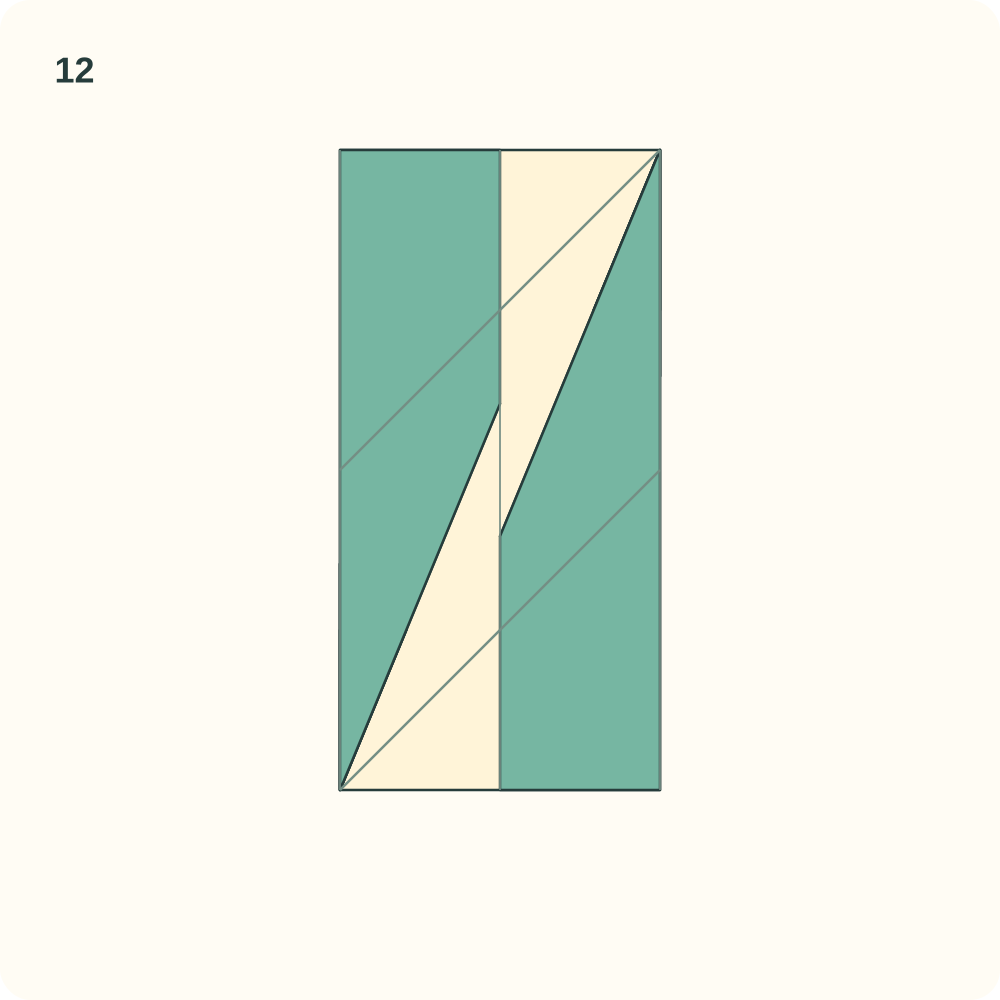
Two parallel diagonals are ready for the tucks; the long quarter strips remain folded.
Step 13: Tuck the upper triangle under the opposite strip
Lift the free edge of the right-hand quarter strip just enough to open its pocket. Refold the upper left large triangle on the diagonal from step 11 and slide it under that right strip. Lower the strip over it; do not merely lay the triangle on top.
Orientation: The inset separates the layers to show the route under the pocket lip. It is not a cut.
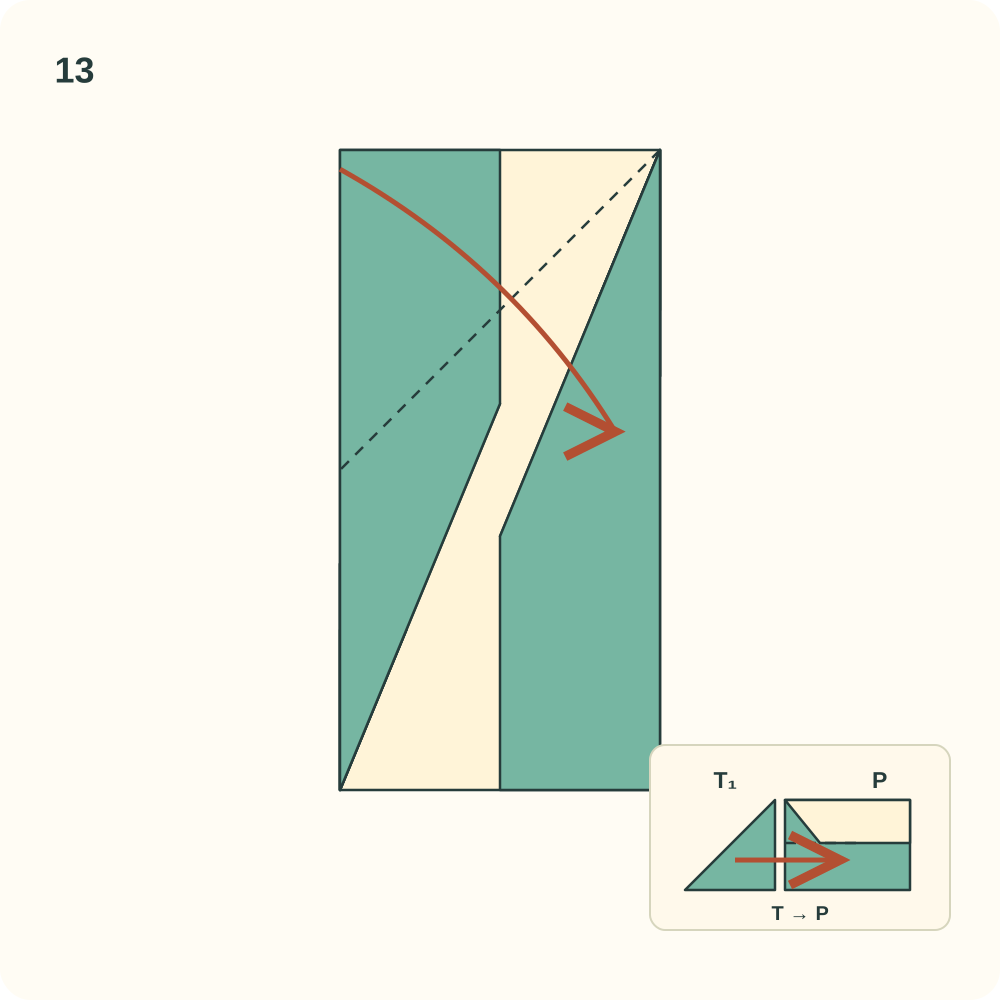
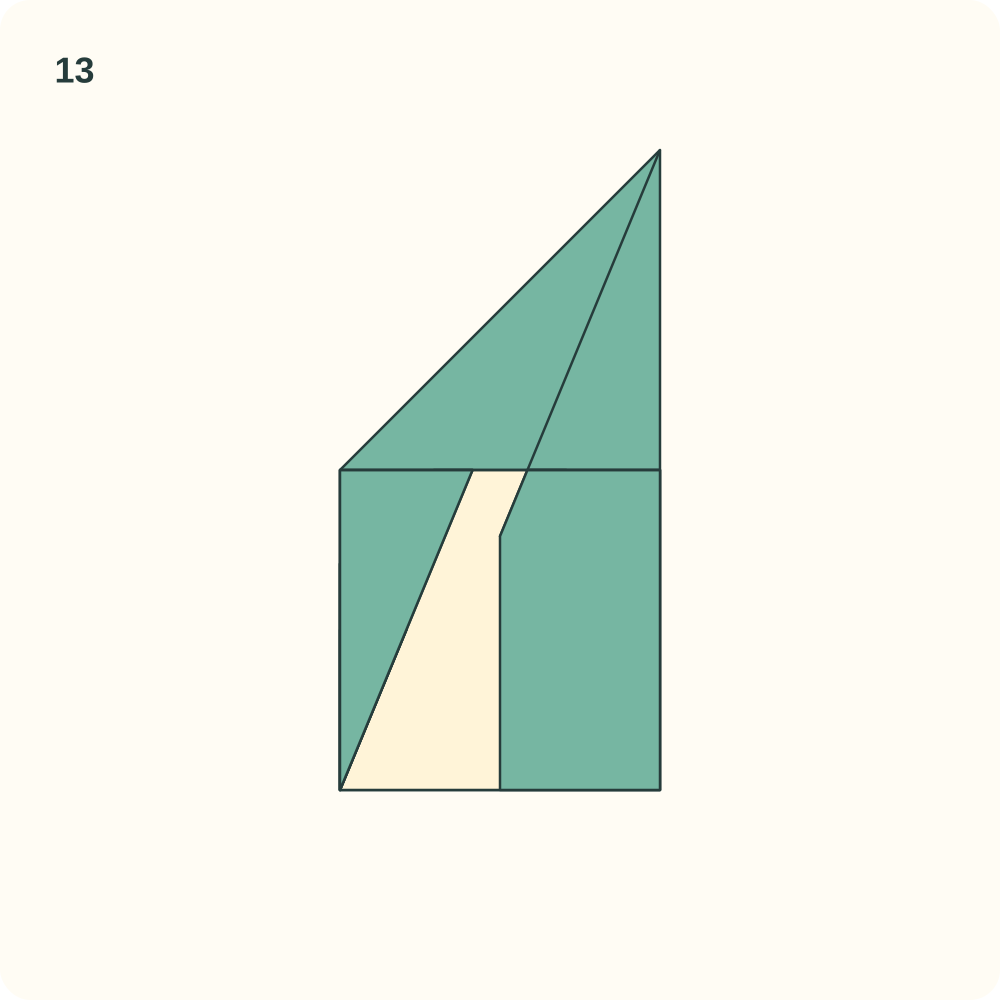
The upper end points upward and right; the receiving strip lies over the tucked triangle.
Step 14: Tuck the lower triangle under the opposite strip
Lift the free edge of the left-hand strip. Refold the lower right large triangle on its guide and slide it beneath that left strip, then lower the strip.
Orientation: The resulting parallelogram still has the original top pointing upward and right.
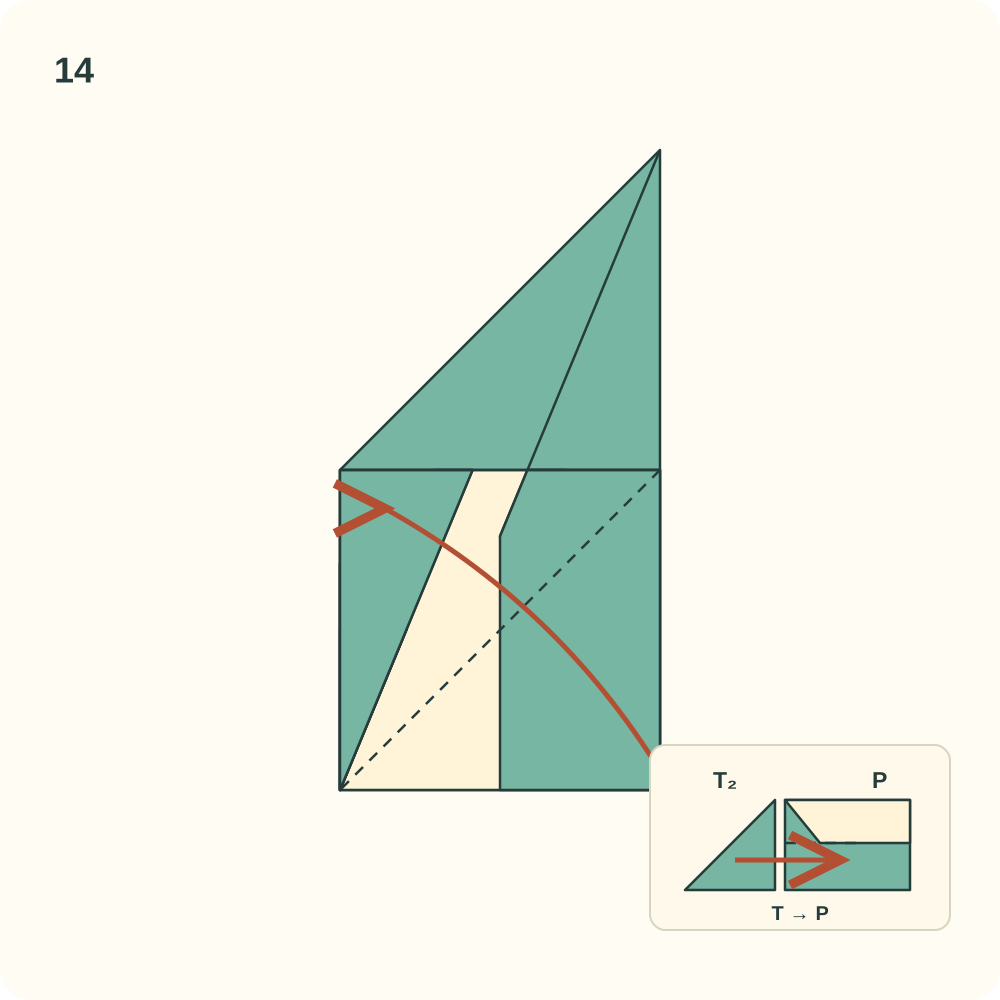
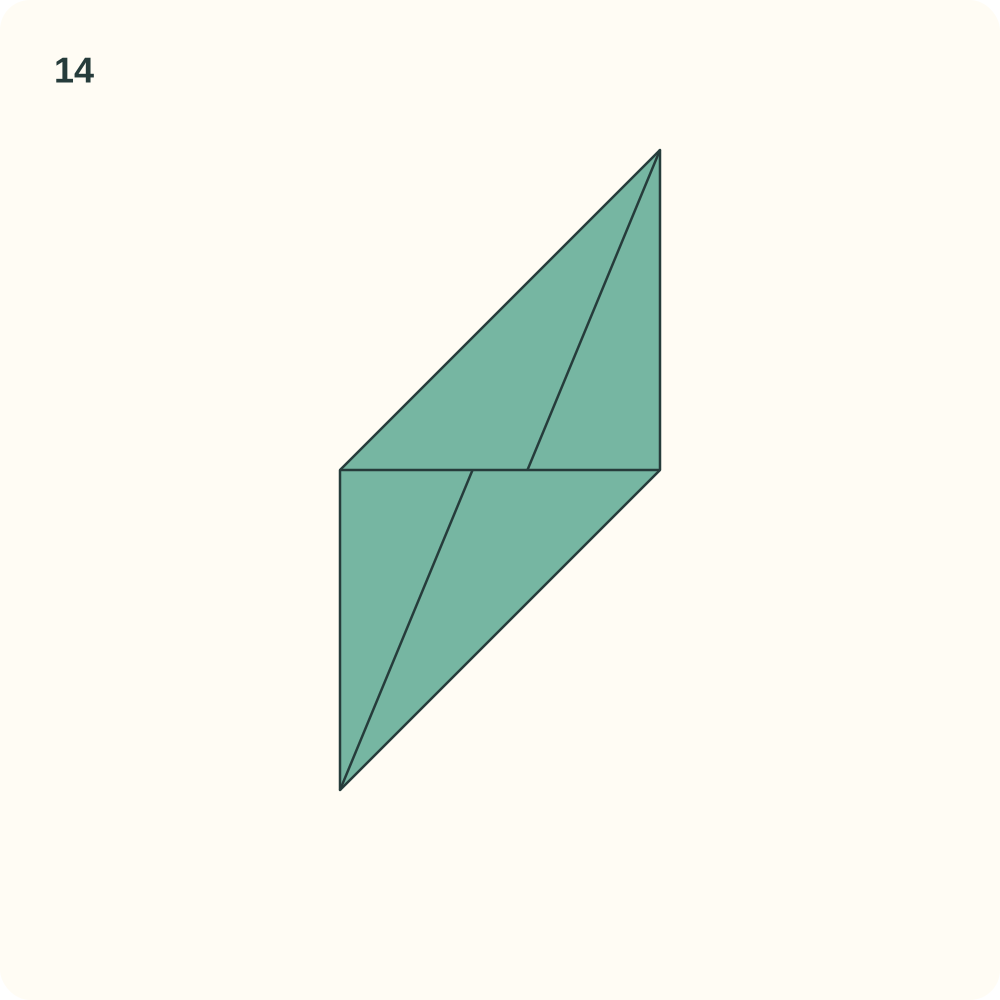
A flat parallelogram has two pointed ends and two opposite pocket mouths.
Step 15: Turn the unit over
Turn the complete unit over from left to right, like a page. Do not rotate it on the table. The upper point moves from the right side to the left side.
Orientation: The smooth back faces you; the long outline now slopes downward to the right.
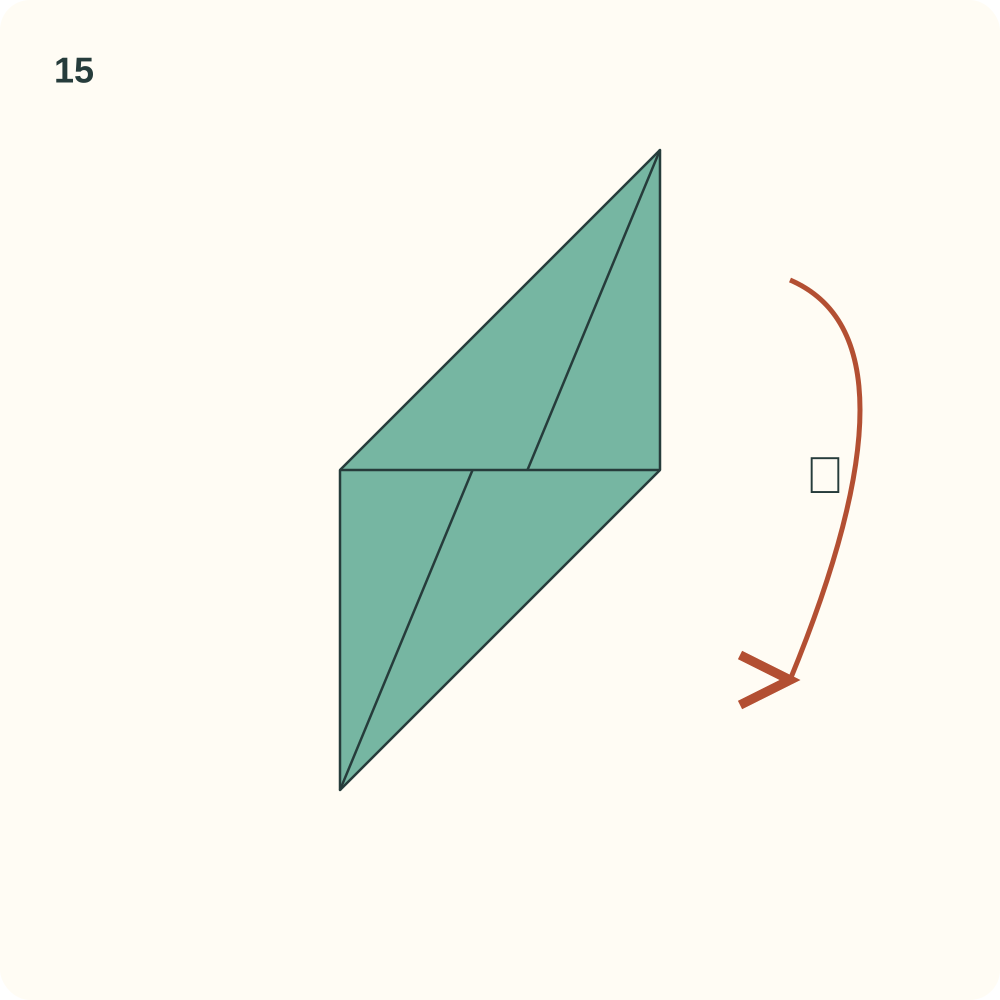
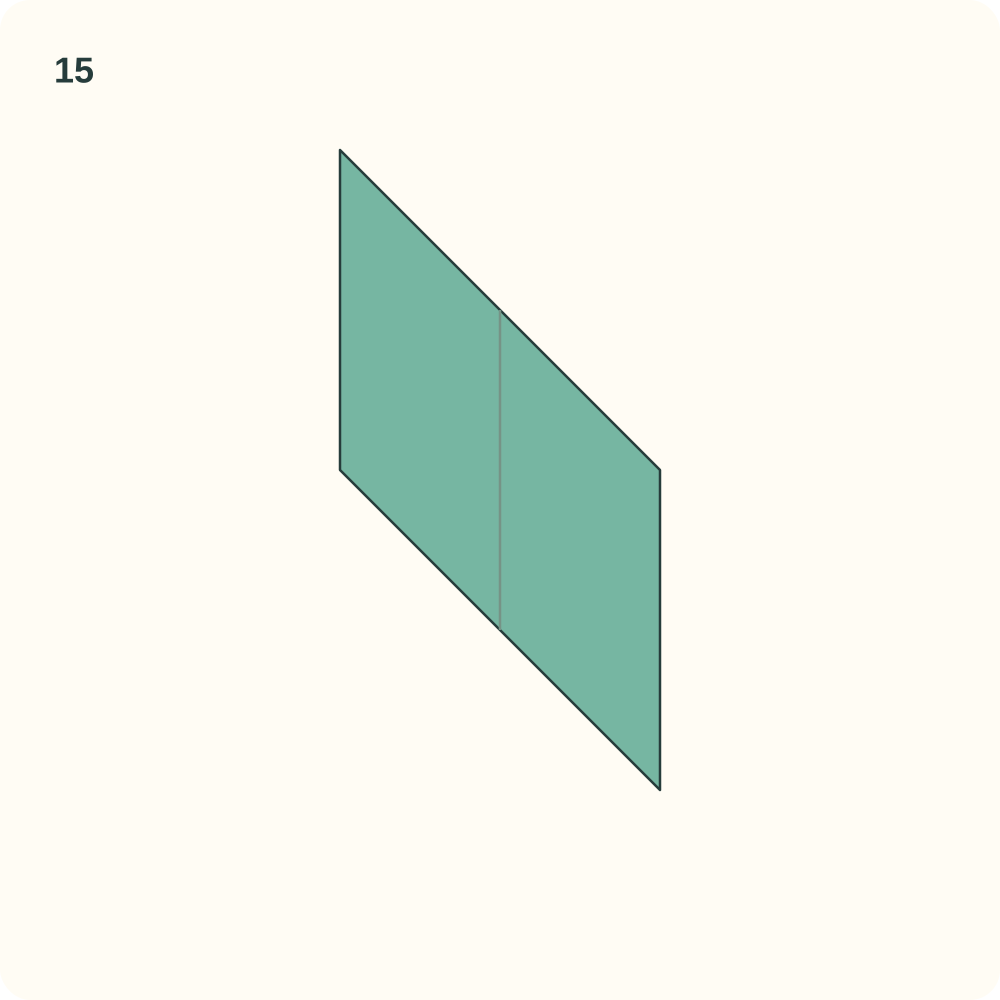
The reverse of the same parallelogram is visible. No new fold is made.
Step 16: Crease the upper tab hinge
Bring the upper pointed end down to the right-hand obtuse corner of the parallelogram. Crease the line that joins the two neighbouring side midpoints, then reopen this triangular tab.
Orientation: Use the point at the upper left; do not fold the whole parallelogram in half.
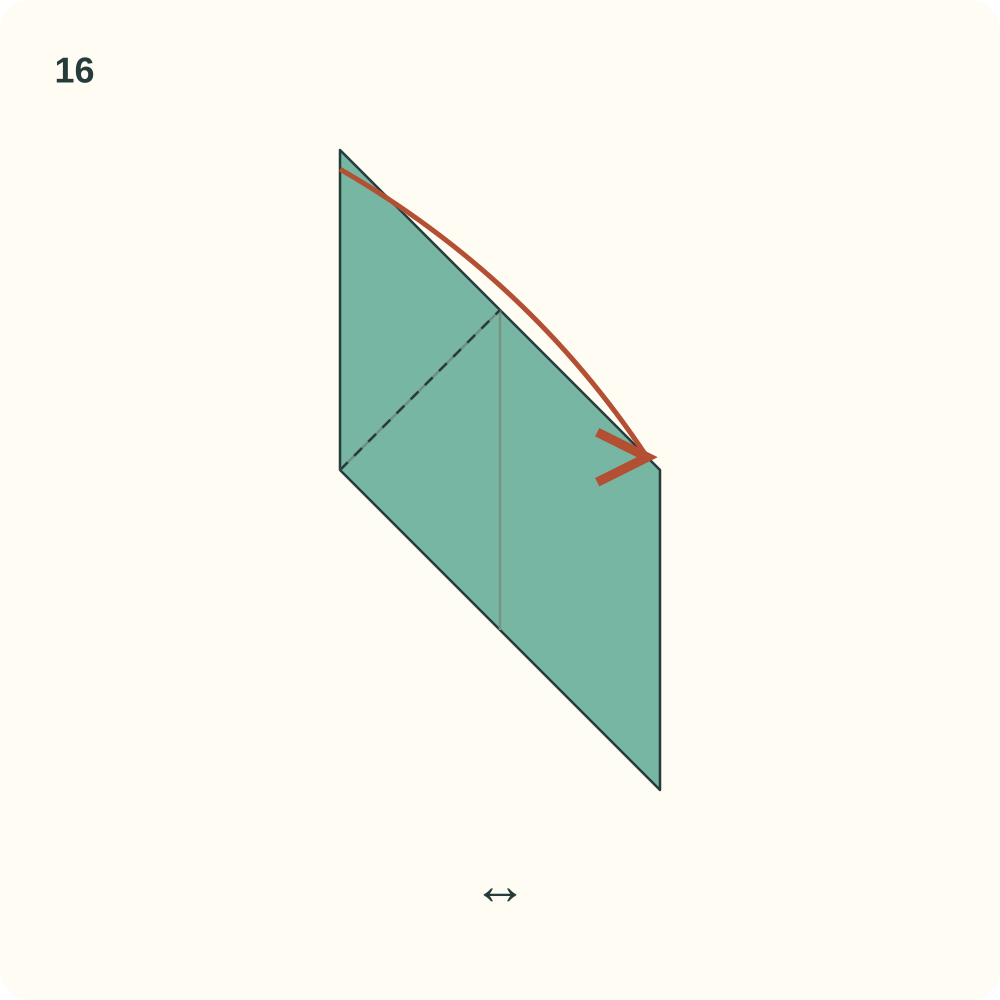
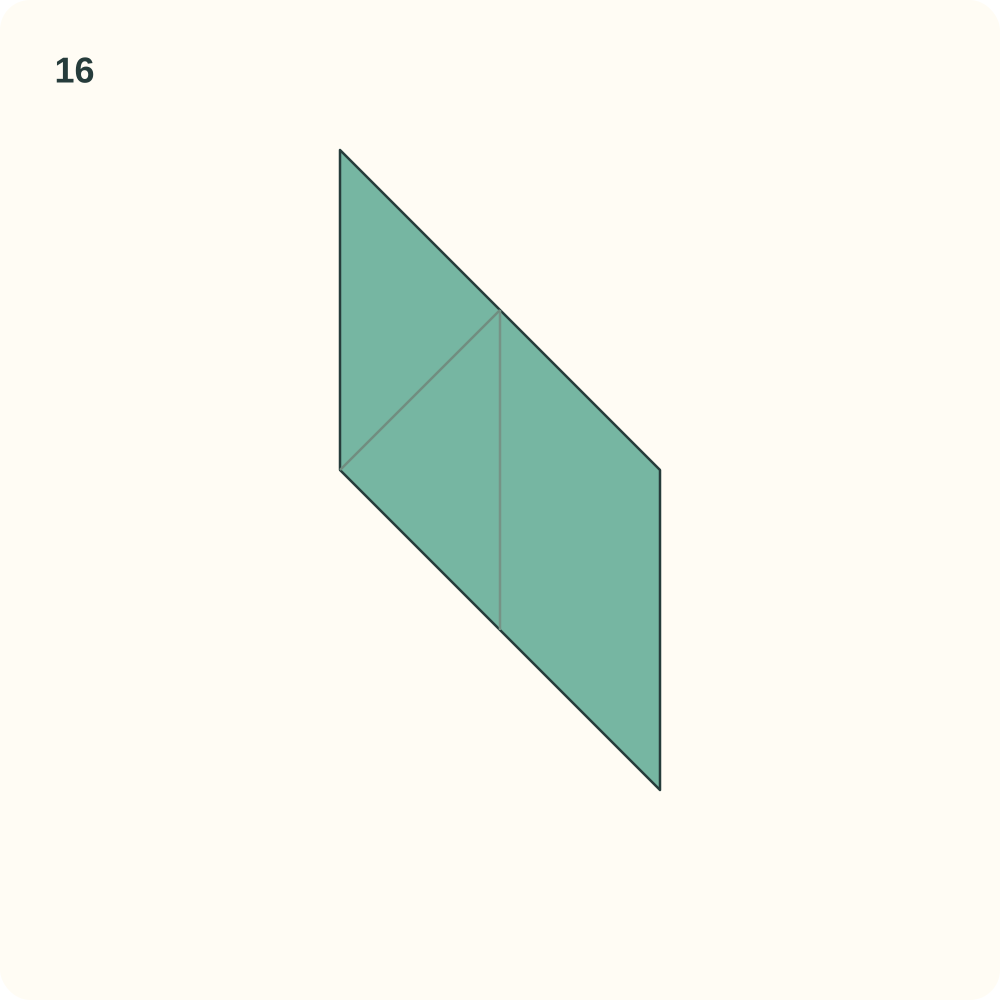
The upper tab has a diagonal hinge. Its tip can now fold onto the opposite corner of the central diamond.
Step 17: Crease the lower tab hinge
Bring the lower pointed end up to the left-hand obtuse corner. Crease its hinge, then reopen the tab. The central region between the two hinges is a square seen as a diamond.
Orientation: The two tab hinges are parallel.
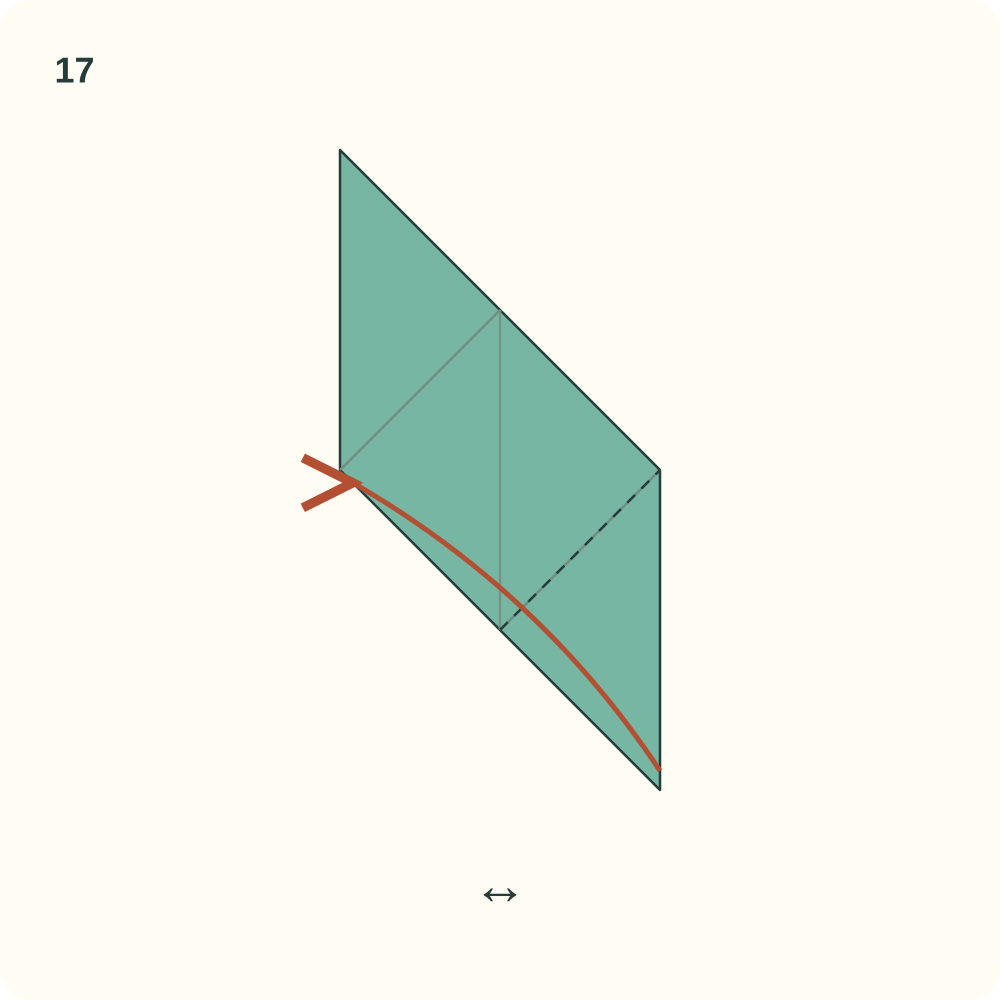
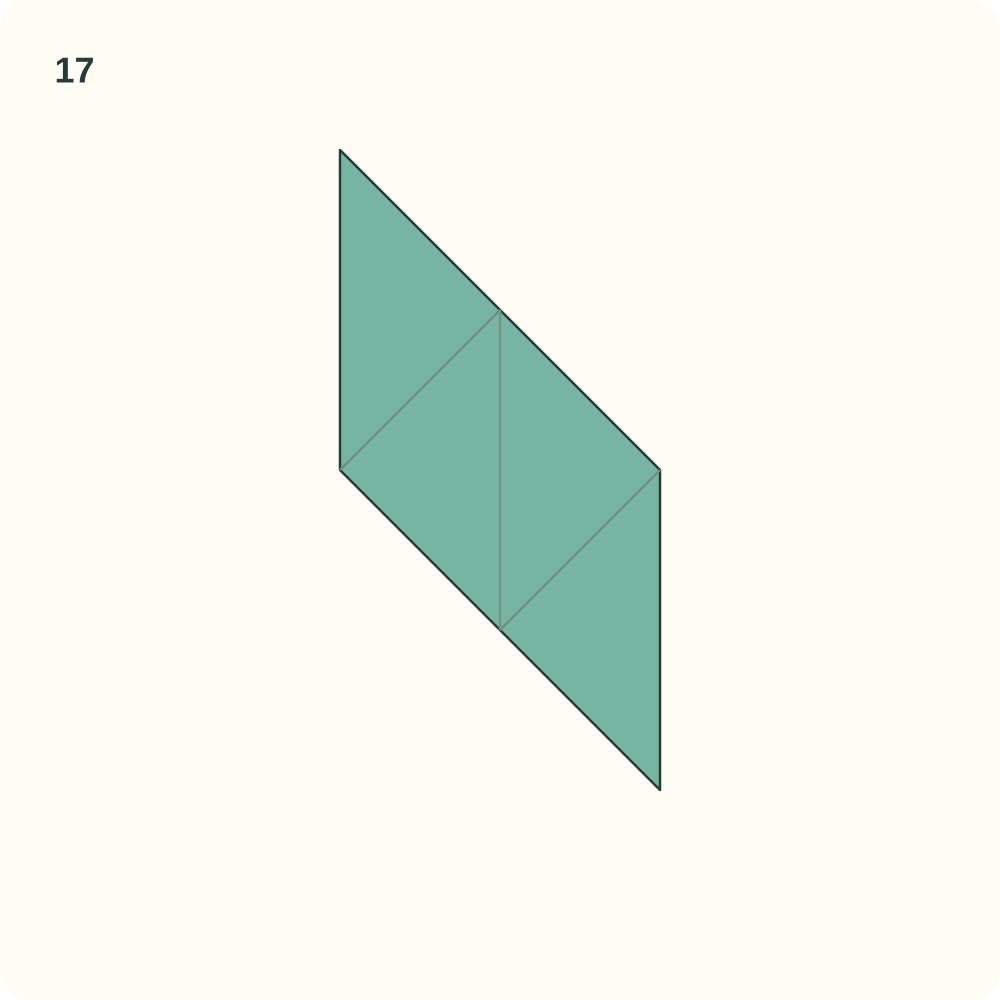
Two triangular tabs flank one central square face. No extra crease crosses that face.
Step 18: Return to the pocket side
Turn the complete unit back from left to right, restoring the pocket side. Gently bend the two end tabs away from you on their existing hinges, then leave them partly open for assembly. The result drawing lays them flat so T₁ and T₂ remain identifiable.
Orientation: The original upper point is again on the right. P₁ and P₂ mark the two receiving edges of the central diamond.
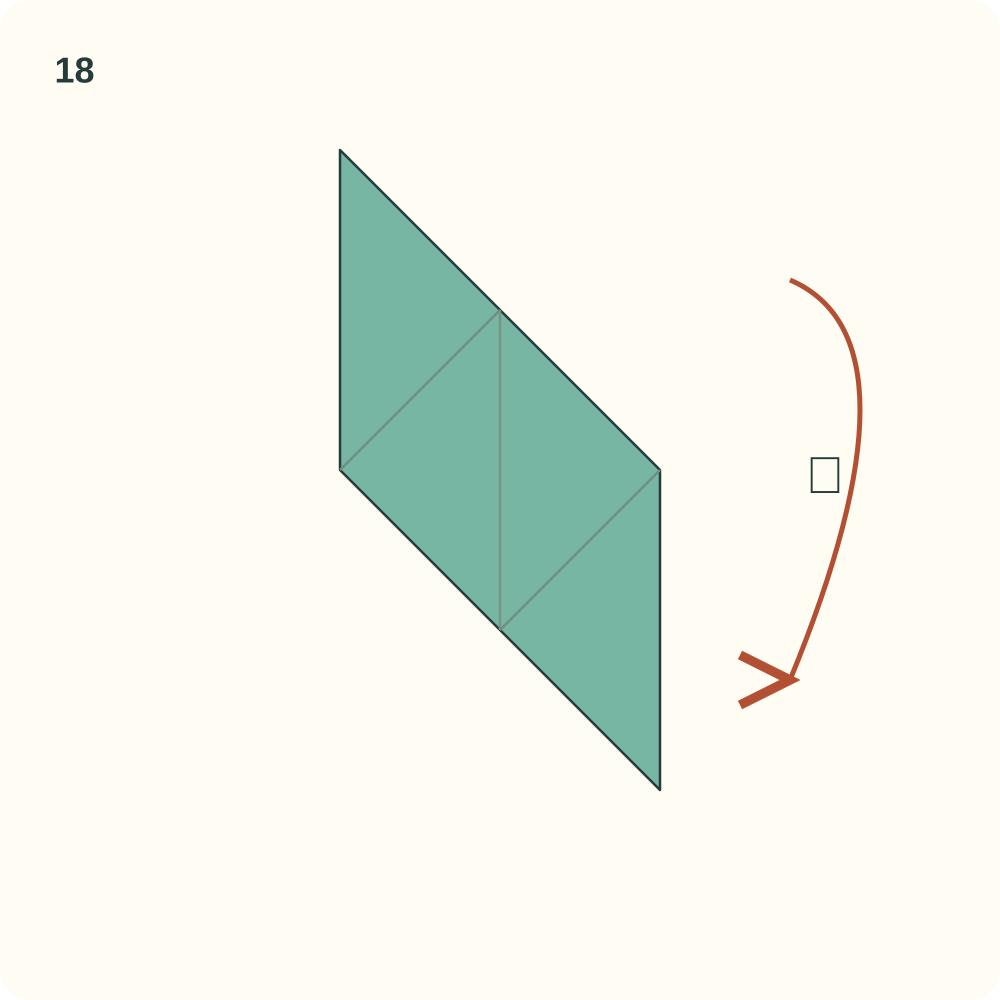
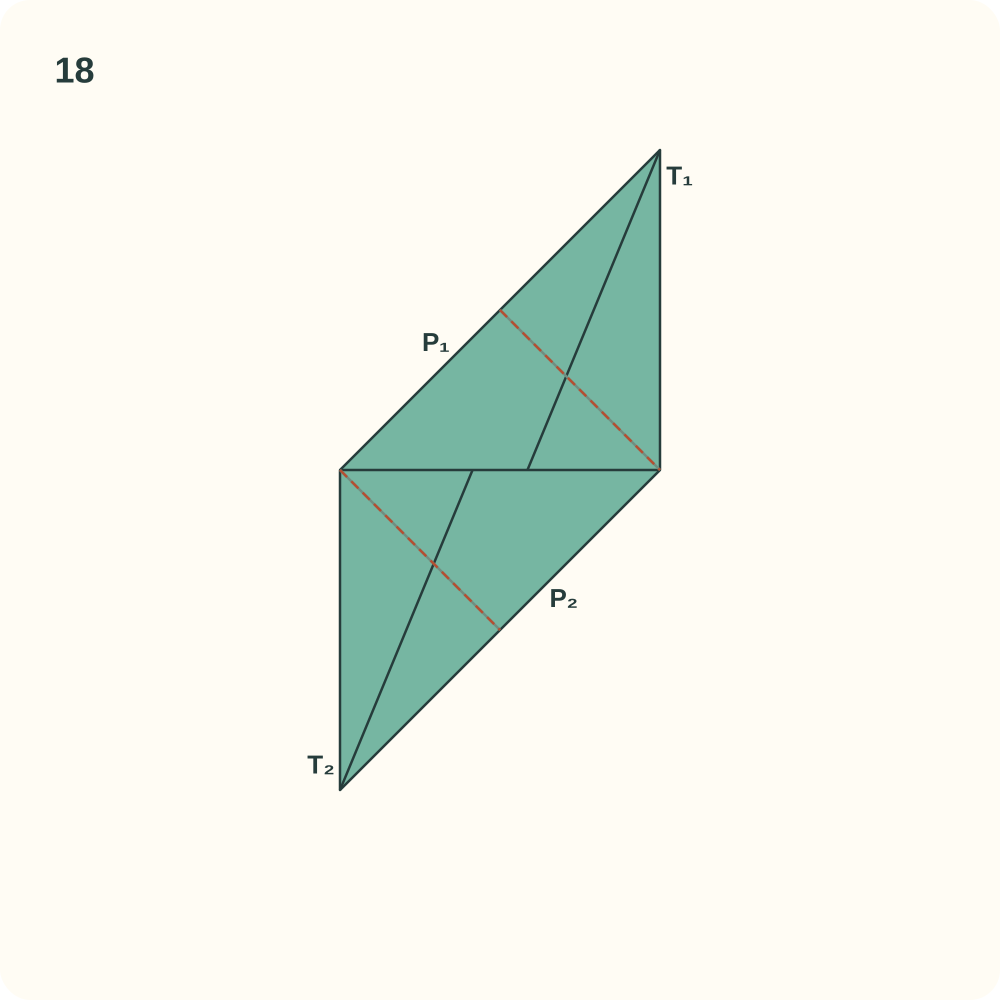
One Sonobe unit has two projecting tabs T and two pockets P. The central square must remain flat.
Step 19: Prepare six matching units
Repeat instructions 1–18 on the other five squares without changing the selected corners. Arrange the six units together and label them A, B, C, D, E and F on a loose note or with a very small optional pencil mark on the back.
Orientation: All six units are made from the same green paper in the diagrams. The letters identify units, not paper cuts.
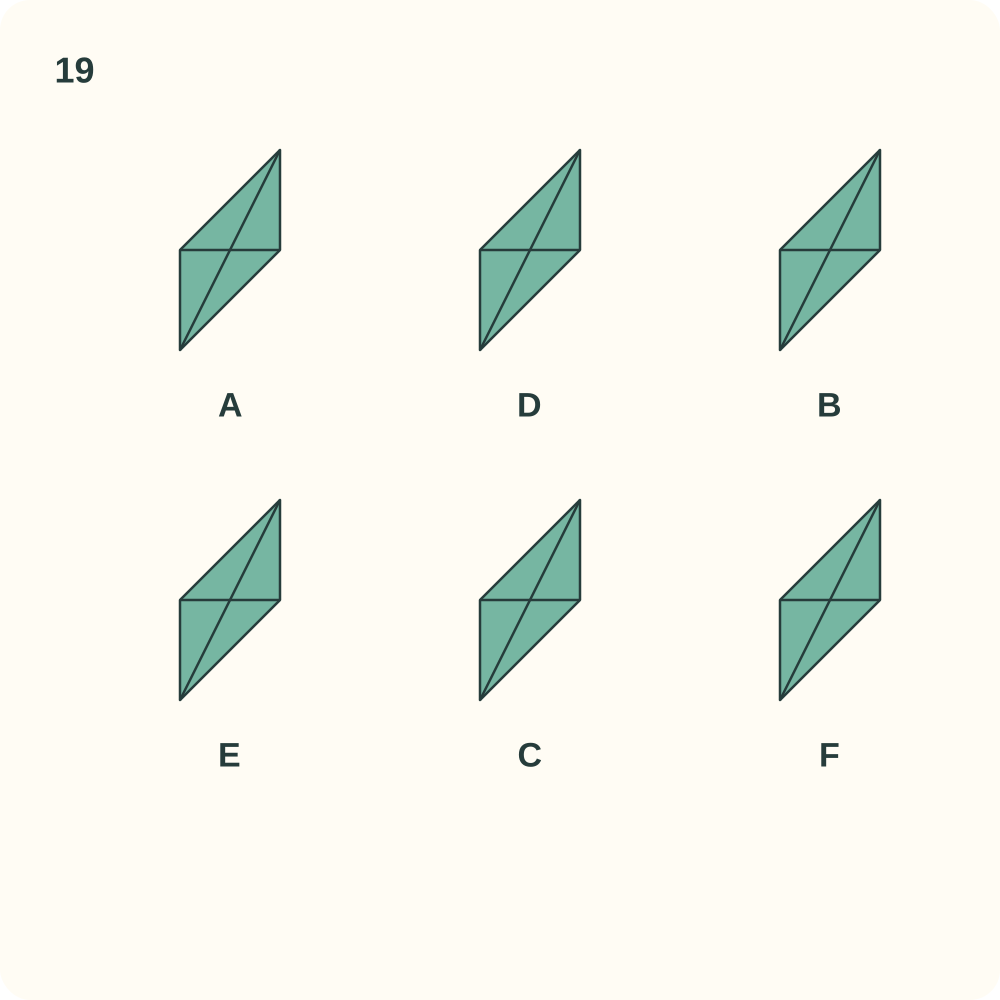
Six units have the same size, pocket side and handed arrangement.
Step 20: Join A to B
Hold A as the front face and B as the right face, with pocket sides facing outward and their central squares at a right angle. Bend A’s right tab around their shared edge and slide it into B’s front-facing pocket, beneath its lip. Stop at the existing hinge; do not push through the pocket.
Orientation: View from above, in front and to the right. A is left in the picture; B is right.
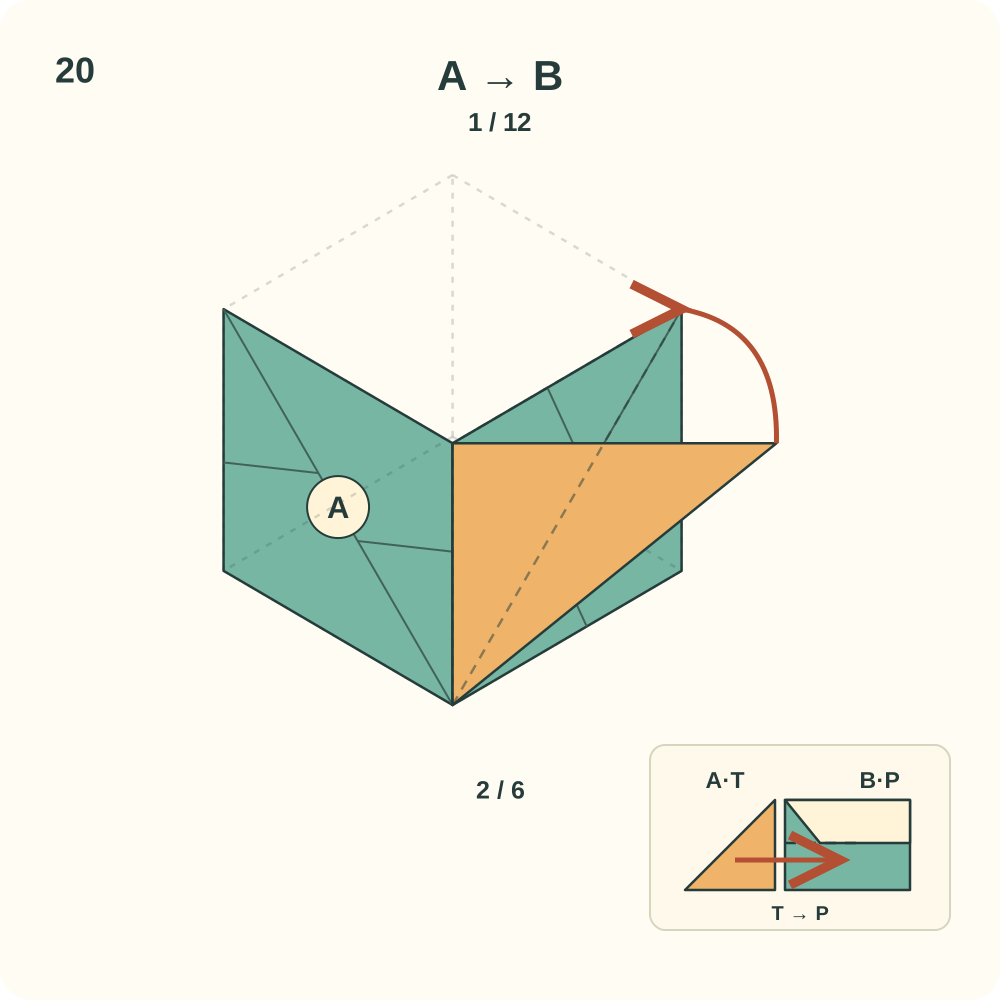
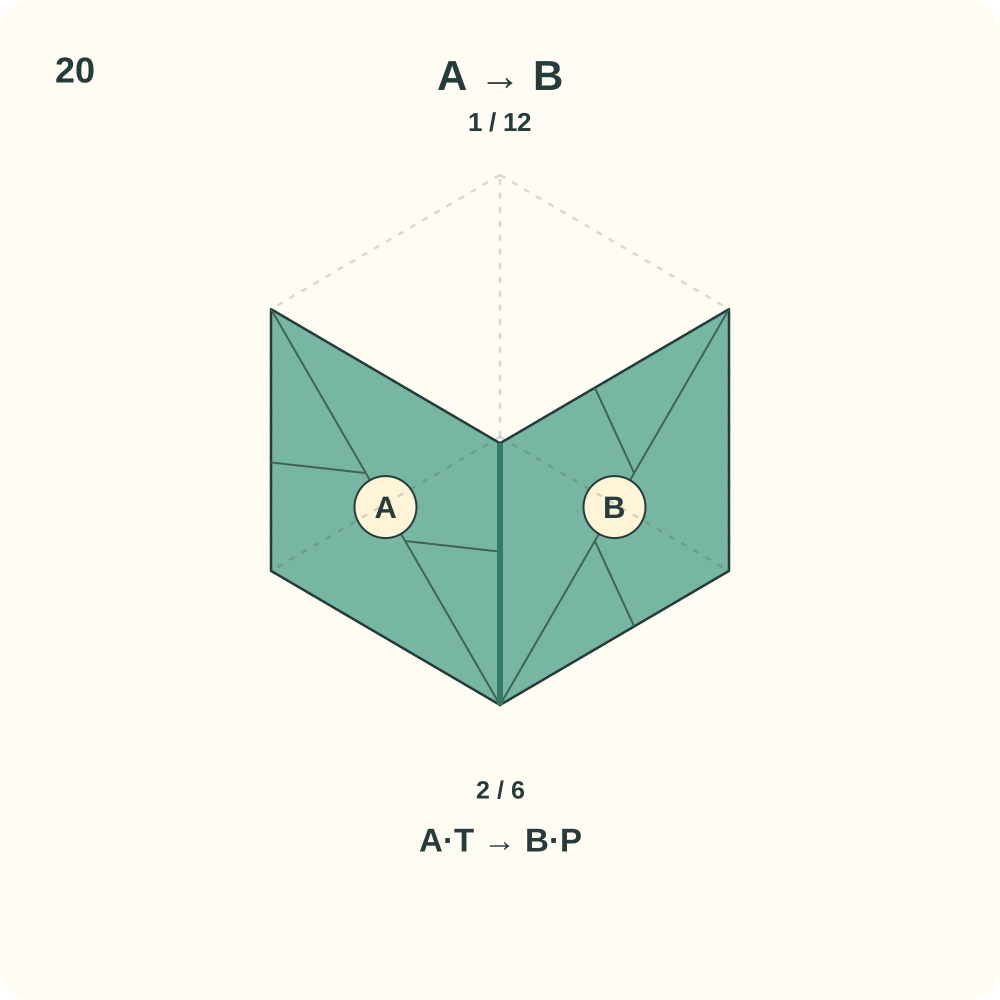
Connection 1 of 12 is A → B. The two central squares share one cube edge.
Step 21: Join C to A
Position C above A and B, with its square forming the top face. Insert C’s front tab into A’s upper pocket. Keep C’s right pocket accessible for the next tab.
Orientation: Keep the same view. C is the new top face; its pocket side faces upward.
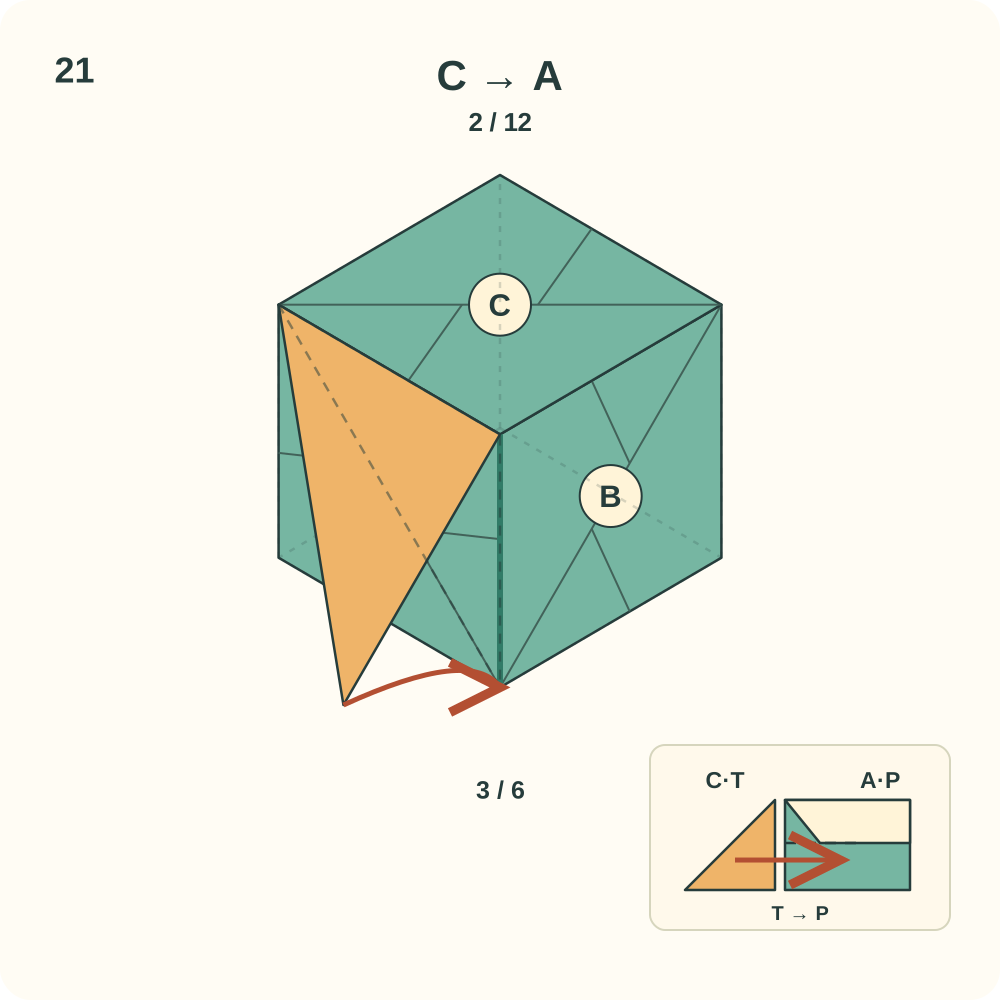
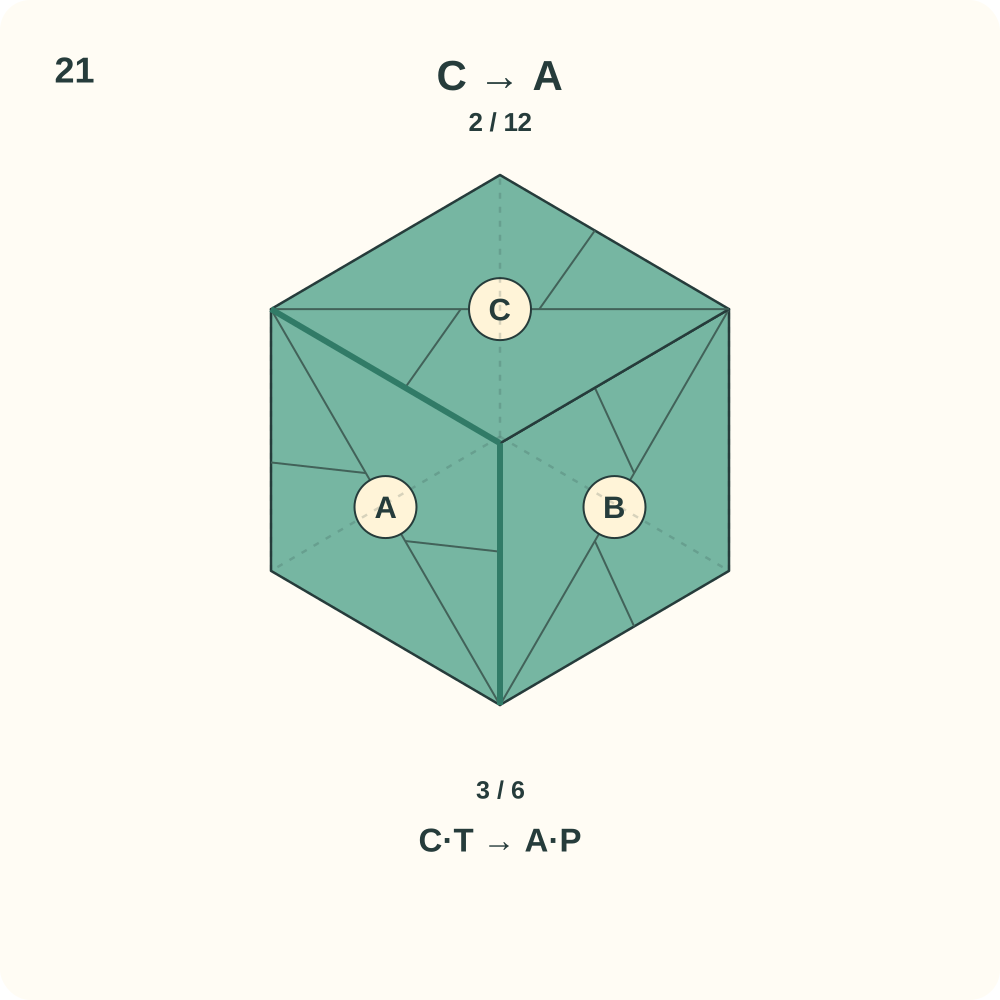
Connection 2 is C → A. Three face units occupy the front, right and top positions.
Step 22: Close the first three-face corner
Lift the lip of C’s right pocket slightly and slide B’s upper tab into it. Adjust only the existing tab hinges so A, B and C meet at one corner with three square faces.
Orientation: The view is unchanged. The partly separated drawing is a construction guide, not a fourth face.
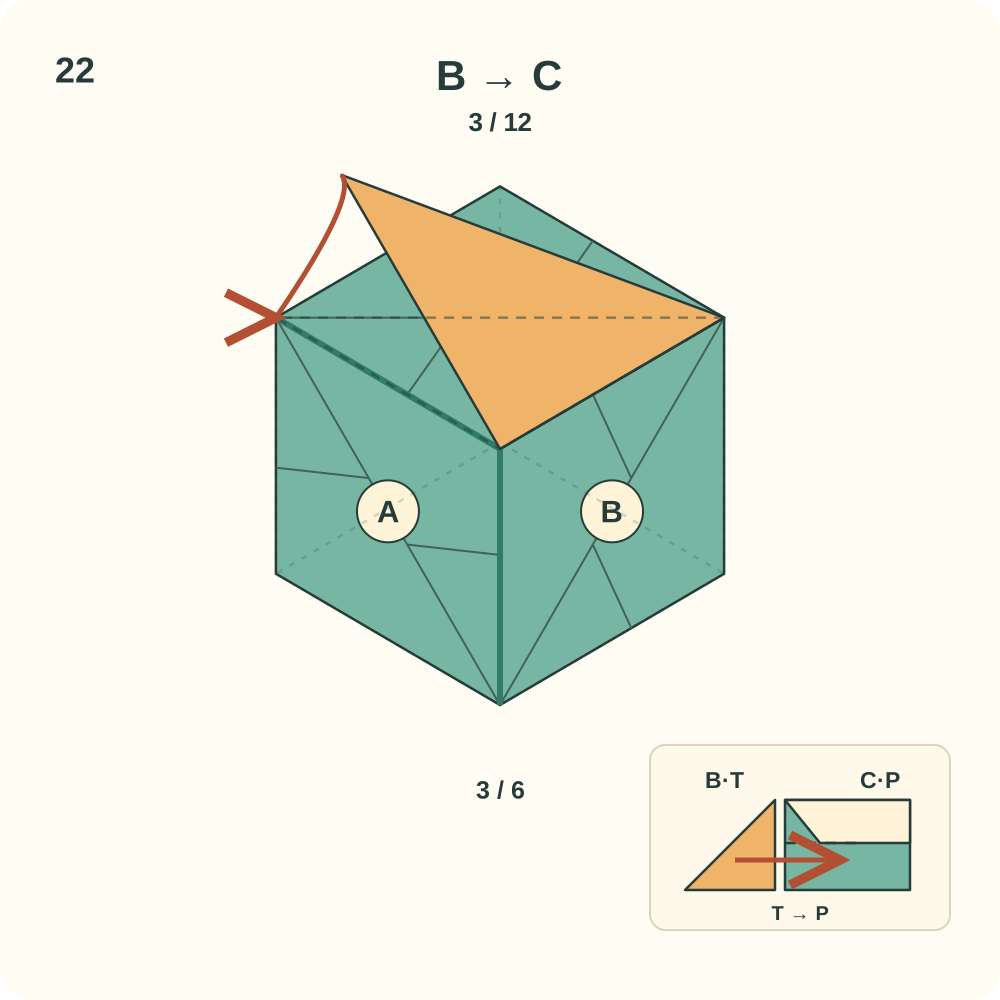
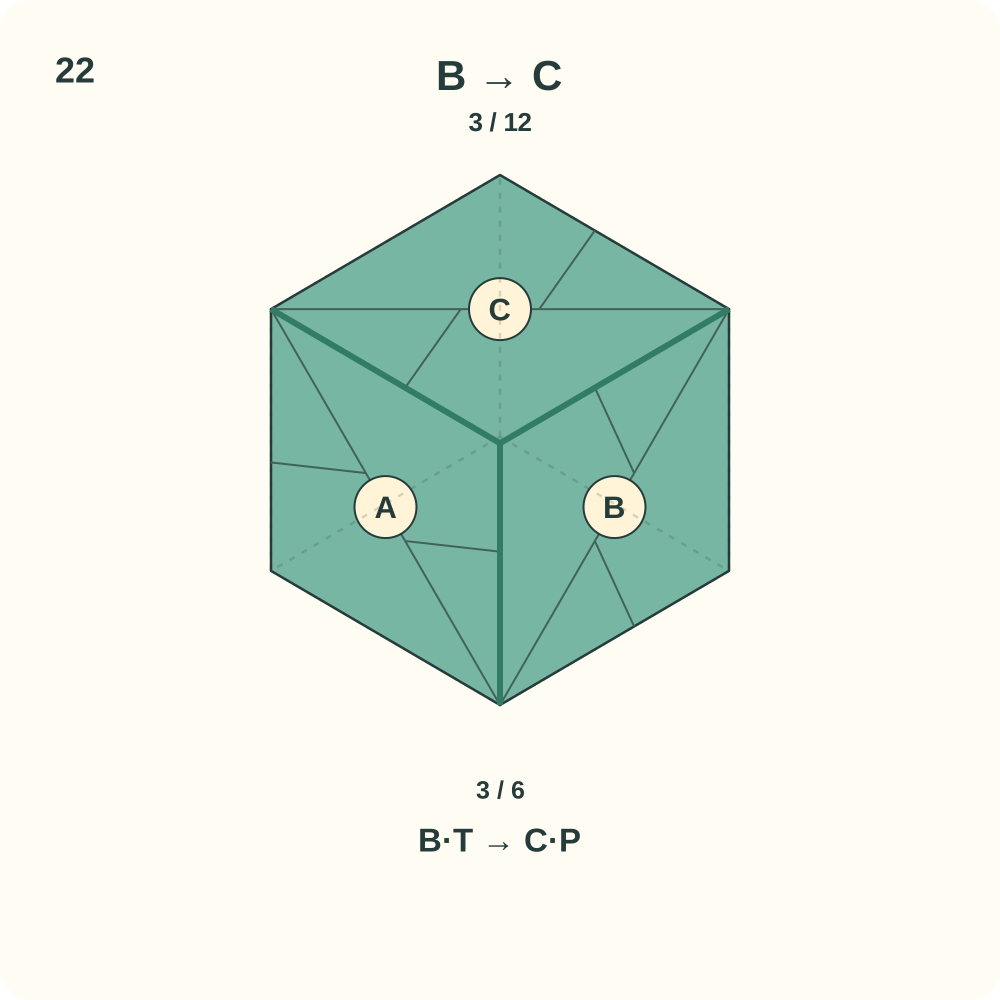
Connection 3 is B → C. A → B → C → A closes the first three-face corner.
Step 23: Add the back face D
Turn the assembly so you look from above and behind its right side. Position D opposite A with its pocket side facing outward. Slide D’s tab nearest B into B’s remaining back-facing pocket.
Orientation: B is still the right face, C the top, and D the back. A is now hidden behind the construction.
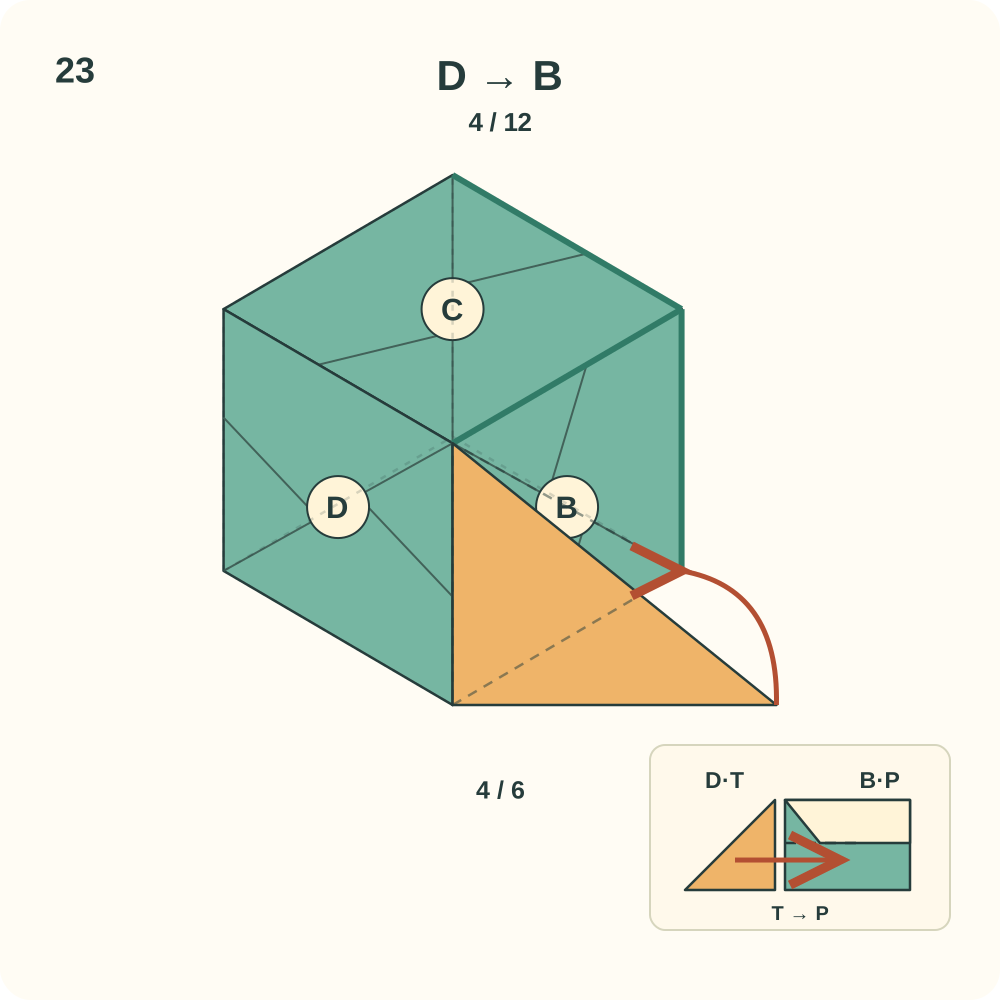
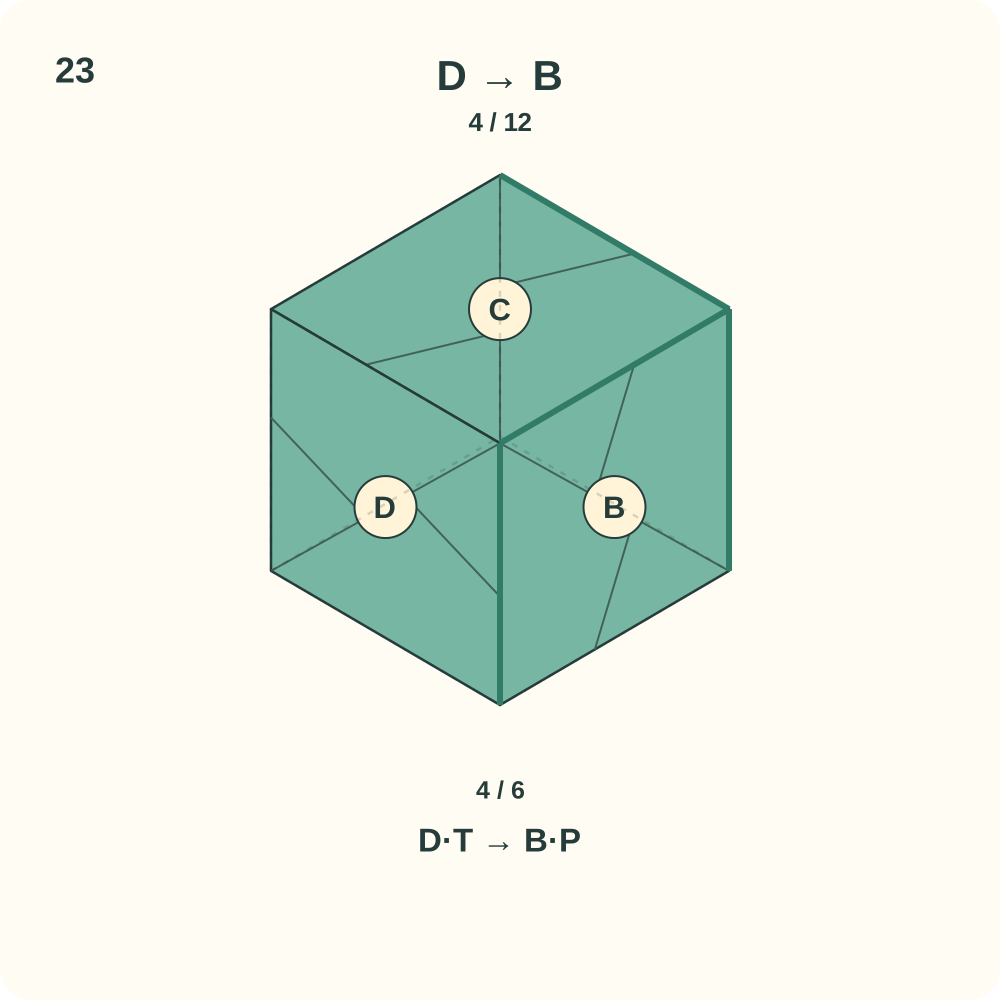
Connection 4 is D → B. The back face D has one attachment.
Step 24: Join C to D
Insert C’s remaining back tab into D’s upper pocket. Keep D square with B and opposite A.
Orientation: Stay in the rear right view so the C–D edge is visible.
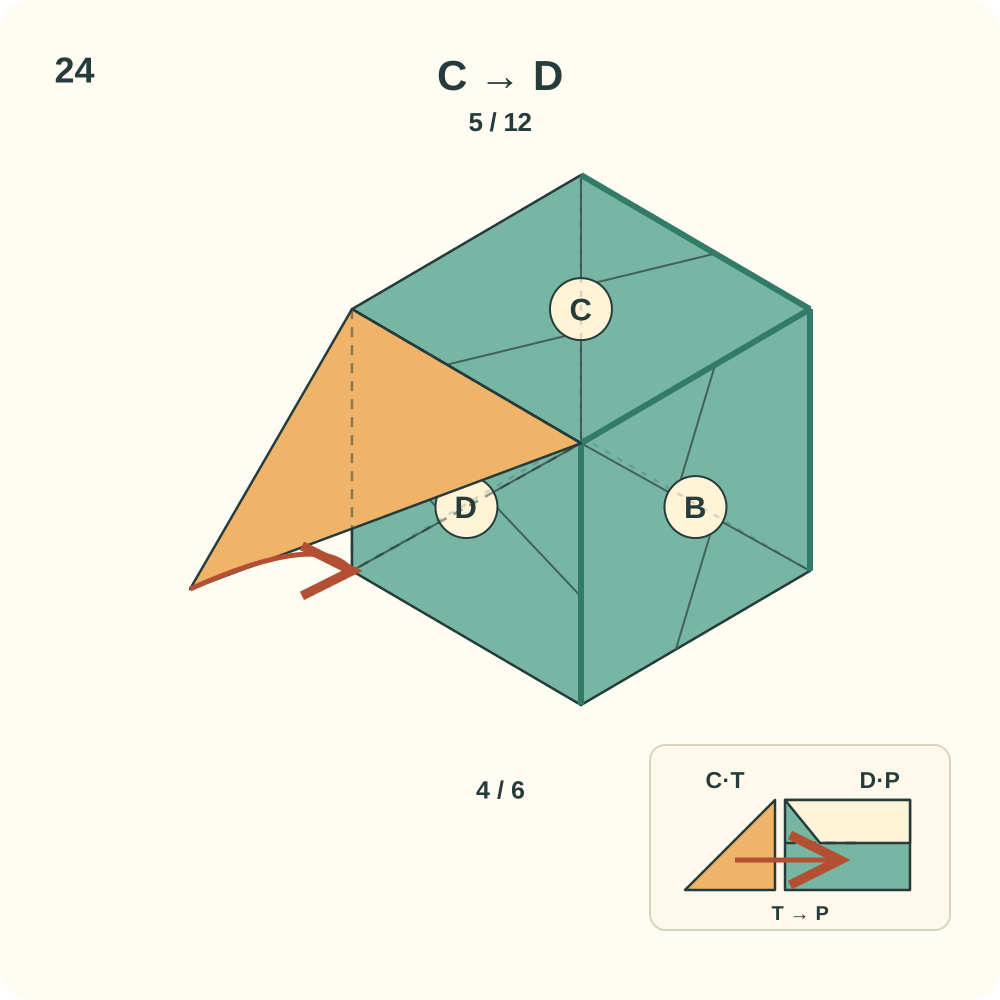
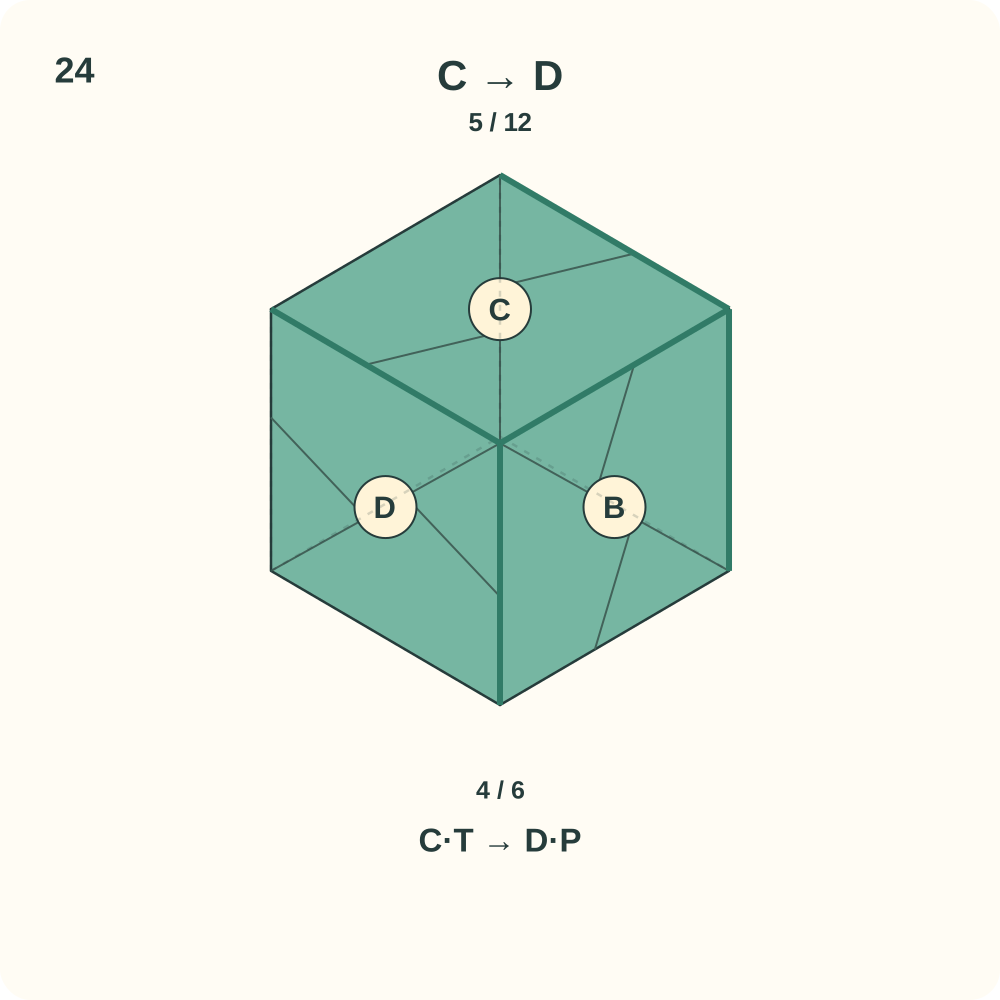
Connection 5 is C → D. A and D are opposite face units.
Step 25: Add the left face E at the front
Turn to the front left side. Position E opposite B with its pocket side outward. Insert A’s remaining left tab into E’s front-facing pocket. Keep E’s other pocket and its upper tab free.
Orientation: A is the front, E the left, and C the top in this view.
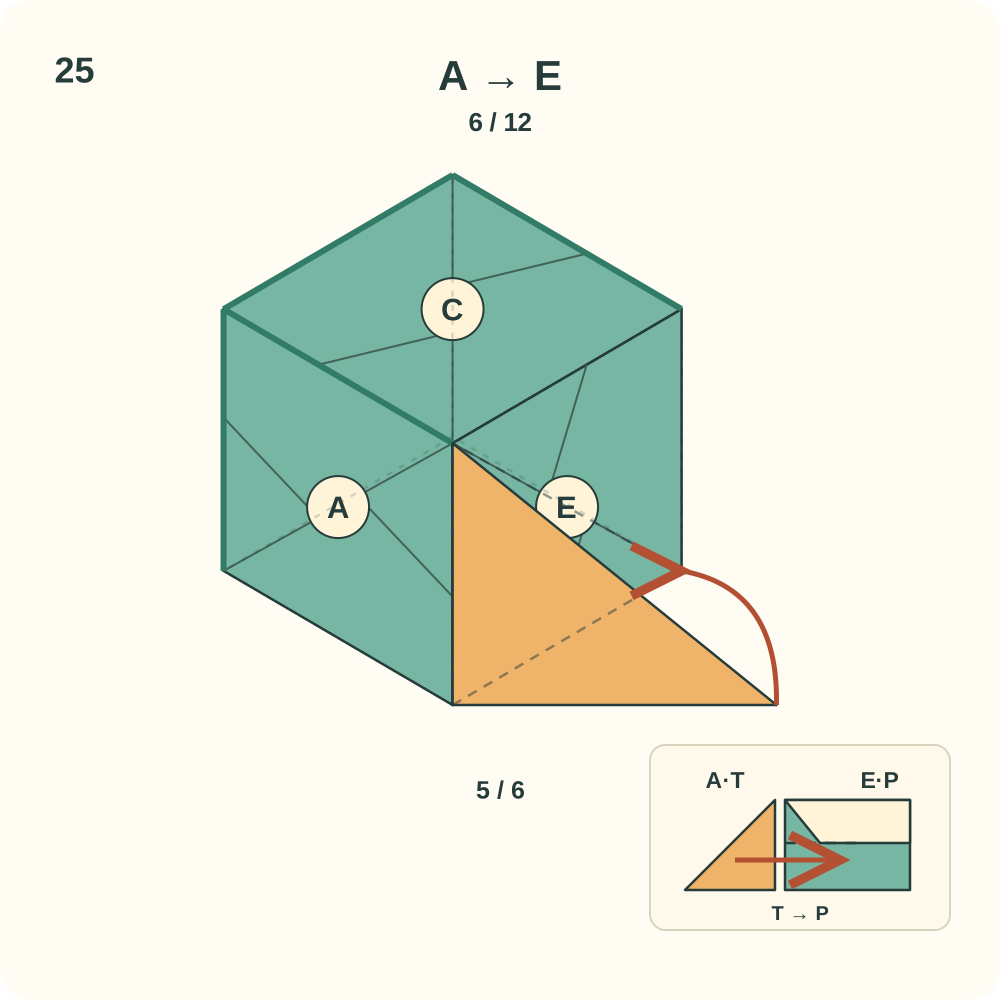
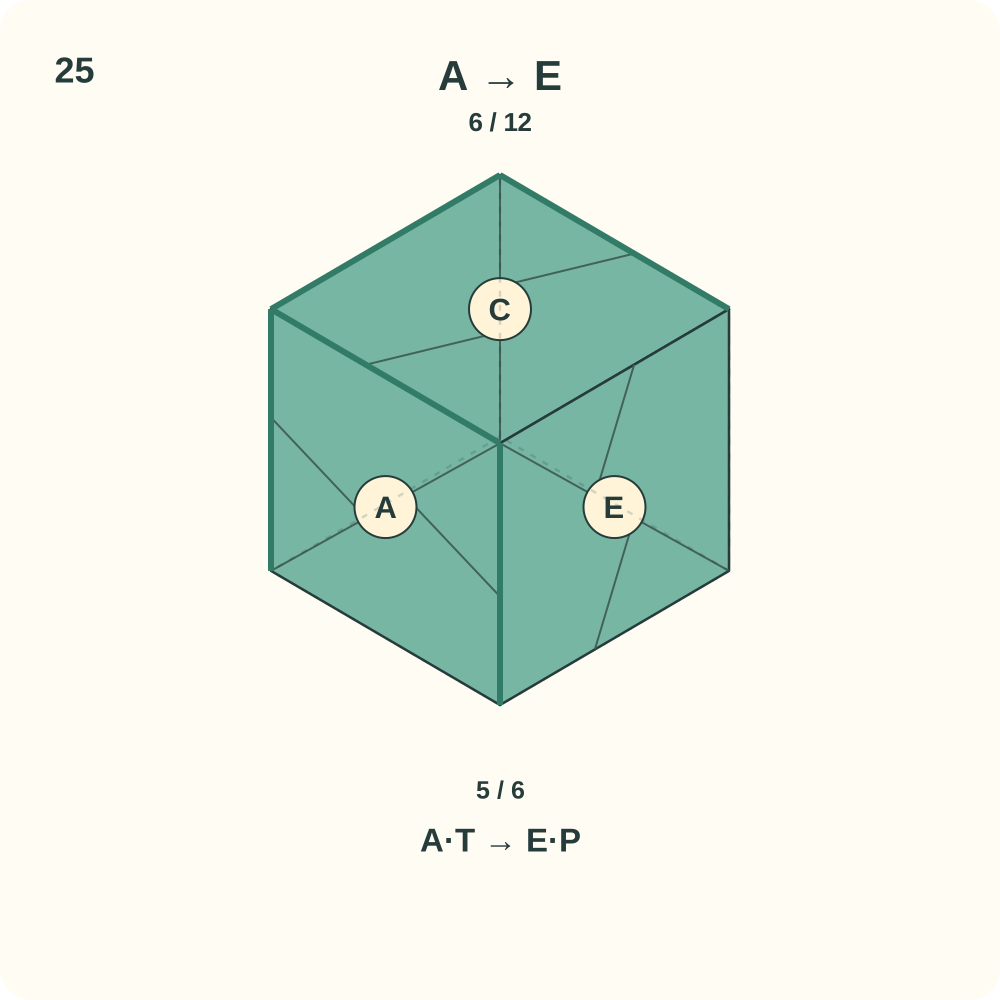
Connection 6 is A → E. The left face E has one attachment.
Step 26: Join D to E
Turn to look from the rear left side. Open E’s remaining back pocket slightly and slide D’s remaining tab into it. Do not fold D’s central square to reach the pocket.
Orientation: D is the back, E the left and C the top. The lower side is still open.
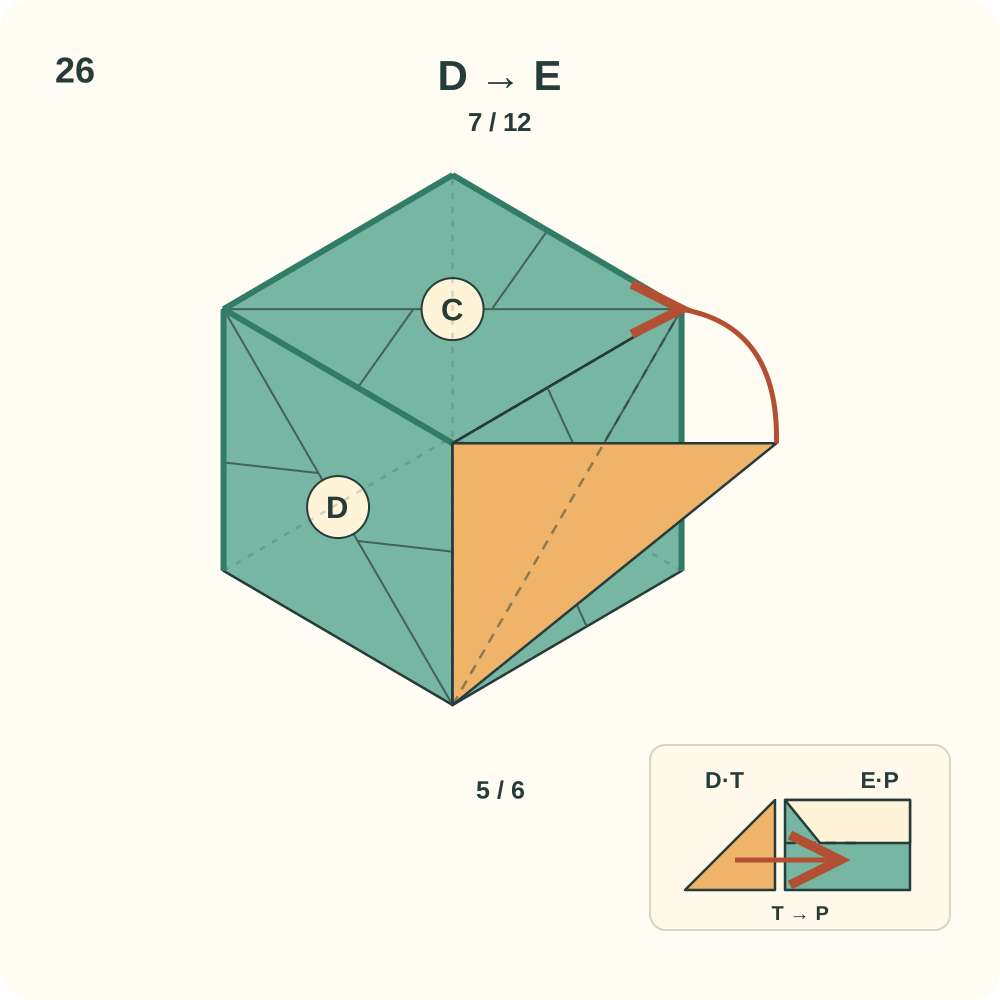
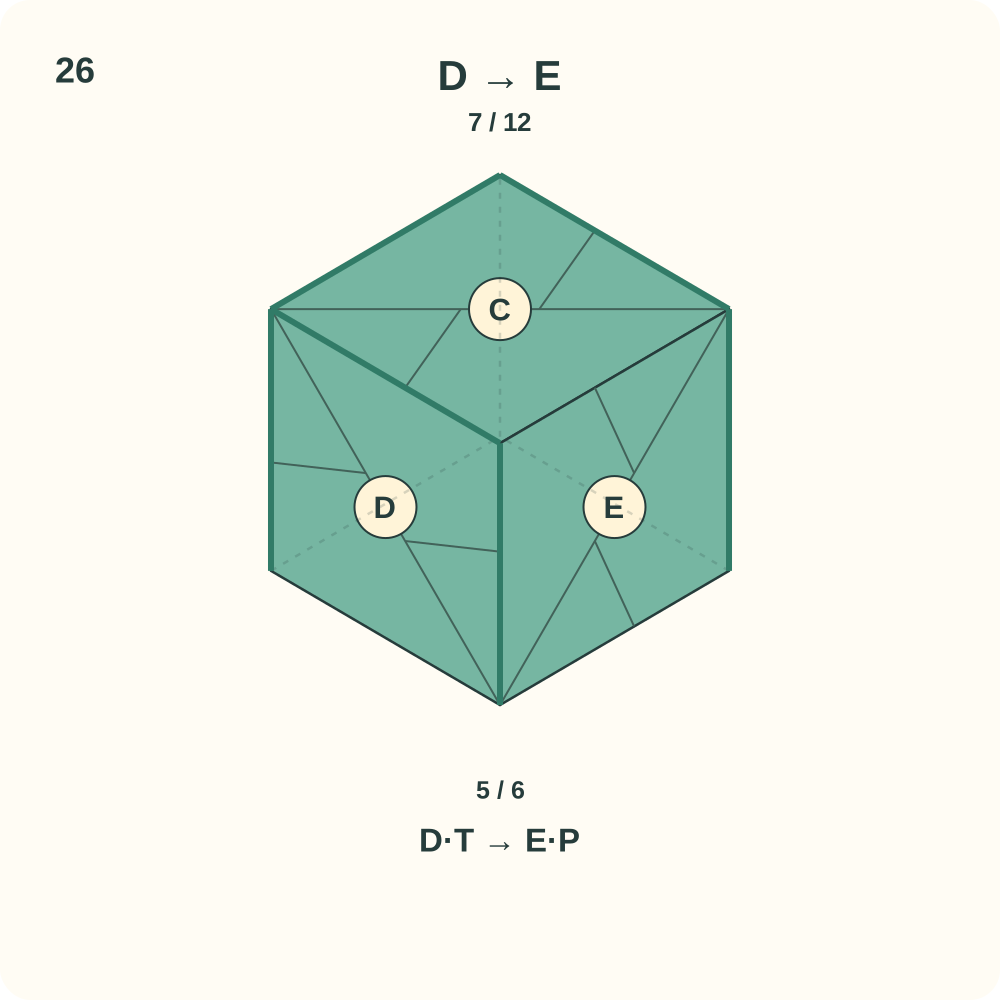
Connection 7 is D → E. E now receives one tab from A and one from D.
Step 27: Join E to C
Slide E’s upper tab under the lip of C’s remaining left pocket. The lower side of the cube stays open for the last unit.
Orientation: Keep the rear left view. Lift only the pocket lip and the tab hinge as needed.
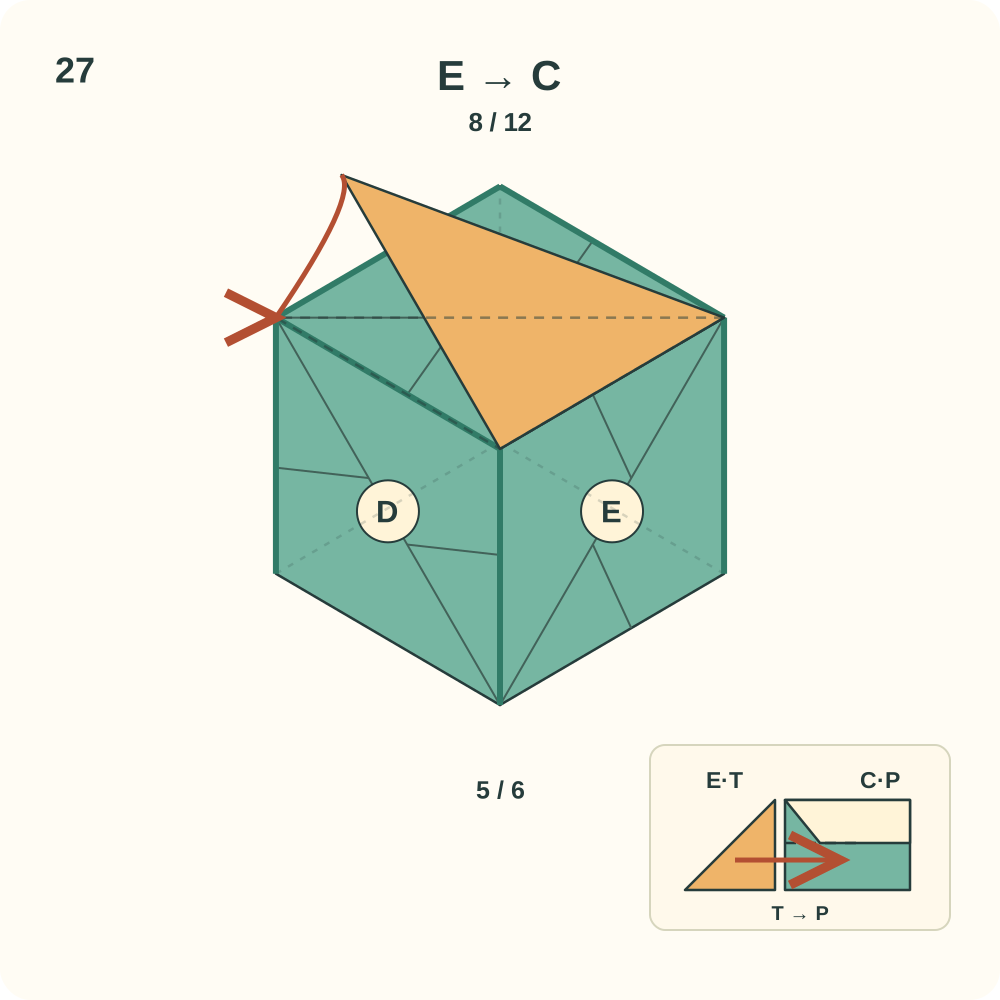
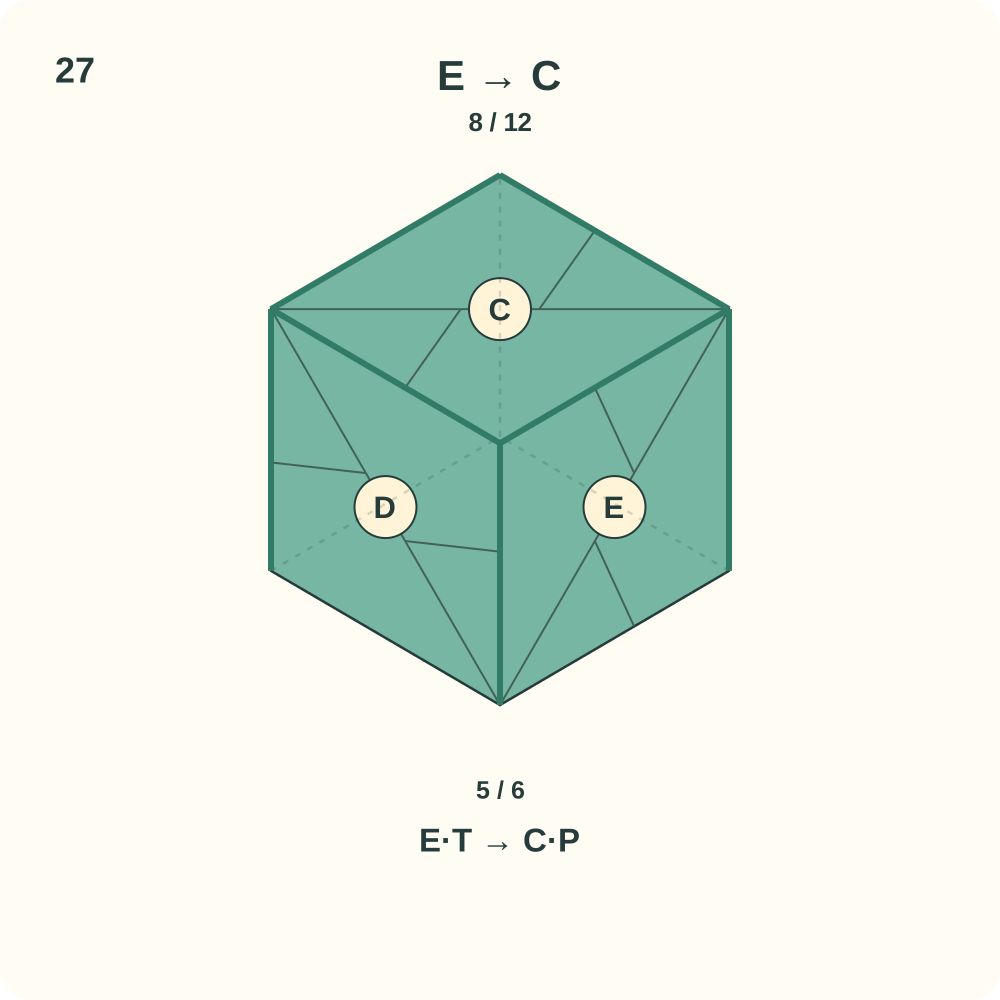
Connection 8 is E → C. Five face units surround one open bottom.
Step 28: Start the bottom face F at B
Turn the construction upside down so the open bottom faces you. Place F over the opening with its pockets outward. Slide B’s free lower tab into the pocket of F nearest B. Leave the other three joins loose.
Orientation: The drawing looks from below and the front right. F is now facing you; it is the final bottom face.
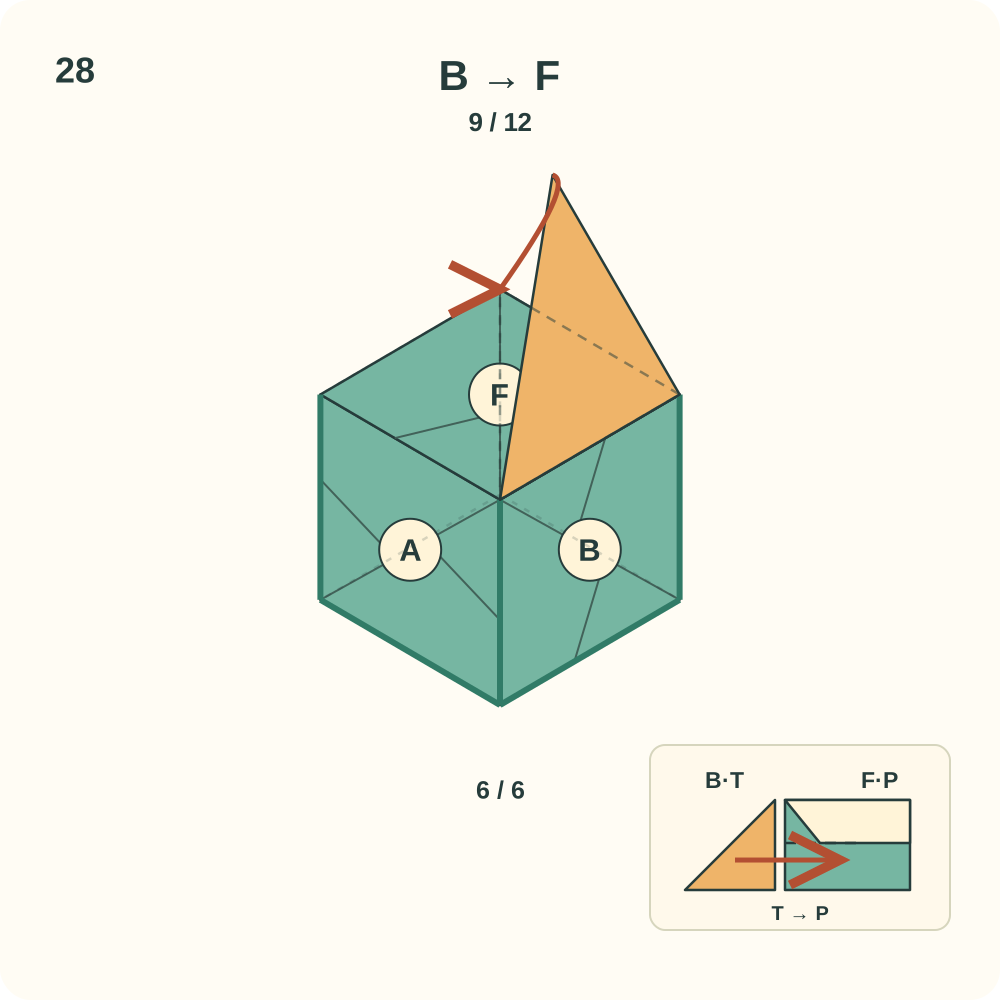
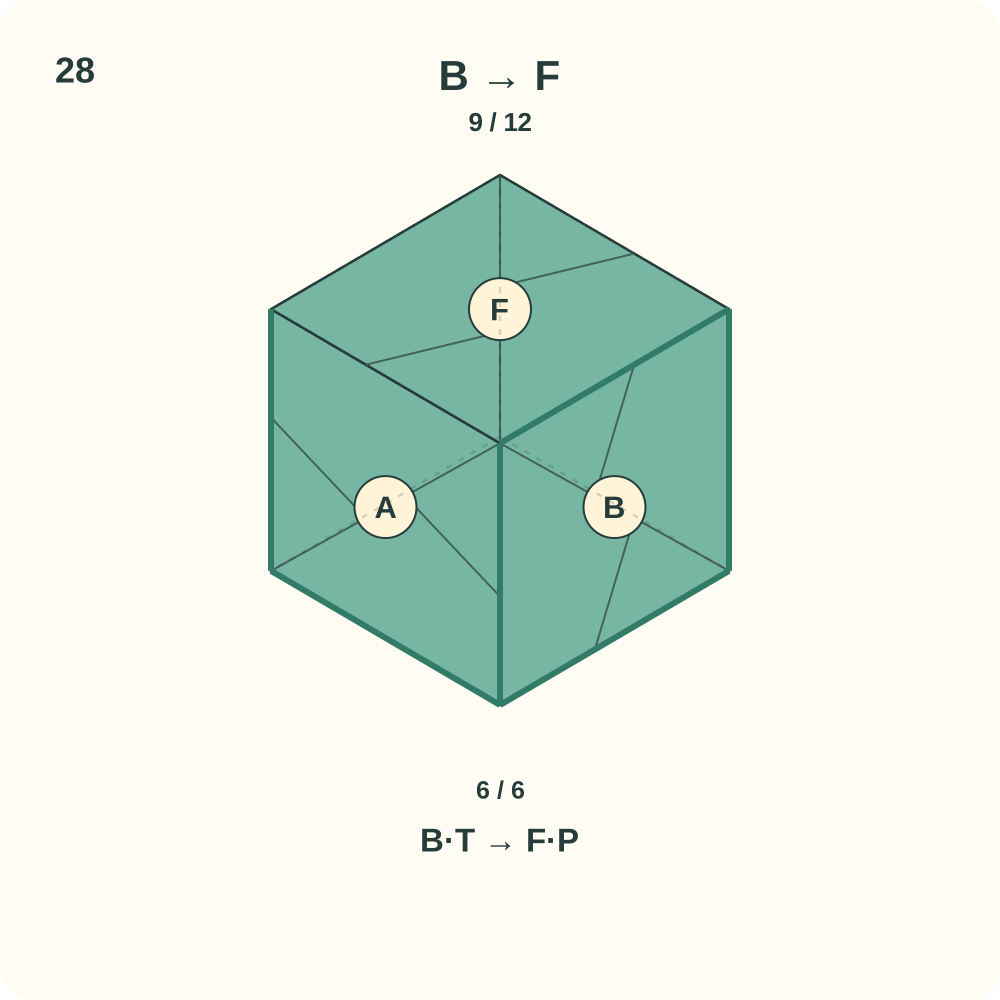
Connection 9 is B → F. The last unit has one attachment and can still tilt.
Step 29: Join E to F
Turn to the lower rear left view. Keep F slightly tilted and insert E’s free lower tab into F’s other pocket. Lower F toward the opening without trapping either of its own two tabs inside.
Orientation: D, E and F are the visible faces. F’s own front and back tabs remain outside their receiving pockets.
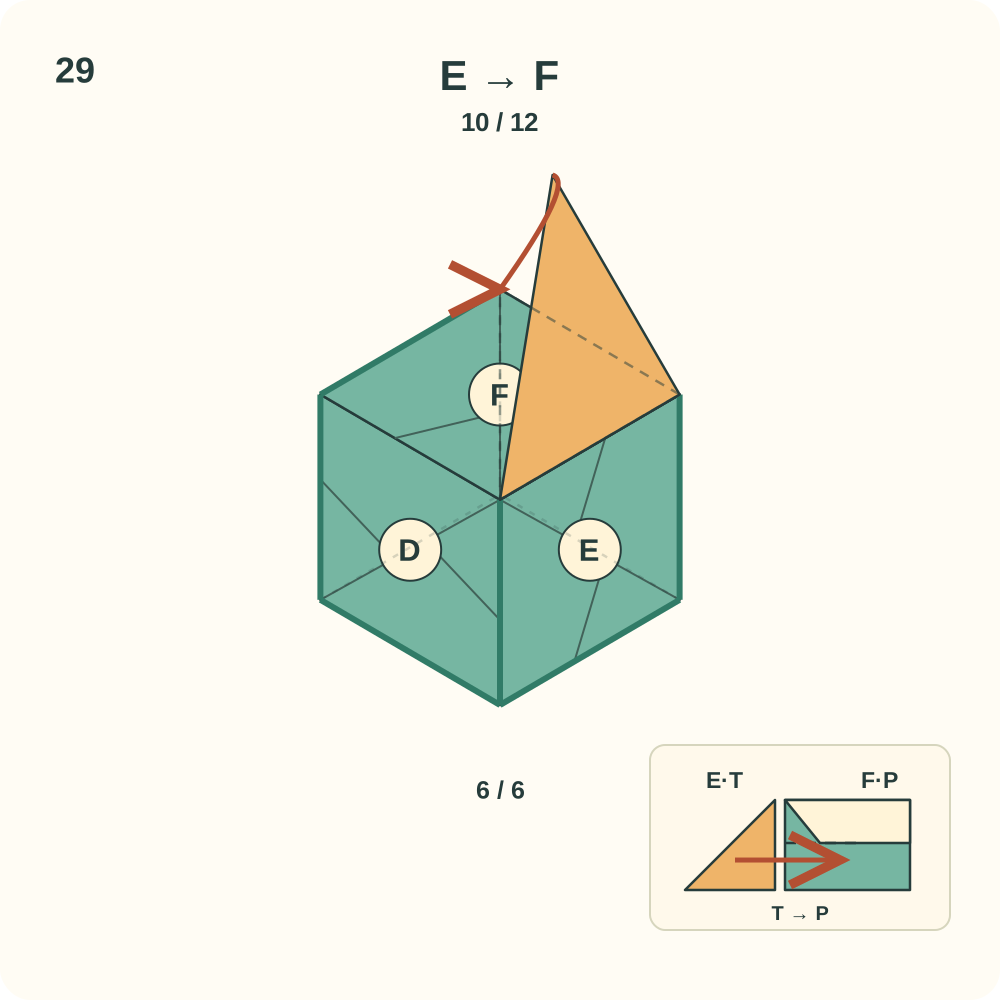
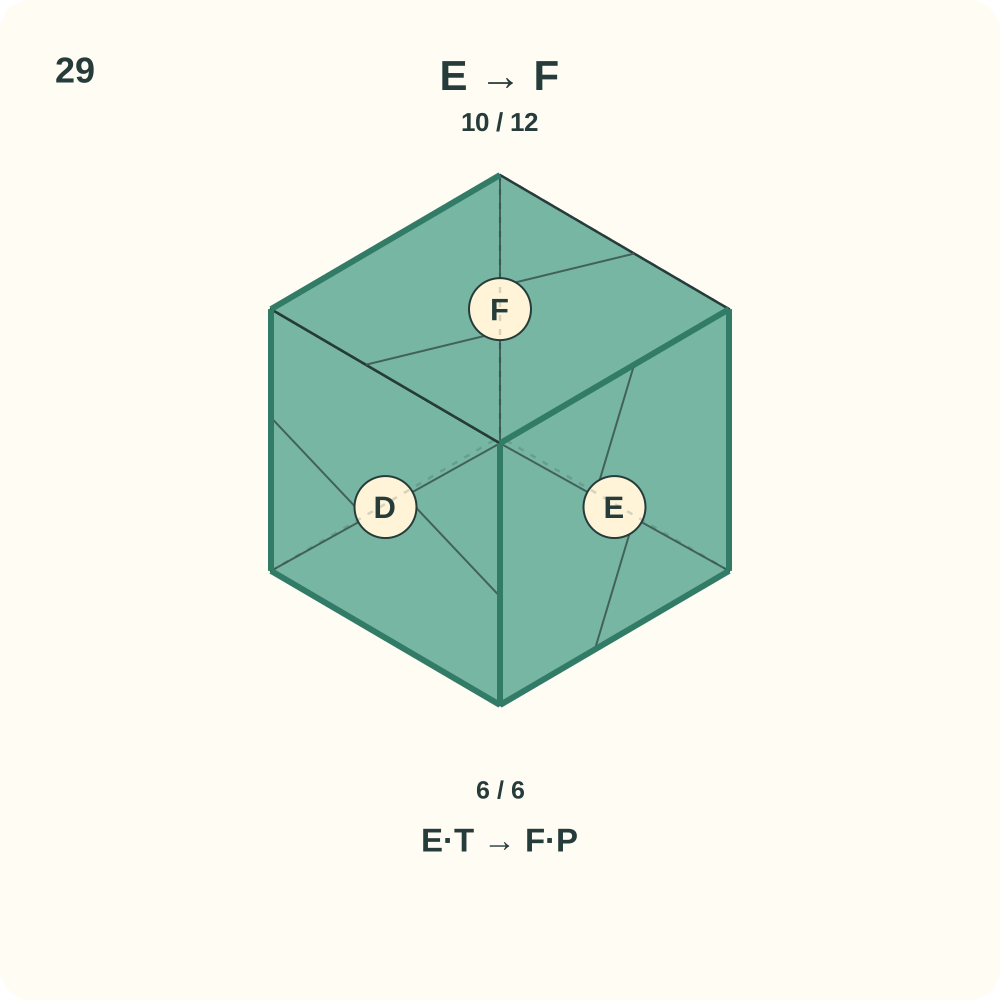
Connection 10 is E → F. F receives the tabs from B and E; its own two tabs are still free.
Step 30: Join F to A
Turn to the lower front left view. Ease A’s lower pocket lip outward and slide F’s front tab beneath it, bending the tab only at its existing hinge. If access is tight, tilt F slightly rather than making a new crease in a face.
Orientation: A, E and F are visible. Keep F’s back tab free for the last insertion.
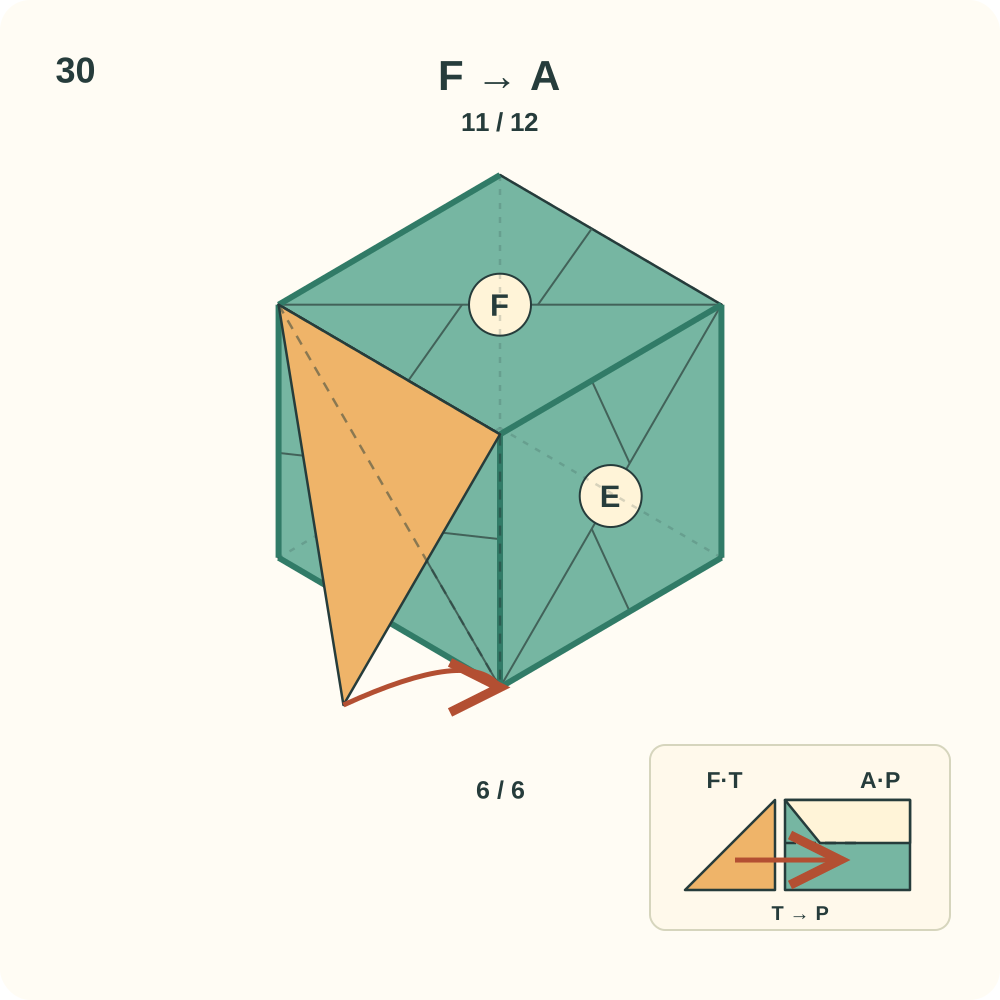
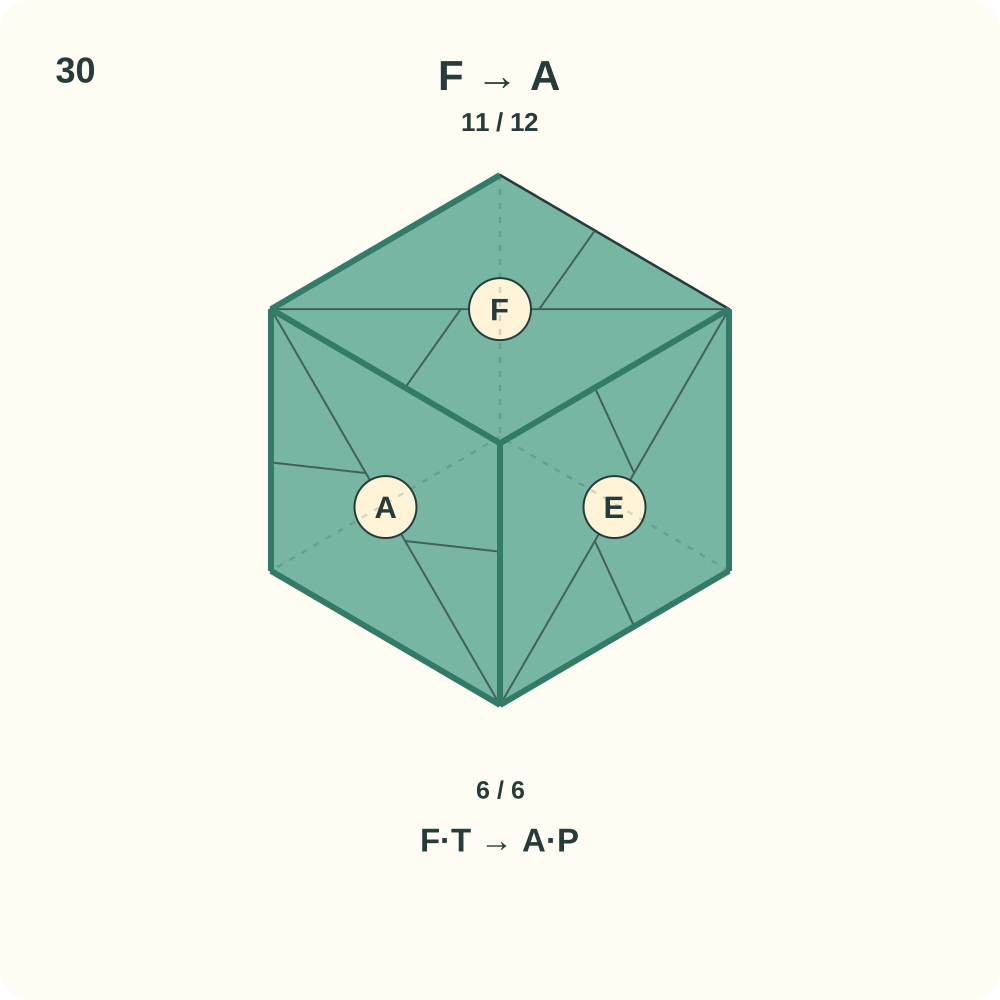
Connection 11 is F → A. One tab and one receiving pocket remain unjoined.
Step 31: Close F into D
Turn to the lower rear right view. Lift the lip of D’s lower pocket and guide F’s remaining back tab underneath it. Ease the faces back to square positions; stop and reopen the last join if a tip crumples or the pocket blocks it.
Orientation: D, B and F are visible. The arrow enters beneath the receiving lip rather than through a sheet.
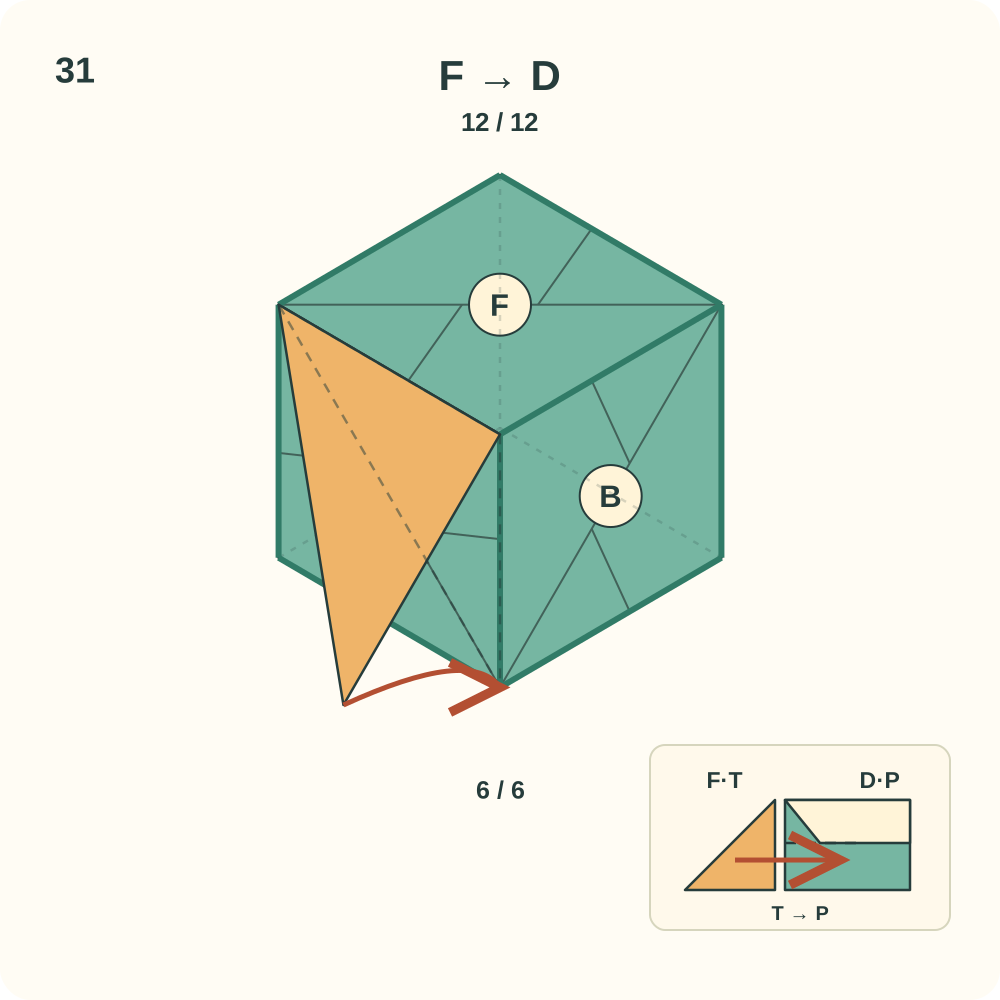
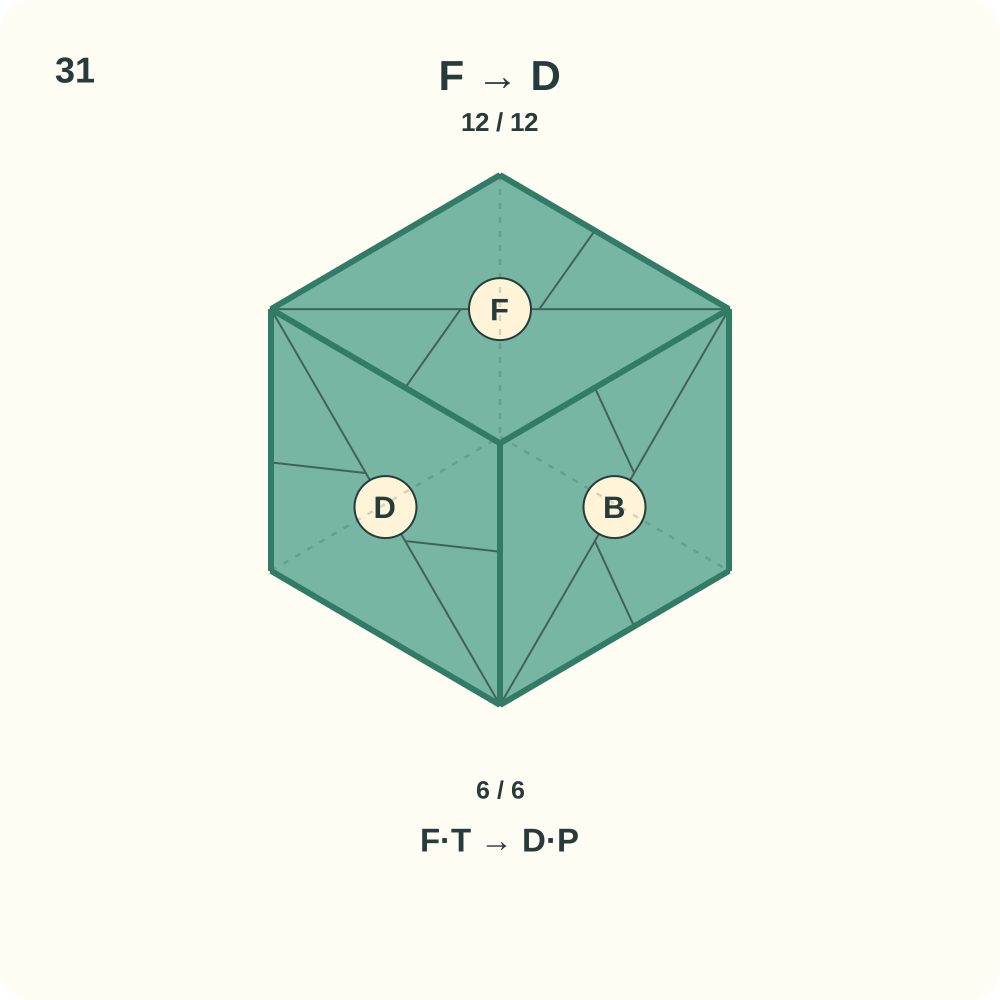
Connection 12 is F → D. All twelve tabs are assigned to twelve pockets. The physical fit still needs a folding trial.
Step 32: Check the six-face cube
Return to the upright front right view. Count six square faces and check that each of the six units has both tabs inside other units and both pockets receiving a tab. Keep it as a display model; do not assume it can hold weight.
Orientation: A is front, B right, C top, D back, E left and F bottom. All six sheets share the same colour; parts of neighbouring tabs also remain visible.
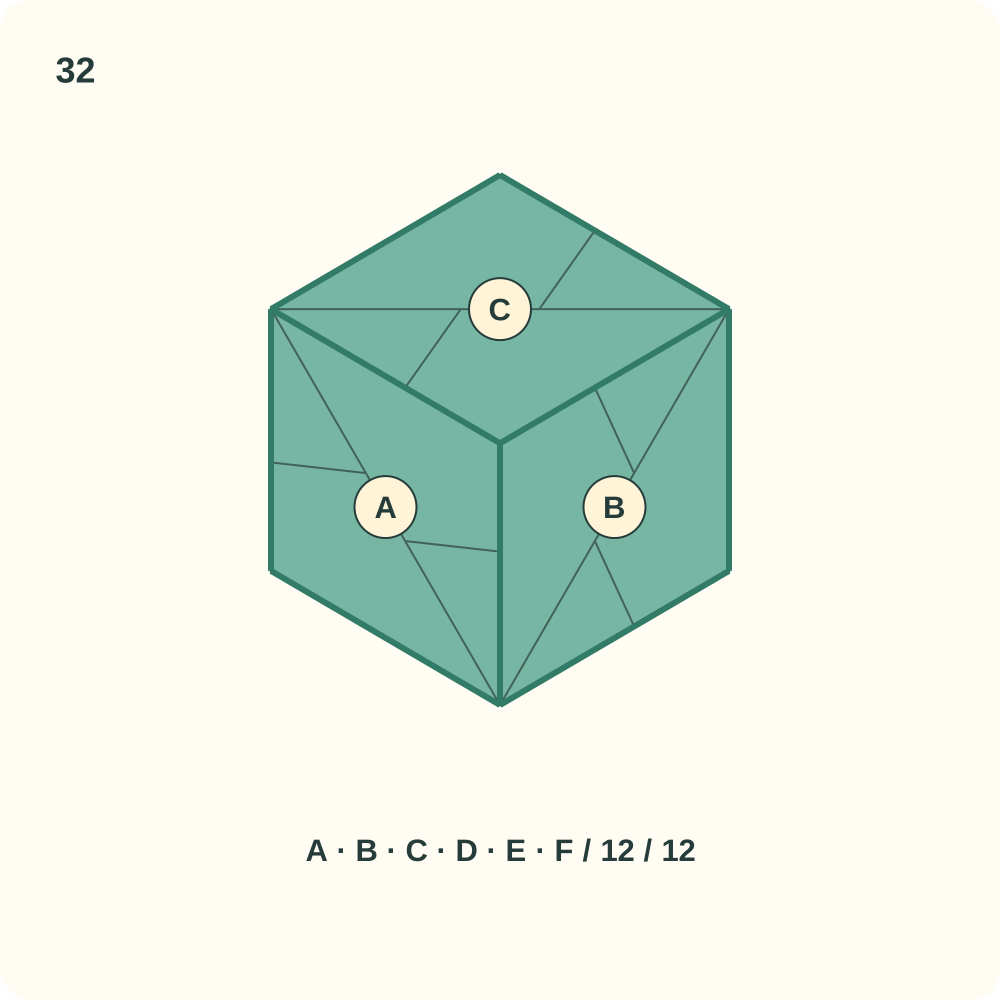
The illustrated Sonobe cube uses six uncut squares, twelve tab-to-pocket joins and no glue.
Checks for units, pockets and assembly
- Compare all six units before assembling. Their size, selected corners, pocket side and handed arrangement must match. A mirrored unit cannot be corrected by simply turning it over.
- After instruction 14 the tucked corners must lie beneath the opposite quarter strips. A large triangle left on top changes the receiving pockets. Reopen that tuck and lift the receiving strip rather than forcing the tip through it.
- The central face is the diamond between the two tab hinges. Do not add a diagonal collapse crease across it for this cube; other Sonobe polyhedra use different creases.
- Follow the twelve directed joins in order. A/D send tabs to B/E; B/E send tabs to C/F; C/F send tabs to A/D. Every pocket accepts one tab and every tab is used once.
- For the last face, attach its receiving pockets first and leave its own tabs free. Lift only a pocket lip or an existing tab hinge to gain access. If a tip catches, withdraw it and inspect the opening; do not create a new crease in a square face.
- The digital review checks conserved paper area, the flat unit outline, opposite faces and all twelve geometric joins. It does not demonstrate real clearance, friction, resistance, durability or suitability for a child.
The six-unit Sonobe cube
Six square faces enclose the illustrated cube. Its twelve tab-to-pocket assignments are complete and all six sheets have the same colour. Parts of neighbouring tabs remain visible on each face; because every sheet is green, those exposed parts are green too. The letter circles identify units in the diagram and are not extra paper pieces. The SVG is a geometric assembly illustration, not a photograph of a successfully folded sample. Paper size, pocket clearance, assembly order in hand and physical durability remain to be tested. Keep this as an exploration of modular construction rather than a container or load-bearing object.
Printable version pending the physical folding test.
Sonobe attribution, sources and illustration licence
The Sonobe unit and six-part cube are attributed to Mitsunobu Sonobe. Riverbend Community Math Center publishes a unit sequence and six-unit cube activity and explicitly releases its own work into the public domain. That release concerns Riverbend’s expression; it does not prove that the Sonobe design itself is in the public domain. David Mitchell’s history records his research into Sonobe’s authorship. OrigamiLove created this bilingual wording, exact-coordinate SVG sequence and twelve-join assembly map in 2026. Our new text and diagrams are CC BY 4.0. No third-party photograph or logo is reproduced, and no source endorses OrigamiLove.