Prepare your paper
Paper and preparation
- One uncut A4 sheet, 21 × 29.7 cm, or one full US Letter sheet, 8.5 × 11 in (21.59 × 27.94 cm). Choose one format and keep it throughout. These formats are proposed; physical tests are pending.
- Plain, flexible writing or printer paper is proposed. Around 75–90 g/m² is a trial range rather than a verified requirement. A sheet with two different sides helps you follow the diagrams.
- A ruler and pencil for the 1 cm tail marks. The pencil marks are construction references, not cuts.
- A clean, flat surface. This sequence uses no scissors, glue, staples or added weights.
- Dashed line: New crease
- Thin line: Existing crease or visible layer edge
- Curved arrow: Move the indicated part; a dashed arrow passes behind
- M: Fold away from you. A: Measured tail reference
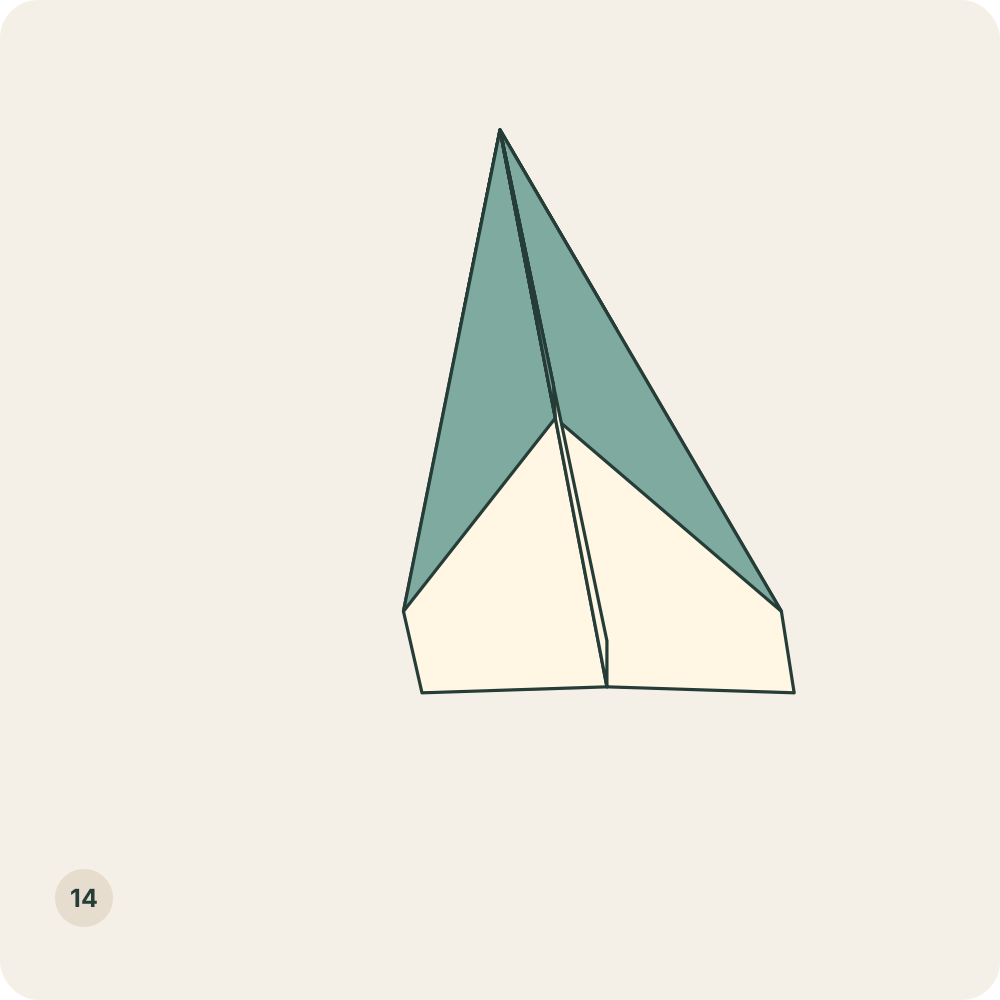
The first thirteen results are flat views from above with the nose pointing away from you. Left and right refer to your sides. Turn the entire model over only in step 11. Step 14 changes to an angled view so you can see the spread wings and the body below.
Read the complete paper & materials guide ↗Folding instructions
Step 1: Place a rectangular sheet upright
Place an uncut A4 sheet with a short edge at the top and the reverse side facing up. A full US Letter sheet is an alternative; its proportions will produce a slightly different outline.
Orientation: Cream reverse up; one layer. The top short edge is away from you.
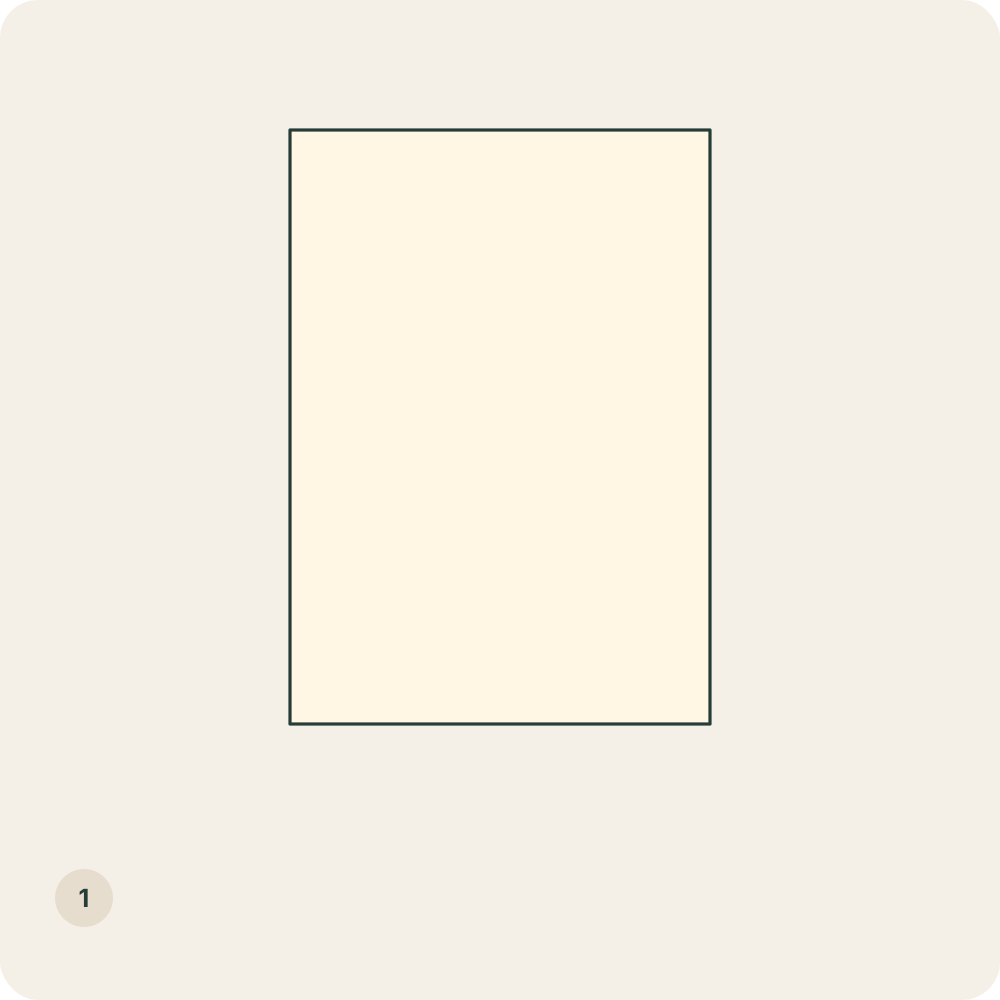
A portrait rectangle is ready, with the two long edges running from top to bottom.
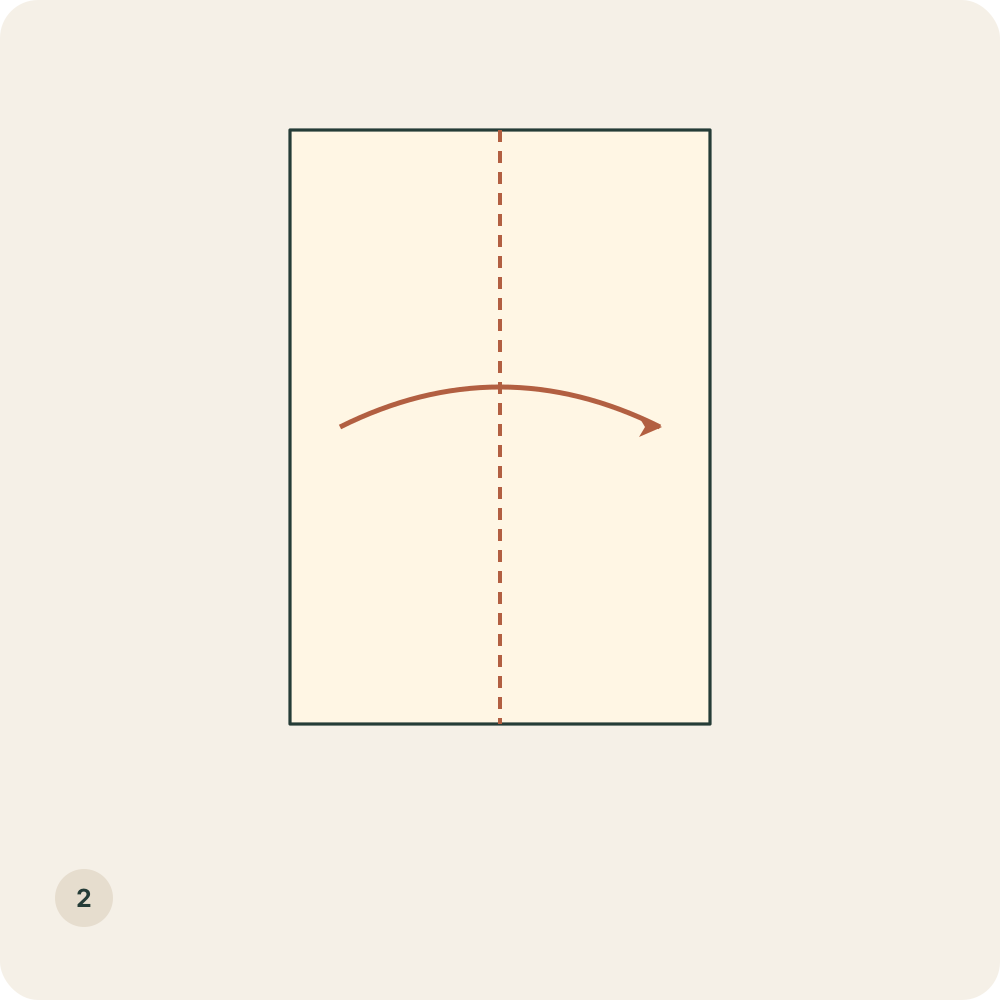
Step 2: Fold the left long edge to the right
Lift the left half and bring its long edge onto the right long edge. Align both pairs of corners, then press the lengthwise fold.
Orientation: Move the whole left half to the right; keep the short edges at the top and bottom.
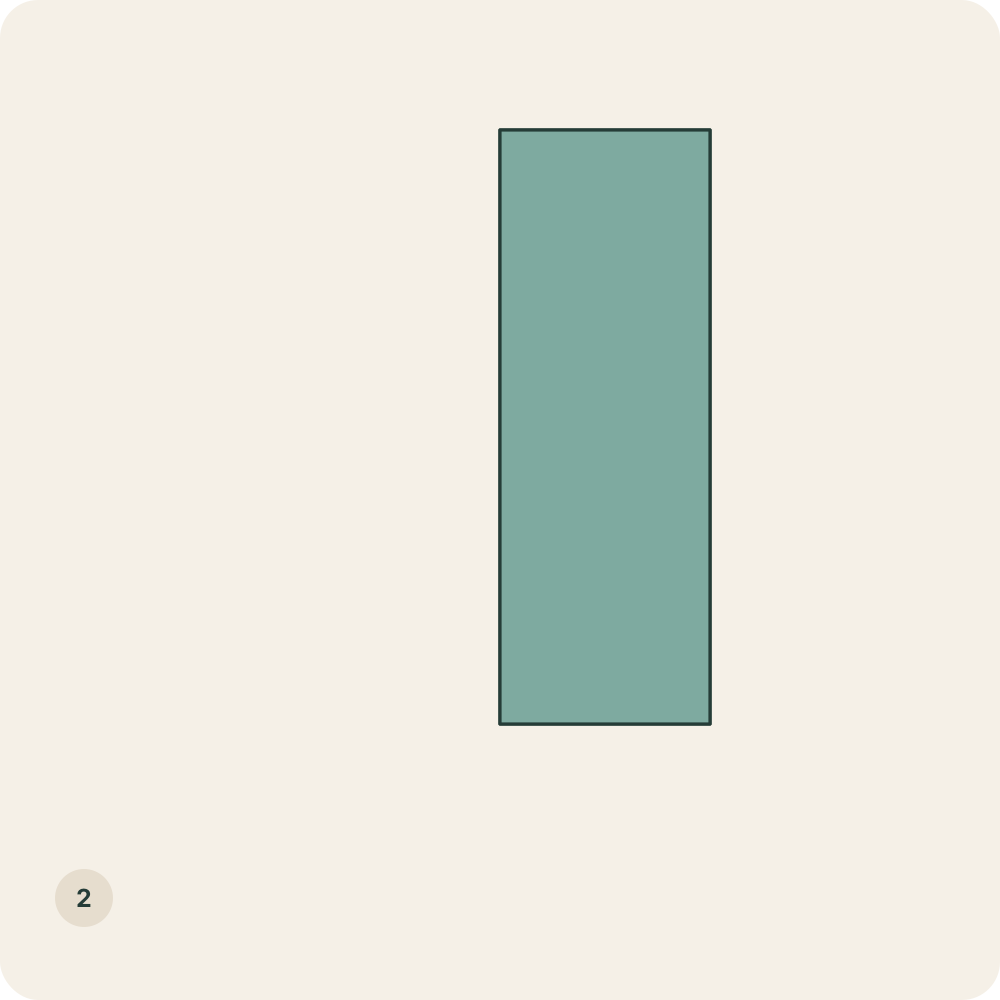
A half-width rectangle lies to the right of the centre fold.
Step 3: Reopen the sheet
Return the upper half to the left and lay the rectangle flat. Keep the lengthwise crease.
Orientation: Cream side up again; do not rotate the sheet.
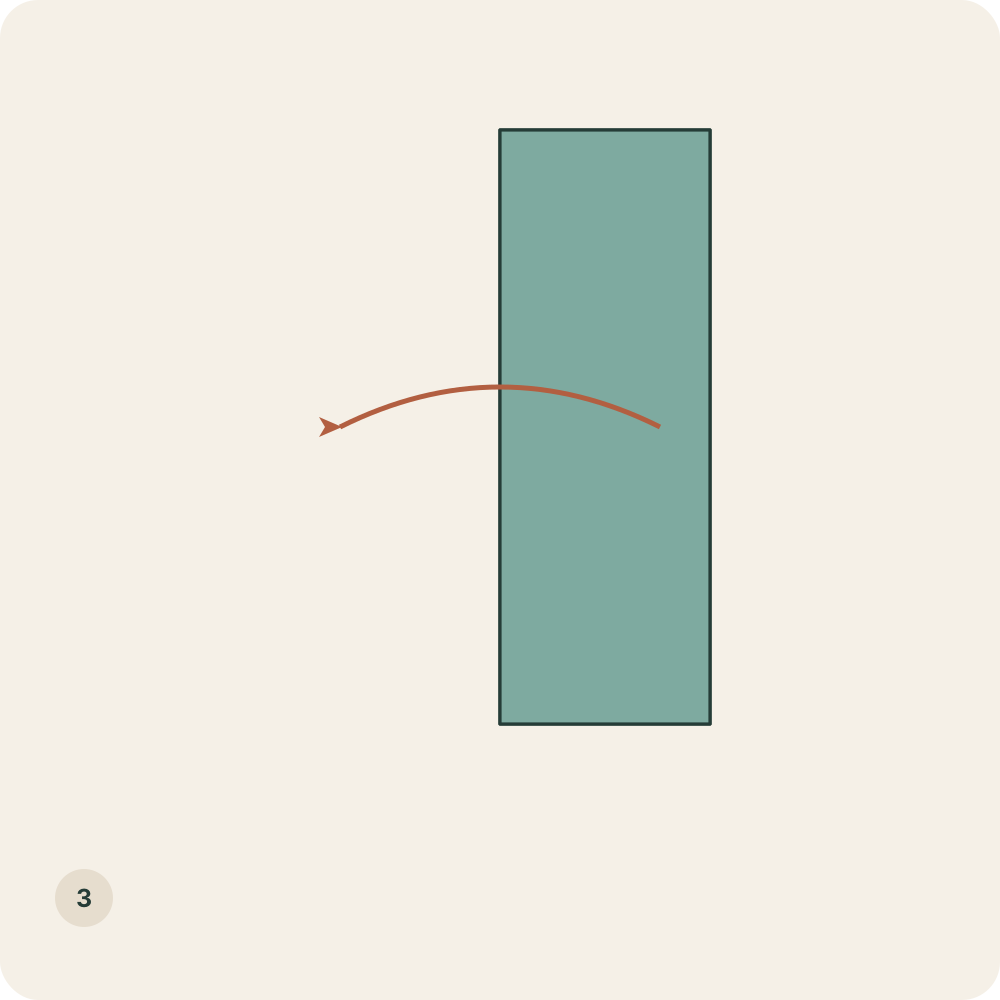
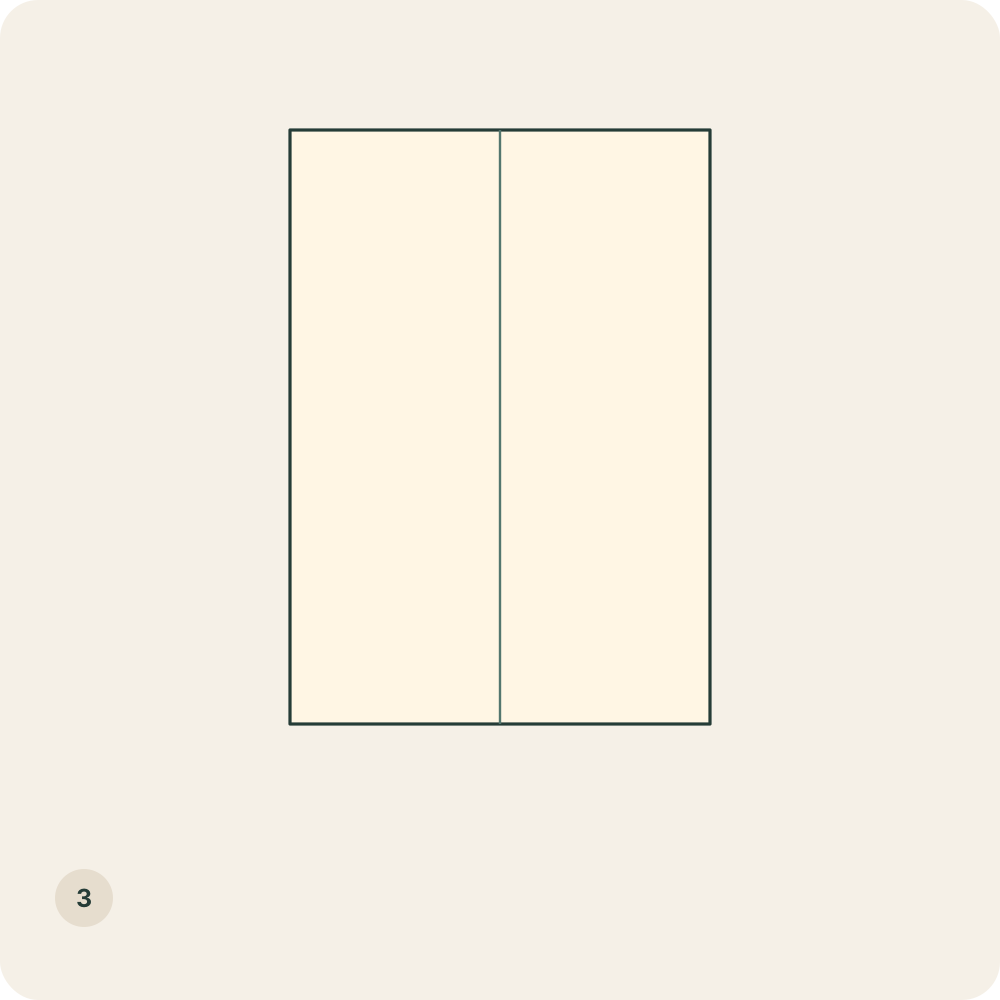
The full rectangle has one vertical centre crease.
Step 4: Fold the upper-left corner to the centre
Bring the upper-left corner onto the centre crease. Align the left half of the top short edge with that crease, with both meeting at the original top midpoint. Press the diagonal fold.
Orientation: Move the single upper-left corner; the lower rectangular part stays flat.
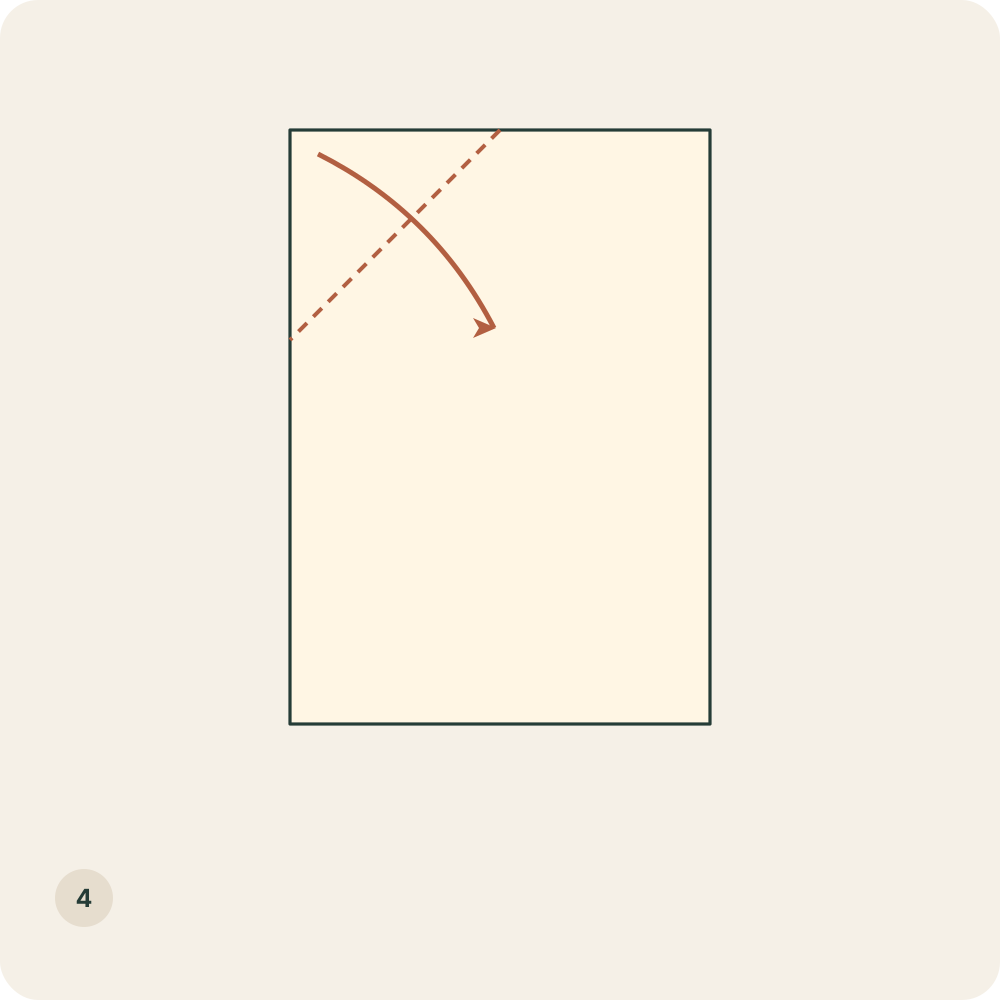
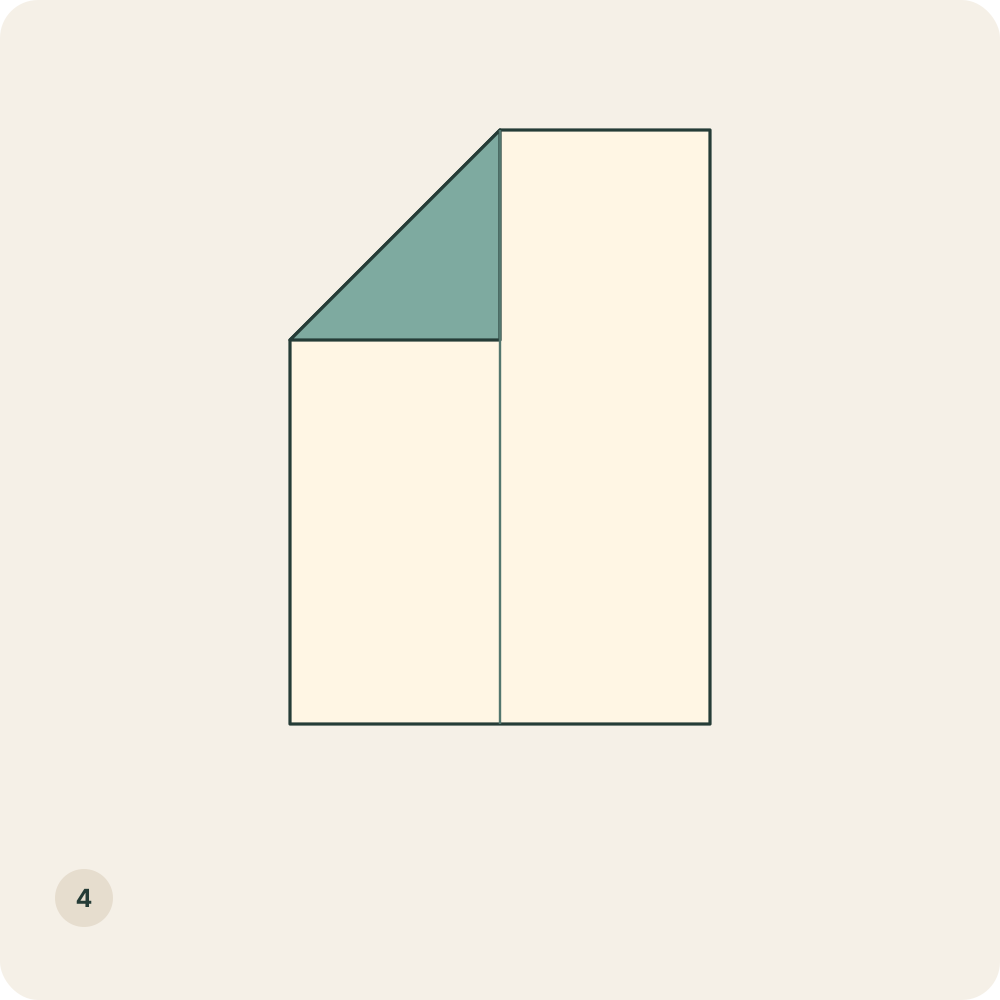
A green triangular flap sits to the left of the centre. Its former top edge now lies on the centre crease.
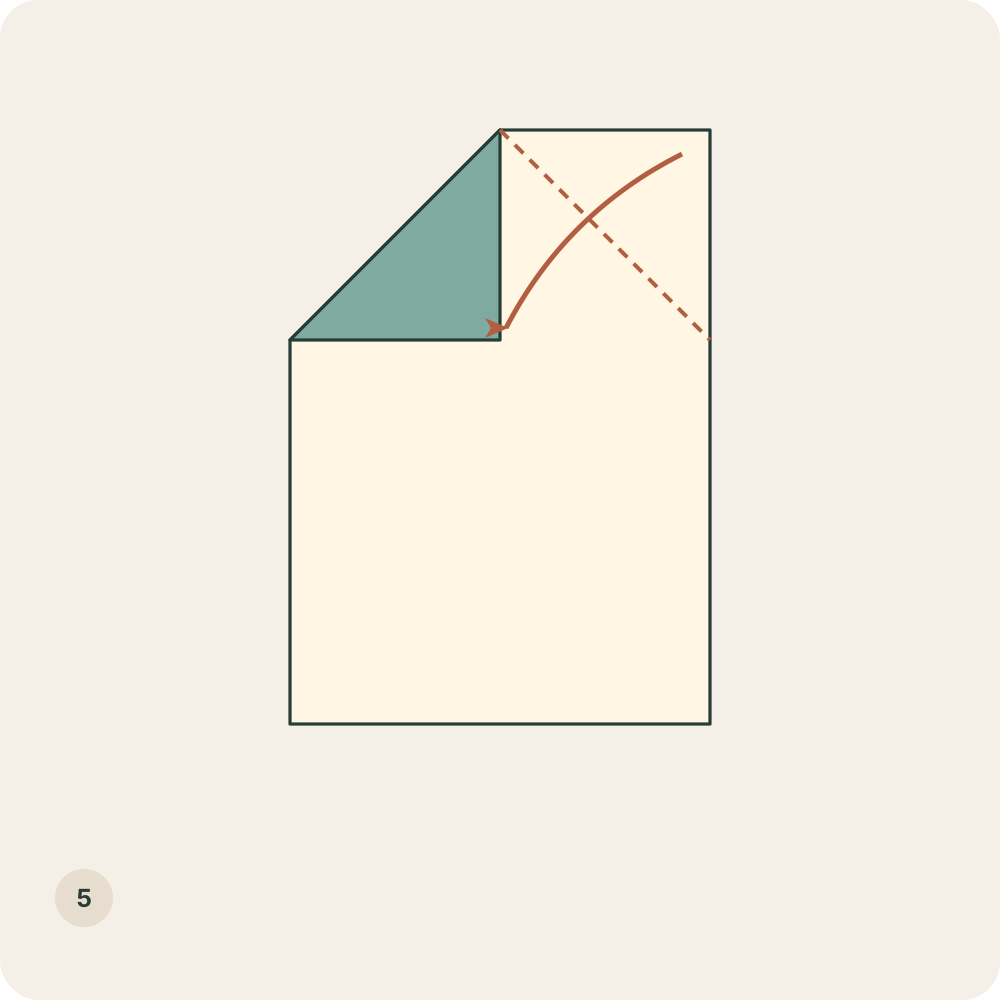
Step 5: Fold the upper-right corner to the centre
Bring the upper-right corner inward so that the right half of the original top edge lies on the centre crease. Match its lower tip to the first flap, then press the diagonal.
Orientation: Keep the first triangular flap closed; move the single upper-right corner.
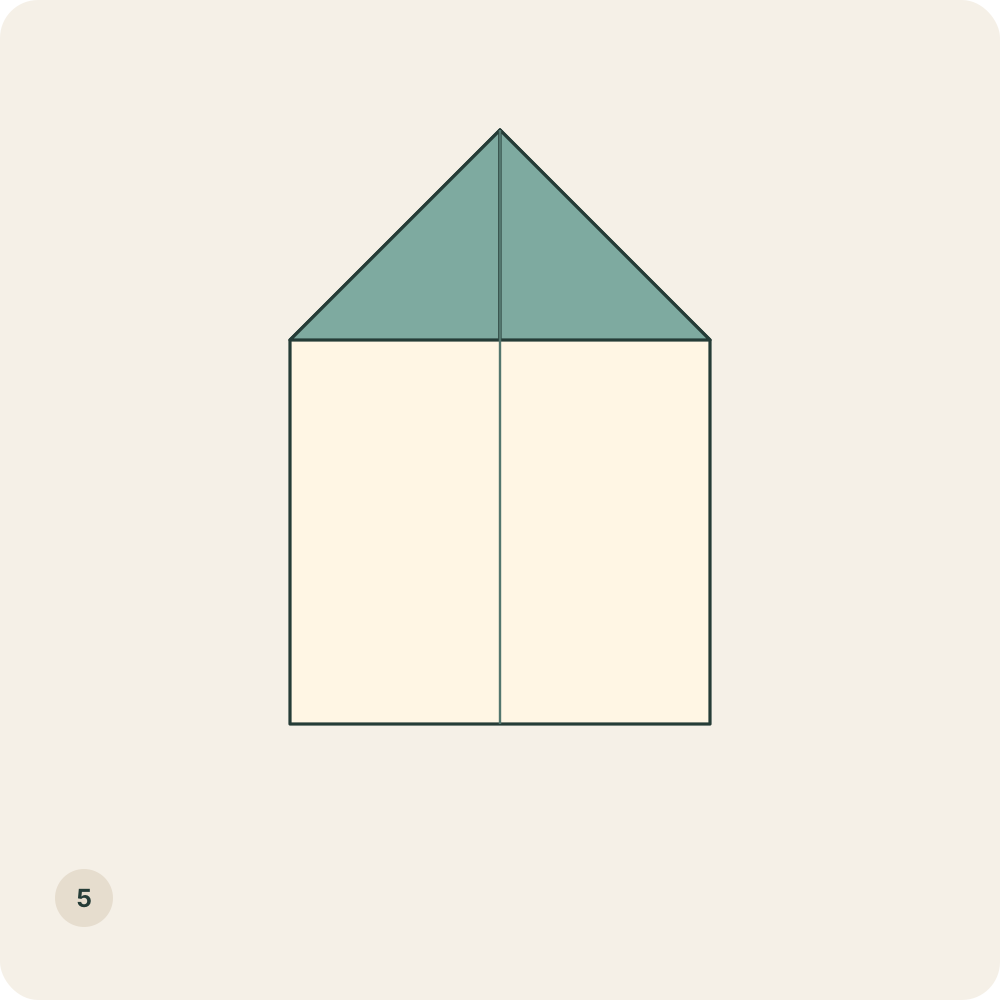
Two green triangular flaps meet along the centre. The outline has a pointed top and a rectangular lower section.
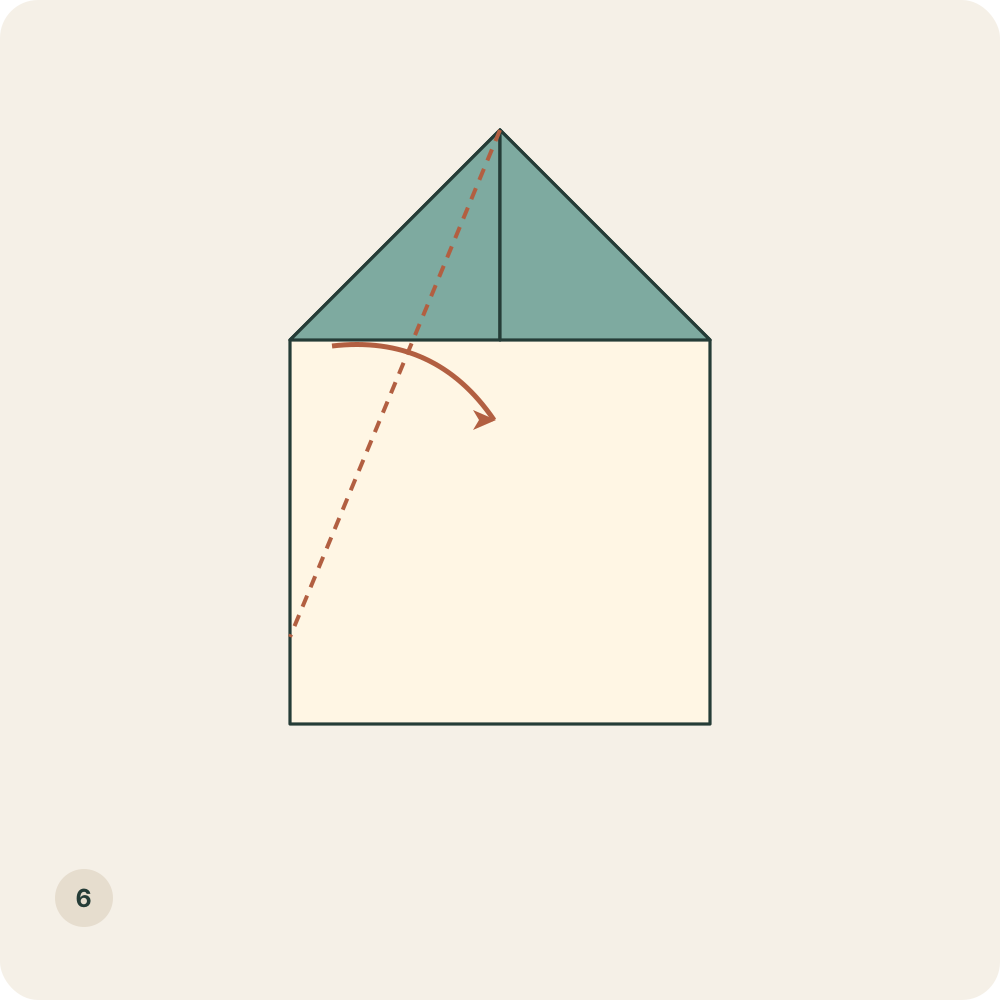
Step 6: Bring the left sloping edge onto the centre
Lift the complete left sloping edge, including the folded layers attached to it. Bring that edge onto the centre crease without moving the top point. Press the new diagonal from the top point towards the lower-left side.
Orientation: The top point stays fixed. Move all layers in the left corner together; keep the right half flat.
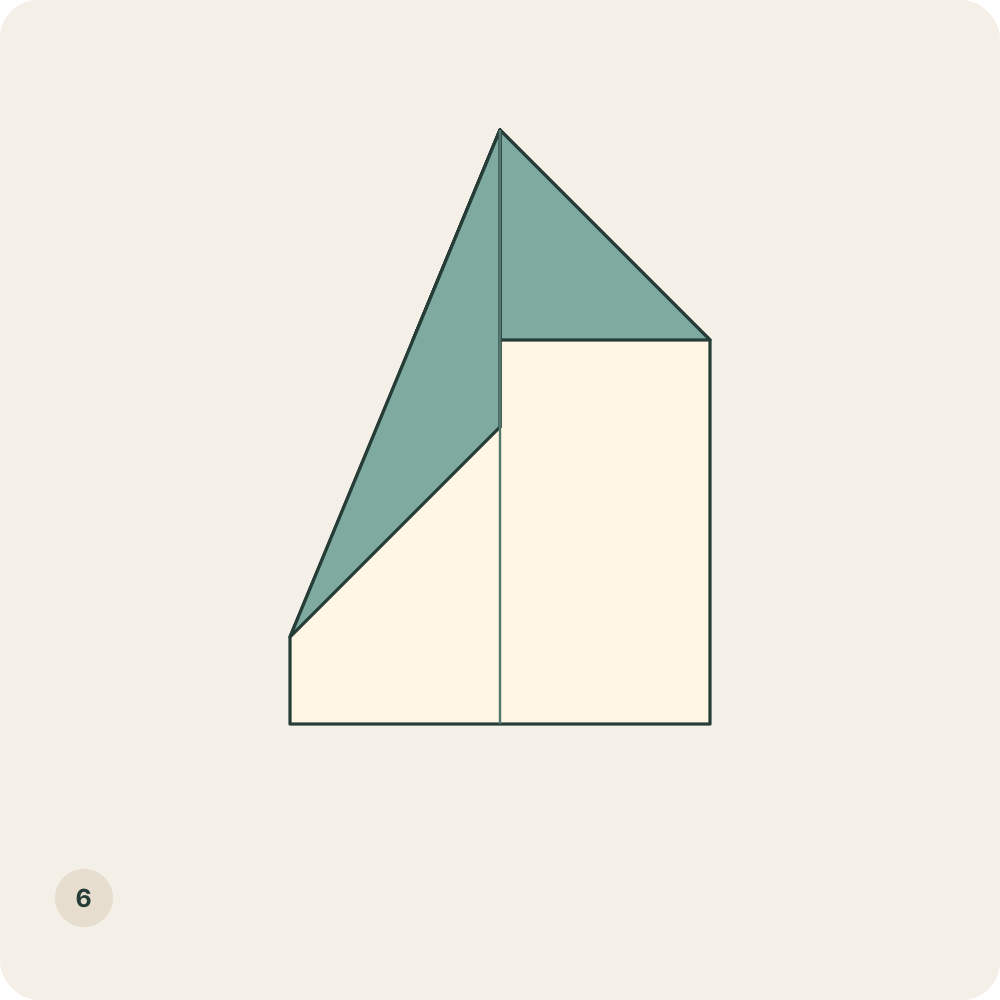
The left side is narrower. Its former sloping edge lies on the centre crease, below the pointed nose.
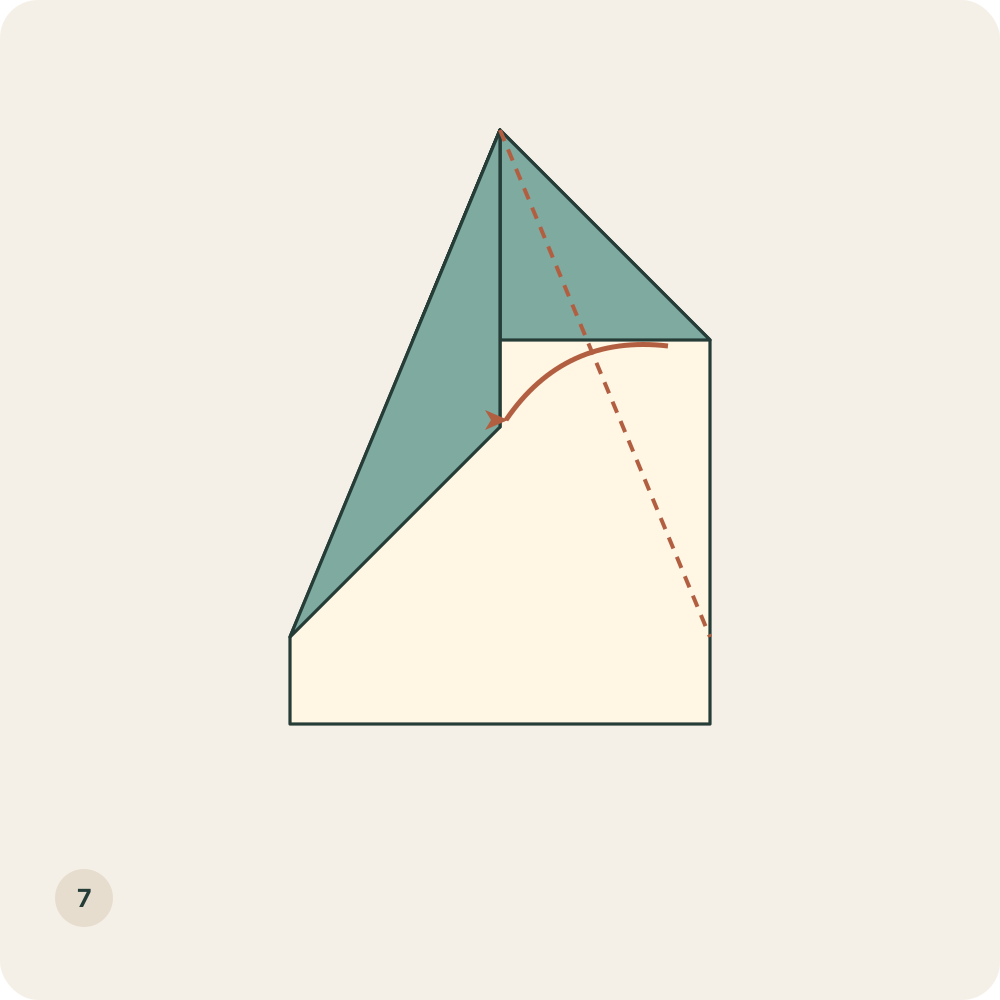
Step 7: Bring the right sloping edge onto the centre
Bring the complete right sloping edge onto the same centre crease, moving its attached layers together. Match the left fold and press the new diagonal.
Orientation: Keep the nose at the top. Neither half is opened or turned over.
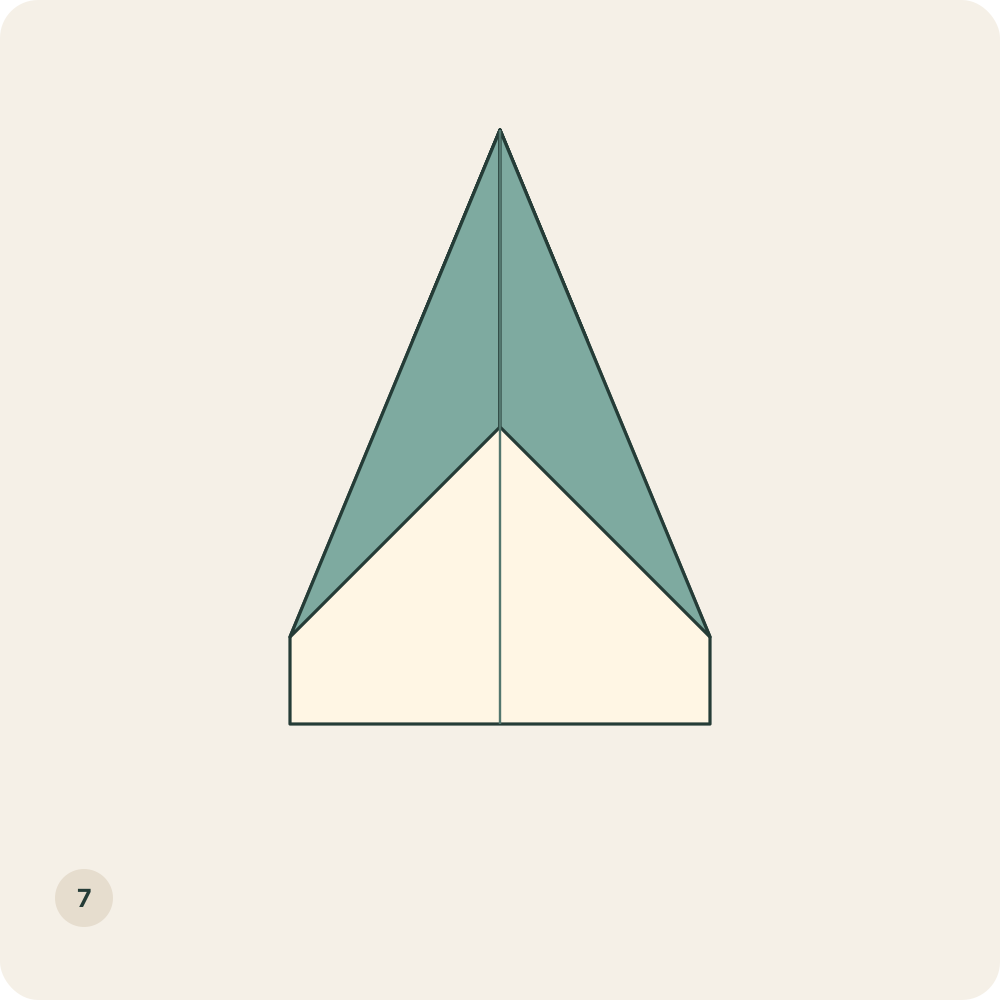
A long, symmetrical pointed shape has a narrow cream lower section and folded layers meeting at the centre.
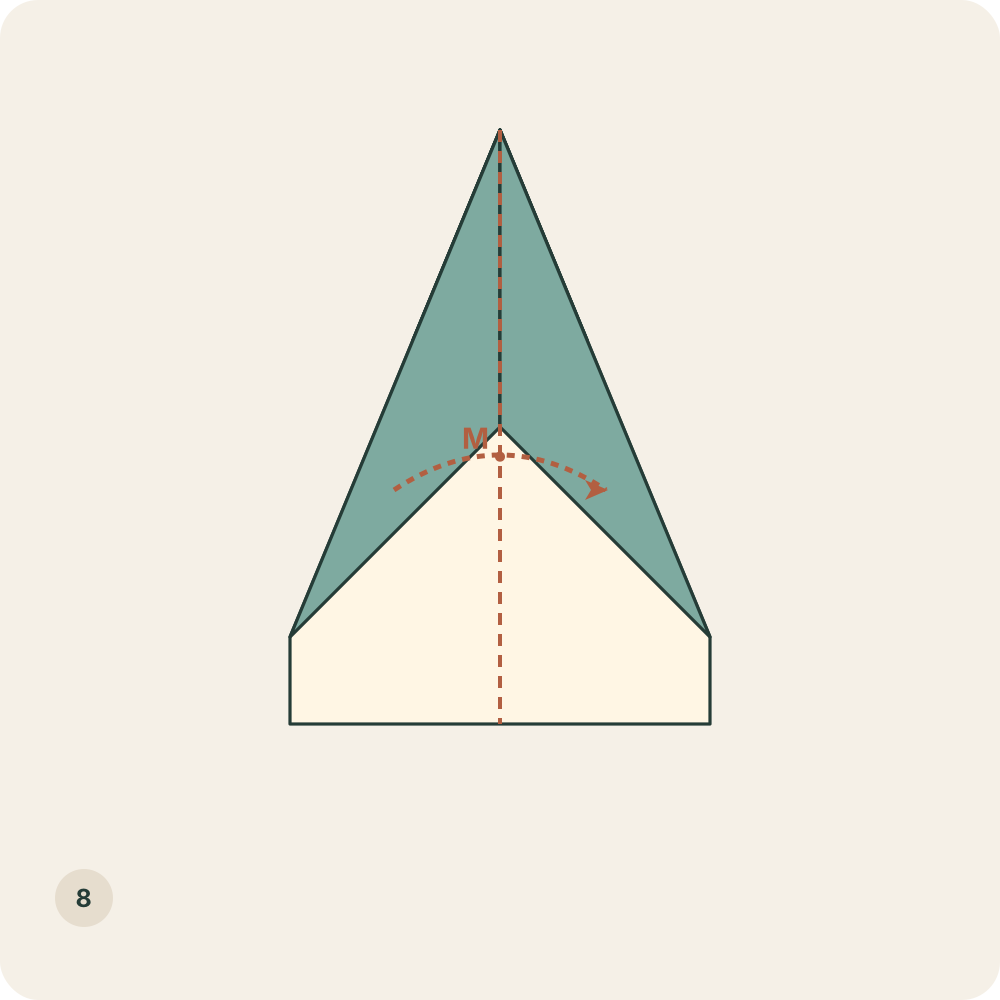
Step 8: Close the left half behind the right
Fold the complete left half away from you along the first centre crease, bringing it behind the right half. Keep the recently folded flaps on the outside of the closed packet.
Orientation: The nose stays at the top. This is a fold away from you; M marks that direction in the diagram.
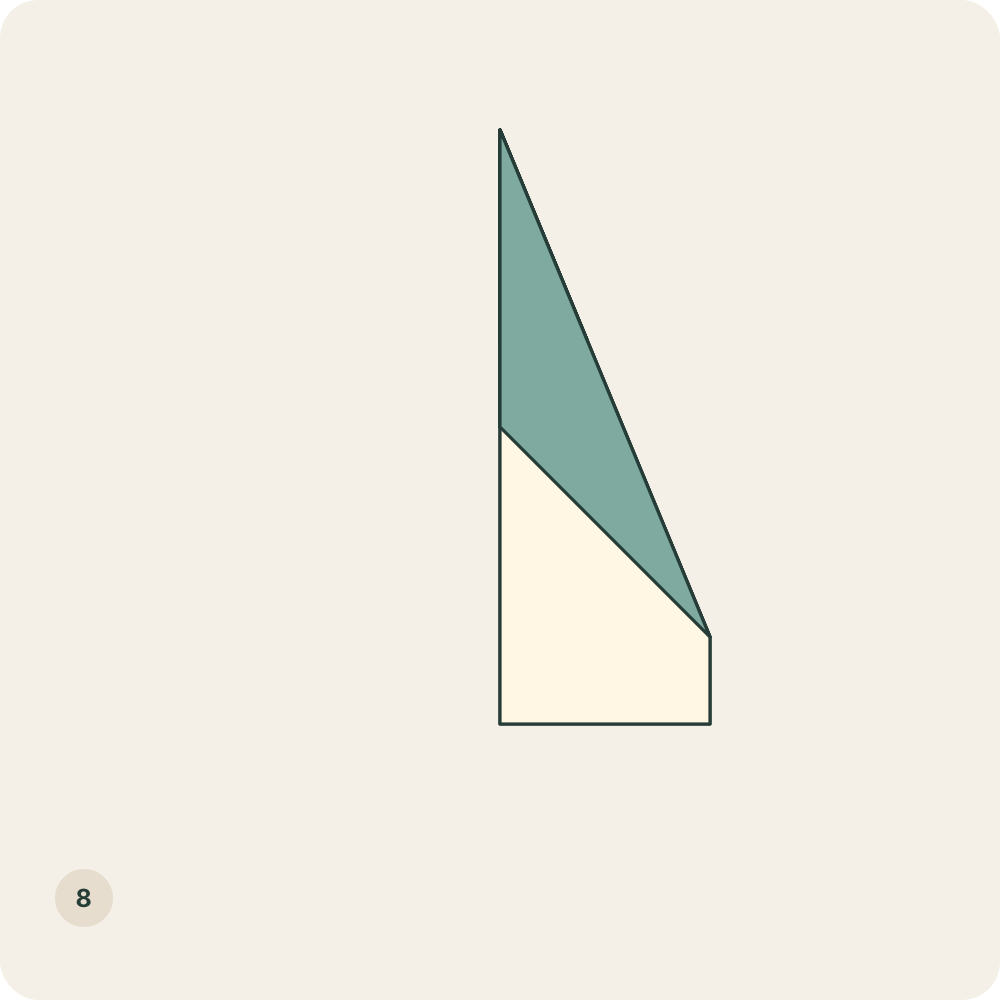
A half-width dart packet lies on the right, with a closed centre edge on its left and two separate wing halves stacked together.
Step 9: Mark A on the tail of the upper half
On the bottom short edge of the upper wing half, measure 1 cm from the closed left edge towards the right and make a small pencil mark A. Mark only the upper half.
Orientation: Keep the folded centre edge on the left and the nose above. The lower half remains untouched.
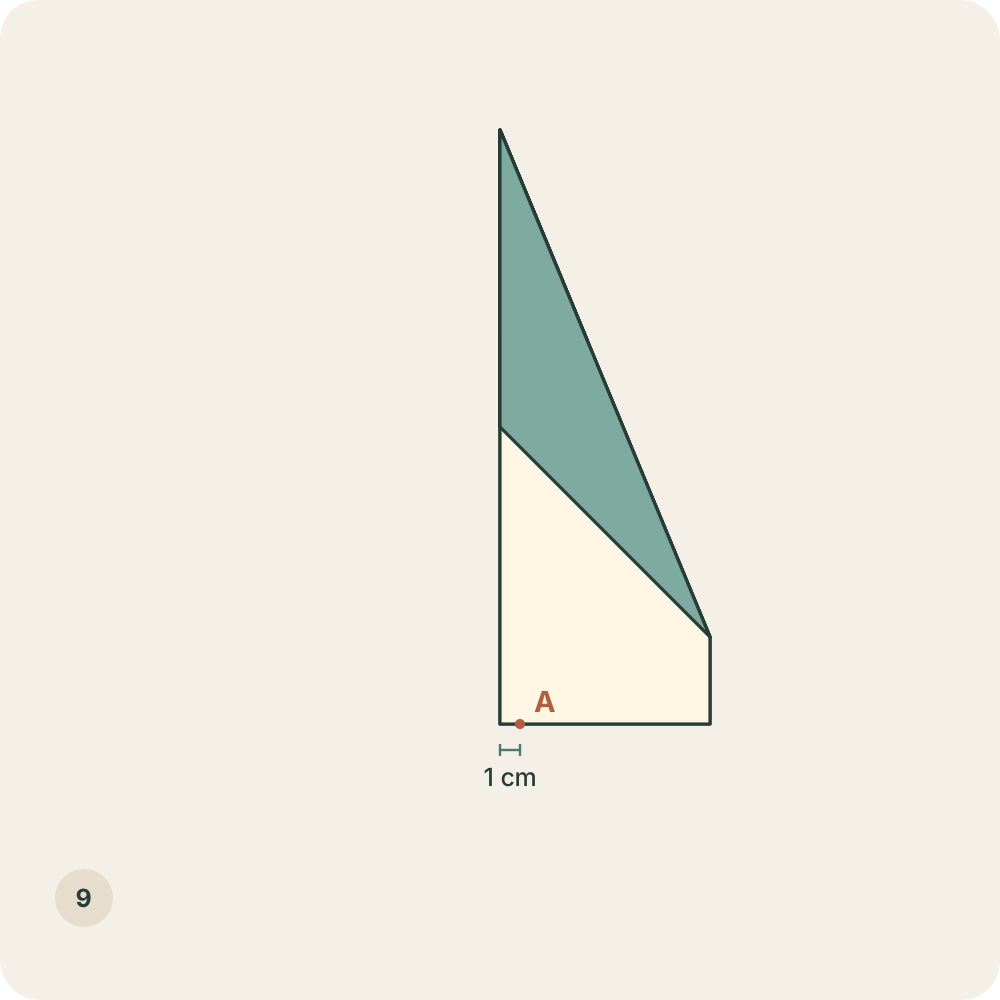
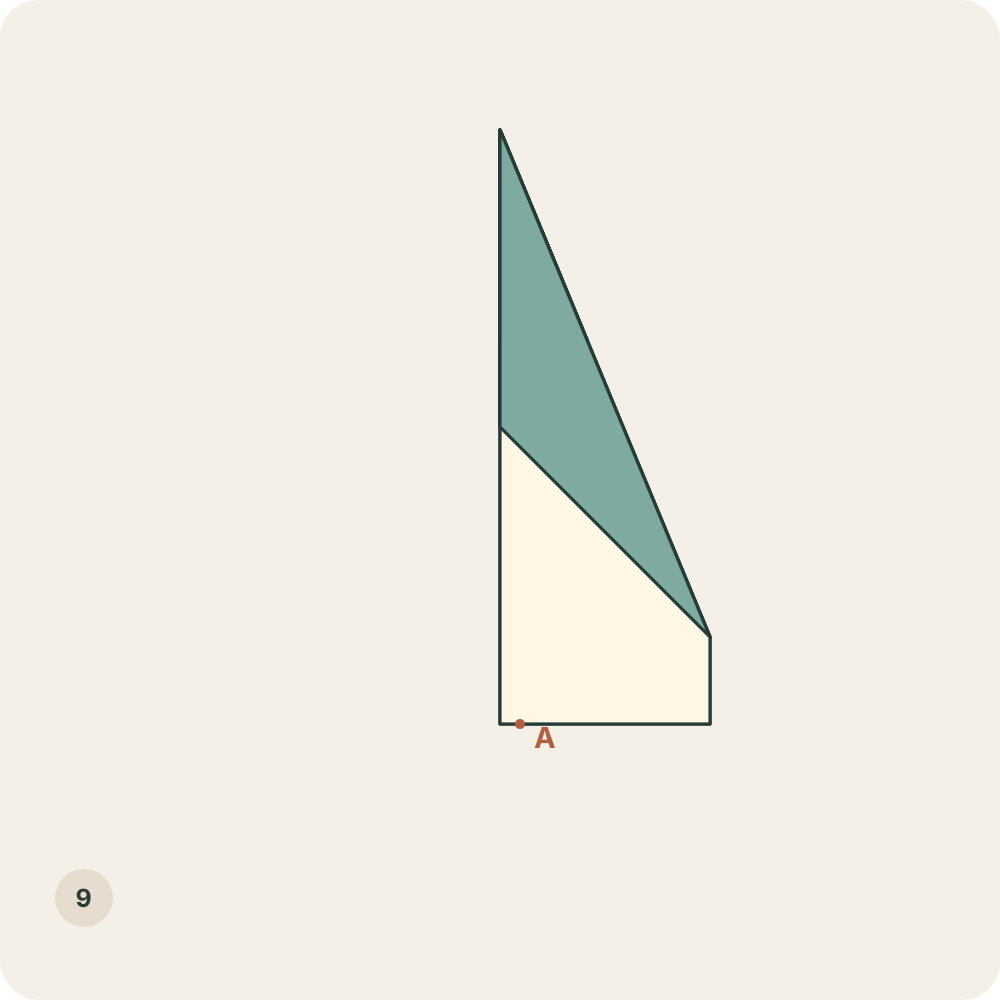
A marks the proposed body width at the tail; it is 1 cm from the closed centre edge.
Step 10: Fold the upper wing along the nose-to-A line
Fold the outer part of the upper half towards the left along the straight line joining the nose to A. Move all layers belonging to that upper half together. Hold the lower half still.
Orientation: The wing crosses over the closed centre edge. The narrow triangle between that edge and the new fold is the body.
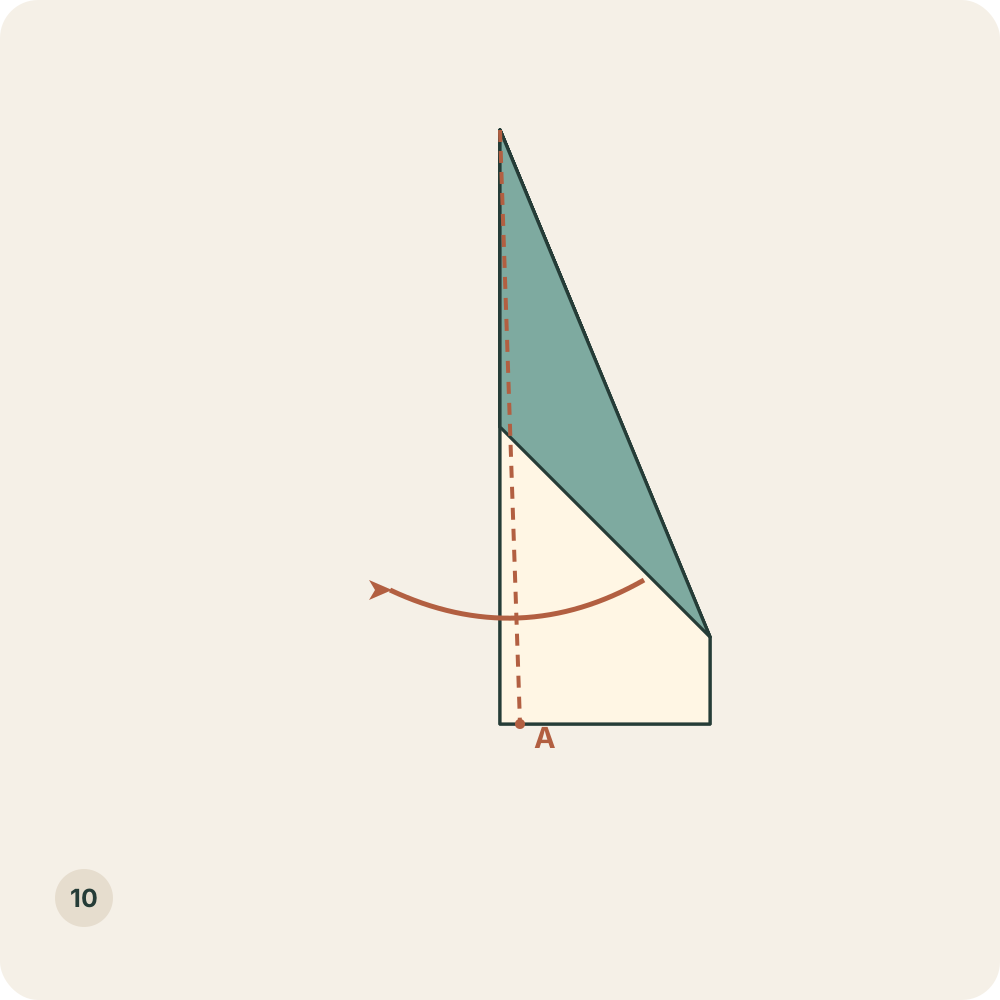
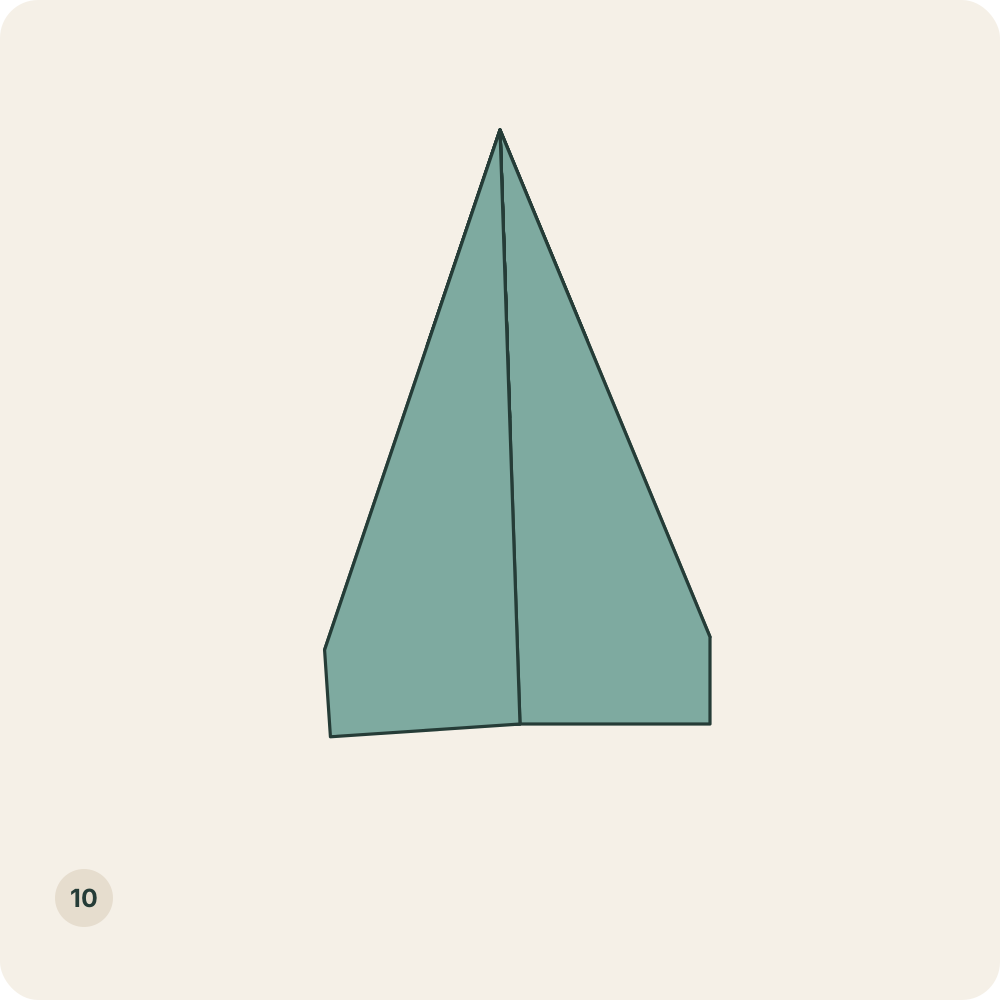
One folded wing extends to the left. The untouched second wing still extends to the right.
Step 11: Turn the complete packet over
Turn the whole model from left to right like a page, keeping the nose pointing away from you. Do not open the first wing.
Orientation: The untouched wing is now on top and extends to the left of the closed centre edge. The first wing is underneath.
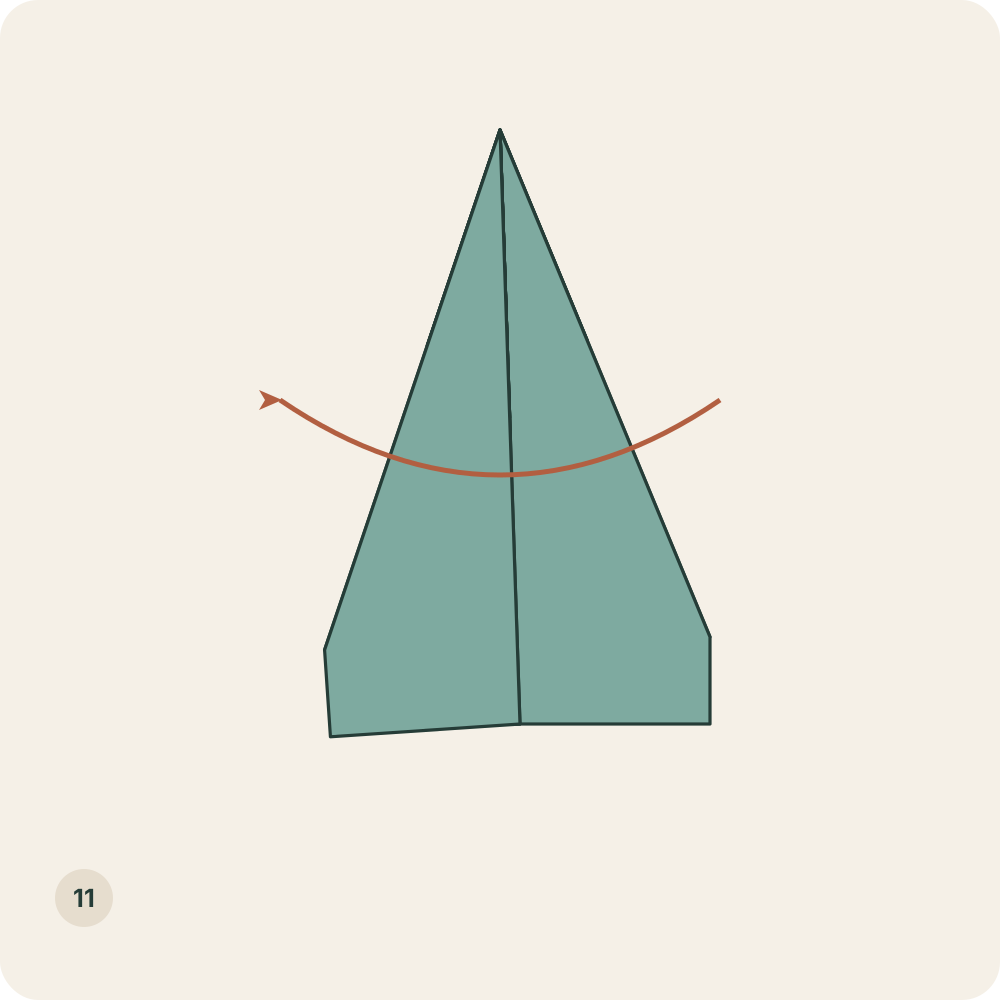
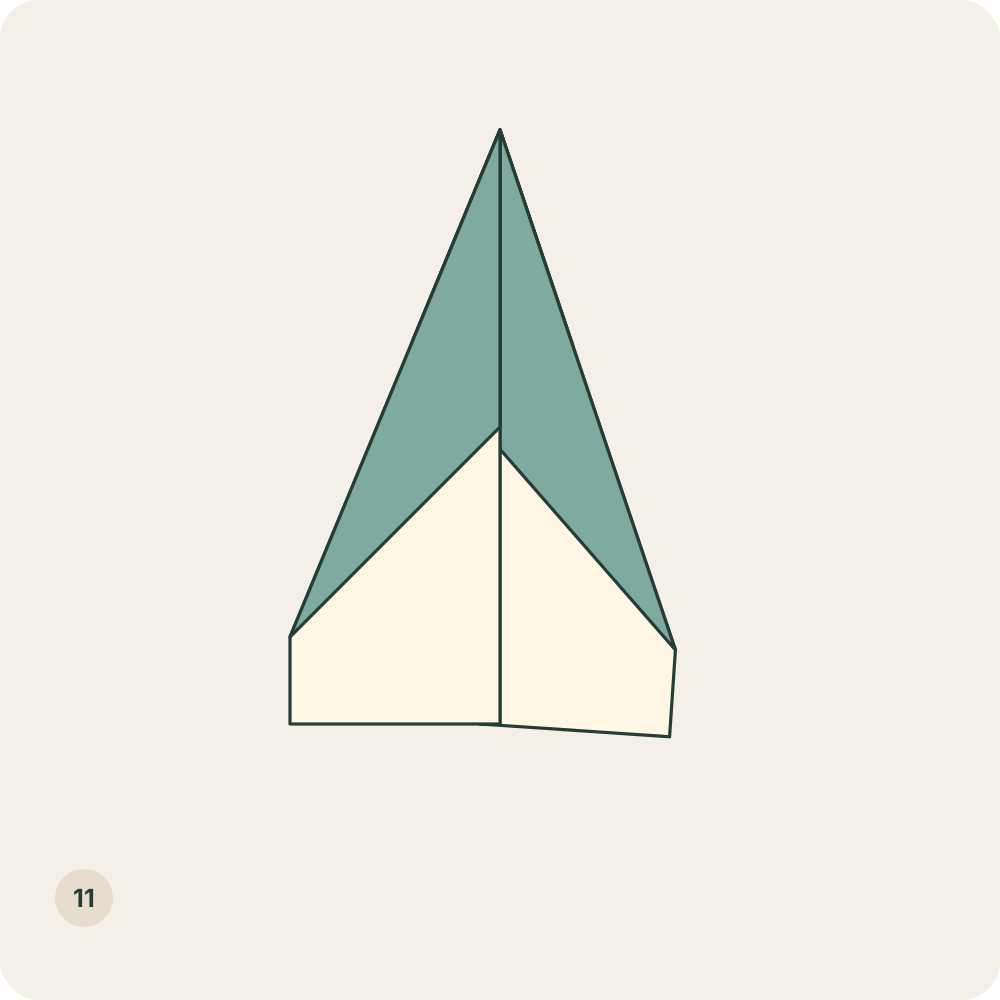
The remaining uncreased wing is accessible on the left; the first folded wing is behind it on the right.
Step 12: Mark the matching A on the second half
Measure 1 cm to the left from the closed centre edge along the tail edge of the now-upper half. Add a small A at that point.
Orientation: The nose remains above. The measuring direction is now leftwards because the model has been turned over.
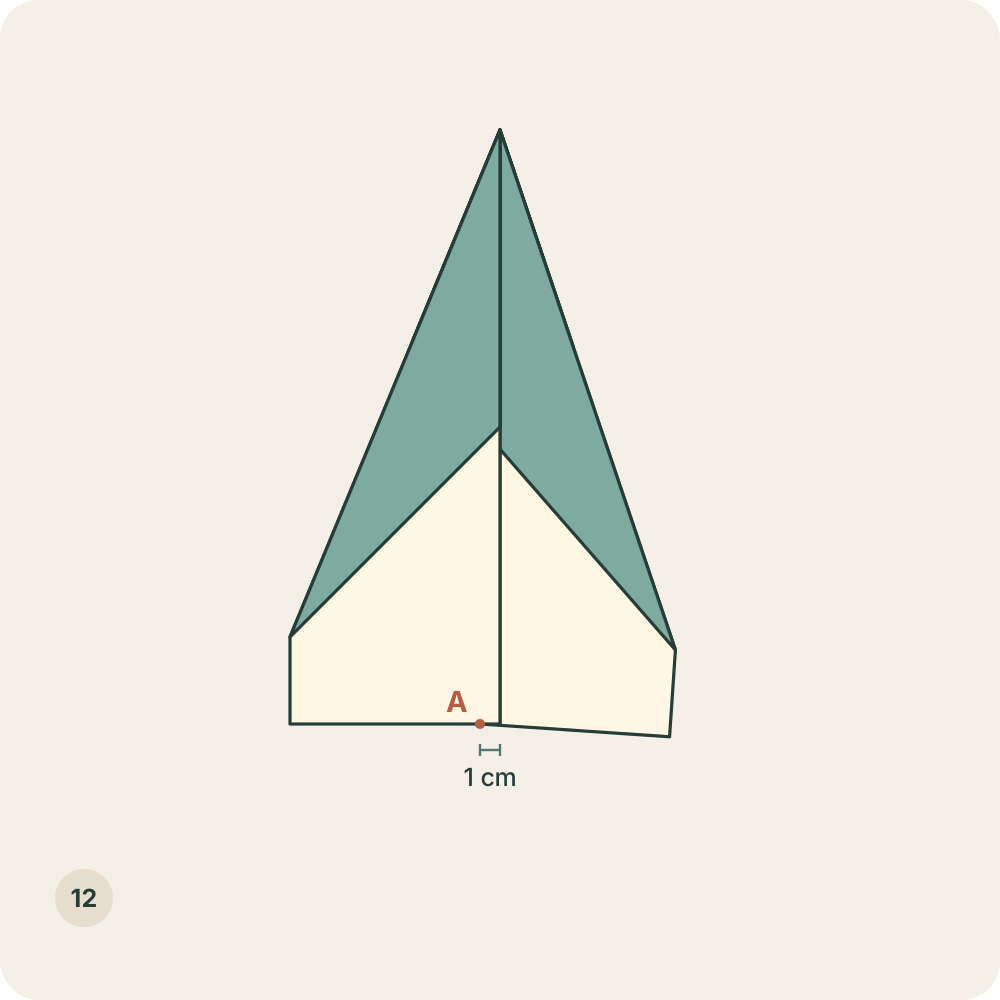
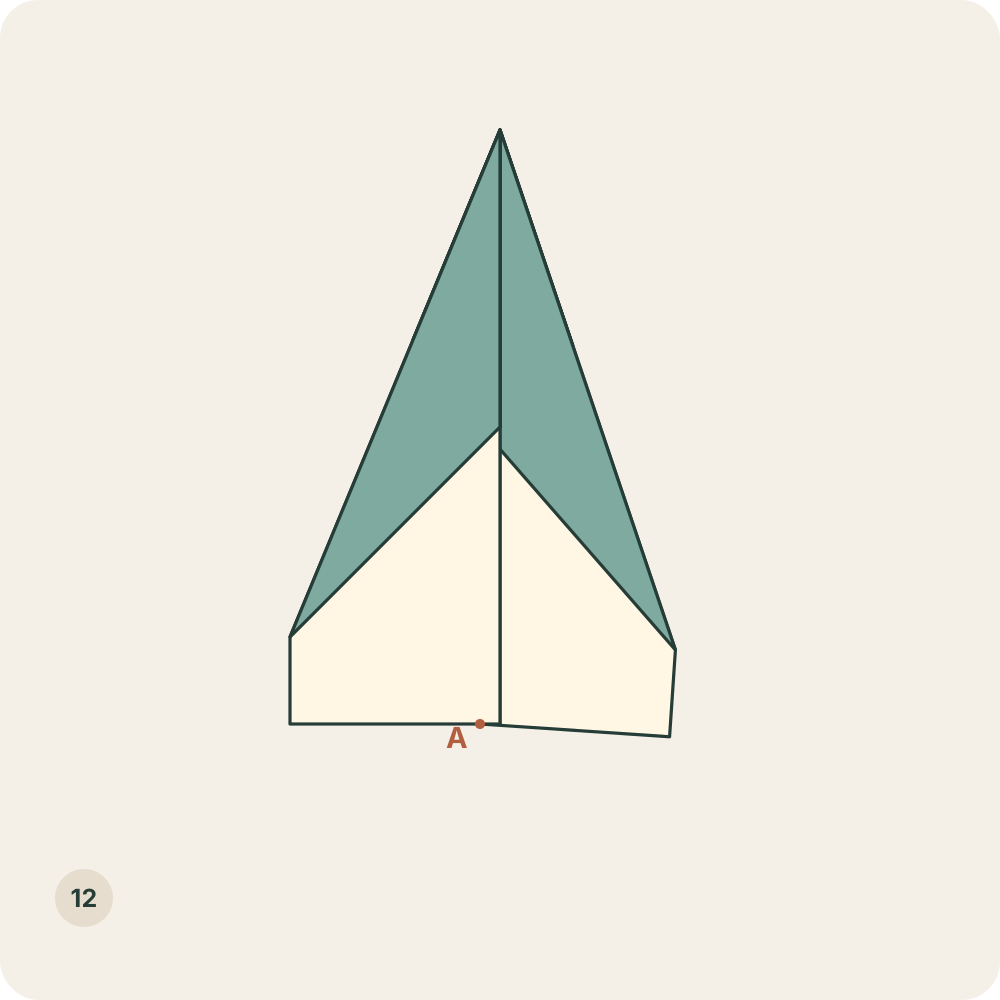
The new A mirrors the first mark, defining the same body width on the other half.
Step 13: Fold the second wing to match the first
Fold the outer part of the upper half towards the right along the line from the nose to the new A. Move only this half and its attached layers. Check the wing outlines against each other before pressing firmly.
Orientation: Keep the already folded wing underneath closed. The second wing now folds in the opposite direction to the first.
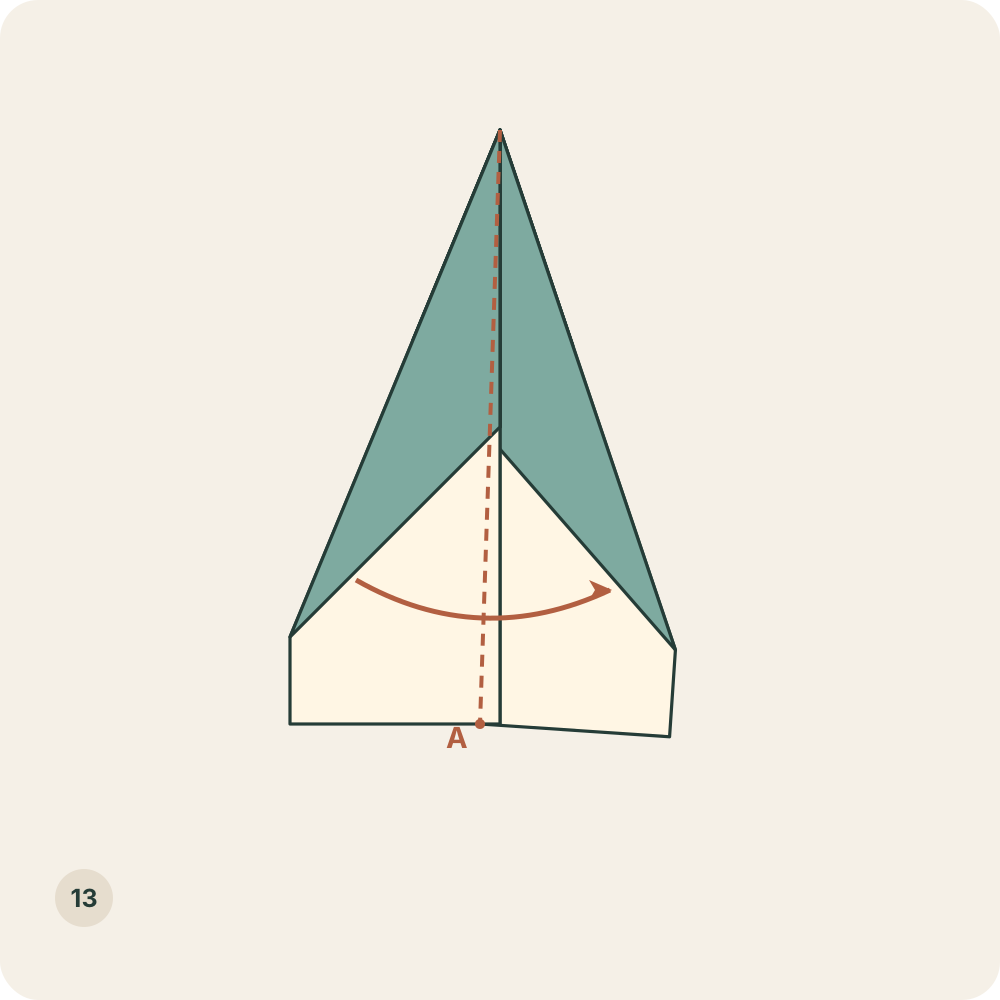
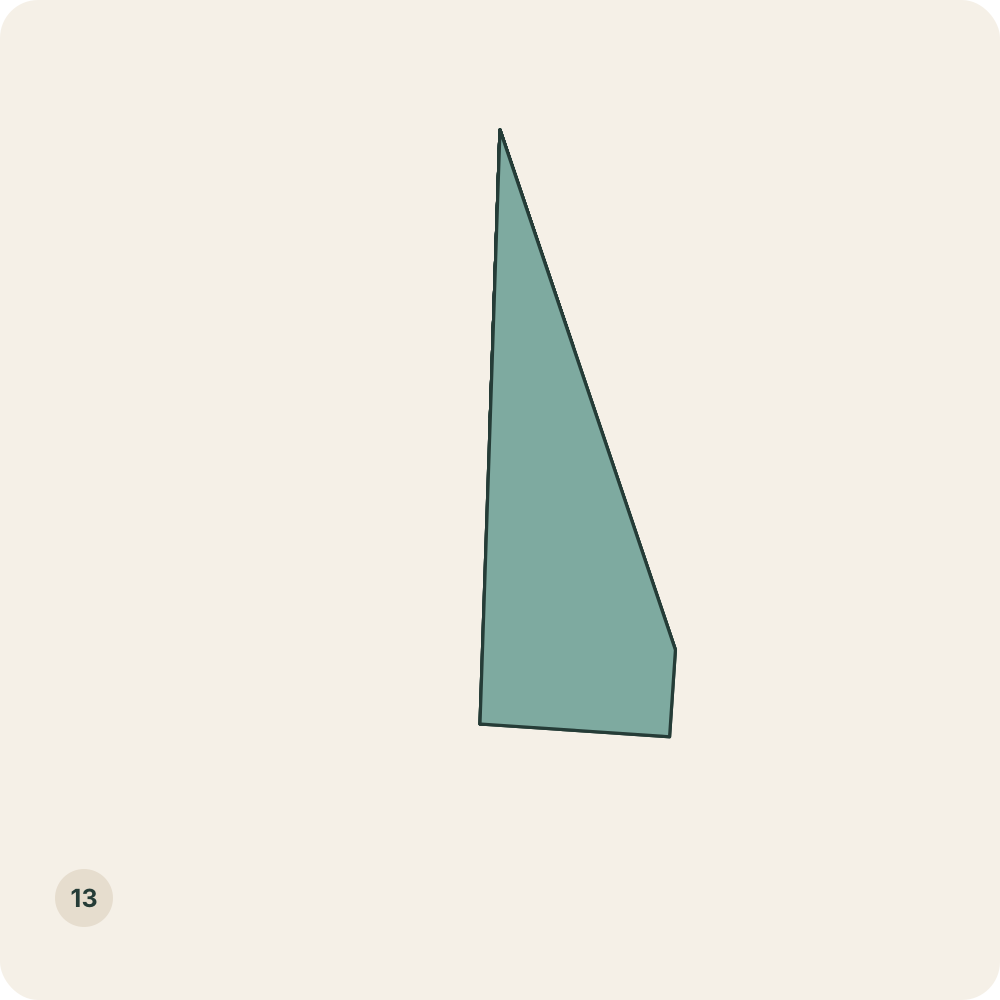
Both folded wings are stacked on the right side of the narrow body. Their tail edges should match.
Step 14: Spread the wings while keeping the body closed
Hold the narrow body by its closed centre fold and open the two wing flaps away from each other along their own creases. Stop when each wing is approximately at a right angle to the central body; do not flatten that body open.
Orientation: The result changes to an angled three-dimensional view. The nose is the same pointed end; the body hangs below the two wings.
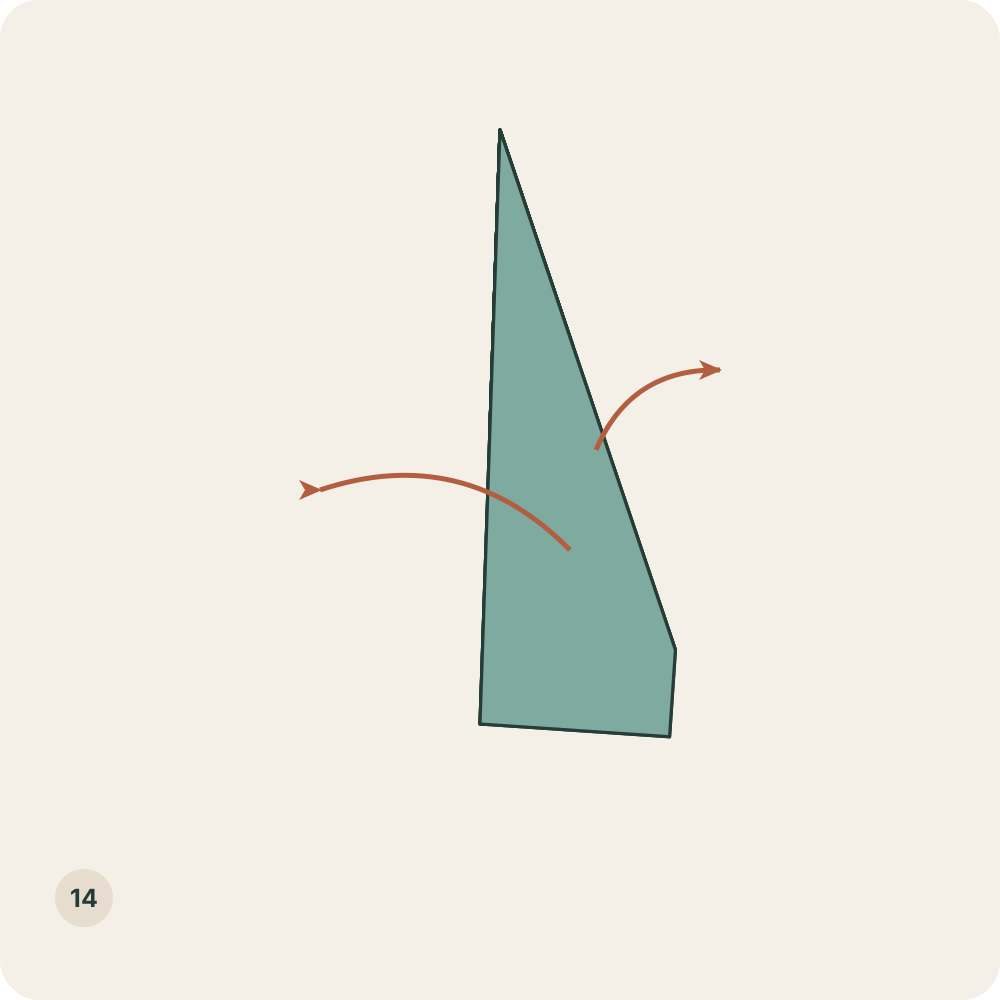
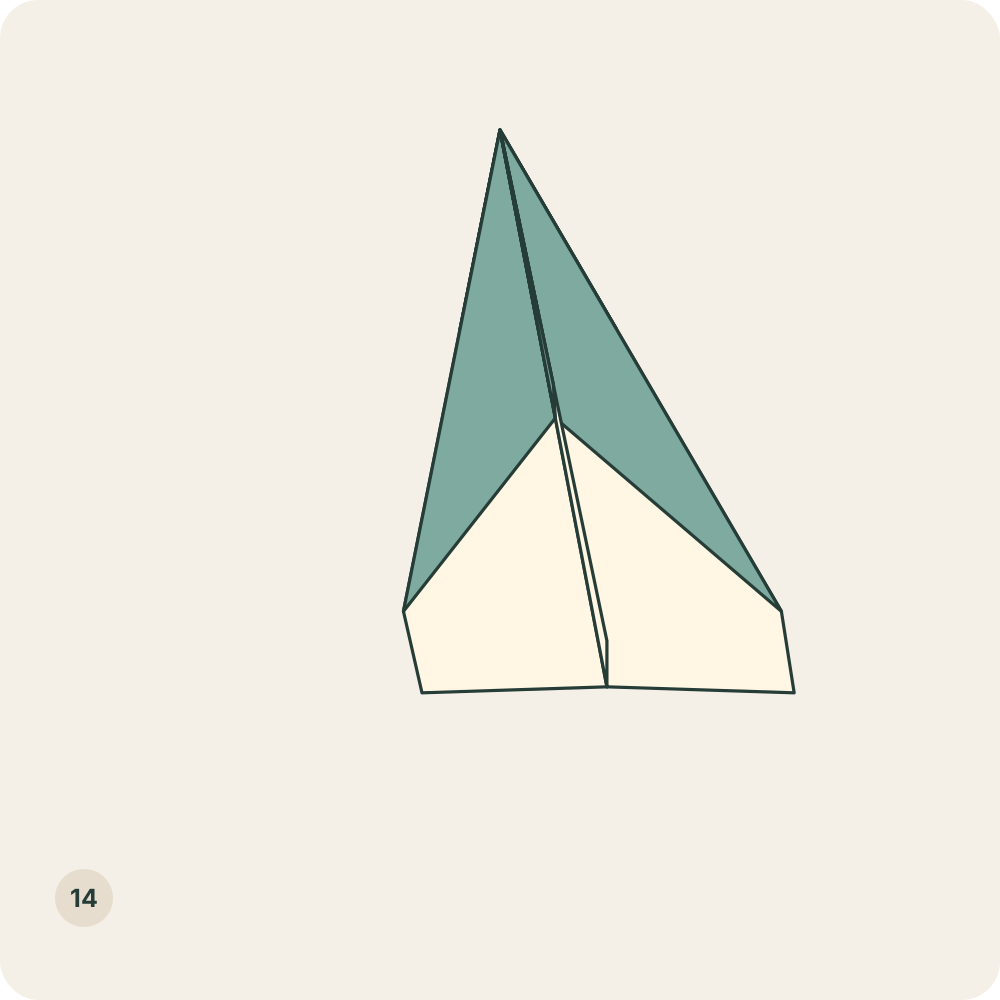
Two matching wings extend on either side of a narrow central body. Compare the two tail corners and straighten a mismatched wing crease before any flight test.
Geometry checks and corrections
- After step 5, the two original top edges should meet at the centre without overlapping. If the pointed top is off-centre, reopen the last corner fold and realign it.
- After steps 6 and 7, the sloping outer edges you moved should lie on the centre crease. Move every layer attached to each sloping corner; folding only a surface flap produces a different base.
- Step 8 closes the left half behind the right. If the triangular flaps are trapped inside, reopen that centre fold and close it in the other direction.
- Measure each A along the tail edge from the closed centre fold, not from a free outer edge. A is on the right in step 9 and on the left after turning over in step 12.
- In steps 10 and 13, move only the currently upper wing half and its attached layers. If both halves move, reopen just that wing fold and separate the halves before trying again.
- Compare the wing outlines while they are stacked. Match the tail corners before opening the wings, and retain the narrow closed body between them. These checks come from a digital geometry review; they are not observations from a physical folding or flight test.
The illustrated paper dart
The model has a pointed nose, two spread wings and a narrow body underneath. Its diagrammed shape has been reviewed digitally; physical folding, paper choice and flight behaviour still need testing. For a later comparison, record the paper format and weight and change one fold or material at a time rather than assuming that a particular paper will fly farther.
Printable version pending the physical folding test.
Model references and illustration licence
This is a measured variant of the classic paper dart method; the inventor of that method is not established by the sources consulted. Ftiercel’s Origami airplane.svg is an openly reusable reference for a related rectangular-paper airplane and its initial folds, centre closure and wing opening. Its Commons file page records a worldwide PD-self release of that diagram. Fold ’N Fly’s Basic Dart and NASA Glenn are factual method references; their illustrations and wording are not reproduced. OrigamiLove wrote this bilingual sequence and generated its geometric SVG diagrams in 2026. Our text and diagrams are licensed CC BY 4.0; no public-domain claim is made for the folding method and no source endorses OrigamiLove.
